• 🏆 Texturing Contest #33 is OPEN! Contestants must re-texture a SD unit model found in-game (Warcraft 3 Classic), recreating the unit into a peaceful NPC version. 🔗Click here to enter!
  • It's time for the first HD Modeling Contest of 2024. Join the theme discussion for Hive's HD Modeling Contest #6! Click here to post your idea!

Warcraft 3 Terraining Class

Status
Not open for further replies.
Don't get excited, I still won't be able to create more videos yet, I need the editor for that. But I will be able to talk to you, got internet explorer working on the desktop (really bad timing, the desktop's windows installation got screwed up by a power surge, had to get a new hard drive, install windows, still trying to find the drivers for it... Might have to take the motherboard out and look at the other side for the numbers, and I really don't like the idea of that.

Anyway, I thought my instructions were pretty clear. I even capitalized the most important word. Make a terrain using ONLY the height tool (and cliffs to create water, but the water should be filled in and the cliffs gone on the finished product). That means no tiles but dirt, no doodads, nothing. And yes it's important that you use dirt because dirt is a very good tile for being able to see the shading of the height. I know you guys want to do full terrains, but it's important that you get your terrain's shape looking good first. If you place doodads and tiles, then decide you need to raise some more height, add a mountain, extend a plateau or something, everything in that area would get screwed up. And that's why you wait until you're satisfied with the shape/height of everything before you do the tiles and doodads.

Thank you MasterTrainer for properly reading the instructions and explaining to them. If only they'd listened to you.

As for how to make "puddles", watch the video again, I taught how to during it.
 
Since I'm a student, I am not allowed to teach (maybe), but may I suggest the teacher to give a 'uniform' terrain, then tell the students to make mountains in relation to the video, then posts the picture in front page and rate it, just like in class, we have a uniform test papers/books/problem solving, etc...

BTW, we cant be limited by not using blizzard cliffs coz since we all consider ourselves as noobs in terraining, might as well include everything...

I already did make a video showing how to make mountains, then the assignment was to create a terrain using only those tools (which would most likely also be mountains). They don't need to copy the exact same thing as the video, though, because an important part of learning to terrain is practicing your ability to take what's on your mind and put it on the ground.

Yes, you can and will be limited by not using blizzard cliffs. You can't learn how to do something the right way by doing it the wrong way as a crutch. Using the height tool is not difficult, don't use being "new" as an excuse. All you have to do is try. Your terrain doesn't have to look great, it just has to exist and you have to put effort into it. You won't get any better unless you do more than what you already do. Every time you try you'll get a little better, just so long as you put effort into it. Nobody has experience doing something before they do it, but that doesn't stop them from trying. Don't let it stop you either.
 
Level 21
Joined
Mar 27, 2012
Messages
3,232
Done mine too. I guess.

When I read that I should only use the height tools, then I took it as a challenge. Thus, waterfall without doodads.
 

Attachments

  • Xonok's Height Terrain.w3m
    32.9 KB · Views: 40
  • Height Showcase Pic.JPG
    Height Showcase Pic.JPG
    132.4 KB · Views: 177
Well, even the desktop is not working, so now I'm typing using internet explorer on my XBOX. It's pretty annoying, so don't expect me to be as active until I get my laptop back.

Good job on that waterfall, Xonok, way to be creative. I'll check your map as soon as I can to make sure you did a good job on the mountains as well.

For the rest of you, I also look forward to seeing your maps. Remember that you are free to spend more time improving your assignments. It's important that you master terrain height before you proceed to the next step. Terrain height, despite being one of the most basic principles of mapmaking, is also one of the most influetial. Doing a good job with the height tool is enough to make your terrain look good and very custom, even if you don't use any imports whatsoever. Keep practicing height until the next lesson is released, even if you think you're already doing well, it's still possible to improve. Even as a teacher I expect to improve throughout the experience of this class. You should spend a total of at least an hour, more comfortabely two, dedicated to practicing with the height tool to get comfortable with it. The more accustomed to it you become, the better you will be at putting the shape of the land in your mind onto the ground of your map, and that's what's most important: Being able to make what you imagine. Not simply being able to make something else that you look at. Good luck everyone, and most importantly, have fun! This isn't just work; this is art, a chance for you to express yourselves!
 
Level 34
Joined
Sep 6, 2006
Messages
8,873
Done mine too. I guess.

When I read that I should only use the height tools, then I took it as a challenge. Thus, waterfall without doodads.
Use that smooth tool that the teacher talked about. Constantly. It deserved to be mentioned over and over again. Use it.
 
@FRENGERS
It depends if you are a student here, he cannot say for you will gain upper hand.

This is exactly why I didn't want this to be turned into a contest. I wanted to reward people based on quality and effort instead of rewarding them based on their ranking against each other. Turning this into a contest causes people to try to push others down and themselves up instead of everyone working to pull the whole group up.
 
Level 14
Joined
Jul 12, 2011
Messages
1,370
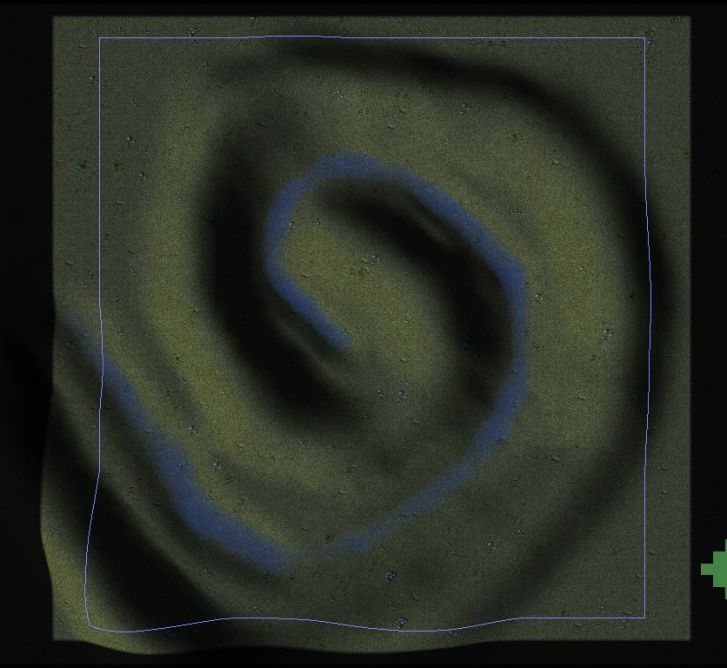
Here you go.
I post a screen too so people can get a view without download.
Looks a shit to me (a real one).
attachment.php


Download the map click the attachment bellow Terrain Class 01.w3m (24.3 KB)
 

Attachments

  • Terrain Class 01.jpg
    Terrain Class 01.jpg
    59 KB · Views: 142
  • Terrain Class 01.w3m
    24.3 KB · Views: 25
Here you go.
I post a screen too so people can get a view without download.
Looks a shit to me (a real one).

attachment.php


Download the map click the attachment bellow Terrain Class 01.w3m (24.3 KB)

I said a few times during that video: No caterpillars! You need height variation. Raise some parts to a peak. What you've done is somewhat interesting, but you need to prove that you can make good-looking mountains.
 
Level 14
Joined
Jul 12, 2011
Messages
1,370
Updated a bit.
Comment, suggest, insult.
I'm alright with everything.
I have also add a small mountain at the top right corner.

attachment.php


Click to download above:Terrain Class 01.w3m (25.9 KB)
 

Attachments

  • Terrain Class 01.w3m
    25.9 KB · Views: 27
  • Terrain Class 01 (2).jpg
    Terrain Class 01 (2).jpg
    123.5 KB · Views: 138
Level 21
Joined
Mar 27, 2012
Messages
3,232
Noise is a powerful tool if used right, which is also why it destroys a terrain if used wrong.
If you use it carefully like TLI suggested(1 click, no holding down), then you should be fine.
Even if you screw something up you can just use Ctrl + Z
 
Level 20
Joined
Apr 14, 2012
Messages
2,901
@Hera_ it's not bugged. It just brings an unpleasant look to a terrain, especially in this situation. If for example you want a rugged terrain, use the raise and lower tools to randomly raise and lower your terrain to make it look more rugged. Use the Noise in that situation and it will look ugly.

Oh and the noise and smooth only produce small height differences compared to when you don't slack off and use the raise and lower tools.
 
Status
Not open for further replies.
Top