• Listen to a special audio message from Bill Roper to the Hive Workshop community (Bill is a former Vice President of Blizzard Entertainment, Producer, Designer, Musician, Voice Actor) 🔗Click here to hear his message!
  • Read Evilhog's interview with Gregory Alper, the original composer of the music for WarCraft: Orcs & Humans 🔗Click here to read the full interview.

SuPa-'s Model Gallery

Status
Not open for further replies.
Level 21
Joined
Mar 18, 2007
Messages
2,247
Thumb demon!

I'd tell you the story of how I got this concept, but I'm too lazy to explain my childhood :p
I also got some of the inspiration for this from the Bartimaeus Trilogy

attachment.php


attachment.php


379 polys

Rhino sucks at smoothing meshes :p Either that, or the vertices unweld when I export the model

attachment.php


attachment.php


The reason these are in Rhino is because my Max trial had just expired, but now I have it registered

attachment.php
 

Attachments

  • ThumbDemonWIPSS1.jpg
    ThumbDemonWIPSS1.jpg
    63 KB · Views: 301
  • ThumbDemonWIPSS2.jpg
    ThumbDemonWIPSS2.jpg
    63.6 KB · Views: 304
  • ThumbDemonWIPSS3.jpg
    ThumbDemonWIPSS3.jpg
    11.7 KB · Views: 256
  • ThumbDemonWIPSS4.jpg
    ThumbDemonWIPSS4.jpg
    11.2 KB · Views: 277
  • ThumbDemonWIPSS5.jpg
    ThumbDemonWIPSS5.jpg
    29.1 KB · Views: 272
Last edited:
Level 21
Joined
Mar 18, 2007
Messages
2,247
Thanks :D


BEHOLD!

attachment.php


attachment.php


attachment.php


A crappy subdivision I felt like making lulz

Fixed the horns

attachment.php


attachment.php


attachment.php


attachment.php


attachment.php
 

Attachments

  • ThumbDemonWIPSS8.jpg
    ThumbDemonWIPSS8.jpg
    49.3 KB · Views: 293
  • ThumbDemonWIPSS7.jpg
    ThumbDemonWIPSS7.jpg
    82.5 KB · Views: 256
  • ThumbDemonWIPSS6.jpg
    ThumbDemonWIPSS6.jpg
    64.6 KB · Views: 253
  • ThumbDemonWIPSS9.jpg
    ThumbDemonWIPSS9.jpg
    66.5 KB · Views: 265
  • ThumbDemonWIPSS10.jpg
    ThumbDemonWIPSS10.jpg
    39.2 KB · Views: 274
  • ThumbDemonWIPSS11.jpg
    ThumbDemonWIPSS11.jpg
    61.7 KB · Views: 270
  • ThumbDemonWIPSS12.jpg
    ThumbDemonWIPSS12.jpg
    60 KB · Views: 262
  • ThumbDemonWIPSS13.jpg
    ThumbDemonWIPSS13.jpg
    56.9 KB · Views: 274
Last edited:
Level 21
Joined
Mar 18, 2007
Messages
2,247
Aha! I fixed the problem. Now there's only conflicts with the wrap at certain points

attachment.php


attachment.php


I need some help. Because the stuff in the original uv wrap isn't all attached, neither is the cage that renders the normal map, so there's all these seems
 

Attachments

  • ThumbDemonNormalMapFix.jpg
    ThumbDemonNormalMapFix.jpg
    85.7 KB · Views: 260
  • Regroup01NormalsMap.jpg
    Regroup01NormalsMap.jpg
    15.8 KB · Views: 239
Last edited:
Level 21
Joined
Mar 18, 2007
Messages
2,247
"A crappy subdivision I felt like making lulz" I subdivided it twice in ms3d using this one good subdivision tool and then defined the muscles on the arms as well as made the thumb more "thumby". In the first few high poly pictures, they just came out like that, but then I edited the low poly mesh because the section looked ugly low poly, so then I modeled the muscles in 3ds Max

I'm not using the high poly for anything, I'm just using it to test out normal mapping, displacement mapping, and bump mapping. Anyway, I mostly fixed the normal map (I edited the actual map in GIMP xD) I still can't get it to show up in a render though

attachment.php


Texture update

attachment.php


Here are some screen shots of the texture on the model

attachment.php


attachment.php


attachment.php


WIP of the thumb

attachment.php


attachment.php
 

Attachments

  • ThumbDemonWIPSS14.jpg
    ThumbDemonWIPSS14.jpg
    79.4 KB · Views: 296
  • ThumbDemonTexture2.jpg
    ThumbDemonTexture2.jpg
    113.1 KB · Views: 279
  • ThumbDemonWIPSS17.jpg
    ThumbDemonWIPSS17.jpg
    41.1 KB · Views: 267
  • ThumbDemonWIPSS16.jpg
    ThumbDemonWIPSS16.jpg
    35.2 KB · Views: 256
  • ThumbDemonWIPSS15.jpg
    ThumbDemonWIPSS15.jpg
    35.2 KB · Views: 260
  • ThumbDemonTexture3.jpg
    ThumbDemonTexture3.jpg
    114.5 KB · Views: 271
  • ThumbDemonTexture4.jpg
    ThumbDemonTexture4.jpg
    116.8 KB · Views: 218
Last edited:

TDR

TDR

Level 18
Joined
Sep 26, 2004
Messages
1,543
I think you'd achieve better results if you'd make the normal maps with xNormal or ZBrush. Also I advise you to try both mudbox and zbrush and then use what suits you best. For example, I personally don't really like mudbox and prefer Zbrush instead.
6k is still low poly, most things in Oblivion are around that value.
 
Level 21
Joined
Mar 18, 2007
Messages
2,247
TDR, I tried ZBrush once and thought it was OK, but I didn't know in hell how to navigate it xD. I'm probably getting Mudbox for my birthday (It's in a little over a month and a half), as I said before (before a said "soon," though) I might make the poly count higher, later, and try to add in some stuff in 3ds Max, but it will come out wrong most likely on a normal map. 3ds Max makes separate parts of the wrap act like separate entities in the normal so the different parts really don't blend together xD

WILLTHEALMIGHTY, thanks

Anyway, here's some crappy bump maps :p

ThumbDemonWIPSS23.jpg


ThumbDemonWIPSS24.jpg


ThumbDemonWIPSS25.jpg


ThumbDemonWIPSS26.jpg


ThumbDemonWIPSS27.jpg

I just randomly like how this part came out, it looks like external intestine things :D
 
Last edited:

TDR

TDR

Level 18
Joined
Sep 26, 2004
Messages
1,543
dude, remember from now on that there's a big difference between lowpoly game models and highpoly models:
Lowpoly models are like "what you see is what you get". Also any real time renderer that ever was, and probably will ever be, renders geometry divided into triangles. Quads and all other ngons are divided into triangles. So that's why in your low poly model is ok to have triangles alongside quads. nGons should be avoided though, in case your mesh will be smoothed (by this I don't mean meshSmooth, I mean that all polygons belong to the same smoothing group) because you won't be able to control its triangulation right, the software will do it for you and it will probably do it in a very nasty way. Ngons are ok on non-smooth surfaces though, you won't even know they're there.

On the other hand, when making high poly models, you always have to keep in mind that a mesh smooth modifier will be happening on top of that. So...what you see is not always what you get. And unlike game engines, mesh smooth algorithms hate triangles and with a vengeance. They're not that polite with ngons either. Mesh smooth simply LOVES quads, however. Feed it quads and it will obey. In other words, you must keep all your polygons 4-sided as much as possible. Triangles create shitty artifacts in the mesh, as well as ngons. Why? Because if you look at a mesh smoothed model's wireframe, you'll notice that all polygons are quads even if on the low poly mesh there were triangles or ngons. Mesh smooth will try to quadify the mesh by splitting every existing polygon into 4. When it tries to split a triangle into 4 quads, the results won't be very good. Same goes for ngons. You'll end up with pointy pimples and sharp edges where you don't want to on the mesh.

So yeah, be careful with that. But don't let all this theory constrain you. Always remember: the 3d program is your bitch. That pile of digital clay is your bitch. You control it, not the other way around. So when you want a certain shape, DO IT! Slice that bitch hard with edges in the way you want without worrying about topology and keeping all quads etc. Getting the shape exactly the way you want is the MAIN priority. After that you can worry about everything else, and almost all the times it will al solve by itself.

holy shit, that's a big post :|
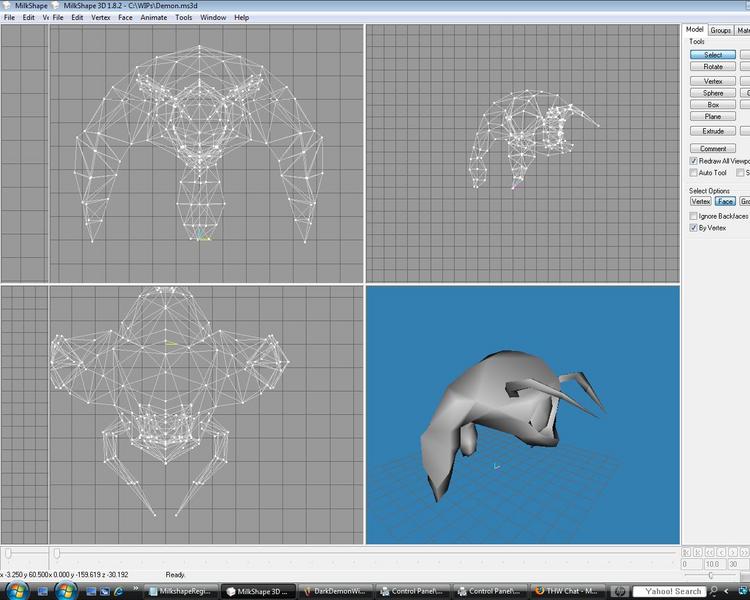
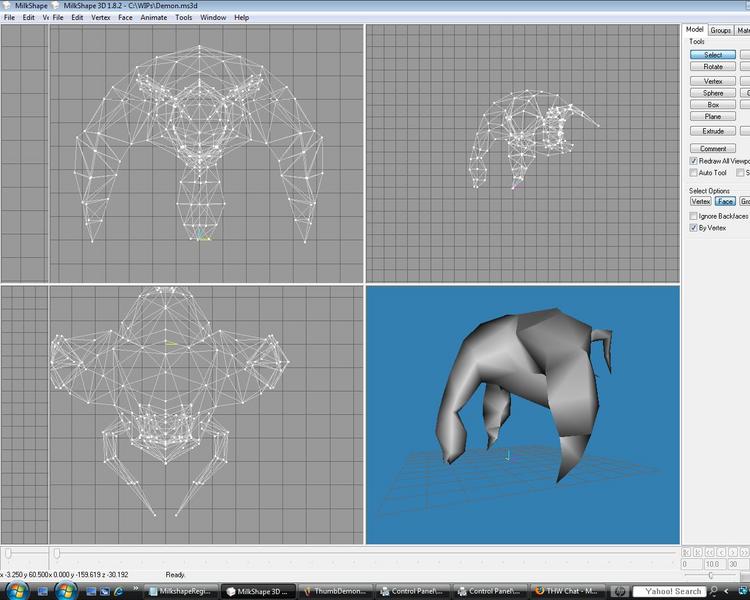
 
Level 9
Joined
Jan 1, 2007
Messages
221
looking good supa,
i still havnt been able to find a unwrapping tut for 3ds max 9 that i can understand :razz: if any1 have one or can make one please link it

ps: what version of max r u using supa?
 
Level 9
Joined
Jan 1, 2007
Messages
221
possible for u to link or make me a step by step tut on how to uv map a reallly simple on maybe even a vid ill make sure i +rep u definetly
 

Deleted member 126647

D

Deleted member 126647

I would give him a simple helmet.
 

TDR

TDR

Level 18
Joined
Sep 26, 2004
Messages
1,543
Yay for SuPa for discovering a tool implemented 3 years ago in max.

Very useful to create brains. Very similar to the Blob brush in Zbrush although it seems much more primitive.

It's not that it's primitive, it's just that it's insanely slow on heavy meshes. I have no idea why the heck they implemented this tool in editable poly instead of editable/edit mesh (which would have been WAY faster).

SuPa, does your model have 2 elbows on purpose or is that an error? Also pay more attention in positioning your polygons, make sure there's equal distances between them where you don't want defined edges and get rid of any triangles and ngons (or if you can't get rid of them, push them away towards parts of the mesh that won't be seen too much, like the armpits or under the chin. And pay even more attention to the flow of polygons in your mesh, 'cause it doesn't seem too good at the moment (especially the pectoral-deltoid area).
 

TDR

TDR

Level 18
Joined
Sep 26, 2004
Messages
1,543
damn man, haven't you read anything from that big post I made? I told you to keep all your polygons quads when modeling high poly and I told you why! Look how silly your mesh looks because of that, it's like it's made out of aluminum foil...you have tons of triangles and, even worse, ngons in there. In case you don't know, ngons are polygons with more than 4 edges (it's easier than to say pentagon, xaewahfsagon, etc).
I also told you to keep distances between edges equal in order to get a nice smooth shape. You have more hard edges there than smooth transitions.
The tongue doesn't have to be part of the same mesh...in fact usually it never is. As well as gum and teeth.
As I said before, that arm is just plain wrong man...Let me illustrate you. This is how a normal arm looks:
arm_01.jpg


And here's how your arm basically looks:

arm_02.jpg


I don't understand why you come up with such ridiculous things instead of looking at some reference pictures...Maybe this was intended though, but what the hell is the purpose for such desing? It's not even appealing and I doubt it could function.
 
Level 21
Joined
Mar 18, 2007
Messages
2,247
I just moved the vertices around to bend the arms a bit :p I can rig it, but I don't really feel like it and I wouldn't be sure what pose to put him in

http://www.hiveworkshop.com/forums/showpost.php?p=524791&postcount=48

Anyway, new model, nature/earth mage

NatureMageWIPSS2.jpg


natureMageWIPSS3.jpg


It has a little over 1k polys xD but I don't care if its poly count is higher, WC3 was made years ago, and computers these days are better then back then so suck it up and accept the poly count ;P Also, since these pics were made I've reduced some stuff and edited some stuff blah blah
 
Last edited:
Status
Not open for further replies.
Top