- Joined
- Apr 20, 2010
- Messages
- 870
I believe many people already know this, but I haven't seen any Tutorial that addresses this. So here it goes, this is how to make a portrait with background glow without having to make a separate file of the model.
Tutorial Difficulty: Easy
Tools needed: Magos’s Model Editor, MDLVIS
This tutorial assumes you have basic knowledge of geosets, materials, and animation sequences.
Step 1: Choose a background screen
There are multiple ways to make a background screen for your model’s portrait, however I will go for the simplest method, that is extracting it from a pre-existing model.
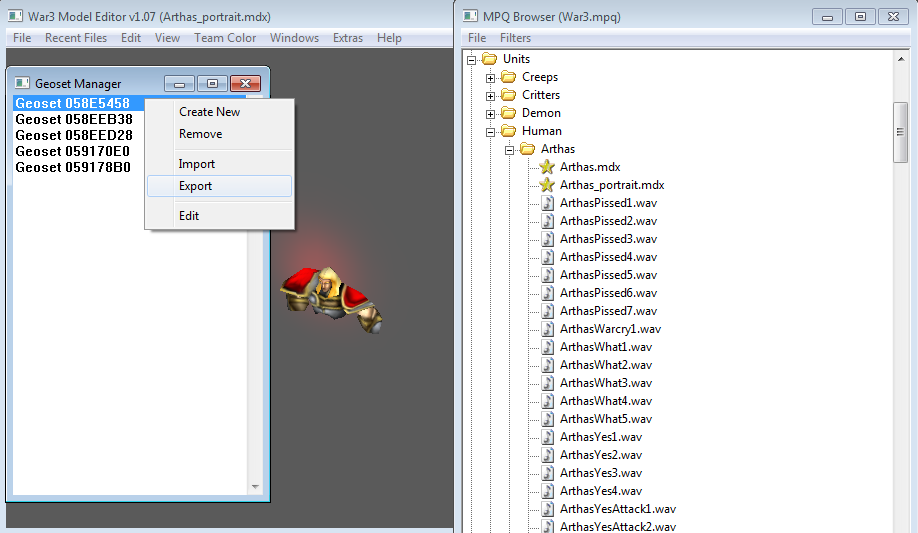
1.1. Open Model Editor
1.2. Go to Windows -> MPQ Browser
1.3. Go to any portrait model file, for example “Units\Human\Arthas\Arthas_Portrait.mdx” in the MPQ Browser
1.4. CTRL+Click on the glowing part behind Arthas’s portrait model
1.5. Go to Windows -> Geoset Manager, a geoset has been selected for you. It is the geoset that you’ve just chosen by CTRL-clicking.
1.6. Right click the geoset and choose Export. Save it as a file with .geo extension, for example “Background.geo”
 Step 2: Make the background screen
For this tutorial we will use the http://www.hiveworkshop.com/forums/models-530/outpost-53313/ model by Kofi_Banan.
2.1. Open “outpost.mdx”
2.2. Go to Windows -> Node Manager
2.3. Create a new bone by right clicking the white space and choose New Bone. You may rename it to anything (for example “background”) for easier reference later.
2.4. Go to Windows -> Texture Manager, create a new texture using the “Create Empty” option. The newly created texture is named “Replaceable ID 0”, so right click on it, choose Edit and change Replaceable ID to 2.
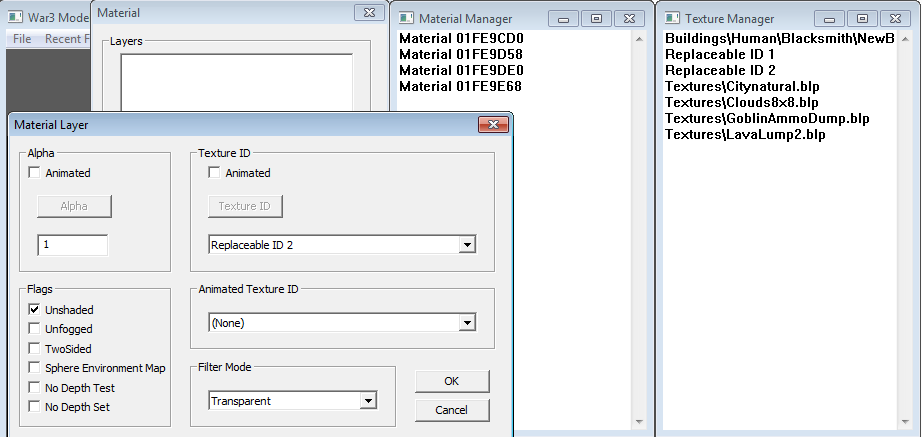
2.5. Go to Windows -> Material Manager, create a new material using “Create New” option.
2.6. Open the material you’ve just created and create a new layer in it.
2.7. In the Texture ID field, choose Replaceable ID 2. In the Filter Mode field, choose Additive. You may also tick the “Unshaded” flag so that the color in the portrait will look brighter later on. After you finish don’t close the Material Manager window yet, we’ll come back to it later.
The Filter Mode must be set to Transparent/Additive/Add Alpha, or the material will show up in animations other than Portrait, which is undesirable.
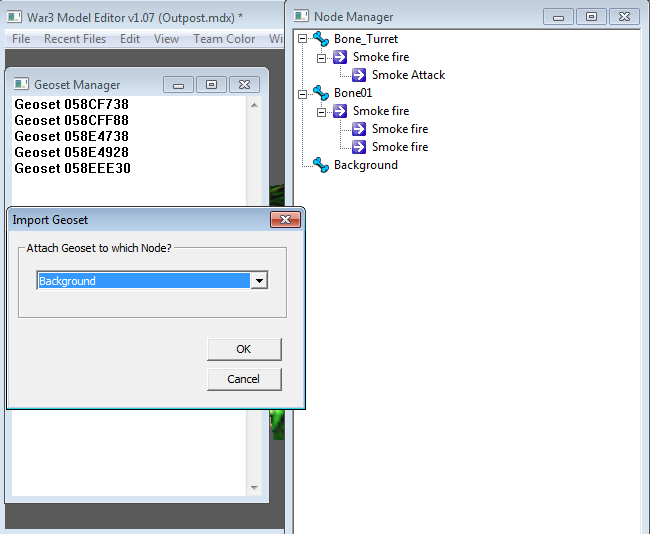
 2.8. Go to Windows -> Geoset Manager, import the background geoset you’ve previously extracted from Step 1 with the “Import” option.
2.9. Attach the imported geoset to the “background” bone.
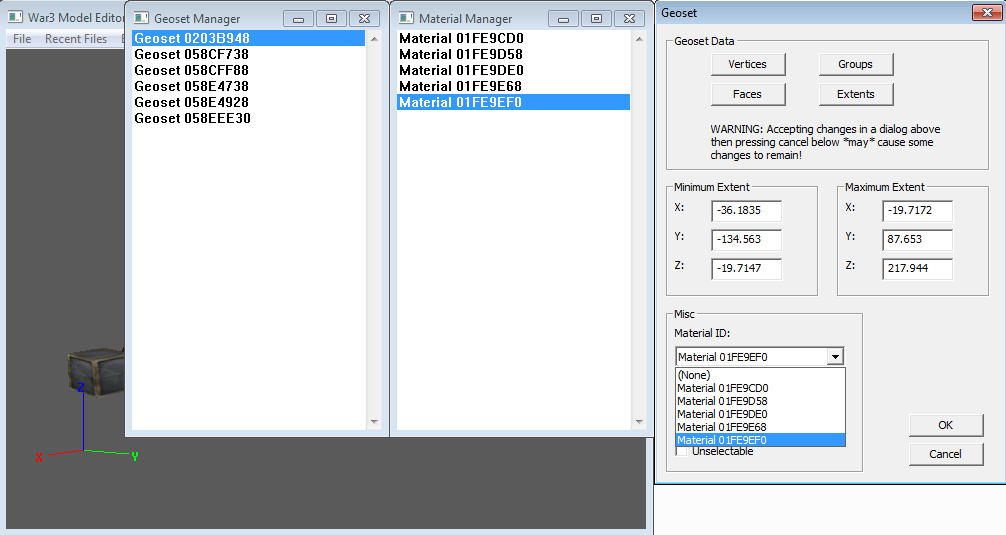
 2.10. Double click the newly imported geoset’s name. If you can’t remember its unique geoset ID, open the Node Manager again and double click the “background” bone to find the ID we’re looking for. In the Misc field of the Geoset window, choose the material you’ve created in step 2.5-2.7. Now the glow finally shows up, but we’re not done yet.
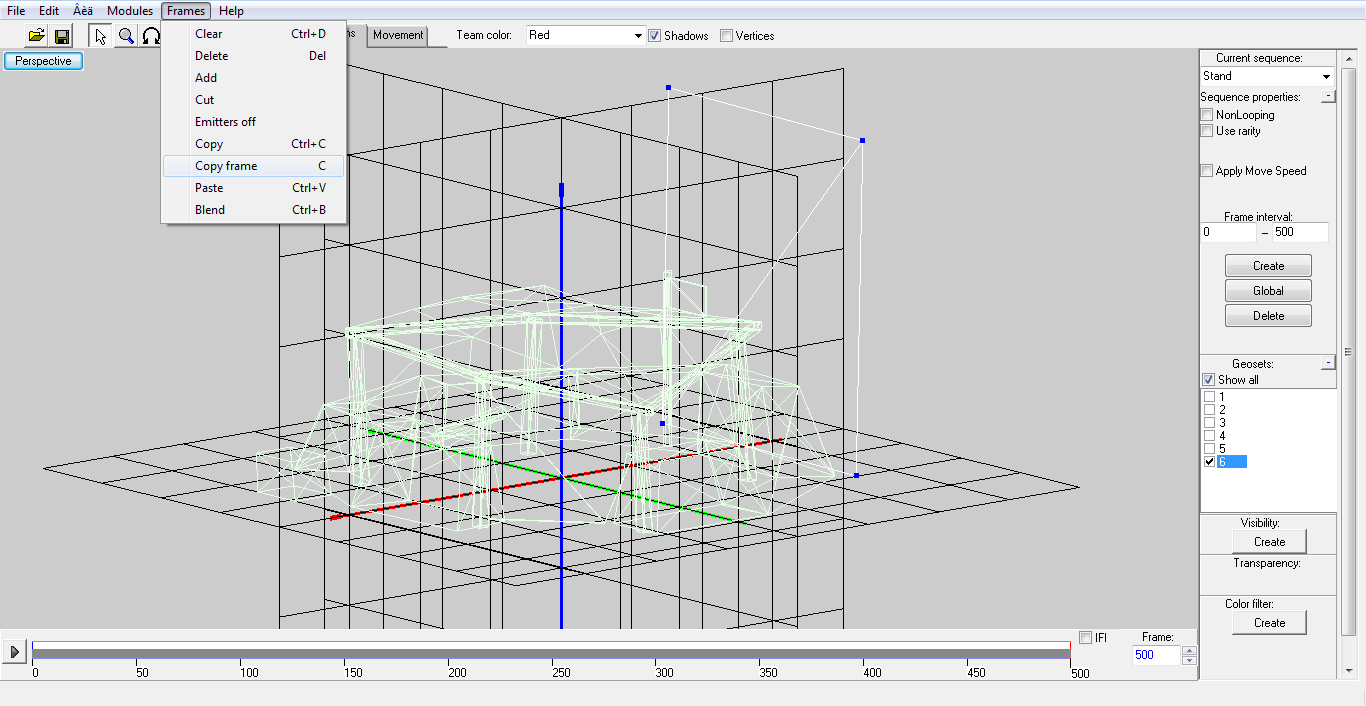
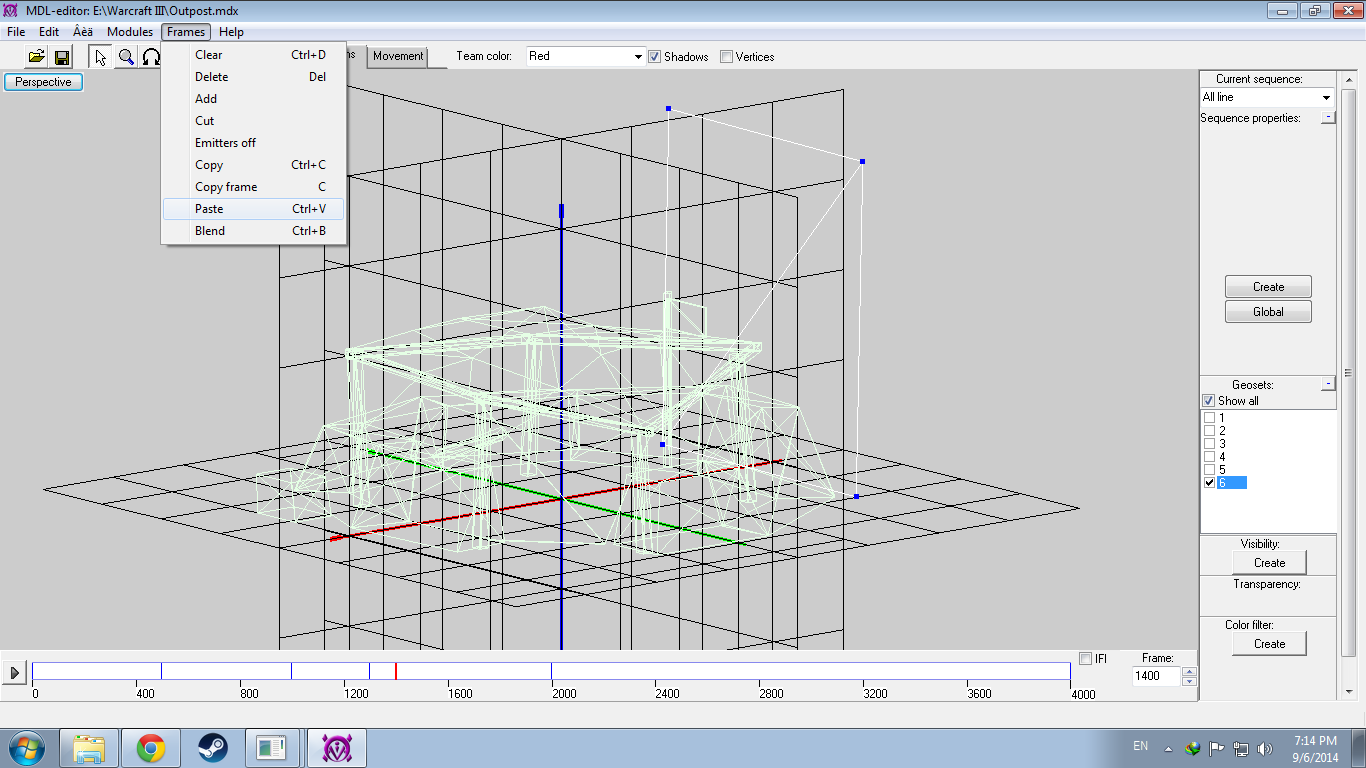
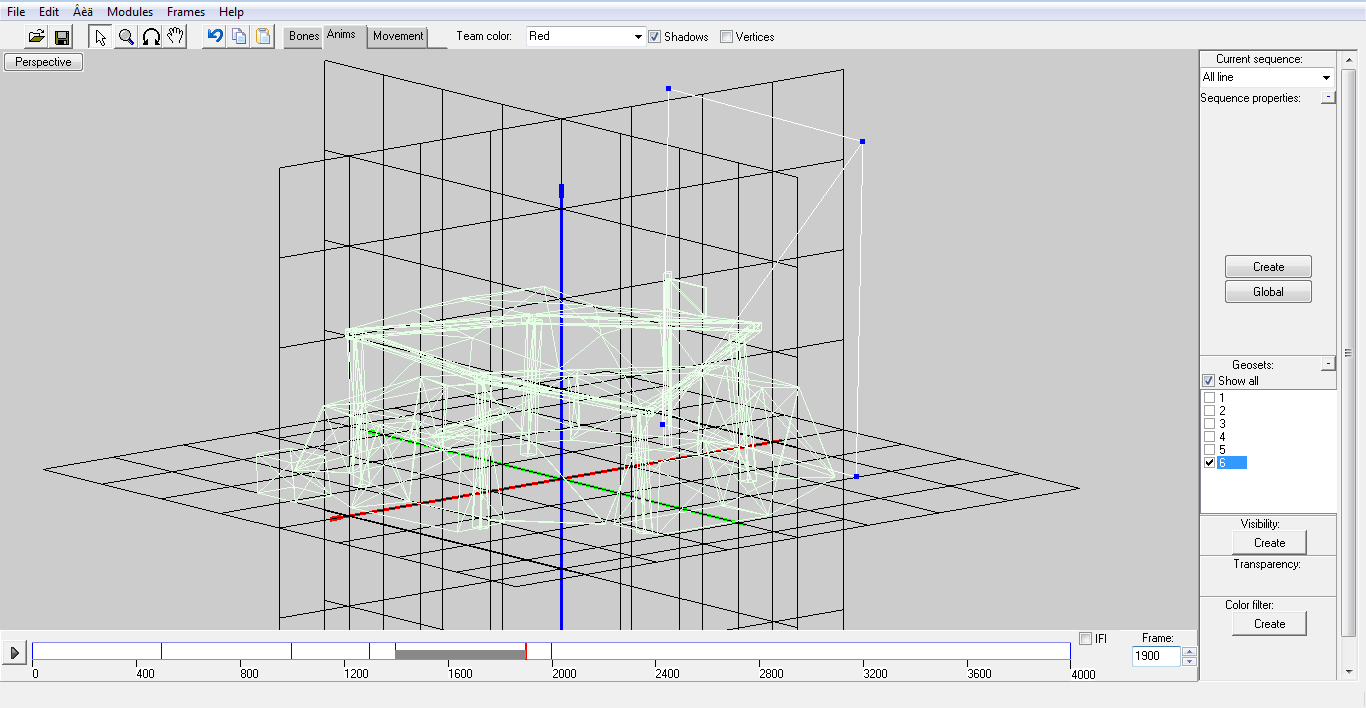
 2.11. Save the model for now, and open it in MDLVIS. Go to Module -> Sequence editor. Find the Stand animation in the "Current sequence" box, select and copy all frames using Ctrl+C. Next, find a space in the model's entire sequence (choose "All lines" in the Current sequence box) that hasn't been used by any other animation, and has enough length for the animation we're going to clone. Paste it using Ctrl+V.
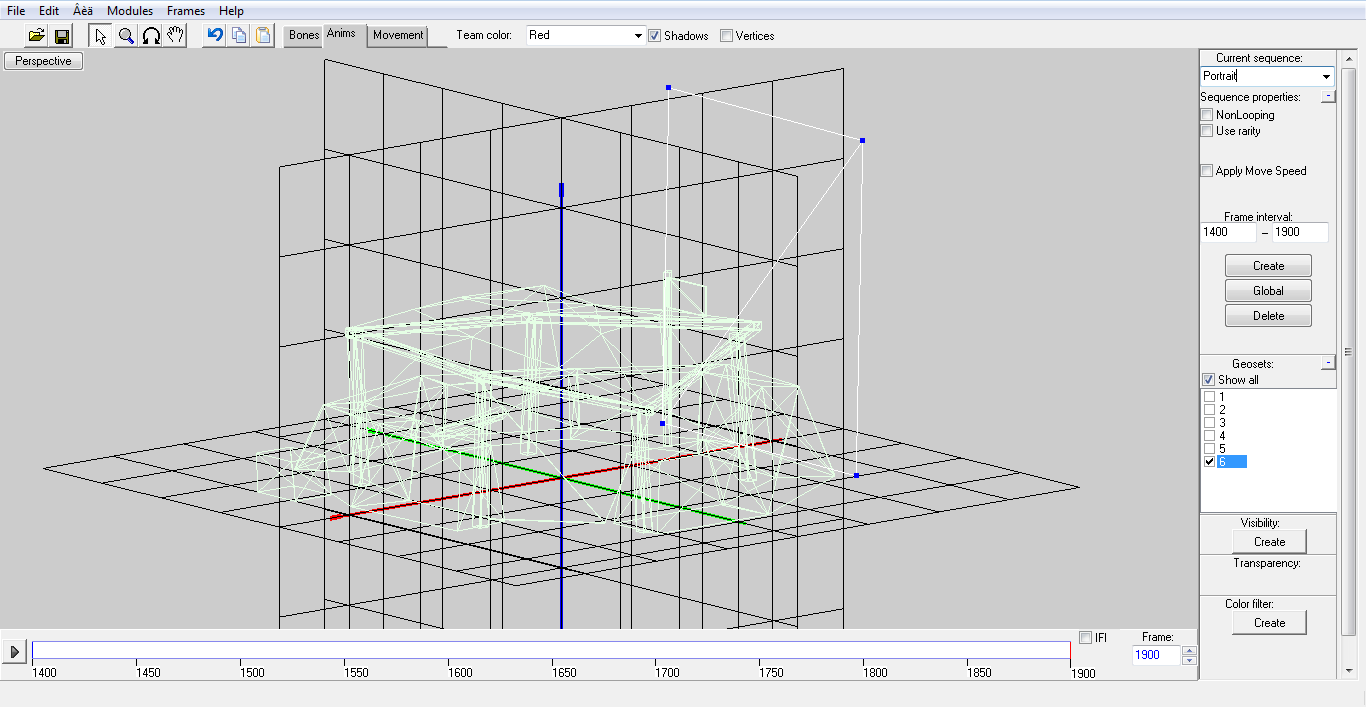
In this case, I used the frames between 1400-1900 for the portrait sequence, as the sequences of Stand, Attack and Death are 0-500, 1000-1300 and 2000-4000 respectively. Lastly, click Create to make a new animation, change its name to Portrait, and set "Frame interval" to 1400-1900. Save the model when you're done. Thanks Anvil for the tip.
If the model you’re working with already had Portrait animation sequences, skip this step and go to the next one.
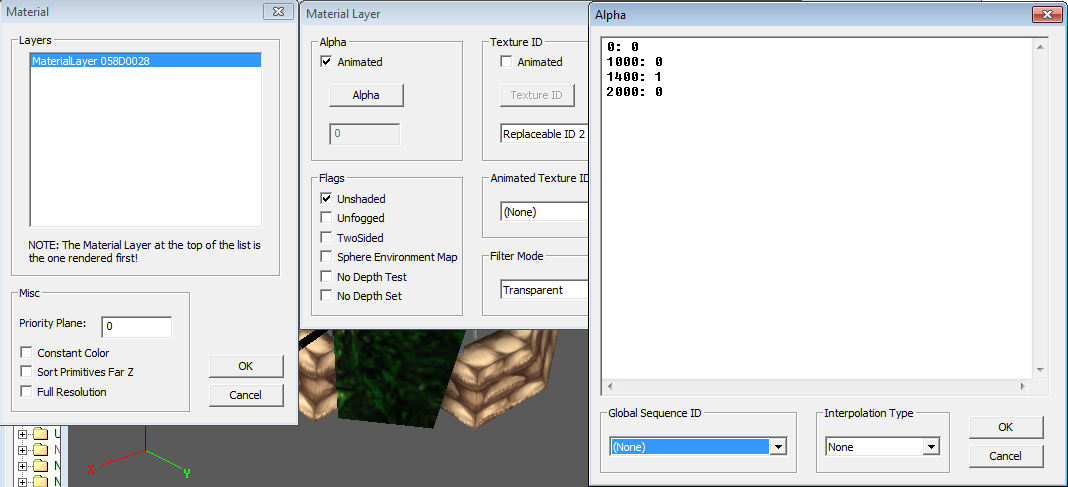
 2.12. Go back to the Material Manager and open the material created in step 2.5-2.7. Open the layer and tick Animated box under Alpha field. Type in the blank field lines in X: Y format, where X is the beginning frame of each animation sequence, and Y=0 (hide) or 1 (show) depending on whether or not you want the glow to show during the sequence that begins with frame X. In this tutorial we want the glow to only show during the portrait sequence, hence Y=1 only if X=beginning frame of the Portrait sequence.
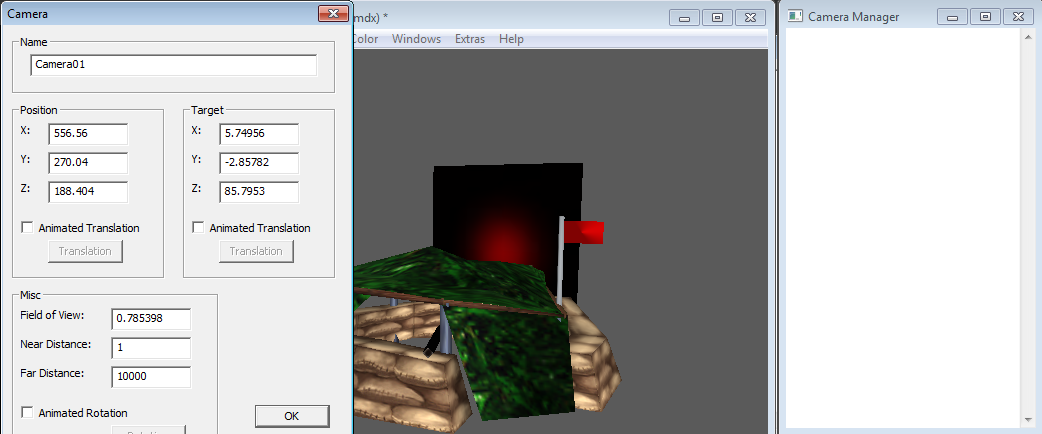
 2.13. Go to Windows -> Camera Manager and create a new camera angle if there isn't already one. The “Create New from Current View” is really handy here.
2.14. Go to Windows -> Animation Controller and watch through all animations to check if step 2.12 has been done correctly. If it has, then congratulations, you have finished the main part of this tutorial.
Step 3: Tweak the background screen
If you are not satisfied with the way the portrait looks in-game, here is a list of things you could do to improve it:
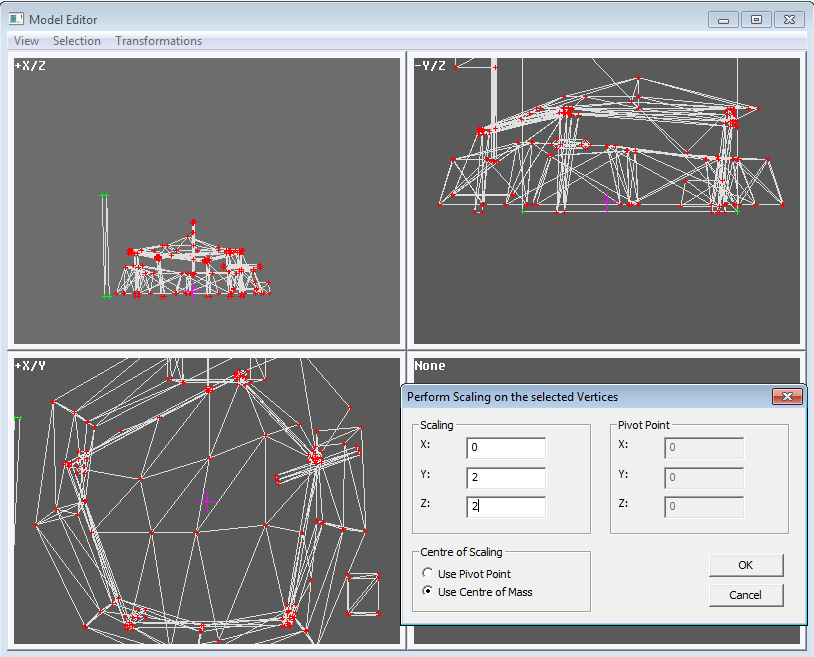
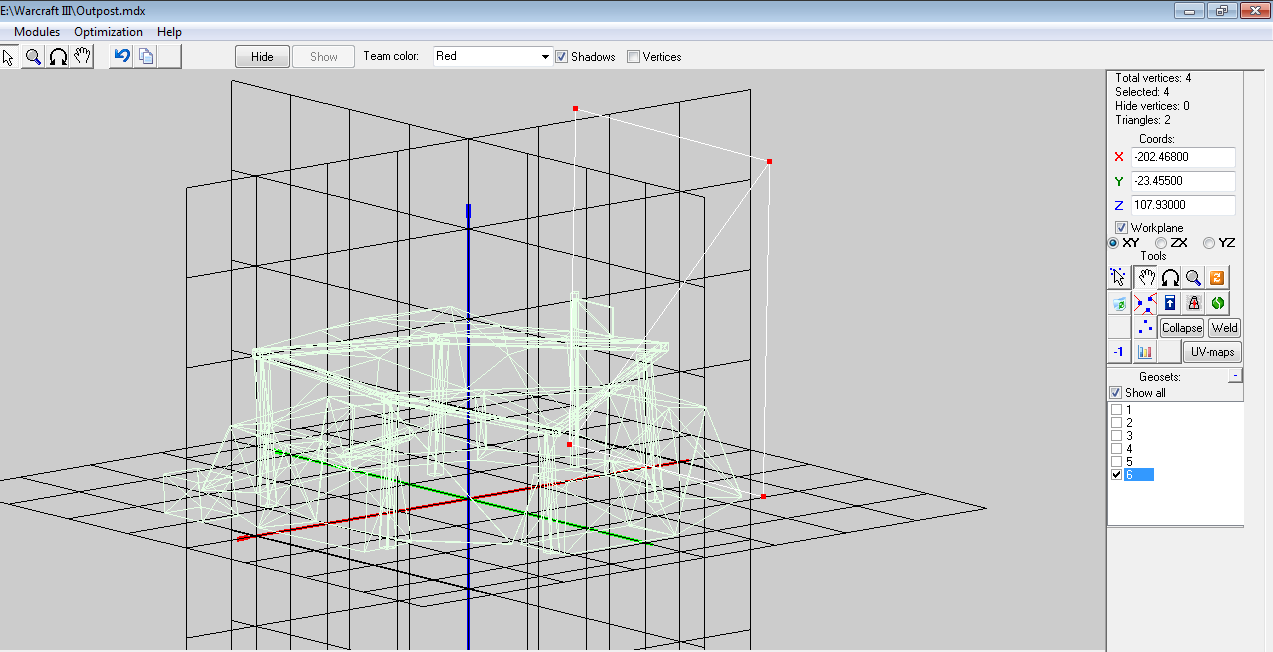
3.1. Go to Windows -> Model Editor. Select the red vertices that make up the square that is your background screen. Use Transformations -> Translation and Scaling options to tweak the background. Translation moves it in X,Y,Z coordinates relative to its current position, and Scaling changes its X,Y,Z dimensions (for Scaling you only need to change Y and Z). When you scale also remember to check the "Center of Mass" box so the geoset doesn't change position when you rescale. MDLVIS can also do this task more efficiently.
3.2. Go to Windows -> Camera Manager. Delete the old camera angle and make a new one you like, using "Create New from Current View". Or if you are good at coordinates, you can just straight up edit the fields of old camera angle.
 3.3. Bored of the same old glow? Import a new texture for your background screen. You do this by going to the background screen’s material in the Material Manager and change the Texture ID field to the newly imported texture. Generally anything can work, but sky textures are the best in my opinion.

Yes, I know WoW rips are frowned upon here, but used it for the sake of this tutorial.
How to make cool portraits without needing a separate file
Tutorial Difficulty: Easy
Tools needed: Magos’s Model Editor, MDLVIS
This tutorial assumes you have basic knowledge of geosets, materials, and animation sequences.
Step 1: Choose a background screen
There are multiple ways to make a background screen for your model’s portrait, however I will go for the simplest method, that is extracting it from a pre-existing model.
1.1. Open Model Editor
1.2. Go to Windows -> MPQ Browser
1.3. Go to any portrait model file, for example “Units\Human\Arthas\Arthas_Portrait.mdx” in the MPQ Browser
1.4. CTRL+Click on the glowing part behind Arthas’s portrait model
1.5. Go to Windows -> Geoset Manager, a geoset has been selected for you. It is the geoset that you’ve just chosen by CTRL-clicking.
1.6. Right click the geoset and choose Export. Save it as a file with .geo extension, for example “Background.geo”
For this tutorial we will use the http://www.hiveworkshop.com/forums/models-530/outpost-53313/ model by Kofi_Banan.
2.1. Open “outpost.mdx”
2.2. Go to Windows -> Node Manager
2.3. Create a new bone by right clicking the white space and choose New Bone. You may rename it to anything (for example “background”) for easier reference later.
2.4. Go to Windows -> Texture Manager, create a new texture using the “Create Empty” option. The newly created texture is named “Replaceable ID 0”, so right click on it, choose Edit and change Replaceable ID to 2.
2.5. Go to Windows -> Material Manager, create a new material using “Create New” option.
2.6. Open the material you’ve just created and create a new layer in it.
2.7. In the Texture ID field, choose Replaceable ID 2. In the Filter Mode field, choose Additive. You may also tick the “Unshaded” flag so that the color in the portrait will look brighter later on. After you finish don’t close the Material Manager window yet, we’ll come back to it later.
The Filter Mode must be set to Transparent/Additive/Add Alpha, or the material will show up in animations other than Portrait, which is undesirable.
2.9. Attach the imported geoset to the “background” bone.
In this case, I used the frames between 1400-1900 for the portrait sequence, as the sequences of Stand, Attack and Death are 0-500, 1000-1300 and 2000-4000 respectively. Lastly, click Create to make a new animation, change its name to Portrait, and set "Frame interval" to 1400-1900. Save the model when you're done. Thanks Anvil for the tip.
If the model you’re working with already had Portrait animation sequences, skip this step and go to the next one.
2.14. Go to Windows -> Animation Controller and watch through all animations to check if step 2.12 has been done correctly. If it has, then congratulations, you have finished the main part of this tutorial.
Step 3: Tweak the background screen
If you are not satisfied with the way the portrait looks in-game, here is a list of things you could do to improve it:
3.1. Go to Windows -> Model Editor. Select the red vertices that make up the square that is your background screen. Use Transformations -> Translation and Scaling options to tweak the background. Translation moves it in X,Y,Z coordinates relative to its current position, and Scaling changes its X,Y,Z dimensions (for Scaling you only need to change Y and Z). When you scale also remember to check the "Center of Mass" box so the geoset doesn't change position when you rescale. MDLVIS can also do this task more efficiently.
In Model Editor
In MDLVIS
In MDLVIS
Yes, I know WoW rips are frowned upon here, but used it for the sake of this tutorial.
Last edited:


