• 🏆 Texturing Contest #33 is OPEN! Contestants must re-texture a SD unit model found in-game (Warcraft 3 Classic), recreating the unit into a peaceful NPC version. 🔗Click here to enter!
  • It's time for the first HD Modeling Contest of 2024. Join the theme discussion for Hive's HD Modeling Contest #6! Click here to post your idea!

Texturing: The Right Way! [Reviewed]

Level 21
Joined
Mar 18, 2007
Messages
2,247
Texturing Tutorial
By SuPa-

Shading

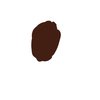
Ok, please note that the base color I used for this is too dark and should be lighter
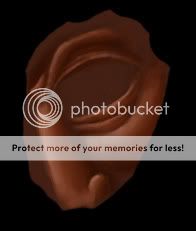
1) OK, so, to start off we have a relatively dark base color. It's plane, nothing fancy, but it shall become something with depth, light, color, shading, and more!
attachment.php


2) After you put that down on the canvas, start drawing out your plan with a pretty translucent, dark color
attachment.php


3) After this, start adding in some shading. It doesn't matter if it's lighter than the actual base color, just not too light. Try going in the range of colors in my pallet example. And remember, USE A VARIETY OF COLORS. I generally like to have my opacity at 11.5%
attachment.php

attachment.php


4) Keep doing this, and uses brush sizes that you think are necessary. For example, the nose and cheeks could probably be worked on with a brush size of 15, while the eye lids and such maybe a 7-3 size
attachment.php


5) Start adding in some lighter colors, but not too light
attachment.php

attachment.php


6) Start adding in some lighter, less saturated colors, as well as add in some more shading and mid tones to make it blend
attachment.php


7) Add even more light colors, and start adding lighter colors to those dark extreme areas (I messed it up a bit xD)
attachment.php
 

Attachments

  • TextureTut1.jpg
    TextureTut1.jpg
    9.9 KB · Views: 591
  • TextureTutExample1.jpg
    TextureTutExample1.jpg
    13.8 KB · Views: 613
  • TextureTut3.jpg
    TextureTut3.jpg
    15.4 KB · Views: 584
  • TextureTut2.jpg
    TextureTut2.jpg
    12.7 KB · Views: 581
  • TextureTut4.jpg
    TextureTut4.jpg
    17.3 KB · Views: 617
  • TextureTut6.jpg
    TextureTut6.jpg
    20.6 KB · Views: 553
  • TextureTut5.jpg
    TextureTut5.jpg
    19.8 KB · Views: 544
  • TextureTut7.jpg
    TextureTut7.jpg
    20.9 KB · Views: 562
  • TextureTutExample2.jpg
    TextureTutExample2.jpg
    14.3 KB · Views: 591
Last edited:

TDR

TDR

Level 18
Joined
Sep 26, 2004
Messages
1,543
white background = always a bad thing, even to have around. If you'd go now and replace the white with black or something dark anyway, you'll realize that the colors are not exactly what you thought they were. You'd see that the darkest color in there is actually pretty bright and low in chroma:
Untitled-1-1.jpg

see?
 

Ralle

Owner
Level 77
Joined
Oct 6, 2004
Messages
10,101
Yeah. My opinion:
- The images are too big, remove all the empty space and make the background black.
- I don't think I would improve in texturing with this guide. It tells nothing about how to start texturing a model or edit textures for a unit, which is what most people would do.
- You should explain what each step does to the result, this is a how-to but drawing is much more abstract than e.g. triggers.
 
Level 36
Joined
Jul 1, 2007
Messages
6,677
white background = always a bad thing, even to have around. If you'd go now and replace the white with black or something dark anyway, you'll realize that the colors are not exactly what you thought they were. You'd see that the darkest color in there is actually pretty bright and low in chroma:
Untitled-1-1.jpg

see?

Hm, it looks like the same color on light and dark backgrounds to me.. Maybe it's just a subtle difference.
 

TDR

TDR

Level 18
Joined
Sep 26, 2004
Messages
1,543
well it is the same color, but if you look a for a while at the one with white background you'll see that it appears to be darker, don't just take a quick glimpse. This is why it's a problem, because while you work you stare a lot at it.
 
Top