- Joined
- Mar 18, 2007
- Messages
- 2,247


SuPa-'s Skinning Tutorial
This tutorial is made for beginners, or anyone else interested, to get a basic idea of how to make skins.
In this tutorial, we're going to learn how to make a demon flesh wolf. But I hope it will give you the general knowledge of how to make a decent skin without recolor. The reason I'm choosing this is because it will show you how This tutorial is made for beginners, or anyone else interested, to get a basic idea of how to make skins.
to make use of the fur technique to make a gore-like texture, muscle sinew, glowing eyes (my way, which doesn't seem that good), blades, bones, and armor!
This tutorial will also explain importing and exporting textures, and viewing your skins in wc3 viewer.
Keep in mind, this is my first time ever trying to make flesh, and what I do in this tutorial is my own way of doing things, and interpreting how other people make flesh skins. So I'm happy to say I've learned from this, also.
Make sure to look at all images as you go
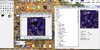
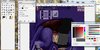
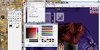
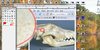
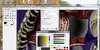
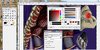
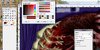
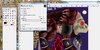
First, we're going to open up WC3 Image Extractor and open up a texture. And in this case, we're going to open a dire wolf texture.Then, we'll click the "save" button, and save it as a TGA


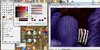
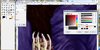
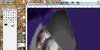
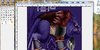
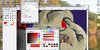
After this, we'll open it in GIMP, a free image editing program, and this is where the editing kicks in!
Gore Textures
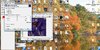
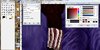
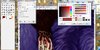
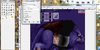
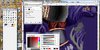
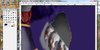
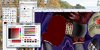
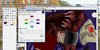
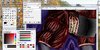
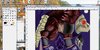
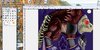
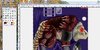
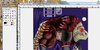
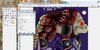
First, we're going to select the body using the lasso tool, and color it one solid color. We're going to color it a dark gray, and use the dodge tool.We're going to start making our own fur, and for reference, we might open up wc3 image extractor to view the image and see where things go. To learn how to make fur, go to this site http://www.wc3campaigns.net/showthread.php?t=89081
If you look at the Dire Wolf skin, you'll see that the fur is mainly on the upper left, and a little at the bottom front. We're going to do the same thing.
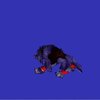
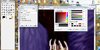
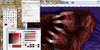
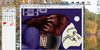
After you're done making the fur, it should look something like this.
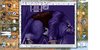
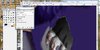
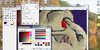
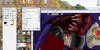
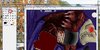
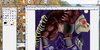
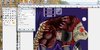
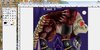
Now, we're going to recolor it red, and then move in with the darkness and contrast. After that, add in some more highlights, and make the bottom a little more defined. Set the burn tool to 3, and start making strokes across. Make sure the opacity is low. Please note, the only time you should ever use the dodge and burn tool is for fur, or fur like effects.
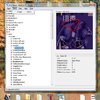
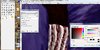
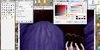
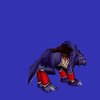
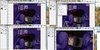
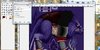
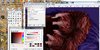
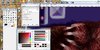
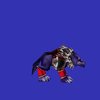
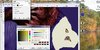
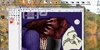
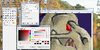
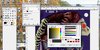
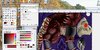
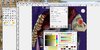
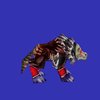
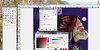
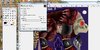
After this, I think we should check up on how the skin will look wrapped. For this, we're going to use WC3 Viewer. Now first, before using the viewer, we're going to need to convert our skin into a blp. Save the skin, open up in image extractor, and then save it as a BLP. Once this is done, Open up WC3 Viewer, go to the tree view, then to the units, and then creeps section, and find the dire wolf mdx. Open it, and then go to "Current File" at the top of the screen, click "Remap textures..." find units\creeps\direwolf\direwolf.blp, click on it, and then click on "change," find your skin, open it, and then click the "OK" button. Now, you can see what the model looks like wrapped. If you notice, the fur is more like flesh, and the lighter part looks almost like a backbone and ribs under flesh.
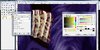
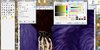
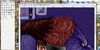
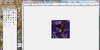
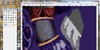
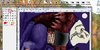
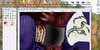
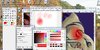
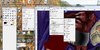
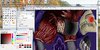
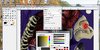
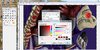
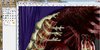
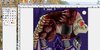
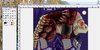
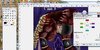
Now that we're done with that, we're going to start on the lower sides, which was the white-ish part of the wolf that we didn't skin. We're going to turn that region into gorey ribs. Start by selecting the white region, and color everything in black.
After that, deselect it, and select parts like this, to form ribs.
Then, make a red off-white, and color in the ribs.
After that, we're going to take a dark grayish-red, set the opacity to about 40-50, and shade in the left sides of the ribs.
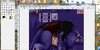
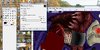
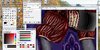
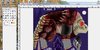
Once you're with that, deselect the ribs. It's time to add some good ol' fleshy gore! First, Select the black spaces between the ribs, and color them red.
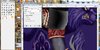
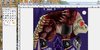
Then set your brush to 1 pixel, move in with a dark red, opacity at 80-100%, and make some lines.
After that, go in with a light red (almost white) and add in some highlights around the dark lines.
Then, make an ugly yellow color, set the opacity to about 60, and then start making webby lines.
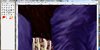
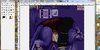
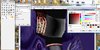
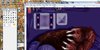
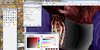
Let's see how it's going so far wrapped. You don't need to re-open the skin in wc3 viewer this time, instead, you can conveniently press the "refresh textures" button at the top of the screen that looks like a recycle sign! As you can see, there's a clear border between the ribs and the rest of the fleshy body. So we're going to need to make the ribs progress into the body
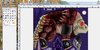
Above each rib, make a selection in the shape of a triangle
Color it a reddish off-white, and add in shading like you did last time
Add in black lines (opacity at 80-100%) as half ovals, a little over the tips of the ribs.
Then, add in some light pink highlights (opacity 10%) right above the black lines, and a few below, at a lower opacity
We'll now add in some more yellow webby stuff. Make that ugly yellow color again, set the opacity from 50-60% and make some stringy stuff along the gashes going down to the ribs.
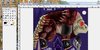
Once we've finished that, we'll add in some blood.
Make a dark red, put the opacity at about 60%, and make it trail from the gashes a little down the ribs.
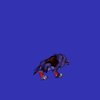
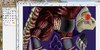
Time to look at the skin all wrapped up again. Now, to me, that looks better.
Armor
Now that that's finished, it's time to start working on the front legs.First, we'll select the whole leg area, and color it dark gray.
Deselect the top part, and some of the bottom, leaving a region aligned with the ribs.
Color in the selected area a lighter gray.
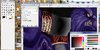
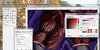
After that, put the brush size to 1 pixel, opacity should be at 80-100%, set the color to solid black, and make a curved line on the left-middle side of the gray. Next, set the opacity to 30%, and on the left side of the line, with the brush size at 7, make a bold line. Repeat this several times in the way I did in the picture. Once you've done that, take out the smudge tool, with the brush size at 3 or 5, and smudge the lines that connect the layered colors together like I did in the picture. Then, use the blur tool and blur out any rough places.
Now to highlight. Set the opacity at about 10%, use a solid white color, have the brush size be about 7, and layer the white on the right side of the armor. Use my picture as a reference.
Then smooth it out with a size 3 brush, and then use a size 5 brush, using the blur tool, to make it smoother looking
Muscle Sinew
Before we get to more details on the armor, we should start the muscle sinew below the un-finished leg armor.
Select the lower half with the want tool, if anything else gets selected besides it, deselect it with the lasso tool (to deselect with the lasso tool hold the ctrl button) Color the selected area dark red.
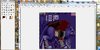
Set the color to a light pink, have the opacity at about 40%, and start to make lines in the way I did in the picture below. Notice how half of the lines face on direction, while half fice the other. This creates the image of 2 muscles.
Set the color to a dark red, put the opacity at about 40%, and add in shading. Use my picture as a reference.
Now, let's, again, see how it looks in wc3 viewer on the model.
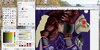
K, since that's finished, we're going to do the upper leg and front body.
We're going to select the region, add little extents, color it the same red we used for the lower leg, and color it all that color.
Switch to a light pink, set the opacity to 40%, make sure the brush size is on 1, use my picture as a reference
Next we're going to add in the shading. Set the brush size to 3, make the color a very dark red, set opacity to 14%, and begin shading. Again, use my picture as a reference.
Time to add tendons. We're going to make a white color, have it at about 15% opacity, and color in the edges of the parts of the selected region that are sticking out.
Now, we're going to use the smudge tool, at a brush size of 3 pixels, to stretch out the "tendons"
Switch back to the paintbrush, make a red color, set the brush opacity to 40%, and make some blood on the ends of the tendons extending up them.
Then, set the red even darker, almost black, and color the ends of the tendons slightly, to make them blend a little bit.
Armor
Now time to get back to the armor.
Reselect it, and let's get started. We're not gonna do much, except add little details.
Make a lot of black dots everywhere (not too crowded), on the right side of them, put half-circle white lines to act as high lights, and then add some high lights to the left of the dark line, to give it more definition, simple as that. Make sure when you put in the highlights, the white is at a low opacity 5-10%.
Here's a close up view so you can get an idea of what to do
And here's a normal view, so you can see what it'll look like when finished
Blades
K, now we're going to do the blades. Keep in mind, when you skin them, all of the mane of the wolf will be made into blades. But that's what we want.As usual, we're going to start out by coloring it on solid color. In this case, gray
Then, we're going to deselect it, select a little up from where the blades will start, and select all of that. Then, we'll make the actual blade part a light gray
Now, we're going to put in some highlights, and some shading
After that, we're going to make a red-ish brown rusty color, use that as dried blood, put it in some blood, and then go over the left sides of the blades with more shading with an opacity of 15%, and a brush size of 3
Now, we're going to select the non-blade part. We're going to start the shading, doing the layer, smudge, blur technique I used before.
So now, we're going to need to add some shading to where the blades attach to the regular metal. Set the color to solid black (which it should already be on), set the opacity to 40%, and make lines that align up with the ones on the blade. You'll get what I mean in the picture. Also, we'll make the shading a little darker by re-layering over the other shading, and making it go a little more down.
Highlights are always important, so we're going to add them in. Use my picture to see where they go. Also, since there's highlights on the right sides of the metal, we'll need shadows on the left, so add those in as well.
And here it is so far!
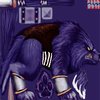
The Skull
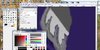
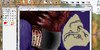
Now we're going to make the head of this wolf into a skull! We'll start by selecting all of the head, except the eyes and mouth, so you can know where things go. Also, like I've said before, you can view the skin in WC3 Image Extractor as a reference to where things should go.
Next, we're going to color everything a light yellow, or white, doesn't really matter.
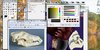
A good thing to do when making something like a skull, is to look up an image online. I went to google and typed in "dog skull," but you can do whatever you like.
Now, with our skin up, and the skull picture up, we're going to use it as a reference to how we make our skull. Also, look at my picture and see what I did.
If you look at the dog skull picture closely, you'll notice little indents everywhere. We're going to add this into the skull part of our texture.
http://hiveworkshop.com/forums/attachment.php?attachmentid=6549&d=1179668967
A really easy way to do this would be like this. Copy the image from google, I'll give you a link to the one I got it from (http://www.skullsite.co.uk/Wolf/wolf_su_lat.jpg)
Go to file, new, in gimp. Doesn't matter what the size is, as long as it's not too small. And paste the skull image in it. Now we can view it easily and use it as a good reference to what we're doing. Select a medium-sized circle around a clear patch of skull, copy it, and then paste it into your texture. Make sure to anchor it down.
Reselect your skull using the magic wand tool. Only click on the white regions. Make sure all of the white is selected, and non of the black lines.
Click on the tool at the bottom left of the tool bar that looks like a stamp.
When using it, hold down the ctrl button, and click in the middle of the pore texture you copied and pasted. Make sure the brush size is at 11, start clicking along your skin, and DO NOT DRAG.
Once you've completely filled the white with the texture, we're going to make it so it's an ugly green-yellow. Click on "Layer" at the top of the menu bar, and click on "Hue-Saturation". You'll see at the top that there's six colors. Select yellow and put hue to -8, lightness to -30, and saturation to 15. Does this 2 times.
Since there's now no shading, we're going to need to add some. Select the whole skull, including the black lines, but still, we're not going to select the eyes and mouth. Set the color to solid black, set the opacity to 5%, and set the brush size to 5. We're going to use layer shading, but at a low opacity so it's smoother, since we can't use smudge to clean it up.
Now that we've done the shading, we're going to need to do the highlighting. Set the opacity to around 40, make it a solid white, set the brush size to 1 pixel, and add in the highlights so it looks something like mine.
Now, we're going to select the eyes, and only the eyes, and make them a red color.
Then, we're going to add a little be of shading to the bottom left of the eye, and some highlighting to the top right.
Now to add the glowing effect. It's pretty simple, really. First, go to the "Select" button, and scroll down to invert.
Once you've done that, set the opacity on you're brush to about 5% and start layering over from out to in. My picture explains how.
Muscle Sinew and Gore Textures
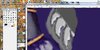
Now we're going to move to the back body and legs.
Start by selecting all of the leg and color it a dark red
Then, deselect it and select the upper part of the leg and color it a dark gray, almost black.
Now, we're going to use the fur technique again by using the dodge and burn tool, make sure to set the opacity to about 35%, and concentrate most of the strands to the right (front) of the leg and on the top until it looks something like this.
Then, go to "Layer" at the top tool bar, "Color", and then "Color Balance" Put the red to +100, the yellow to -100, and the magenta to -100
Next, go to Hue-Saturation, also under "Layer" and then under "Color" and set the lightness to -50, and the saturation to -30
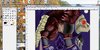
Ok, now we're going to deselect that, and select the solid red below it with the magic wand tool and start to make some more muscle.
Set the color of the brush to a light pink, make the opacity about 60%, set the brush size to 1, and start shaping muscles. Use my picture as a reference of what to do.
Next, we're going to add in some shading, and define things with some dark color. Change the color to a dark red, and start defining the muscle. Since all highlights have shading, we're going to mainly but dark lines on the left sides of white lines, and where we want to make it so it looks like different muscles. Look at what I did in my pick.
Now, we're going to add some shading and highlighting to define the different muscles more. Set the opacity on the dark red to about 10%, the brush size at 5, and start layer shading on the left of muscles. Once again, look at my pic to get the idea of what to do.
Time for the highlighting part. Set the brush color to a light pink, the brush size to 7, and set the opacity to 3%
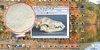
So let's view the skin wrapped up on the model. And there you have it! The upper back legs!
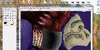
Since that's completed, we're going to move on to the tail and upper back leg and body. Start by deselecting the upper leg, and selecting the rest of the leg and tail. Then, color everything a gray-ish yellow
Then start to make the outline of vertebrae, and little bones going downward.
Next, we're make the places between the bones darker. Deselect the tail, and select the gaps in between the bones using the wand tool.
Set the opacity to 80%, the brush size to something big, switch to the pencil tool (the brush tool tends to send color beyond the selected area)and start darkening. We'll get back to the rest of this part later
Now, we're going to switch back to the brush tool and add some shading and highlights to the bones. Select the bones, but not the gaps. The easiest way to do this would be to select everything, then use the magic wand tool while pressing ctrl to deselect the gaps
Set the opacity to about 15 for the brush, have the brush size at 3, leave it at the color it is, and shade mainly to the left and bottom of things. When shading the small bones that stick out, use a brush size of 1, and set the opacity to about 40%. Use my picture to get a better idea of what to do.
Now for the highlighting. Lower the opacity to about 15%, change the color to a light yellow, use a brush size of 1, and begin the highlighting. For highlighting, it's best to have the highlighting at the top right. Make sure to look at my picture.
Now to move back to the gaps. We're going to make those look like the flesh between the ribs, but a little different, since it's bigger and we can add more details. So we're going to deselect the bones, and then select the gaps with the magic wand tool. Now, probably more than just the gaps will be select.
Just use the lasso tool (while holding down ctrl) to deselect any extra things selected.
First, color everything a dark-red.
Then, set the opacity to 40%, set the color to a light pink, the brush size to 1, and start making lines going downwards from bone to bone.
Then add in some dark lines in between. Use the same opacity and brush size, just make a dark red color.
Now, we're going to add some shading and highlights. Leave the color the same, but lower the opacity down to 20%, and change the brush size to 3.
Shade along the middle, going horizontal-wise, of each gap
Now, lower the opacity down to 10%, change the color to a light pink, and highlight along the edges of the gaps horizontal-wise
And now time to add some more webby yellow stuff. Deselect everything, set the color of the brush to an ugly yellow, the opacity to 40%, the brush size to 1, and begin making a webby formation along the bones and flesh. Should look along the lines of mine.
Now, if we look at the skin on the model, we can see that it doesn't flow with the rest, like the other time we did bones. We're going to do something like that, but instead of puncturing into the flesh, we're just going to make it branch out a little. Look at my pic below to see what I mean. And then fill them in with a color similar to the rest of the bone.
After you've done that, add shading and highlighting similar to the rest, so it blends in with the rest of the bone.
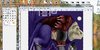
If you look at the skin in WC3 Viewer now, you'll see it still doesn't flow too well. We're going to fix that by adding in some blood. Deselect everything, make a red color, set the opacity to 40%, make sure brush size is on 1, and start scribbling around like I did.
And here's what it should look like so far!
Now it's time to go back to the neck. Basically, all we're going to do is select it
make it a solid red color and then make it look like sinew
And add in some shading. Set the opacity to 15%, make the brush size 15, have it at a dark red color, and start shading from top to about middle
And then some highlighting. Set the opacity to 10%, a light pink color, and use the same brush size. The reason we're not adding much detail to this is because it's not an important part of the skin.
Armor
Now we're going to do the lower leg. We'll start by selecting the team color part.
Erase everything in the selected team color, which wouldn't be a lot, but still, erase it.
Now we're going to deselect a diamond shape in the middle
And then color everything else selected dark gray
Put the brush size on 1, make sure opacity's at 100%, and change your color to black, and make a curved line along the left side of the armor
And then make another diamond out of black surrounding the original, but don't link the points.
After that, change the opacity to 10%, set the brush size to 5, and start shading like I did.
Then, do the highlights, using a brush size of 1, a white color and an opacity of 5%
Deselect what you we were just working on, and select the diamon-shaped team color. Start shading up and down the left side of the diamonds, with an opacity of 10%, and using black as your color. It won't be that noticeable, though.
Then, switch your color over to white, and start highlighting on the top right of the diamond-shaped team color.
Then go to "Select" at the top menu bar, and then go down to "Invert" and it will flip around the selection, selecting everything but the diamond-shaped team color.
Now we're going to make the diamonds look as if they're glowing. We'll select the eraser tool, set the opacity to 10%, and set the size at 11. Then do what we did with the glowing eyes, except we're using an eraser.
Now we're going to move on to the feet. Select the feet, and color over everything with a dark gray. Use the dodge and burn tool, and focus the strands mainly at the front of the feet, in toe shapes. Look at mine to see what I did.
Then go to Color Balance and make it +100 Red, -100 Magenta, and -100 Yellow
After that, go to Hue-Saturation. Set the Lightness to -50, and the Saturation to -30.
Finally, is the paw. It's really not that important so all we're going to do is a recolor, setting it to +100 Red, -100 Magenta, and -100 Yellow
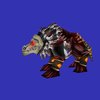
And there you have it! Our skin is complete!
Technique Review
Here, we're going to review the techniques for making textures!
For this, I'm not going to actually skin something, instead I'm just gonna make a free-hand to give you the basic idea of what to do.Gorey fur/flesh Texture
First, the gorey fur\flesh texture.
Color everything a dark gray (in this case, I'm just gonna color a little bit of the full thing a dark gray, since we don't need to work with the whole canvas)
Then, make lots of lines, pointing downward. If they're on the right of the blob, make them slant right, on the left, make them slant left, and in the middle, make them straight. Focus the strands mainly on the middle, and have them branch out a little
Attachments
-
 !!AATutPic3.jpg249 KB · Views: 396
 -
 !!AATutPic4.jpg113.6 KB · Views: 356
 -
 !!AATutPic5.jpg260.1 KB · Views: 356
 -
 !!AATutPic6.jpg301.5 KB · Views: 344
 -
 !!AATutPic7.jpg312.1 KB · Views: 309
 -
 !!AATutPic8.jpg230.7 KB · Views: 274
 -
 !!AATutPic9.jpg240.6 KB · Views: 321
 -
 TutScreenShot1.jpg17.6 KB · Views: 297
 -
 !!AATutPic10.jpg15.1 KB · Views: 284
 -
 !!AATutPic11.jpg12 KB · Views: 290
 -
 !!AATutPic12.jpg203.2 KB · Views: 295
 -
 !!AATutPic13.jpg220.3 KB · Views: 285
 -
 !!AATutPic14.jpg165 KB · Views: 253
 -
 !!AATutPic15.jpg172.2 KB · Views: 277
 -
 !!AATutPic16.jpg159.2 KB · Views: 285
 -
 !!AATutPic17.jpg31.4 KB · Views: 300
 -
 !!AATutPic18.jpg124.5 KB · Views: 292
 -
 !!AATutPic19.jpg148.4 KB · Views: 287
 -
 !!AATutPic20.jpg181.1 KB · Views: 306
 -
 !!AATutPic21.jpg178.2 KB · Views: 288
 -
 !!AATutPic22.jpg160 KB · Views: 265
 -
 !!AATutPic23.jpg183.2 KB · Views: 275
 -
 !!AATutPic24.jpg186.6 KB · Views: 277
 -
 !!AATutPic25.jpg24.9 KB · Views: 274
 -
 !!AATutPic26.jpg180.2 KB · Views: 281
 -
 !!AATutPic27.jpg168.4 KB · Views: 269
 -
 !!AATutPic28.jpg175.2 KB · Views: 280
 -
 !!AATutPic29.jpg222.2 KB · Views: 229
 -
 !!AATutPic30.jpg181.8 KB · Views: 290
 -
 !!AATutPic31.jpg180.6 KB · Views: 314
 -
 !!AATutPic32.jpg169 KB · Views: 319
 -
 !!AATutPic33.jpg195.6 KB · Views: 260
 -
 !!AATutPic34.jpg194.1 KB · Views: 283
 -
 !!AATutPic35.jpg26.4 KB · Views: 263
 -
 !!AATutPic36.jpg161.2 KB · Views: 269
 -
 !!AATutPic37.jpg186.3 KB · Views: 308
 -
 !!AATutPic38.jpg206 KB · Views: 280
 -
 !!AATutPic39.jpg174.4 KB · Views: 266
 -
 !!AATutPic41.jpg194 KB · Views: 234
 -
 !!AATutPic42.jpg207.8 KB · Views: 328
 -
 !!AATutPic43.jpg190.7 KB · Views: 258
 -
 !!AATutPic44.jpg209.3 KB · Views: 236
 -
 !!AATutPic45.jpg132.1 KB · Views: 275
 -
 !!AATutPic46.jpg33.4 KB · Views: 264
 -
 !!AATutPic47.jpg211.1 KB · Views: 240
 -
 !!AATutPic48.jpg196.4 KB · Views: 254
 -
 !!AATutPic49.jpg184.6 KB · Views: 245
 -
 !!AATutPic50.jpg197.3 KB · Views: 252
 -
 !!AATutPic51.jpg202.2 KB · Views: 260
 -
 !!AATutPic52.jpg157.3 KB · Views: 214
 -
 !!AATutPic53.jpg165.6 KB · Views: 225
 -
 !!AATutPic54.jpg163.2 KB · Views: 243
 -
 !!AATutPic55.jpg156 KB · Views: 284
 -
 !!AATutPic56.jpg22.1 KB · Views: 282
 -
 !!AATutPic57.jpg188.1 KB · Views: 260
 -
 !!AATutPic58.jpg183.2 KB · Views: 273
 -
 !!AATutPic59.jpg203.4 KB · Views: 256
 -
 !!AATutPic60.jpg241.5 KB · Views: 233
 -
 !!AATutPic61.jpg297.8 KB · Views: 103
 -
 !!AATutPic62.jpg241.6 KB · Views: 258
 -
 !!AATutPic63.jpg219.3 KB · Views: 272
 -
 !!AATutPic64.jpg236.5 KB · Views: 303
 -
 !!AATutPic65.jpg237.1 KB · Views: 233
 -
 !!AATutPic66.jpg230.5 KB · Views: 229
 -
 !!AATutPic67.jpg231.9 KB · Views: 299
 -
 !!AATutPic68.jpg228.4 KB · Views: 246
 -
 !!AATutPic69.jpg223 KB · Views: 269
 -
 !!AATutPic70.jpg201.5 KB · Views: 225
 -
 !!AATutPic71.jpg204.4 KB · Views: 244
 -
 !!AATutPic72.jpg211.3 KB · Views: 255
 -
 !!AATutPic73.jpg220.4 KB · Views: 232
 -
 !!AATutPic74.jpg215 KB · Views: 283
 -
 !!AATutPic75.jpg229.9 KB · Views: 267
 -
 !!AATutPic76.jpg245 KB · Views: 224
 -
 !!AATutPic77.jpg238.7 KB · Views: 76
 -
 !!AATutPic78.jpg217.1 KB · Views: 241
 -
 !!AATutPic79.jpg224.7 KB · Views: 208
 -
 !!AATutPic80.jpg237.7 KB · Views: 257
 -
 !!AATutPic81.jpg250.2 KB · Views: 239
 -
 !!AATutPic82.jpg242.5 KB · Views: 209
 -
 !!AATutPic83.jpg235.3 KB · Views: 227
 -
 !!AATutPic84.jpg236.8 KB · Views: 232
 -
 !!AATutPic85.jpg19.9 KB · Views: 250
 -
 !!AATutPic87.jpg225.9 KB · Views: 245
 -
 !!AATutPic88.jpg246.3 KB · Views: 206
 -
 !!AATutPic89.jpg234.4 KB · Views: 231
 -
 !!AATutPic90.jpg234.2 KB · Views: 254
 -
 !!AATutPic91.jpg248.2 KB · Views: 262
 -
 !!AATutPic92.jpg228.8 KB · Views: 220
 -
 !!AATutPic93.jpg227.5 KB · Views: 239
 -
 !!AATutPic94.jpg230.6 KB · Views: 193
 -
 !!AATutPic95.jpg250.7 KB · Views: 197
 -
 !!AATutPic96.jpg201.4 KB · Views: 221
 -
 !!AATutPic97.jpg202 KB · Views: 256
 -
 !!AATutPic98.jpg212 KB · Views: 229
 -
 !!AATutPic99.jpg211.4 KB · Views: 235
 -
 !!AATutPic100.jpg190.7 KB · Views: 216
 -
 !!AATutPic101.jpg213 KB · Views: 201
 -
 !!AATutPic102.jpg206.6 KB · Views: 221
 -
 !!AATutPic103.jpg167.6 KB · Views: 215
 -
 !!AATutPic104.jpg32.5 KB · Views: 215
 -
 !!AATutPic105.jpg198.2 KB · Views: 204
 -
 !!AATutPic106.jpg207.3 KB · Views: 311
 -
 !!AATutPic107.jpg197.7 KB · Views: 213
 -
 !!AATutPic108.jpg190.9 KB · Views: 232
 -
 !!AATutPic109.jpg205.5 KB · Views: 257
 -
 !!AATutPic110.jpg204.7 KB · Views: 195
 -
 !!AATutPic111.jpg205.4 KB · Views: 198
 -
 !!AATutPic112.jpg204.3 KB · Views: 249
 -
 !!AATutPic113.jpg204.6 KB · Views: 209
 -
 !!AATutPic114.jpg205.2 KB · Views: 210
 -
 !!AATutPic115.jpg205.2 KB · Views: 177
 -
 !!AATutPic116.jpg205.6 KB · Views: 58
 -
 !!AATutPic117.jpg203.3 KB · Views: 220
 -
 !!AATutPic118.jpg203 KB · Views: 225
 -
 !!AATutPic119.jpg209.6 KB · Views: 230
 -
 !!AATutPic120.jpg202.6 KB · Views: 209
 -
 !!AATutPic121.jpg205.8 KB · Views: 217
 -
 !!AATutPic122.jpg211.4 KB · Views: 212
 -
 !!AATutPic123.jpg206 KB · Views: 215
 -
 !!AATutPic124.jpg37.6 KB · Views: 340
Last edited by a moderator:


