- Joined
- May 1, 2008
- Messages
- 655
Ok i see that there are alot of 2d tutorials, and most them have/use photoshop,
you must be thinking "photoshop thats easy!(click click click)gah i cant find it or what to do!".
The main reason i am doing this tutorial on photoshop tools and options, is because while i was in the chat room
and i was making a request for a cursor.Someone in there asked "idk what to use!" so i thought this would help people.
Ok lets go through what Photoshop is. First of all photoshop is image enhancing/creating application made from Adobe. In this tutorial i will use CS3, but ill try to make it as close to CS2(will be in theses parenthesis AND what most of the pics are gonna be like). Alright lets get started now shall we? This is what photoshop looks like when you first open it up, according to who you are this may look familiar, or very foreign.
CS3-
(CS2(not much of a diff eh?)-
 )
)
Alright now that we have this set up already lets get started.
BRUSH(hotkey=b)-
Now we will start getting to know the brush(hotkey is b) tool-

This does exactly what you think, It is the main tool you will use in photoshop. You can choose from a HUGE variety of colors(using the color picker which will be covered later). You can adjust the size of how big you want the brush by pressing [ (this makes it smaller) and ] (this makes it bigger), or right click somewhere(when you do this you will get something that looks like this-

in this window you can change the master diameter(size), hardness(how transparent you want the sides) and the type of brush)
The "Box"(Top)-
Now for the box above it(where the lasso, magic wand, Slice tool, Move tool, Crop tool, and the Marquee tools(rectangular, elliptical, single row, and single column)).I wont spend much time explaining this part mainly because they are your basic tools that are very easy to use(you will almost never use the slice tool(i haven't)), move tool does what you think, move stuff, the lasso tool lets you select a circular(or free hand) an area, the marquee tool are just a preset set of selection tools, the crop tool let you choose an area you want to crop(good when you have a big image and don't need all of it(the selected area will become brighter and the rest will become darker this lets you know what area you selected(it cuts out the selected part of the picture and deletes the rest of forever))), and the magic wand tool(this lets you select similar colored pixels at the same time and you have a tolerance option inside it this is what it looks like-

this option will let you choose the tolerance(how closely the pixels are in color(max is 255 which will select everything).
The "Box"Middle-
Onto the middle portion of the box.
This part contains the Spot Healing brush(for image enhancement(more options inside it)), brush tool, clone stamp tool(lets you copy the color from one spot in the picture to another spot), History brush(lets you "reveal" the image from the previous layer(more on that later), Eraser, Paint Bucket/Gradient tool, Blur/Sharpen/Smudge tool, and the Dodge(desaturate the color)/Burn(Darken)/Sponge tool(haven't used this yet). You will use the Dodge/Burn tool Alot for skins, icons, sigs, etc.
The "Box" Semi last part-
Now for the semi to last part

In this box we have our, Pen tool(lets you free handedly choose an area), Text type tool, Path/Direct Selection Tool, and the last thing is just a bunch of preselected shapes. You will use the text tool alot(especial if you make sigs/loading screens).
The last part of the "box"-
Onto the last part of this "box"!

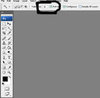
This part of the "box" contains some of your MOST used tools. They are the: Note tool(lets you leave a note for someone to read if they open it up using the .psd(default save of photoshop) version, Eye drop tool(lets you select a color from and already existing img(i use this ALOT) and it has a pixel option 1*1 3*3 and 5*5 11*11 31*31 51*51 101*101

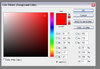
Under that we have our hand(aka move across screen)tool (the hotkey for this is space bar held down), next to that we have our Zoom tool(hotkey Z), Under that we have our Color Picker in which you can pick the colors(if you right click it then this pops up-

as you can see you have a giant variety of colors to pick from.(The front is call front color, and the one behind is the background(you can alternate from the 2 using the hotkey x)))
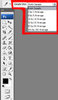
Next under that we have the quick mask tool(masks will be covered later), and the window tool(click it once it becomes wide screen, 2x full screen, 3x and it becomes full screen w/ a black background, 4x and it resets. This part covers "The box"
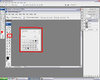
Now we move onto the layers!(this is the CS3 look)

So layers are basically what Photoshop uses to store info in different pieces or "layers" each layer can be created(pressing the button that i circled). You can rename each layer by double clicking on the name itself(this also unlocks that layer if its set as background as you can see in the screenshot above. The trash can button is where you drag the layers you do want to delete. You can also drag layers into the layer button to copy them(useful if you have repeating textures). The folder button next to the layer button creates a group of layers(click one layer and Shift+click the other layer you want(multiple select(this selects all layers in between also))) and drag them into here. This is to keep big .psd files organized.The half black/white square is the options you can add different color options(hue, saturation, etc)Then layer next to that on the left is called the mask layer. This tool lets you reveal whats in the layer under the one your one(via the black color, the white color covers it back up).
Now the fx button lets you choose layer styles(outer glow, inner glow, drop shadow, inner shadow, stroke(outline), texture, etc.this is gonna be used alot) and lastly the chain icon links together 2layers(so they move together).These are the basics of Photoshop, later i will make another tutorial on the rest of the options i didnt cover.
you must be thinking "photoshop thats easy!(click click click)gah i cant find it or what to do!".
The main reason i am doing this tutorial on photoshop tools and options, is because while i was in the chat room
and i was making a request for a cursor.Someone in there asked "idk what to use!" so i thought this would help people.
Ok lets go through what Photoshop is. First of all photoshop is image enhancing/creating application made from Adobe. In this tutorial i will use CS3, but ill try to make it as close to CS2(will be in theses parenthesis AND what most of the pics are gonna be like). Alright lets get started now shall we? This is what photoshop looks like when you first open it up, according to who you are this may look familiar, or very foreign.
CS3-
(CS2(not much of a diff eh?)-
Alright now that we have this set up already lets get started.
BRUSH(hotkey=b)-
Now we will start getting to know the brush(hotkey is b) tool-
This does exactly what you think, It is the main tool you will use in photoshop. You can choose from a HUGE variety of colors(using the color picker which will be covered later). You can adjust the size of how big you want the brush by pressing [ (this makes it smaller) and ] (this makes it bigger), or right click somewhere(when you do this you will get something that looks like this-
in this window you can change the master diameter(size), hardness(how transparent you want the sides) and the type of brush)
The "Box"(Top)-
Now for the box above it(where the lasso, magic wand, Slice tool, Move tool, Crop tool, and the Marquee tools(rectangular, elliptical, single row, and single column)).I wont spend much time explaining this part mainly because they are your basic tools that are very easy to use(you will almost never use the slice tool(i haven't)), move tool does what you think, move stuff, the lasso tool lets you select a circular(or free hand) an area, the marquee tool are just a preset set of selection tools, the crop tool let you choose an area you want to crop(good when you have a big image and don't need all of it(the selected area will become brighter and the rest will become darker this lets you know what area you selected(it cuts out the selected part of the picture and deletes the rest of forever))), and the magic wand tool(this lets you select similar colored pixels at the same time and you have a tolerance option inside it this is what it looks like-
this option will let you choose the tolerance(how closely the pixels are in color(max is 255 which will select everything).
The "Box"Middle-
Onto the middle portion of the box.
This part contains the Spot Healing brush(for image enhancement(more options inside it)), brush tool, clone stamp tool(lets you copy the color from one spot in the picture to another spot), History brush(lets you "reveal" the image from the previous layer(more on that later), Eraser, Paint Bucket/Gradient tool, Blur/Sharpen/Smudge tool, and the Dodge(desaturate the color)/Burn(Darken)/Sponge tool(haven't used this yet). You will use the Dodge/Burn tool Alot for skins, icons, sigs, etc.
The "Box" Semi last part-
Now for the semi to last part
In this box we have our, Pen tool(lets you free handedly choose an area), Text type tool, Path/Direct Selection Tool, and the last thing is just a bunch of preselected shapes. You will use the text tool alot(especial if you make sigs/loading screens).
The last part of the "box"-
Onto the last part of this "box"!
This part of the "box" contains some of your MOST used tools. They are the: Note tool(lets you leave a note for someone to read if they open it up using the .psd(default save of photoshop) version, Eye drop tool(lets you select a color from and already existing img(i use this ALOT) and it has a pixel option 1*1 3*3 and 5*5 11*11 31*31 51*51 101*101
Under that we have our hand(aka move across screen)tool (the hotkey for this is space bar held down), next to that we have our Zoom tool(hotkey Z), Under that we have our Color Picker in which you can pick the colors(if you right click it then this pops up-
as you can see you have a giant variety of colors to pick from.(The front is call front color, and the one behind is the background(you can alternate from the 2 using the hotkey x)))
Next under that we have the quick mask tool(masks will be covered later), and the window tool(click it once it becomes wide screen, 2x full screen, 3x and it becomes full screen w/ a black background, 4x and it resets. This part covers "The box"
Now we move onto the layers!(this is the CS3 look)
So layers are basically what Photoshop uses to store info in different pieces or "layers" each layer can be created(pressing the button that i circled). You can rename each layer by double clicking on the name itself(this also unlocks that layer if its set as background as you can see in the screenshot above. The trash can button is where you drag the layers you do want to delete. You can also drag layers into the layer button to copy them(useful if you have repeating textures). The folder button next to the layer button creates a group of layers(click one layer and Shift+click the other layer you want(multiple select(this selects all layers in between also))) and drag them into here. This is to keep big .psd files organized.The half black/white square is the options you can add different color options(hue, saturation, etc)Then layer next to that on the left is called the mask layer. This tool lets you reveal whats in the layer under the one your one(via the black color, the white color covers it back up).
Now the fx button lets you choose layer styles(outer glow, inner glow, drop shadow, inner shadow, stroke(outline), texture, etc.this is gonna be used alot) and lastly the chain icon links together 2layers(so they move together).These are the basics of Photoshop, later i will make another tutorial on the rest of the options i didnt cover.
Attachments
-
 psdCS3.jpg64.1 KB · Views: 68
 -
 psdCS2.jpg88.2 KB · Views: 79
 -
 psdCS2-7.jpg115 KB · Views: 78
 -
 th_psdCS2-6.jpg3.2 KB · Views: 56
 -
 th_psdCS2-5.jpg2.2 KB · Views: 61
 -
 th_psdCS2-4.jpg2.1 KB · Views: 33
 -
 th_psdCS2-3.jpg2.8 KB · Views: 47
 -
 th_psdCS2-2.jpg4 KB · Views: 82
 -
 th_psdCS2-1.jpg2.4 KB · Views: 47
 -
 th_psdCS2.jpg2.4 KB · Views: 49
 -
 th_psdCS3.jpg2 KB · Views: 56
Last edited:
