- Joined
- Feb 3, 2007
- Messages
- 1,081
Beginners Guide to Texturing
Contents
Introduction to Texturing
a. Extracting Warcraft Textures
b. Basic Shading
Human Texturing
a. Hair
b. Eyes
c. Faces
d. Male and Female Torsos
e. Tattoos and emblems
Clothing and Armor
a. Leather
b. Metal
c. Cloth
d. Wood
Miscellaneous Tidbits
a. Pen Tool
b. Layer Effects
Introduction
In this tutorial, I will be teaching you how to become an aspiring texture artist and take you from Microsoft Paint crap to professional looking textures.
To start off, you need a good program. Gimp is good and free, so I recomend those who do not own a real photo-editing program to get it. If you want to spend some money, you can get Photoshop, PhotoImpact, or many other software. You will also need Warcraft III Image Extractor.
To extract your image, simply go to File > Open MPQ. Find War3.mpq or War3x.mpq (The directory should be something like C:/Program Files/Warcraft III/) and click on it. Now, you see a confusing jumble of text and drop down menus. To extract a texture, simply click on the little "+" box by a dropdown, and scroll to find the texture you are looking for. (Note, some textures are in Textures\Texture.blp and some are located in units\Race\Unit\Texture.blp) Then simply hit File > Save and save it at a Targa (.tga).
Now, simply pop up your photo-editing software and open the Texture file from wherever you saved it.
Highlighting and Shading
Now, a texture with a flat color is boring, and nothing escapes lighting. There is always a light source, in texturing's case, its a cylindrical light source. What? Cylindrical? Let me explain.
Lighting shows that a color will be darker the farther away it gets from the light source, like how the right side is darker than the left on this picture. The yellow line signifies the light's direction. coming in from the left. Imagine it is a sideways floodlight shined on a red box.

Now, imagine the same floodlight coming down from the direct center of the box, like this.

Now, shading a circle is a bit harder. Light reflects and refracts off round surfaces, so you need to add volume. Here is an example on how to skin a sphere, first is a render , the second is an example I did.
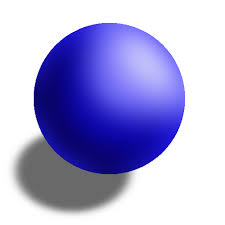

You need to create a central highlight somewhere within the circle, then highlight a section around it bright, but not as bright as the central highlight. Then, shade the rest of the circle, darker the farther it is away from the central highlight point..


Start off with a shape sorta like this. The outline of the eye should be lighter whenever it meets the most light, or wherever the eyelid extends the farthest away from the face.

Insert the Iris here. The Iris is a circle that the top portion of is usually underneath the eyelid. Also, add in the pupil, and a highlight source.

Use two different but similar colors to highlight and shade your iris, since the human eye is comprised of several different hues.

Now come the fun part. Take a scratchy brush with various similar colors to your base and brush inwards to create the effect of coloration. Repeat step 3-4 how many times you like until you are satisfied.

Add an inner glow layer effect with a Normal setting and a black glow. This effect makes sure that the outside of the iris is darker than the center.

Now, just shade the other portion of the eye.

Take a scratchy brush at 25% opacity and make outlines around the edges of the lines. Then, create eyelashes by whisking them away in the direction of the outside of the eye. (---> That way) Do the same, but with shorter lashes on the bottom.

Now just follow this shading!
Lighting shows that a color will be darker the farther away it gets from the light source, like how the right side is darker than the left on this picture. The yellow line signifies the light's direction. coming in from the left. Imagine it is a sideways floodlight shined on a red box.
Now, imagine the same floodlight coming down from the direct center of the box, like this.
The difference is that this light is rounded.. The light is stronger in the center, then fades out around the whole object, giving it a rounded look, hence the cylinder. This is the light source we use in creating our textures
You need to create a central highlight somewhere within the circle, then highlight a section around it bright, but not as bright as the central highlight. Then, shade the rest of the circle, darker the farther it is away from the central highlight point..
Human Texturing
Hair
Start off with a solid block of color. For this example, I am texturing the hair found on Arthas, Blood Mage, and the Death Knight.

Start by applying shading with a darker brush at 10% opacity. This should follow the basic direction of your hair.

Start by applying shading with a darker brush at 10% opacity. This should follow the basic direction of your hair.
Now, take a larger brush and apply larger areas of shading, so that each lock is part of a highlight or shadow.

Next, reduce your opacity to 5% and apply highlights between the locks of hair to give your hair depth.

With a 3px brush, scribble all over the hair in the general direction that the hair is flowing. It may look very messy, but it will wrap nicely, since Warcraft blurs parts of the texture. Once you complete this step, you may need to repeat steps 2-4 until you are given the desired effect.
Next, reduce your opacity to 5% and apply highlights between the locks of hair to give your hair depth.
With a 3px brush, scribble all over the hair in the general direction that the hair is flowing. It may look very messy, but it will wrap nicely, since Warcraft blurs parts of the texture. Once you complete this step, you may need to repeat steps 2-4 until you are given the desired effect.
Eyes
Start off with a shape sorta like this. The outline of the eye should be lighter whenever it meets the most light, or wherever the eyelid extends the farthest away from the face.
Insert the Iris here. The Iris is a circle that the top portion of is usually underneath the eyelid. Also, add in the pupil, and a highlight source.
Use two different but similar colors to highlight and shade your iris, since the human eye is comprised of several different hues.
Now come the fun part. Take a scratchy brush with various similar colors to your base and brush inwards to create the effect of coloration. Repeat step 3-4 how many times you like until you are satisfied.
Add an inner glow layer effect with a Normal setting and a black glow. This effect makes sure that the outside of the iris is darker than the center.
Now, just shade the other portion of the eye.
Take a scratchy brush at 25% opacity and make outlines around the edges of the lines. Then, create eyelashes by whisking them away in the direction of the outside of the eye. (---> That way) Do the same, but with shorter lashes on the bottom.
Now just follow this shading!
Last edited:


