Community
Maps
Tutorials
Gallery
Support Us
Install the app
-
Listen to a special audio message from Bill Roper to the Hive Workshop community (Bill is a former Vice President of Blizzard Entertainment, Producer, Designer, Musician, Voice Actor) 🔗Click here to hear his message!
-
Read Evilhog's interview with Gregory Alper, the original composer of the music for WarCraft: Orcs & Humans 🔗Click here to read the full interview.
-
Create a faction for Warcraft 3 and enter Hive's 19th Techtree Contest: Co-Op Commanders! Click here to enter!
-
Create a void inspired texture for Warcraft 3 and enter Hive's 34th Texturing Contest: Void! Click here to enter!
-
The Hive's 21st Texturing Contest: Upgrade is now concluded, time to vote for your favourite set of icons! Click here to vote!
You are using an out of date browser. It may not display this or other websites correctly.
You should upgrade or use an alternative browser.
You should upgrade or use an alternative browser.
[Role Playing Game] Memento Mori
- Status
- Not open for further replies.
- Joined
- Jan 18, 2010
- Messages
- 1,122
Hello there. Sorry for the apparent lack of updates in the thread. The project is obviously still in development.
I just did not have much to update on. I have been busy with personal stuff and the little time left went mostly into Stone & Sword pack.
I would like to dish out some gameplay footage sometime soon. Mostly concerning the camera, inventory, object interaction and the dynamic hud.
Meanwhile hope you like sharks. The good guy, scary silhouette pal from the first teaser.
He is still in concept stages and I don't know how much geometry detail will be kept but yeah. (the rest of the small fine detail will be baked into the texture)
He has a fully wrapped low poly mesh (680 tris) and I'm just going through a couple of tries to finalize the design.
I reckon showing off monsters from a horror themed project ruins the tension but ! at least something for the taste for now.
I know it is not how shark fins look like, it is not a shark . What role he will play in the mod will be for you to experience !

I just did not have much to update on. I have been busy with personal stuff and the little time left went mostly into Stone & Sword pack.
I would like to dish out some gameplay footage sometime soon. Mostly concerning the camera, inventory, object interaction and the dynamic hud.
Meanwhile hope you like sharks. The good guy, scary silhouette pal from the first teaser.
He is still in concept stages and I don't know how much geometry detail will be kept but yeah. (the rest of the small fine detail will be baked into the texture)
He has a fully wrapped low poly mesh (680 tris) and I'm just going through a couple of tries to finalize the design.
I reckon showing off monsters from a horror themed project ruins the tension but ! at least something for the taste for now.
I know it is not how shark fins look like, it is not a shark

- Joined
- Sep 24, 2012
- Messages
- 357
Nice looking shark! Can't wait to see some gameplay. Tell me if you need any help on monster models.
- Joined
- Feb 28, 2013
- Messages
- 1,898
Guessing its high poly D:
- Joined
- Jan 18, 2010
- Messages
- 1,122
About two million polygons. That is about the max subdivision my pc can handle. It has an 8,5 million subdivision but it gets a bit choppy at that point, besides I don't need that much detail for the most part.Guessing its high poly D:
If this was SC2 he would get nearly all of that detail with a normal map, alas because this is wc3 I will only bake the diffuse and ambient occlusion from it so all the detail will stay on the texture. (hopefully)
If the 512p texture will be too small I'll have to chop him in the middle I reckon.
I have also been playing the Outlast, I dig the art direction so a few things may be inspired after it.
- Joined
- Jan 15, 2013
- Messages
- 251
beautiful models, exellent lighting.
One good lighting brings every emotion to the game. ^^
+REP
One good lighting brings every emotion to the game. ^^
+REP
- Joined
- Feb 28, 2013
- Messages
- 1,898
Dont tell me that you're going to use it in Warcraft D:
- Joined
- Jan 18, 2010
- Messages
- 1,122
I am, not the 2 million poly model of course. When the model gets sculpted and painted the small details will be baked into the texture.
As for other news, I had to scrap levels 1 and 2 unfortunately, or their design rather.
They were intended to be set in the little Tokyo and in the civic center of LA. Unfortunately the environment although really nice was not ideal from game level design perspective.
There was too much open space, with either too few large or too many small buildings and it was pain in arse to make a good logical playable environment with.
Another reason is time constraints, the levels had way too many detailed and unique buildings and it made the entire production so very not feasible.
Although I would really love to keep them (or little Tokyo at least) because they had some designs I loved, I was forced to ditch them, considering the two levels were supposed to be introductory I opted to start with the more uniform (but also more exciting) design of the later levels.
As a result there will be no openish levels and it will be mostly dense urban jungle of LA downtown. (which I do however believe will look better)
And some progress on the lad

- Joined
- Feb 28, 2013
- Messages
- 1,898
It looks like a tortured shark now 
- Joined
- Sep 19, 2011
- Messages
- 829
OMG! What extreme changes caused that shark to look like that, your world is insane!
Have to admire your modeling skills.
You will probably optimize this shark a lot...
Have to admire your modeling skills.
You will probably optimize this shark a lot...
- Joined
- Jan 18, 2010
- Messages
- 1,122
Yep, the design is not final though so it may end up looking completely different.
It will be a recurring enemy, and a highly annoying one at that.
It is intended as the ultimate dread as it is unbeatable so it will have to be avoided, it represents the very basic form of fear, the fear of the unknown and the protagonist's fear of water which is tightly tied to the fear of the unknown as water represents depth through which you cannot see with your senses alone.
He may cause disturbing insta-kills when you piss around in water too much (and let your horror reach too high) and will have a whole level dedicated for him which will be a flooded subway and a part of the Perching square station.
- Joined
- Sep 19, 2011
- Messages
- 829
Did you use a brush on that shark?
Hope you eventually integrate the 2 levels in the end. It seems you put a lot of work in them, it would be a shame not to be used anywhere.
Hope you eventually integrate the 2 levels in the end. It seems you put a lot of work in them, it would be a shame not to be used anywhere.
- Joined
- Sep 19, 2011
- Messages
- 829
[bUMP]
-----------
-----------
Just bake the Displacement map and use a scribble cell technique it should look just as bumpy. I don`t know how you do it but you'll have to see my bumping technique. You could be using a similar technique but I'm not sure. From the results I got the bump looks just like the original one and it is less visible in the light (got the opposite effect as well in v2) and more deep in the dark, it also interacts with the light but maybe it`is just a optical illusion. It`is not actually much to be proud of but let's just say I improved the bump a little, better than the first results you have seen, those were nahh...bump!About two million polygons. That is about the max subdivision my pc can handle. It has an 8,5 million subdivision but it gets a bit choppy at that point, besides I don't need that much detail for the most part.
If this was SC2 he would get nearly all of that detail with a normal map, alas because this is wc3 I will only bake the diffuse and ambient occlusion from it so all the detail will stay on the texture. (hopefully)
If the 512p texture will be too small I'll have to chop him in the middle I reckon.
I have also been playing the Outlast, I dig the art direction so a few things may be inspired after it.
- Joined
- Jan 18, 2010
- Messages
- 1,122
Hello there ladies and gentlemen. I would like to present you with the newest graphical invention to be added to the mod.
It is a trick that uses layers of two-dimensional images to reconstruct 3D space that gives illusion of fully three dimensional volume where there is none.
Results of the technique are similar in look to what parallax mapping produces and because the technique is indeed a parallax illusion I dared to call it "Faux Parallax"
as seen below.

And a following example using a bit more detailed texture suggesting the target application of faux parallax.

The shark is made in mudbox, and yep I'll just bake an ambient occlusion with the diffuse map blended together.
From what I tested the surface looks just fine like that. The problem is the texture size limit..which may force me to somehow cut it in parts.
I'm looking forward to see how you expanded the bumps.
It is a trick that uses layers of two-dimensional images to reconstruct 3D space that gives illusion of fully three dimensional volume where there is none.
Results of the technique are similar in look to what parallax mapping produces and because the technique is indeed a parallax illusion I dared to call it "Faux Parallax"
as seen below.

And a following example using a bit more detailed texture suggesting the target application of faux parallax.

The shark is made in mudbox, and yep I'll just bake an ambient occlusion with the diffuse map blended together.
From what I tested the surface looks just fine like that. The problem is the texture size limit..which may force me to somehow cut it in parts.
I'm looking forward to see how you expanded the bumps.
- Joined
- Sep 24, 2012
- Messages
- 357
Fake parallax. Impressive. How did you manage that?
- Joined
- Jan 18, 2010
- Messages
- 1,122
The artist paints layers and layers and layers of glass with a piece of painting. When overlaid on each other they make a 3d illusion.
This works the same way, applied differently. The height and quality of the displacement depends on how many layers you use. Because of its nature the technique is best used on low poly, inanimate models.
To lower the performance burden, the displaced layers should use a considerably shittier texture resolution than the topmost layer.
- Joined
- Sep 24, 2012
- Messages
- 357
I saw that to.. I think I get it now. Is it just a bunch of planes on top of each other?
Or maybe I don't get it. I stupid, you know.
Or maybe I don't get it. I stupid, you know.
- Joined
- Jan 18, 2010
- Messages
- 1,122
Exactly, similar trick was used in Shadow of the Colossus for fur shader. ~ off I'm for today.Is it just a bunch of planes on top of each other?
- Joined
- Sep 19, 2011
- Messages
- 829
A Stunning discovery. I am still puzzled on how you got the layers to blend together or you are using multiple planes?
- Joined
- Jan 18, 2010
- Messages
- 1,122
It is 10 planes, the bottom one is the base and all the top ones are the height they are all transparent.A Stunning discovery. I am still puzzled on how you got the layers to blend together or you are using multiple planes?
9 offset layers give enough density to create a solid 3D illusion. Ofc the illusion is lost when you view the model from side where you can see the layers.
It is kinda like when you duplicate a text in photoshop and put a layer under each other with 1 pixel offset down and to side.
When you have about 6 ~ 10 duplicates it makes the text look 3D and because of the pixel density it looks solid and not just a bunch of layered text.
Like in this image, you can see the layers a bit when viewed from an angle.

And the another gorgeous part I did not mention yesterday. When you put a dark shadow under the transparent texture (using the drop shadow or glow in photoshop or whatever) and use blend material mode, it makes the layers look like they have proper occlusion in the crevices, rendering the final illusion pretty much complete ! (although it may be a bit spazy because of how blend works)
Also remember, this is using a single layered texture so if you would use a different map for every other layer you could make a completely smooth height transition for pretty much anything.
Alternatively, ENB seems to be able to tell the alpha and the SSAO reconstructs it even more accurately !
Obviously, you have to keep in mind the model has to be fairly simple and even so the shell can scale around it properly.

Without native blend, using SSAO only. Another alternative is to simply ensure the height layers have dark outline which will have similar result but it won't be smooth.
One advantage over real parallax and normal mapping is that this technique creates illusion of 3D volume even on corners whereas parallax and normal mapping don't as it is still just a 2D shader.
As seen in the examples here, the bricks quite obviously extrude out of the column. Which could not be done using parallax (without silhouette rendering) or normal mapping, only with displacement mapping and tessellation.
EDIT:
Well balls, I just found out somebody else thought of the same thing before for similarly ugly game. (even called it fake parallax like I did what the eff) And now I thought I'm just a unique snowflake xD.
Well, at least mine doesn't look like shit.

Last edited:
- Joined
- Sep 19, 2011
- Messages
- 829
Don't worry, Yours looks damn like the real deal even better since it uses actual geometry so stop crying! Can't wait to test this out, think I am going to combine this with bump out of curiosity, It seems to open up more possibilities.
I just had this Dumb idea of trying to do this with only one plane but I doubt it will work since wc3 blends all the layers like a dumbass. This probably will mean less geometry more textures.
Forgot to mention:
My bump doesn't work with ambient for some reason.
Was trying to make it react like real bump, when moving the light the shadow also changes position but it didn't work. I Tried multiple layer combinations and mask directions, should of worked but the layers cancel eachother out or blended together. Testing the Team color layer I thought that maybe it would work if I added Actual R G B layers, Still nothing. The whole process is still in development but maybe I can do it...
Also working on a police skin pack!
OVH POLICE CAR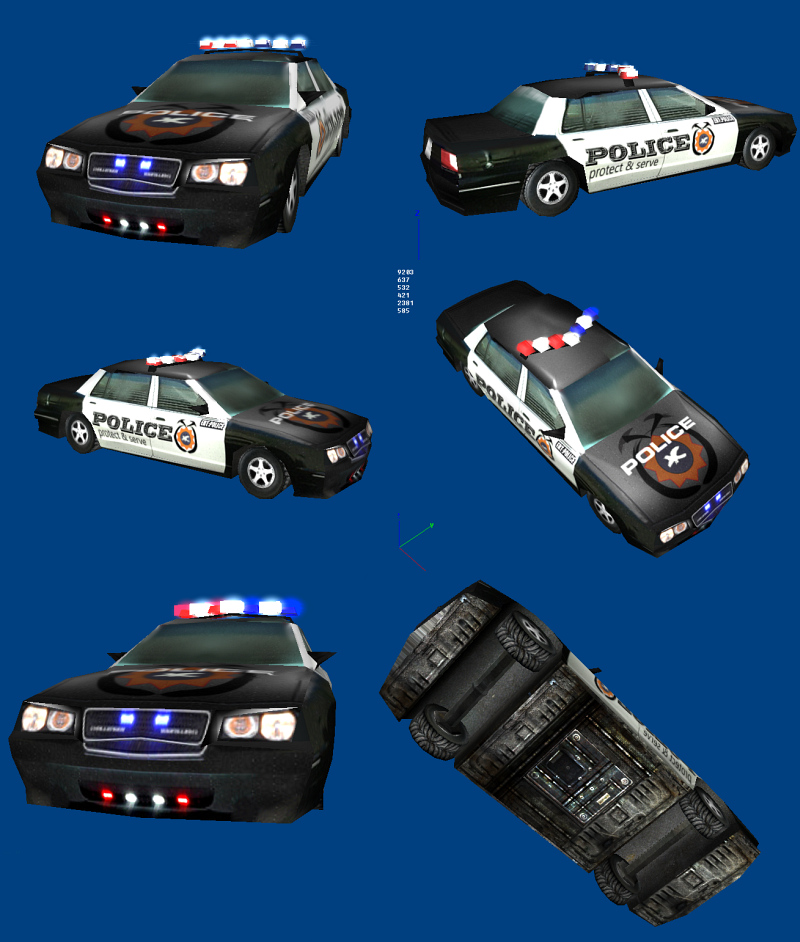 Skin still under developmentDedicated to the OVH POLICE Police Department!
- Joined
- Jan 18, 2010
- Messages
- 1,122
Yeah, you can make some heavy geometry and I think it will still be very efficient performance wise.
I'm not an expert on the technical side but the polys are low, the texture is same for every layer (so it should not really take up video ram) and it is only two materials so it shouldn't be too taxing.
And it really does look kick ass. The best part is that ENB seems to shade it just as if it was actual geometry somehow which is perfect.
And at the density I used, there is no way you'd be able to tell in-game.
Also, lovely car is that. What is the pack for ?


- Joined
- Sep 19, 2011
- Messages
- 829
Remember the flying police cars from the physics example? They were so horribly low poly and res that I had to change them. Wasn't satisfied and obviously was too lazy to make a car model from scratch so I painted one on the model, Will also remake the physic more accurate. Obviously it's for my cinematic. I`am making a scene where the villain fight the police and police cars will be sent flying in the air in a rain of explosions. So I decided to make a skin pack available for download. Obviously it won't be much but just enough to please some pls hunger.Also, lovely car is that. What is the pack for ?
------------------------
Well I already tested it and It does look kick ass. This is probably the first real displace and it is visually impressive to see when you move in 3d space.Yeah, you can make some heavy geometry and I think it will still be very efficient performance wise.
...
Too bad that my bump doesn't work with this technique, I tried but there are too many layers and they cancel the mod and adds, tried to place it underneath but that cancels the Displace. Not even a simple additive can't go over it so I`am going to ask you how you make specular on this.
I also noticed that it looks better with the ENB.
Forget about what I said about achieving something like this with one plane, I was probably daydreaming.
Here is that rock I used for bump with your Parallax.

It's kinda crude..
Used blend and about 20 planes or so What density did you use in the last pics? It seems dens.
EDIT:
It eats performance some bit, i don't believe it but if you had modulate or x2 it slows down depending on how many planes it's got plus graphic card got a little hotter. I shouldn't of doubted a master in multiple geometry!
-------------------------
EDIT:
Added some specular and it helps make it bumpy in the dark but doesn't look to good in global light, it's... white like some birds had a party on it! The specular must be in the area outside the mask exclusion otherwise you get a undesirable glass like effect.
Using modulate is out of the question.

Last edited:
- Joined
- Sep 19, 2011
- Messages
- 829
[BUMP]
PS: Kinda fell in love with this technique and I'm testing it on every texture I have. There goes my productive time for OHV!
PS: Kinda fell in love with this technique and I'm testing it on every texture I have. There goes my productive time for OHV!
- Joined
- Jan 18, 2010
- Messages
- 1,122
Lovely ! I used only 10 layers. Transparent mode with the top one being blend because all layers with blend spazzed out on me.
I think 10 is enough for fairly high stuff, you won't generally see it from too close so yeah.
The advantage of ENB is that the SSAO can tell the pixel depth of my parallax and shades the cracks as if it was a proper mesh.
Wc3 does not as it still treats it as a flat surface. You can fake that with some extra dark black blend like I did in the examples and it looks ok though.
The wall looks neat, did you use a single texture for the bricks or you used levels of different height ?
xD honestly I didn't get as far as to start applying speculars on it so you will have to wok on that one
Good luck with your experiments !
- Joined
- Sep 19, 2011
- Messages
- 829
Grass & Fuzz
Too tired to comment on it ~~~
Too tired to comment on it ~~~
1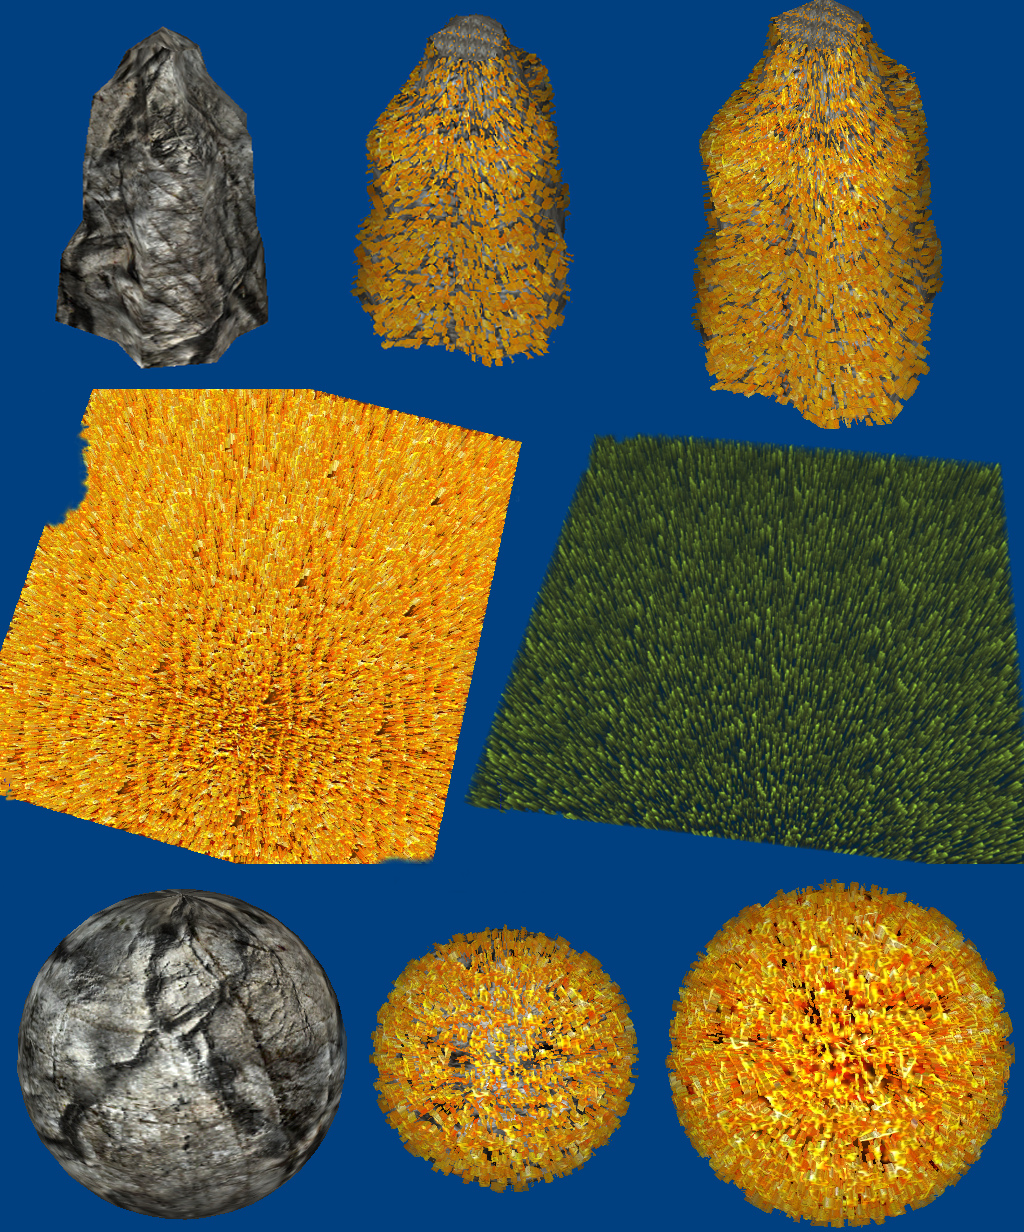
2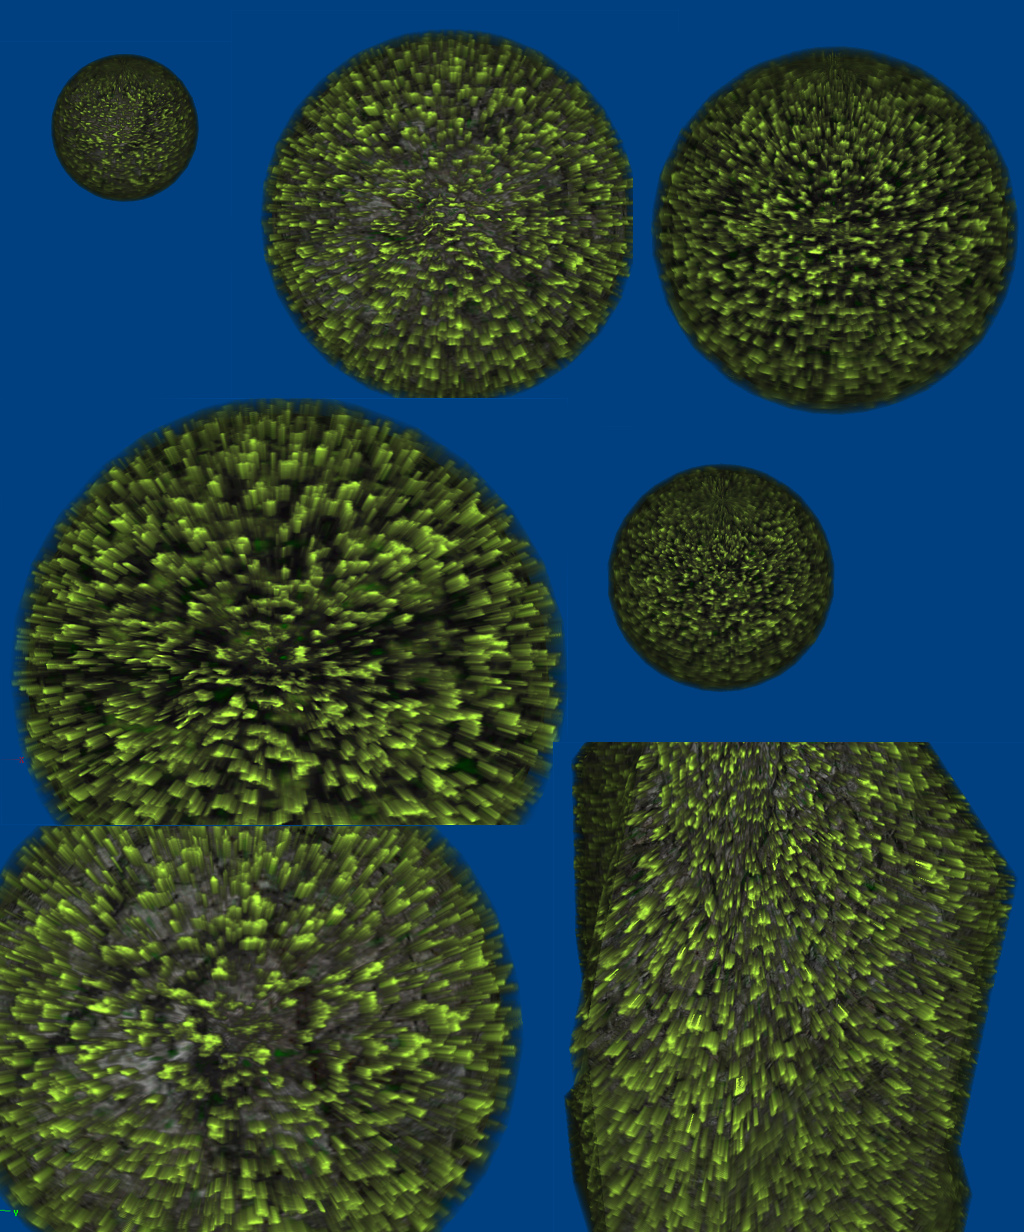
- Joined
- Jan 18, 2010
- Messages
- 1,122
Heh yeah I know of this it is very neat.
It is another fun thing to use this for. It has actually been used extensively in shadow of the colossus for fur and grass patches.
The more deformed the base mesh is the more offset you get as well, not sure if they used different textures per layer because their fur was pretty detailed (but didn't actually use many layers only like 5 or so)
The game is l33t for its time especially after people started poking in it and figuring out its insane tricks (such as that it is one of the first games to ever use self shadowing on its models using stencil shadows) these fur tricks, and its massive use of vertex color to easily paint occlusion.
The green parallax looks perfect for moss patches too. By the way tried what happens when you skew it ? Or flip around a few planes you get a bit more noisy look. It is particularly good for grass because it doesn't have to be too dense and the texture doesn't have to be too big.
But it still will end up nice and fluffy. Another thing you can do is animate the top layers for waving in the wind for ever neater visual.
The advantage of the technique is it can be used for quite a wide range of things. Even volumetric clouds/light for example.
By the way regarding another things, I made displacement for water (which displaces texture using vertex paint).
It is made using vertex paint on the diffuse. Incidentally, I made it when I was testing whether I can use vertex paint to paint occlusion and store it in the mesh.
It works with scribble cel (already applied), the problem is it needs large amount of vertices for finer displacement and cannot be tiled very well. So for a big flat surface you'd need tremendous amount of vertices.
Ironically, it is what I needed because scribble adds highlights and I wanted to displace the surface somehow and efficiently. The technique is so efficient as the textures can be of laughably small size, because most detail is added by the vertex paint and scribble cel and it only really requires a single texture or two if you want cel.
It is the most "liquid" effect and it is closest to any actual water shader that I got so far. It still does not reflect or refract anything but you can fake this by making the diffuse texture from the surroundings sphere map (the container+sky+environment) and blend it somehow.
Here is the result:
Last edited:
Deleted member 219079
D
Deleted member 219079
I see you have no resources uploaded here on hive. Is this your first warcraft 3 project on internet?
- Joined
- Jan 18, 2010
- Messages
- 1,122
Yes it is. As far as resources go, there aren't any in the actual resources section but some are here. I'm not very fond of the THW's resource submission system.
As for maps, I made some long time ago but never released them for whatever reason. (usually mostly because they were impulse thing born after whatever thing I liked at the moment)
Among those .. were a campaing with a few functional maps, gothic 2 based map, arena kind of map based on Sacred, and a bunch of wow inspired maps. (and much more crap that was too vague to remember)
Neither made it out into the public, I only played some of them with my friends on lan.
Deleted member 219079
D
Deleted member 219079
Oh, okay. You should commercialize this imo. But if you want to go 100% legal then I think you can't.
Edit:
Edit:
What ;DIs this mod related to Requiem by Goris ?
For god's sake no.
- Joined
- Sep 19, 2011
- Messages
- 829
I personally would not do that. It would be awkward + there are other ways to make money.
This is just like selling items to a wow addict!
This is just like selling items to a wow addict!
- Joined
- Jan 18, 2010
- Messages
- 1,122
Nah, of course I cannot monetize unless I'd pull upheaval arts and ask people to kickstart me. Which I won't because I'm not a self-important douche and can realistically evaluate the amount of time and effort that goes into making a mod.
Unfortunately, I'll take my leave following the completion of this mod. Not because I won't like modding for wc3 anymore but because I'd prefer to spend my free time more effectively, ideally on something I can actually monetize.
My current job is quite exhausting and time consuming so I'm looking for a better one in a field of my interest which will probably end up being working online from my home.
I'm hoping to make this transition in about 4 months or so, unless I find a really good full-time offer. (or a well-paid contract work)
Part of the future stuff may include unity 3d, which I just started crash testing recently. It won't be making actual projects, just assets for them.
On another note, the vertex paint displacement water looks really kick ass too. I think I found the final solution, it will only take some extra details to iron out like the foam and underwater refractions. (I'm hoping to do those with a trick with neodex which should be capable of doing it from what I understand)
- Joined
- Sep 19, 2011
- Messages
- 829
Oh now your leaving to! I feel the same way and shall also leave after I finish the 3 episodes. To be honest it's too hard to give ups since there's a lot of ideas rushing through my head and I've started to become addicted to this stuff. I'll probably still be around after I finish with it, still making some extra stuff. There has been a lot of tech discovered so far, you or me should neatly arrange a "wikipedia" tutorial on this stuff for others to "come...if they still come, apparently they still do". It could most probably be you since I have attention problems and you write more eloquently than little old caveman me.
My map is beginning to scare me so much that I don't see it as a wc3 map anymore but as a world filled with small rooms that each contain new tech, I think you probably feel the same...
Yeah it's hard to find a proper job, am facing the same problems with a family partially in my care, I'm partially in theirs. In the meantime still moving, continuing my existence with small things.
Working on wc3 modding has boosted my motivation level quite a lot, so much that I have to move to more serious stuff. Not that I'm not doing serious stuff but I dont do it with the same motivation. Seeing Talavage (got is wrong - Talavaj ) work was another factor. In worst case scenario I won't have any occupations and will start testing how different textures look with parallax without doing anything productive however my family will make sure that that doesn't happen.
On another note, can you get anymore better at making water? I am working on water to but It's not as great as yours, only 2 animated with scribble cel.
On a different note, I tried a little something with the parallax grass like implementing it in the actual wc3 terrain but in came the wc3 limitation resulting in the destruction of what I thought was a great Ideea. Unfortunately can only be used as planes like water or exported terrains. Used only 10 planes and a bigger distance between them obviously with blend (helps it look fuzzy) but it doesn't look good from a side, looks superb from a sky view which makes it just perfect for wc3 and would deserve a pack. Rpg fans will find this useful.
I'm having this vision of a super real picture of a old building in which I am combining parallax with bump for walls and bricks and finale adding some parallax grass for details in crack and ocluded areas over grassy textures. This is going to be my first attempt on a realistic image.
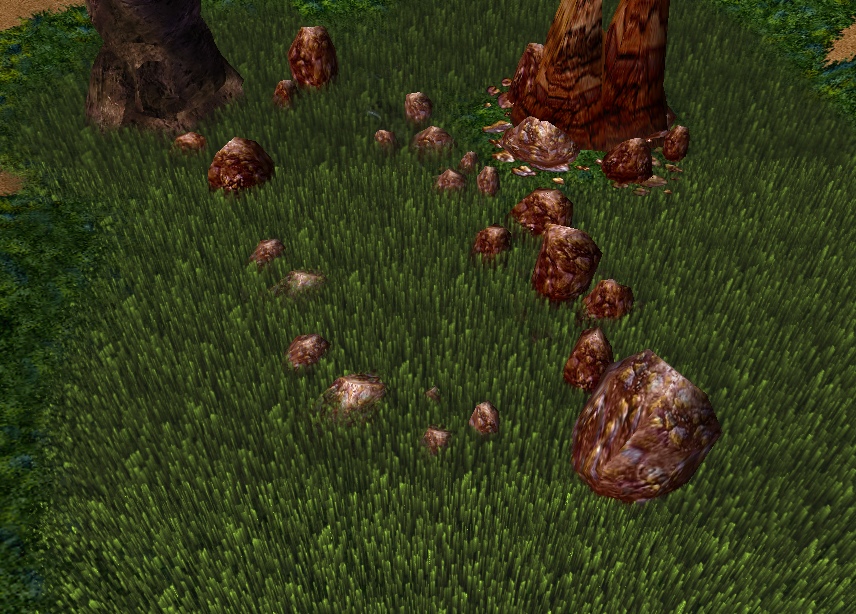
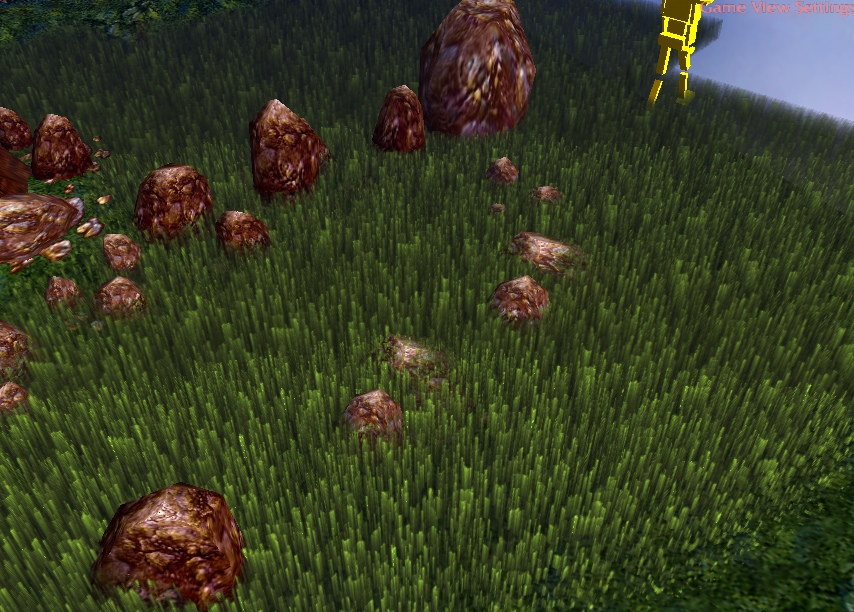
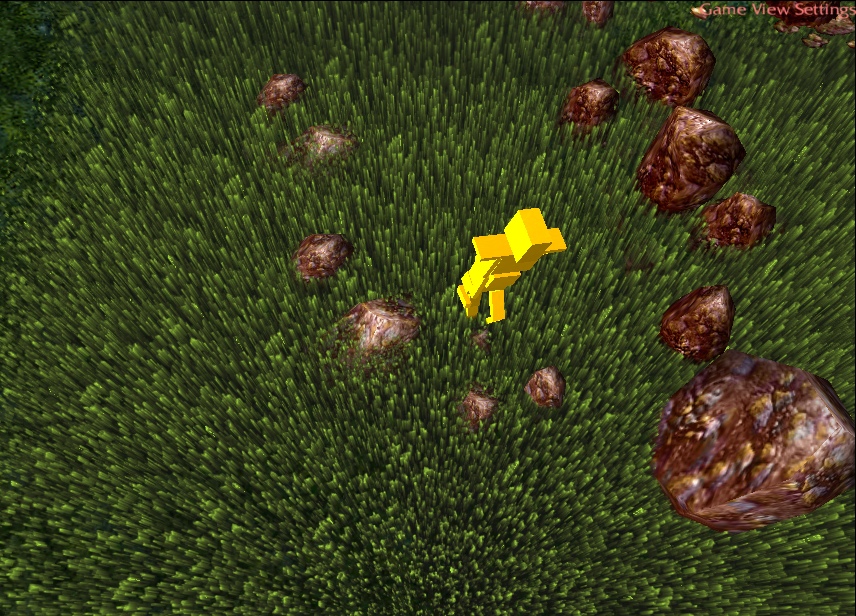
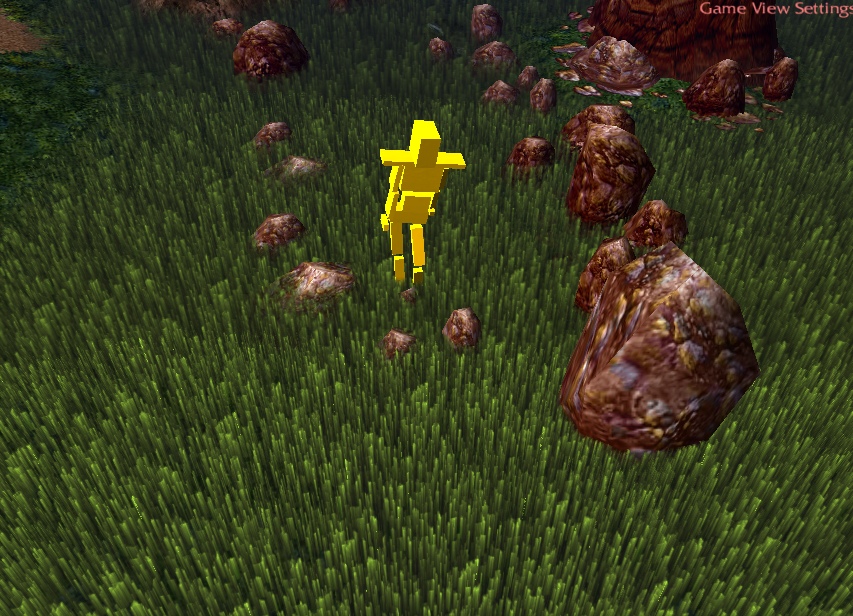
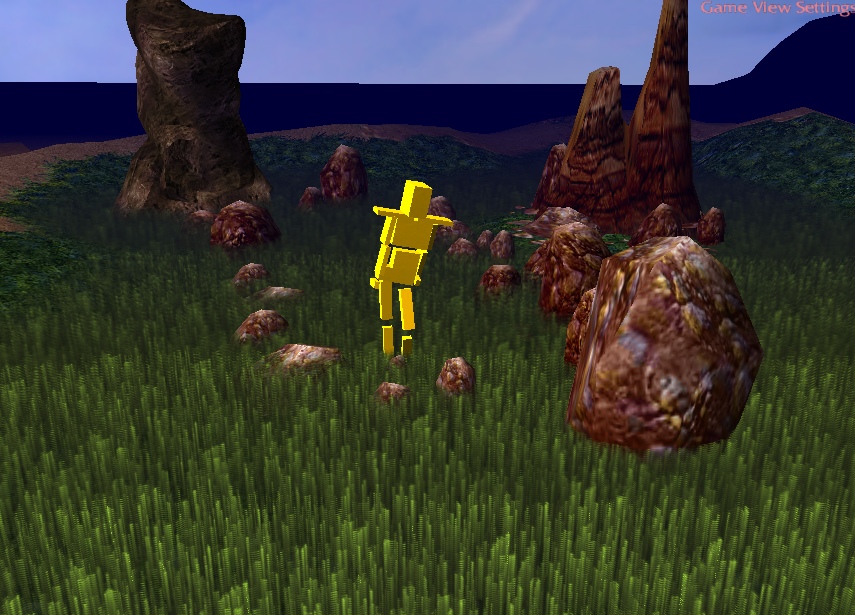

They look different height because I baked the Bump in the diffuse and it's the same texture all the way.
Sorry for getting your name wrong all this time.
My map is beginning to scare me so much that I don't see it as a wc3 map anymore but as a world filled with small rooms that each contain new tech, I think you probably feel the same...
Yeah it's hard to find a proper job, am facing the same problems with a family partially in my care, I'm partially in theirs. In the meantime still moving, continuing my existence with small things.
Working on wc3 modding has boosted my motivation level quite a lot, so much that I have to move to more serious stuff. Not that I'm not doing serious stuff but I dont do it with the same motivation. Seeing Talavage (got is wrong - Talavaj ) work was another factor. In worst case scenario I won't have any occupations and will start testing how different textures look with parallax without doing anything productive however my family will make sure that that doesn't happen.
On another note, can you get anymore better at making water? I am working on water to but It's not as great as yours, only 2 animated with scribble cel.
On a different note, I tried a little something with the parallax grass like implementing it in the actual wc3 terrain but in came the wc3 limitation resulting in the destruction of what I thought was a great Ideea. Unfortunately can only be used as planes like water or exported terrains. Used only 10 planes and a bigger distance between them obviously with blend (helps it look fuzzy) but it doesn't look good from a side, looks superb from a sky view which makes it just perfect for wc3 and would deserve a pack. Rpg fans will find this useful.
I'm having this vision of a super real picture of a old building in which I am combining parallax with bump for walls and bricks and finale adding some parallax grass for details in crack and ocluded areas over grassy textures. This is going to be my first attempt on a realistic image.


No, the planes are same height. I used blend on them and it almost looks like the original texture, you only need to have a biger density and a closer distance 0.01 - 0,02.The wall looks neat, did you use a single texture for the bricks or you used levels of different height ?
They look different height because I baked the Bump in the diffuse and it's the same texture all the way.
Sorry for getting your name wrong all this time.
I was looking at my reputation and was wondering who is this Talavaj, resembles Travaj. When I got on his profile I got a SHOCK!
- Joined
- Sep 19, 2011
- Messages
- 829
(Bump)
I almost successful blended parallax with bumping. By making multiple testes I achieved some crazy and weird results. Apparently I was wrong when I said that the mat don't blend well with add and modulate. The trick is to give every material a priority plane from 0 to 3,4 etc. I mixed transparent + blend , Modulate + add and got a more bumpy surface than the regular bump + plus a nice specular. It's not perfect because some textures aren't working as I thought and I haven't tried modulate x2 yet. I also forgot to mention in the previous post that using blend + a additive layer on top makes the paralax appear unified and dif elevated. (Like in the picture with the cube above). Because in some cases the blend seems fuzzy I also got a weird motion blur efect.
Your regular Parallax with transparent would be the best choice to use since it has no problems with fog however the combi would also be good for close ups and in obscure areas.
Some samples coming...
The water Is very awesome, no clue how you did it.
- Joined
- Sep 24, 2012
- Messages
- 357
Leaving?!!
Wish you could stay, but good luck when you do. Hope you'll still have time to stay in contact with all of us, and you can keep me posted about your current activities.
Wish you could stay, but good luck when you do. Hope you'll still have time to stay in contact with all of us, and you can keep me posted about your current activities.
- Joined
- Jan 18, 2010
- Messages
- 1,122
Hello hello Bumpdate~
I was still working this week (2 days longer than I was supposed to) so no significant updates have been made.
Although I have stumbled upon another trick.
I speak of cell shaded outline effect (think Borderlands). The trick looks nearly identical to the real shader and shows outline in all outer edges (and none on the edges inside the shape).
Obviously, the outline is displayed properly as the object rotates. The drawbacks are that it is a bit wonky to setup on distorted and complex meshes.
It is actually really simple, hahah. I reckon others used it before.
And looks like you'd expect, as seen here:

I have been working lately and I'm tired as hell hence no updates.
I was messing around with the water a bit more, the form and dynamics are great but transparency ended up being way more troublesome than I anticipated.
I can't find an efficient way to keep both scribble and transparency in the model. And I can't have one without the other aaarghh.
My only hope is to make the model a dummy unit and change the vertex transparency in game and see how that will work.
I was still working this week (2 days longer than I was supposed to) so no significant updates have been made.
Although I have stumbled upon another trick.
I speak of cell shaded outline effect (think Borderlands). The trick looks nearly identical to the real shader and shows outline in all outer edges (and none on the edges inside the shape).
Obviously, the outline is displayed properly as the object rotates. The drawbacks are that it is a bit wonky to setup on distorted and complex meshes.
It is actually really simple, hahah. I reckon others used it before.
And looks like you'd expect, as seen here:

I have been working lately and I'm tired as hell hence no updates.
I was messing around with the water a bit more, the form and dynamics are great but transparency ended up being way more troublesome than I anticipated.
I can't find an efficient way to keep both scribble and transparency in the model. And I can't have one without the other aaarghh.
My only hope is to make the model a dummy unit and change the vertex transparency in game and see how that will work.
Last edited:
- Joined
- Nov 11, 2004
- Messages
- 1,986
Just copy the original mesh, scale up to normals, inverse triangles and give it a black unshaded material.
It's an old technique, Anime maps use it on their ripped models all the time.
It's an old technique, Anime maps use it on their ripped models all the time.
- Joined
- Jan 18, 2010
- Messages
- 1,122
Yeah, pretty much. I just used the shell (or push) modifier instead of duplicating the model then detached the outer shells. (because I wasn't sure if it can be done properly by just scaling stuff)
I stumbled upon it while making a nicer selection graphics for interactive objects (like trash cans doors etc) and inventory items in the mod.
I used to make a glow on it manually but decided this looks neater.
So the selection glow looks like this now:
All interactive things and loot will be highlighted like this when you are close, I prefer it over blindly aiming with your mouse around doodads wondering which one is clickable.

It is also bound to look good on an animated character I reckon.
As a matter of fact do you have any links ? I did more testing with it and it just looks stunning, I would really love to see "cell shaded" visuals in maps.
I'm almost tempted to xD put it into the mod, but I'm afraid it won't fit the rest of the visuals.
Here is Manoo's model (the protagonist) with extra cell layer, for example.

I also just decided to use faux parallax wherever applicable, it just looks so much neater than a flat texture.
This one example has one half a flat texture and the other raised with parallax about 6 layers in height and fake occlusion using low resolution black drop shadow as blend under the transparent layer top.
Not ideal in the example, as the texture quality is shit but you get the idea.
It is probably gonna be on most uneven surfaces and I'll see how it performs.

I stumbled upon it while making a nicer selection graphics for interactive objects (like trash cans doors etc) and inventory items in the mod.
I used to make a glow on it manually but decided this looks neater.
So the selection glow looks like this now:
All interactive things and loot will be highlighted like this when you are close, I prefer it over blindly aiming with your mouse around doodads wondering which one is clickable.

Yeah, I supposed so. Did they though ? I didn't really see it used much, which is a shame because I feel it fits the smooth texturing very nice.It's an old technique, Anime maps use it on their ripped models all the time.
It is also bound to look good on an animated character I reckon.
As a matter of fact do you have any links ? I did more testing with it and it just looks stunning, I would really love to see "cell shaded" visuals in maps.
I'm almost tempted to xD put it into the mod, but I'm afraid it won't fit the rest of the visuals.
Here is Manoo's model (the protagonist) with extra cell layer, for example.

I also just decided to use faux parallax wherever applicable, it just looks so much neater than a flat texture.
This one example has one half a flat texture and the other raised with parallax about 6 layers in height and fake occlusion using low resolution black drop shadow as blend under the transparent layer top.
Not ideal in the example, as the texture quality is shit but you get the idea.
It is probably gonna be on most uneven surfaces and I'll see how it performs.

Last edited:
- Joined
- Sep 19, 2011
- Messages
- 829
Oh yes, there are a few models, not to many but some anime maps have 1 or 2 models that are using that technique. I first stumbled across this technique on a Bleach map and am using it in the cinematic for certain efx. The models is not to good because I used scale but I don't mind at this particular model.
Some bleach models with that type of shading. Not quite good but you get the idea. I can't find the original one perhaps BlinkBoy can provide you some links.


The selection thing is a very good idea indeed however think harder about using it on characters. It looks great and probably might work having it with a realistic environment but it would change the whole project's look dramatically. I realized that I had to change everything in my map after I added bump.
Some bleach models with that type of shading. Not quite good but you get the idea. I can't find the original one perhaps BlinkBoy can provide you some links.


The selection thing is a very good idea indeed however think harder about using it on characters. It looks great and probably might work having it with a realistic environment but it would change the whole project's look dramatically. I realized that I had to change everything in my map after I added bump.
- Joined
- Jan 18, 2010
- Messages
- 1,122
Yep, of course. It would make little sense only using it on a few characters.
It looks good but too different, I may not even use it on the selection. I'll see, I'm still struggling with unifying the look too.
But for a second, it gave me an idea of making an entirely "cell shaded" environment for something. (for one of my unannounced projects perhaps, if I ever get to make it, which I most likely won't)
Also, BITE YOUR NAILS ! A major update to the OP coming soon !
- Joined
- Sep 24, 2012
- Messages
- 357
What could it be? Perhaps a teaser trailer?
Deleted member 219079
D
Deleted member 219079
I'm surprised if this comes out before sc2's final expansion.
- Joined
- Jan 18, 2010
- Messages
- 1,122
Perhaps, or it could be a completely redesigned original post with gameplay screenshots or perhaps an official site with epic background music or even all three.What could it be? Perhaps a teaser trailer?
Oh I don't know
- Joined
- Sep 24, 2012
- Messages
- 357
I think that's really unlikely. I mean, it would be nice, but It's not going to happen.
- Joined
- Jan 18, 2010
- Messages
- 1,122
Final planned expansion of sc2 is slated for like 2015, it's safe to assume MM will be out by then.
Maybe not all chapters but the first two definitely.
I have got a full time contract for 3 months which may impact the process significantly but I'd dare to say Chapter 1 and 2 will be out in a finished state by first quarter of 2014.
Closed beta may start as soon as in the next 2 months.
Also, here is the final build of ENB that I ended up using. It has better SSAO, depth of field with bokeh and also noise (that fits the mod well).
Very satisfied in that matter.
I have problems getting shadow maps to work with fake parallax, hoping that priority plane will fix it as Toby suggested because I have re-mapped the streets with it as seen in here:

Last edited:
- Joined
- Sep 19, 2011
- Messages
- 829
More Reply to Thread
So, before I begin talking about stuff let me say that you got me hyped again and I won't sleep tonight because of you. Again!
About the thing I didn't get to mansion earlier, posted some examples of the many ways parallax layers can be combined to make really weird efex. My bump worked over the parallax and it helps it look more bumpy, it also ads bump to the details on the surface. By changing the layers order and giving them a priority plane you can get efx like metal, to blur to jelly like materials. It's strange for example by adding a single specular layer on top of all layers it makes it appear elevated somewhat or I'm not sure about that but it looks different from the normal bump. I also stumbled upon something new so I might get close to achieving glass distortions.
Some of the materials eat away a lot of Comp resources like the blood for example so it's not too practical. In the end I have to forget about half of the materials that I don't even use but could be nice for one picture or special scene.
Can't wait for your update...
Edit: Love that last pic.
I'll have to go and start taking care of my thread/make the new one. I spend way too much time at your thread, Yes I blame you!


Love adding details with parallax!
Was working on differently elevated details and also a new way to make grass but I got tired so I don't have them to show yet.


Sometimes if I don't use the bump carefully I get undesirable results, like the bump looking like plastic or having too much high shine which is inappropriate for a desert land. Yuk!

So, before I begin talking about stuff let me say that you got me hyped again and I won't sleep tonight because of you. Again!
About the thing I didn't get to mansion earlier, posted some examples of the many ways parallax layers can be combined to make really weird efex. My bump worked over the parallax and it helps it look more bumpy, it also ads bump to the details on the surface. By changing the layers order and giving them a priority plane you can get efx like metal, to blur to jelly like materials. It's strange for example by adding a single specular layer on top of all layers it makes it appear elevated somewhat or I'm not sure about that but it looks different from the normal bump. I also stumbled upon something new so I might get close to achieving glass distortions.
Some of the materials eat away a lot of Comp resources like the blood for example so it's not too practical. In the end I have to forget about half of the materials that I don't even use but could be nice for one picture or special scene.
Can't wait for your update...
Edit: Love that last pic.
I'll have to go and start taking care of my thread/make the new one. I spend way too much time at your thread, Yes I blame you!


Love adding details with parallax!
Was working on differently elevated details and also a new way to make grass but I got tired so I don't have them to show yet.


Sometimes if I don't use the bump carefully I get undesirable results, like the bump looking like plastic or having too much high shine which is inappropriate for a desert land. Yuk!

Last edited:
- Joined
- Sep 19, 2011
- Messages
- 829
[Bump]
I know I forgot something all this time and that is to try shadow maps on parallax however priority plane should definitely do the job.
But if I think about it how's that going to work if the modulate will cover the holes?
Shit!
Edit: Almost solved!
Only tested normal bump so far and as for parallax solved the modulate layer problem.
It works but you might consider adding the modulate shadow to all planes if it's only in a top layer than it will look like it's covered by something invisible. Will make more test tomorrow but I'm sure You'll find a way to make it work eventually.
Last edited:
- Status
- Not open for further replies.
Similar threads
- Replies
- 61
- Views
- 11K
- Replies
- 36
- Views
- 8K

 Thanks,guy.


