- Joined
- Feb 23, 2008
- Messages
- 1,711


I couldn't leave without making a tutorial could I... ")
Well SC2 is on the horizon and I'm worried that a lot of modelers for WC3 won't be able to transition due to a lack of up to date graphics knowledge. Therefore, I think it would be a good idea to look at some of the differences between modeling in older times and modeling now. This entire tutorial is meant for all the WC3 modelers planning on making models for SC2. Note that I am not going to teach you how to model or make textures. Nor, will I teach you how to convert your model to whatever format SC2 uses. This tutorial is here to point out the differences in the makeup of a modern day model and an old school model. This is for people who already understand how UVWrapping, polygon editing, and basic animation work.
Prepare for massive brain explosions.
I am going to cover these topics. Please, read them in order.:
1. Materials
2. Mesh/UVW
3. Lighting/Smoothing
4. Animation
5. Particles
CONCLUSION:
That pretty much covers everything I wanted to talk about. So, have fun in your SC2 modding endeavors!
Well SC2 is on the horizon and I'm worried that a lot of modelers for WC3 won't be able to transition due to a lack of up to date graphics knowledge. Therefore, I think it would be a good idea to look at some of the differences between modeling in older times and modeling now. This entire tutorial is meant for all the WC3 modelers planning on making models for SC2. Note that I am not going to teach you how to model or make textures. Nor, will I teach you how to convert your model to whatever format SC2 uses. This tutorial is here to point out the differences in the makeup of a modern day model and an old school model. This is for people who already understand how UVWrapping, polygon editing, and basic animation work.
Prepare for massive brain explosions.
I am going to cover these topics. Please, read them in order.:
1. Materials
2. Mesh/UVW
3. Lighting/Smoothing
4. Animation
5. Particles
MATERIALS:
Well the first obvious difference between old models and new models is poly count. It's fairly obvious that the Marine in SC2 has many times more polies than the Grunt in WC3. Or does it? More importantly, does it matter? What I am about to tell you may come as a shock. Prepare yourself.
A models static visual quality is not solely dependent on poly count and diffuse map quality.
That means that a model with 2000 polies in many cases can look just as good as one with 20000. It also means that the diffuse map (I'll explain what a diffuse map is in a minute.) is not the only actor in the materials world anymore.
This is because over the last couple of years, game engine programmers have gotten smart. In early 3d video game days, we would just make the graphics as good as a renderer can handle, regardless of the nasty visuals. Now we have a new technique. Instead of sacrificing visual quality for the renderer's limits, we trick the renderer and the person viewing the graphics. Most of the 'tricking' is done with materials. Now, obviously it has a lot to do with the increase in machine performance. But, materials are probably the largest difference in the graphics now and back in the WC3 days.
First, we need to work on our terminology. In the WC3 days, we only worked with diffuse maps. We called them textures or materials. While these terms technically fit, they are not only used to describe a diffuse map.
Today, we do it a bit differently. Instead of one single map, we actually use anywhere from 1 to 20 or so maps. These are the main map types used in games today.
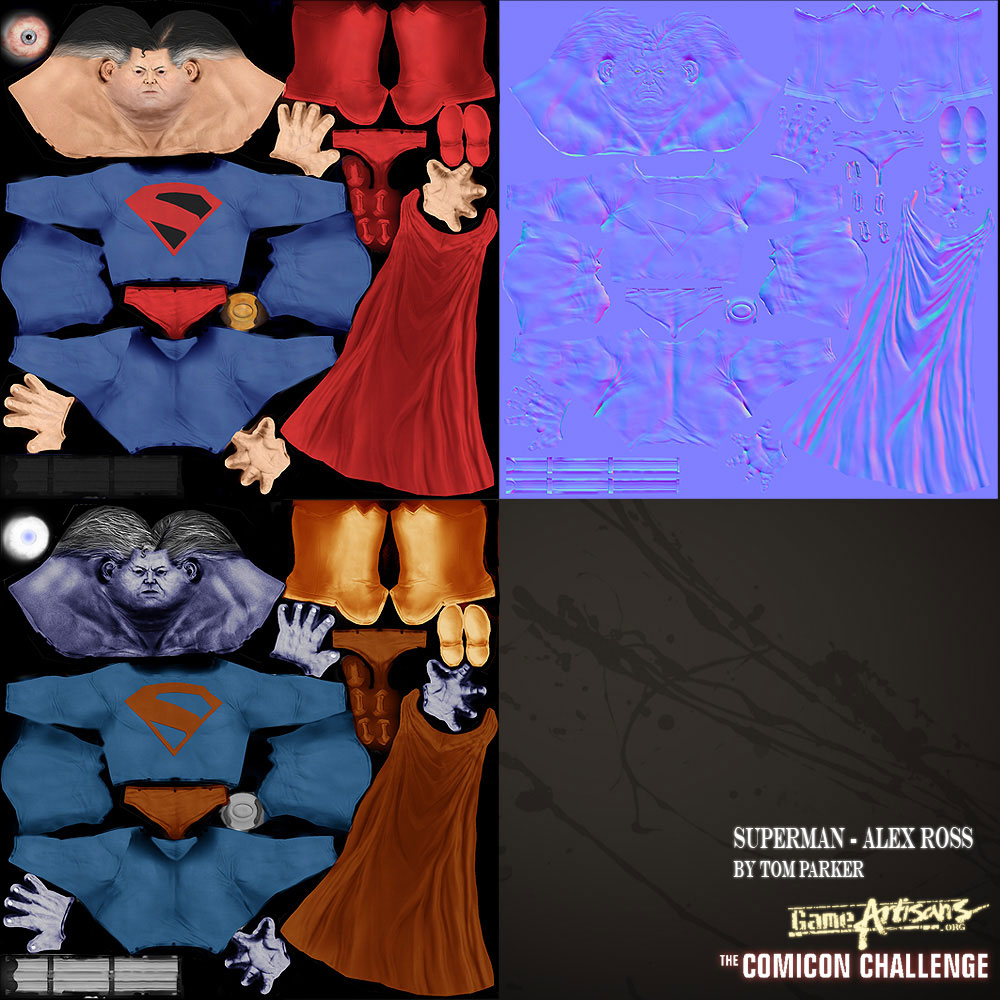
1. Diffuse: This is the main visual aspect of most materials. This is what we would call "materials/textures" for WC3.
2. Specular: This determines the shininess or glossiness of a model. It also determines the intensity based on location. (Shiny on the armor and dull on the wood.)
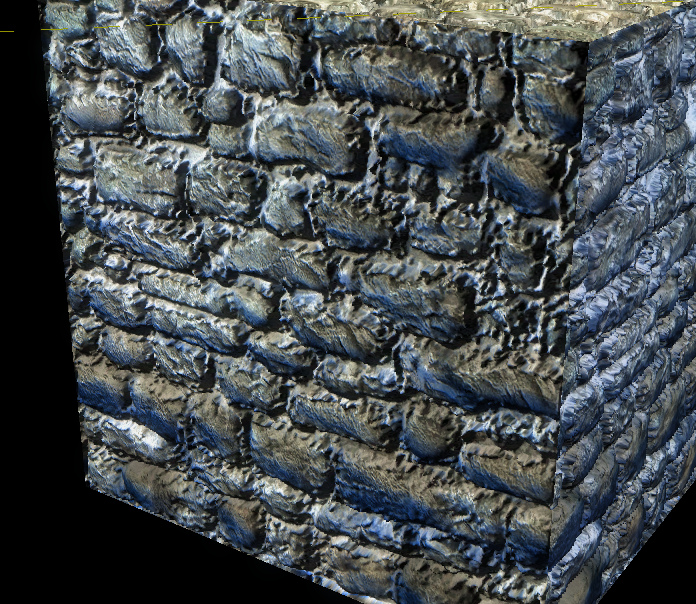
3. Normal: This is what makes games today look amazing. This combined with specularity and shadows can make your model look amazing. It can add geometric detail (or atleast what looks like geometric detail to us) to models without adding polies. I'll show pics later on.
4. Opacity: This determines what parts of the mesh are visible. In WC3 we would just alpha out parts of the diffuse texture. This is basically the same except it is a texture in itself. I'm not sure if SC2 will use opacity maps or if it will rely on alpha channels.
5. Height: Behaves similarly to a normal map. Except a height map only inherits z values. In other words, it can only determine up and down. Height maps in games are generally used for things like terrain. Supreme Commander for instance. Unlike in WC3 where the terrain is premade mesh based, in Supreme Commander, mappers had to literally draw a map for their map. It works on a greyscale value system. The lighter the higher, the darker the lower. When you work with map editors for various games where you can smoothly raise and lower terrain with a good falloff, what your really doing is painting a height map. The engine is simply converting the greyscale image into a mesh that is your terrain.
6. Emissive: Sometimes called "glow maps" simply say to the engine, "this spot is always fully lit, regardless of the lack of light." You'd get a similar effect in WC3 when you turn off a material's ability to inherit fog and shading. Of course, it works differently now because you have actual light being cast. An emissive map, is not to be confused with a "light map" which tells the engine, "cast more light here than the rest of the model". I don't think SC2 uses light maps though. Depending on the engine, emissive lights can actually cause the effected areas to "glow". SC2 does this, and it is also color based. So, a red emisive map glows red, and a blue one glows blue.
There are more types of maps, but being an RTS game, it's unlikely that SC2 will use the others. Each of these maps tells the engine what to do based on their pixel color and luminescence. Some maps work off of a greyscale, while some work off of a RGB vector. Normal maps work off of a normal XYZ vector. All of these big words and crap actually mean something. So, I'll go through each map type adding layer upon layer until you completely understand.
NOTE: All of these new textures are possible because of lighting. Even if you could directly input something like a normal map into WC3, the engine has such a crappy lighting system that it would have no effect.
Well the first obvious difference between old models and new models is poly count. It's fairly obvious that the Marine in SC2 has many times more polies than the Grunt in WC3. Or does it? More importantly, does it matter? What I am about to tell you may come as a shock. Prepare yourself.
A models static visual quality is not solely dependent on poly count and diffuse map quality.
That means that a model with 2000 polies in many cases can look just as good as one with 20000. It also means that the diffuse map (I'll explain what a diffuse map is in a minute.) is not the only actor in the materials world anymore.
This is because over the last couple of years, game engine programmers have gotten smart. In early 3d video game days, we would just make the graphics as good as a renderer can handle, regardless of the nasty visuals. Now we have a new technique. Instead of sacrificing visual quality for the renderer's limits, we trick the renderer and the person viewing the graphics. Most of the 'tricking' is done with materials. Now, obviously it has a lot to do with the increase in machine performance. But, materials are probably the largest difference in the graphics now and back in the WC3 days.
First, we need to work on our terminology. In the WC3 days, we only worked with diffuse maps. We called them textures or materials. While these terms technically fit, they are not only used to describe a diffuse map.
Today, we do it a bit differently. Instead of one single map, we actually use anywhere from 1 to 20 or so maps. These are the main map types used in games today.
1. Diffuse: This is the main visual aspect of most materials. This is what we would call "materials/textures" for WC3.
2. Specular: This determines the shininess or glossiness of a model. It also determines the intensity based on location. (Shiny on the armor and dull on the wood.)
3. Normal: This is what makes games today look amazing. This combined with specularity and shadows can make your model look amazing. It can add geometric detail (or atleast what looks like geometric detail to us) to models without adding polies. I'll show pics later on.
4. Opacity: This determines what parts of the mesh are visible. In WC3 we would just alpha out parts of the diffuse texture. This is basically the same except it is a texture in itself. I'm not sure if SC2 will use opacity maps or if it will rely on alpha channels.
5. Height: Behaves similarly to a normal map. Except a height map only inherits z values. In other words, it can only determine up and down. Height maps in games are generally used for things like terrain. Supreme Commander for instance. Unlike in WC3 where the terrain is premade mesh based, in Supreme Commander, mappers had to literally draw a map for their map. It works on a greyscale value system. The lighter the higher, the darker the lower. When you work with map editors for various games where you can smoothly raise and lower terrain with a good falloff, what your really doing is painting a height map. The engine is simply converting the greyscale image into a mesh that is your terrain.
6. Emissive: Sometimes called "glow maps" simply say to the engine, "this spot is always fully lit, regardless of the lack of light." You'd get a similar effect in WC3 when you turn off a material's ability to inherit fog and shading. Of course, it works differently now because you have actual light being cast. An emissive map, is not to be confused with a "light map" which tells the engine, "cast more light here than the rest of the model". I don't think SC2 uses light maps though. Depending on the engine, emissive lights can actually cause the effected areas to "glow". SC2 does this, and it is also color based. So, a red emisive map glows red, and a blue one glows blue.
There are more types of maps, but being an RTS game, it's unlikely that SC2 will use the others. Each of these maps tells the engine what to do based on their pixel color and luminescence. Some maps work off of a greyscale, while some work off of a RGB vector. Normal maps work off of a normal XYZ vector. All of these big words and crap actually mean something. So, I'll go through each map type adding layer upon layer until you completely understand.
NOTE: All of these new textures are possible because of lighting. Even if you could directly input something like a normal map into WC3, the engine has such a crappy lighting system that it would have no effect.
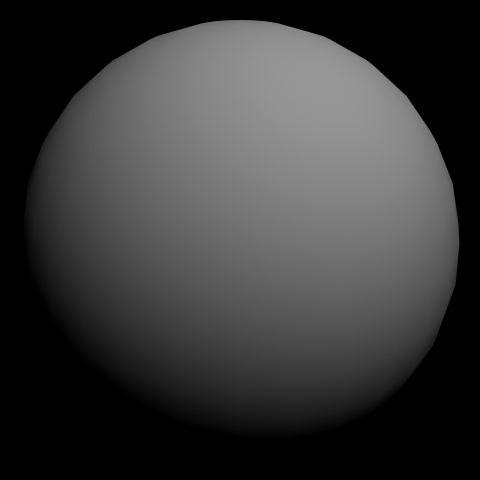
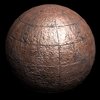
MATERIALS-> DIFFUSE:
A diffuse map is the most strait forward of the bunch. You paint a picture, and that picture is what you see on the model. Your familiar with this type of map from WC3.
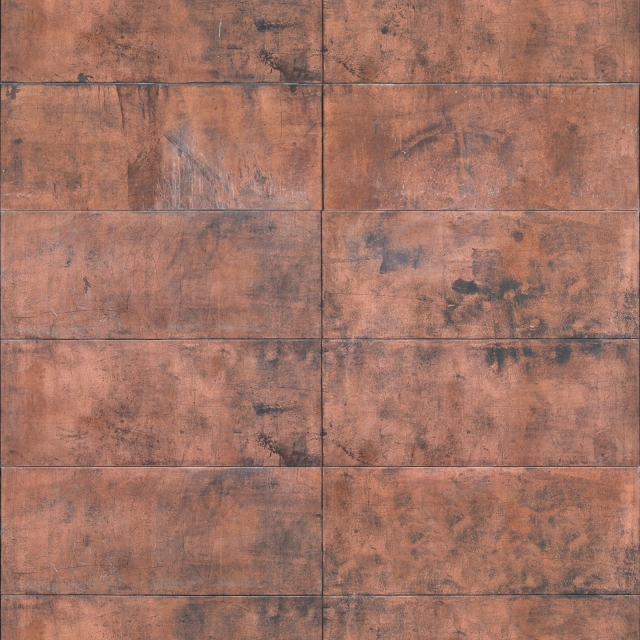
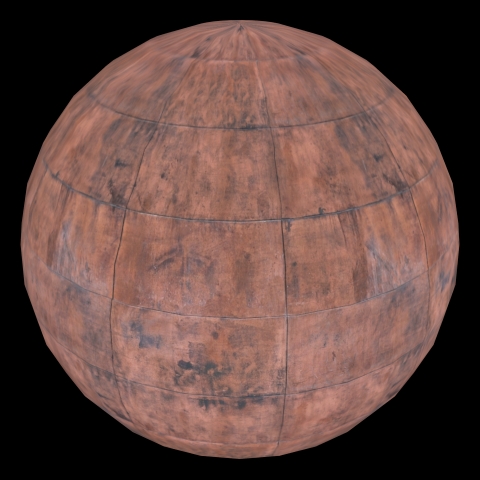
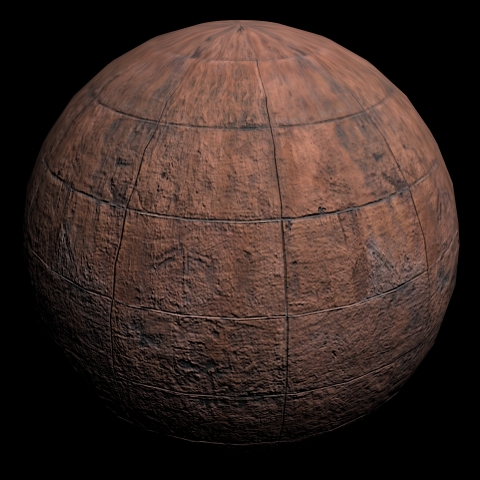
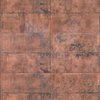
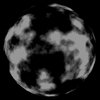
Here is a sphere model with a diffuse map I got from the good peeps at CGtextures. Note that the model is receiving light all over. No shadows or anything. This is the technology of WC3. Just a plain old diffuse map.
Let's add some directional lighting to the mix.
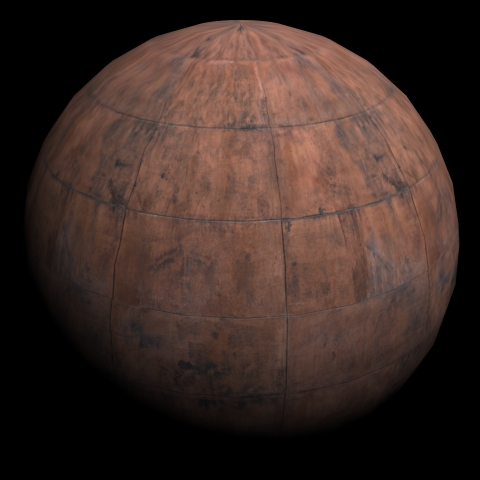
Already, looking a lot better. This is why WC3 models just look ugly sometimes. It's all about lighting.
Because engines now use actual calculated lighting, you no longer need to paint shadows into the diffuse map. This actually makes the 2d artists job a lot easier.
A diffuse map is the most strait forward of the bunch. You paint a picture, and that picture is what you see on the model. Your familiar with this type of map from WC3.
Here is a sphere model with a diffuse map I got from the good peeps at CGtextures. Note that the model is receiving light all over. No shadows or anything. This is the technology of WC3. Just a plain old diffuse map.
Let's add some directional lighting to the mix.
Already, looking a lot better. This is why WC3 models just look ugly sometimes. It's all about lighting.
Because engines now use actual calculated lighting, you no longer need to paint shadows into the diffuse map. This actually makes the 2d artists job a lot easier.
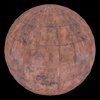
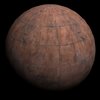
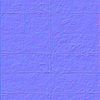
MATERIALS-> NORMAL:
Now that we can light up our models realistically, it's time to use the normal map. Of course, before we use the normal map, we have to actually figure out what it is.
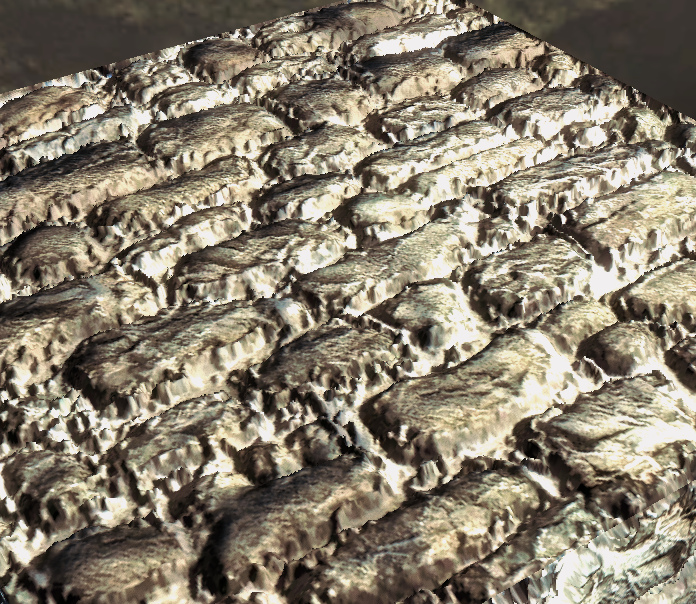
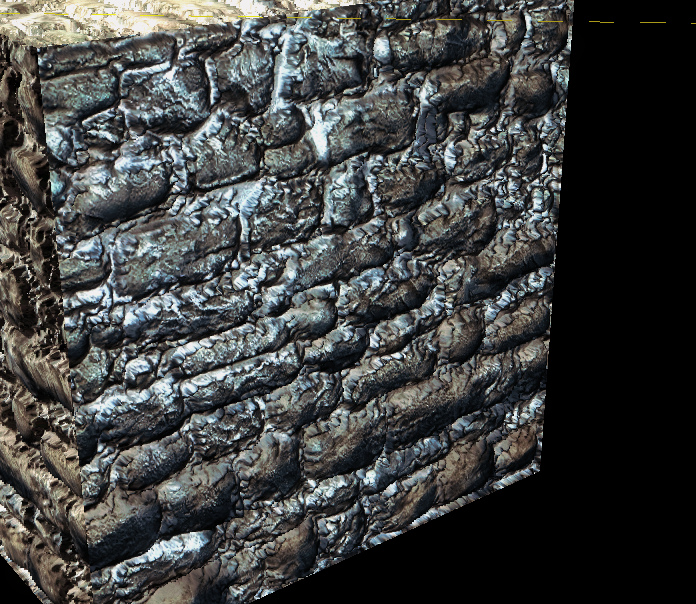
A normal map tells the light within the engine where the detail is. So, instead of having millions of polies for tiny little details, you can use a normal map to tell the lighting where and how to cast shadows.
The normal map used in 2 main ways. The first is to add detail based off of the diffuse. So, for instance, on our copper texture above, the normal maps can tell the lighting system that there are crevices in between the copper plates that are deeper than the surrounding area. The second way it is used is to add detail not based off of the diffuse directly. For instance, if you have a model of a man, and you want that model to be under 400 polies, you can generate a normal map based off of a much more detailed version of the model (with tens of millions of polies) and then apply the normal map to the lower res version to simulate the detail.
You can use a combination of both methods, of course. Note that the normal map DOES NOT EFFECT THE GEOMETRY. It only effects the lighting.
Here is what the normal map for our copper texture looks like after it's been generated.
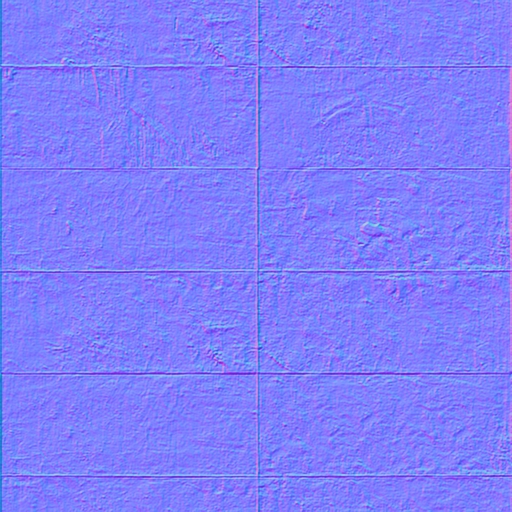
It's an ugly sucker...
The colors may confuse you. To be honest they confuse my too. That's not really an issue. All you need to know is that unlike the diffuse map which has RGB data, the normal map relies on normal XYZ vector data. Of course, technically it is all RGB data, but the engine does not see it that way. All the color in that picture is telling the engine where the detail is so that the light can cast shadows accordingly.
Here is what our model looks like with diffuse + lighting + normals.
This is the stuff that makes games look great. No need to add polies. With lighting, all you have to do is tell the engine where to cast shadows.
So, how does one go about making a normal map? Well, I've never heard of someone literally painting a normal map by hand, but it technically can be done. What you would normally do is generate one using a plug-in. NVidia has a plug-in for photoshop, and there is also a plug-in for Gimp. Use Google to find them. All you do is give it a diffuse, and it generates a normal. No pain necessary.
Now that we can light up our models realistically, it's time to use the normal map. Of course, before we use the normal map, we have to actually figure out what it is.
A normal map tells the light within the engine where the detail is. So, instead of having millions of polies for tiny little details, you can use a normal map to tell the lighting where and how to cast shadows.
The normal map used in 2 main ways. The first is to add detail based off of the diffuse. So, for instance, on our copper texture above, the normal maps can tell the lighting system that there are crevices in between the copper plates that are deeper than the surrounding area. The second way it is used is to add detail not based off of the diffuse directly. For instance, if you have a model of a man, and you want that model to be under 400 polies, you can generate a normal map based off of a much more detailed version of the model (with tens of millions of polies) and then apply the normal map to the lower res version to simulate the detail.
You can use a combination of both methods, of course. Note that the normal map DOES NOT EFFECT THE GEOMETRY. It only effects the lighting.
Here is what the normal map for our copper texture looks like after it's been generated.
It's an ugly sucker...
The colors may confuse you. To be honest they confuse my too. That's not really an issue. All you need to know is that unlike the diffuse map which has RGB data, the normal map relies on normal XYZ vector data. Of course, technically it is all RGB data, but the engine does not see it that way. All the color in that picture is telling the engine where the detail is so that the light can cast shadows accordingly.
Here is what our model looks like with diffuse + lighting + normals.
This is the stuff that makes games look great. No need to add polies. With lighting, all you have to do is tell the engine where to cast shadows.
So, how does one go about making a normal map? Well, I've never heard of someone literally painting a normal map by hand, but it technically can be done. What you would normally do is generate one using a plug-in. NVidia has a plug-in for photoshop, and there is also a plug-in for Gimp. Use Google to find them. All you do is give it a diffuse, and it generates a normal. No pain necessary.
MATERIALS-> SPECULARITY:
Now that we have our diffuse, our lighting, and our normals in place, it's time to add some shine.
Specular maps are fairly easy to make most of the time. Normally it's just a flat white texture. (Or gray if you want less intensity.) In some game engines, your not even required to make one. It just does it for you. The only time they ever get complex is when you only want certain areas to be shiny. In that case you just take your diffuse, and paint black where you want no shine, and gray to white for various levels of intensity. The normal map takes care of the shadowing.
Here is what the model looks like with diffuse + lighting + normal + specularity.

It's just a white texture.
That's pretty much it for this model. With texture maps you can make a fairly low poly model look fairly high poly from any angle. That's how you trick a game engine.
Remember, when dealing with spec maps, only some parts of the model have levels of specularity. You should paint only those areas on the wrap. Also, try not to paint strait white. Add some noise effects and some variation to add realism. Try looking at some of the spec maps in SC2.
When you compile all of these textures together, you get a material. You wrap the model with the diffuse, and then apply the material to it for the game.
Now that we have our diffuse, our lighting, and our normals in place, it's time to add some shine.
Specular maps are fairly easy to make most of the time. Normally it's just a flat white texture. (Or gray if you want less intensity.) In some game engines, your not even required to make one. It just does it for you. The only time they ever get complex is when you only want certain areas to be shiny. In that case you just take your diffuse, and paint black where you want no shine, and gray to white for various levels of intensity. The normal map takes care of the shadowing.
Here is what the model looks like with diffuse + lighting + normal + specularity.
It's just a white texture.
That's pretty much it for this model. With texture maps you can make a fairly low poly model look fairly high poly from any angle. That's how you trick a game engine.
Remember, when dealing with spec maps, only some parts of the model have levels of specularity. You should paint only those areas on the wrap. Also, try not to paint strait white. Add some noise effects and some variation to add realism. Try looking at some of the spec maps in SC2.
When you compile all of these textures together, you get a material. You wrap the model with the diffuse, and then apply the material to it for the game.
MATERIALS-> EMISSIVE:
An emissive map tells the engine to disregard the lighting for a certain area of the model, and to be lit by itself. This is called, "self-illumination". The emissive map can also cause a glow effect, depending on the engine, or on the settings. It can also, depending on the settings, effect the lighting around them and act as a light source themselves.
You've seen an emissive map in almost every recent sci-fi game, for things like lasers, screens, explosions, weird glowy buttons, etc. It's actually quite simple.
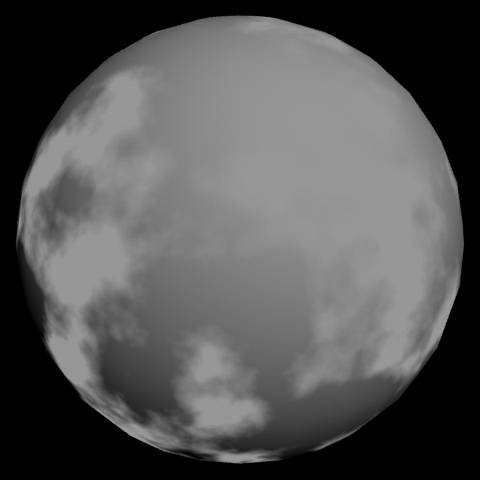
Here is a basic sphere model with nothing but lighting + diffuse map.

Let's say we want this model to be lit in certain areas, in a cloudy pattern.
Right, now, it doesn't look like much of a difference. Let's turn the lights off.

You see, the lighting has no effect on the area defined by the emissive texture.
Now, how about we add some glow.
This amount of glow is a bit much, but I want you to see the difference.
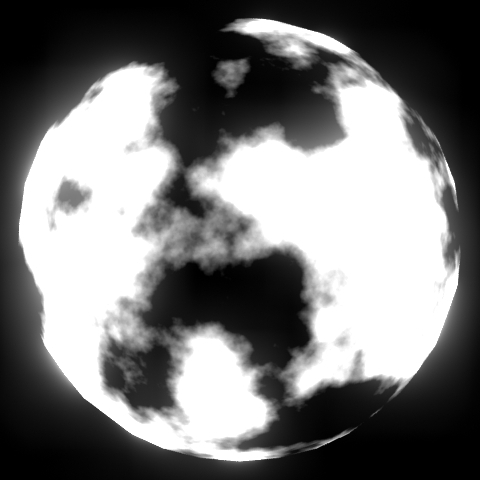
The map, just looks like this.
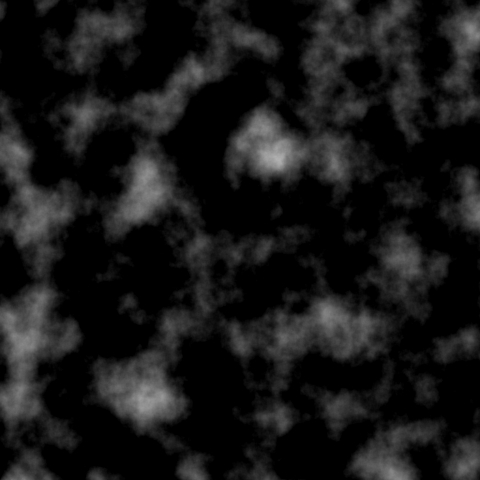
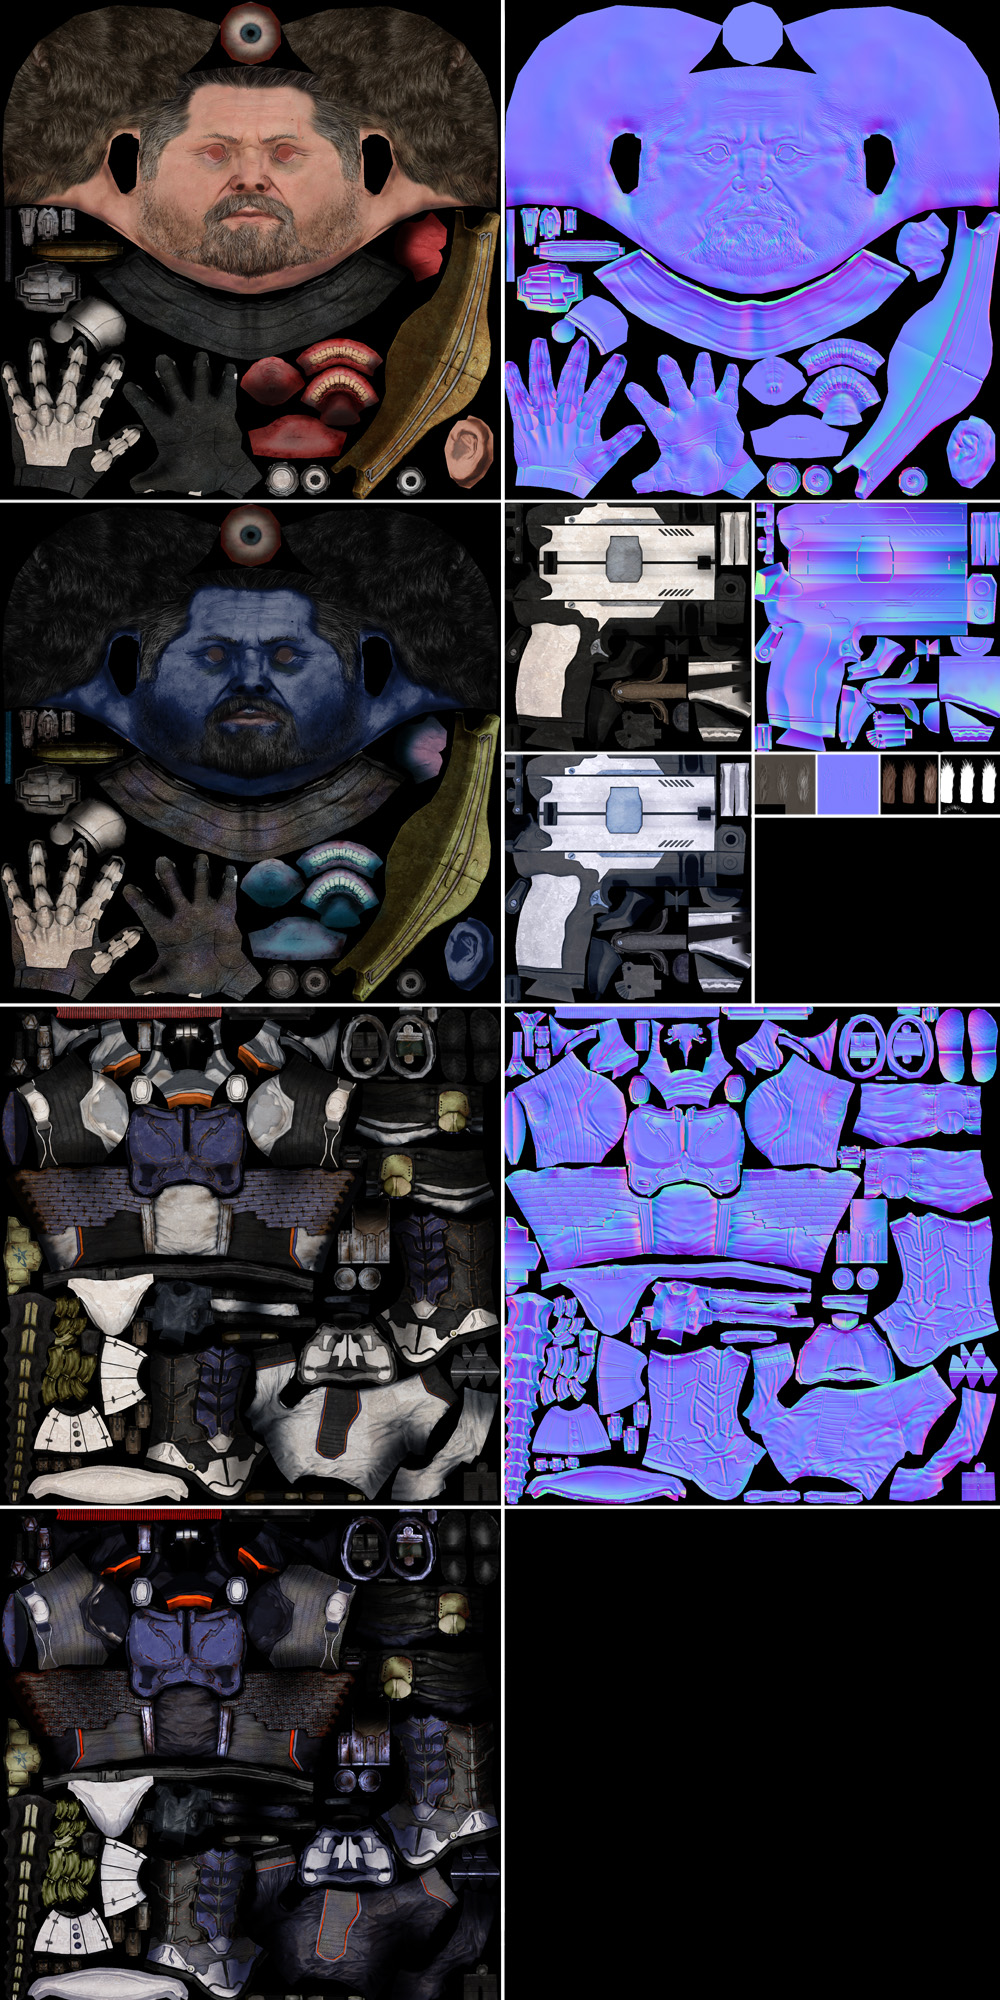
It's very simple. Keep in mind, that you can have it color based. Or, you can take the diffuse, and black out what you don't want to be emissive, and the rest can be. This was done with the SC2 marine portrait.
There are a lot of uses for an emissive map. You'll sometimes see games use it for the sky. They will have a texture spread onto a large sphere, and use this for sky. Then, they will take the texture (diffuse) and make it emissive so that the sun area glows much like it would if you were to look at the sun in real life.
An emissive map tells the engine to disregard the lighting for a certain area of the model, and to be lit by itself. This is called, "self-illumination". The emissive map can also cause a glow effect, depending on the engine, or on the settings. It can also, depending on the settings, effect the lighting around them and act as a light source themselves.
You've seen an emissive map in almost every recent sci-fi game, for things like lasers, screens, explosions, weird glowy buttons, etc. It's actually quite simple.
Here is a basic sphere model with nothing but lighting + diffuse map.
Let's say we want this model to be lit in certain areas, in a cloudy pattern.
Right, now, it doesn't look like much of a difference. Let's turn the lights off.
You see, the lighting has no effect on the area defined by the emissive texture.
Now, how about we add some glow.
This amount of glow is a bit much, but I want you to see the difference.
The map, just looks like this.
It's very simple. Keep in mind, that you can have it color based. Or, you can take the diffuse, and black out what you don't want to be emissive, and the rest can be. This was done with the SC2 marine portrait.
There are a lot of uses for an emissive map. You'll sometimes see games use it for the sky. They will have a texture spread onto a large sphere, and use this for sky. Then, they will take the texture (diffuse) and make it emissive so that the sun area glows much like it would if you were to look at the sun in real life.
MATERIALS-> BLEND MODES AND LIGHTING MODELS:
The blend mode is what determines how the material on the mesh interacts (visually) with other materials. You should be familiar with this concept from WC3. For instance, in the Magos editor for WC3 you could change the blend mode to things like alpha, masked, blend, and additive. You should already understand this concept.
Lighting models are where the light in the engine comes from. I believe (Correct me if I'm wrong someone.) that SC2 uses a PHONG model. Which basically, just emits light. (All you really need to know.) WC3 on the other hand uses an unidirectional light source. This means that the WC3 models are all lit all around. (Bad bad bad...)
MESH/UVW:
Now that we have covered the new texture maps, we can apply this to a new method of poly modeling.
In WC3 we would always try to limit our models to below 500 or so. Obviously, in SC2, we can go much higher. But, just because we can doesn't mean we need too. Because we now have normal maps, little details do not need to be polies. What we need to do with polies is more beveling and extruding. Why? Because, if you remember, I said that normal maps do not change geometry. The only polies needed are ones that matter, obviously. And the ones that matter are the ones that change the overall shape. Not the little shapes on the big shape. In other words, if you have a big box model, and in one little corner there are little pipes and stuff made out of mesh, you are waisting polies. That stuff can be done with the normal and diffuse maps. It would be much more visible if you were to bevel the edges of the big box. The biggest rule regarding performance and polies is: the size of the poly doesn't matter. It's how many of them there are. So, don't make giant undetailed shapes with little super detailed shapes all over them.
Also, you no longer have to worry about your models clipping distance. You can make your model however large you want and all the edges will still be visible no matter how far from the center of the model the camera is.
UVWrapping behaves almost the same now as it did back in WC3 times. Except, now, we have a higher standard. You can no longer make a mesh and do a planar wrap on one side while the rest is stretched, and hope to get away with it. And please, PLEASE, do NOT wrap a model BEFORE it's done being made. ALWAYS FINISH THE MODEL FIRST. (Unless of course, it's separate pieces.) And, don't worry about wrapping maps other than the Diffuse map. Once you make a material out of the maps, your other maps with inherit the same UVW.
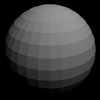
LIGHTING/SMOOTHING:
The main difference in the lighting from WC3 to SC2 is that in SC2 there is actual dynamic lighting... Lighting is the key to good graphics. This also means you have to pay more attention to your model's smoothing.
The smoothing of your model is how the lighting rolls from poly to poly. Or doesn't roll. If a model is completely smoothed, every poly will look like they connect with a bevel, or are part of the same poly.
Here is a model without smoothing.

Here is a model with smoothing.
It's fairly straightforward.
Be sure to smooth your model properly before exporting. I won't tell you how to smooth because, it changes from program to program.
The main difference in the lighting from WC3 to SC2 is that in SC2 there is actual dynamic lighting... Lighting is the key to good graphics. This also means you have to pay more attention to your model's smoothing.
The smoothing of your model is how the lighting rolls from poly to poly. Or doesn't roll. If a model is completely smoothed, every poly will look like they connect with a bevel, or are part of the same poly.
Here is a model without smoothing.
Here is a model with smoothing.
It's fairly straightforward.
Be sure to smooth your model properly before exporting. I won't tell you how to smooth because, it changes from program to program.
ANIMATION:
Animating for next gen RTS games is fairly similar to animating for WC3 but again, with a higher standard.
SC2 uses IK. That means that now, your anims can interact with the world in a much more realistic way. aka the colossus. This is also more helpful to animating in general as you can move joints in a realistic motion when generating keyframes. You may even be able to use the biped bone structure in 3ds max. The model itself though, must be in FK when imported. You can make the anims in IK then convert them later.
One thing to note is that because you have lighting, you do not need to keep the model close to the pivot throughout the animation. And, I'm sure SC2 uses some sort of collision model for projectiles, so it could be all over. The zergling is the perfect example. Look at the walk loop. He falls back then jumps way forward. The unit is actually walking at a steady speed. The model on the other hand, is not.
Animating for next gen RTS games is fairly similar to animating for WC3 but again, with a higher standard.
SC2 uses IK. That means that now, your anims can interact with the world in a much more realistic way. aka the colossus. This is also more helpful to animating in general as you can move joints in a realistic motion when generating keyframes. You may even be able to use the biped bone structure in 3ds max. The model itself though, must be in FK when imported. You can make the anims in IK then convert them later.
IK is short for "Inverse Kinematics". The only real way to explain how it works is with a mental picture. Try this experiment.
Get a cup from your kitchen, fill it with water, and place it on a table. Sit down at the table. Now, reach for the cup and pick it up to drink it. IK simulates this.
When you extend your arm out, it is all one fluid motion. You did not have to think about how to move your shoulder, move it, then think about how to mover your upper arm, move it, etc. This is what animating with IK is like. Your moving one bone, that tells all the connected bones to move to the logical position. If your were to animate without IK, you'd have to move each parent bone down through the children bones till you get the position you want. With IK, it is much easier.
This is what allows the colossus in SC2 walk over stuff and have it's legs touch ground. The engine is telling the tip of the leg to touch the ground directly below it. And, because of IK, the rest of the connected parts all move accordingly in a fluid motion. It really is quite simple.
IK in a nutshell, is the ability to change a parent bone's position and rotation, based off of what you do to the child bone.
You may have also heard of FK. FK is the opposite. It means "Forward Kinematics".
FK in a nutshell, is the ability to change a child bone's position and rotation based off of what you do to the parent bone.
You'll need to have the final anims be in FK. You can convert it later. But, for me anyway, it's easier to animate in IK than FK. The engine has it's own IK system implemented.
IK and FK are also used in robotics.
One thing to note is that because you have lighting, you do not need to keep the model close to the pivot throughout the animation. And, I'm sure SC2 uses some sort of collision model for projectiles, so it could be all over. The zergling is the perfect example. Look at the walk loop. He falls back then jumps way forward. The unit is actually walking at a steady speed. The model on the other hand, is not.
PARTICLES:
Again, similar but with a higher standard than before. You can no longer do the old Blizzard trick and make your buildings or units instantly disappear on death. Todays standards require some actual effects. Your going to need to bind your particles to your mesh much more often now. DON'T BE LAZY!
I'm not sure how the SC2 particle editing system works so I can't comment on it much.
Instead of giving you a SC2 specific particles tutorial, I'll just give you some general do's and don'ts regarding modern particle systems for games.
1. Never ever have all your particles emit from one spot. That's something that is generally not even excepted in WC3 modding.
2. Keep in mind that your not trying to make your particles look good in a screenshot. They need to look good from any moving angle. This is because particles are always billboarded.
3. Use a host of different emitters for different materials. That way, each element (sparks, fire, smoke) can all behave differently.
4. Try to use grid sprites as much as possible. Particles looks awful if it's just the same pic with no animation.
5. Have particles happen at different times at different places that actually make sense. If you have a fort model with an empty middle, it would make no sense to have the middle explode while the walls fall.
6. Flare effects are your friend. When you see a flare on an explosion in a game, it looks nice, but the real reason the designers put it there is to kind of
obscure their particle effects.
7. Have your particles behave realistically by attaching them to a bone or object. Then, you can simply animate that bone/object.
8. Try to use a variation of sizes and speeds. Randomizing your particles' speed and size makes it look more natural.
CONCLUSION:
That pretty much covers everything I wanted to talk about. So, have fun in your SC2 modding endeavors!
Attachments
-
 1.jpg124.2 KB · Views: 5,203
 -
 2.jpg97.6 KB · Views: 5,035
 -
 3.jpg246.9 KB · Views: 5,363
 -
 4.jpg137.7 KB · Views: 4,870
 -
 5.jpg154.2 KB · Views: 5,761
 -
 6.jpg36.3 KB · Views: 4,763
 -
 7.jpg43.7 KB · Views: 4,789
 -
 BronzeCopper0020_21_S.jpg381.1 KB · Views: 6,093
 -
 8.jpg42.9 KB · Views: 4,644
 -
 9.jpg57.8 KB · Views: 4,329
 -
 10.jpg58.6 KB · Views: 4,400
 -
 11.jpg67.6 KB · Views: 4,302
 -
 12.jpg78 KB · Views: 4,262
Last edited: