- Joined
- Feb 8, 2013
- Messages
- 1,476

|


Attachments
![ScreenshotKeyboard[1].png](https://cdn.hiveworkshop.com/data/attachments/114/114108-2bf5ec5b7f9917287a157375cf4af45c.jpg?hash=K_XsW3-ZFy)
Last edited:
Follow along with the video below to see how to install our site as a web app on your home screen.
Note: This feature may not be available in some browsers.
|
[plain][plain][/plain][/plain][plain][img]Image URL Here.jpg[/img][/plain]


[edit] Title color changed.It is nice.
However, the images must be attached to the hive (if you rely on other websites, then they may be removed without your knowing). Also, I think you should use a tamer color for the title (green is pretty bright).
Other than that, it is fine.


") . +Rep for nice tutorial ^^.
. +Rep for nice tutorial ^^.
You can use Advanced --> View Entire Map. For the Whole Map View. Anyway Nice tutorial tho so if there is any problem in the Map Section like " How to post screenshots?? " So I'll link this and I'll attach this tutorial in my signature


[edit] Title color changed.
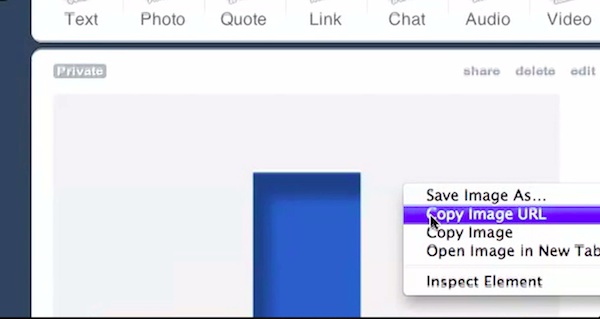
I know the rule about the links. When I made this it was for myself to post to a map that had no screenshots and the user said he didn't know how to make them. Then I used it again for another map, same deal. Then I kept seeing the problem and kept posting it. Then Daffa told me to add it to tutorials. I don't know if I want to download every image and load it to my hive album. To remedy the problem I made sure to use the word in text along side the image so if the link goes dead, the tutorial will still be readable. Maybe that's not good enough but I won't have time to download every image. I could just remove them, but I think they are kinda fun. The important images are from my photobucket or hive album. Ideas?
")

now with the new hive where can i make an album?


