Follow along with the video below to see how to install our site as a web app on your home screen.
Note: This feature may not be available in some browsers.
Listen to a special audio message from Bill Roper to the Hive Workshop community (Bill is a former Vice President of Blizzard Entertainment, Producer, Designer, Musician, Voice Actor) 🔗Click here to hear his message!
Upon starting the game, you will find yourself in a scorching desert.
Move through the desert and make the game display messages 4 times in order to get to the beginning of an underground cave.
Once down in the cave, head east until you meet a Ripper (ghoul unit). Go north from there onto a small ramp and pick up a book.
The book will tell you how to use a catapult. Remember (or check log again later) the instructions and move back to the starting area.
Go south and up via a ramp. Kill the enmies and the Hiv spitting out Scarabs. Head east to the ghost like unit.
Watch out as this unit will start channeling a powerful spell as soon as you get close. Back off, and go back when it finished casting it. Kill it and and go down a ramp to the south.
There is an owl flying over a fiery crack in the ground. Go down to the start of the crack and stay under the bird in order to cross to the other side unharmed.
Go up on the platform to the right, defeat the enmies and hit the lever.
Get out of the fiery area, and head back to the place where you encountered the ghost.
Go east, get psat the fire traps and the fire elementals, and hit the lever they are guarding.
Head back to where you encountered the ghost. Then head east and down the ramp.
Go north and find the catapult. Remember the instructions? Use them to shoot down the rocks in front of you, so that you can get up on the platform holding another lever.
Get to the platform, hit the lever, and get back to the catapult.
Go south from the catapult, and down a ramp, and then down a staircase leadin to the temple itself.
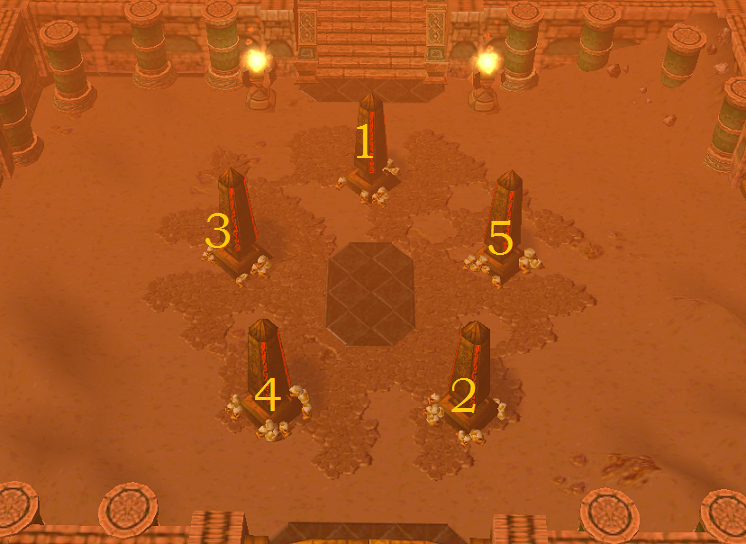
In the chamber you enter there are a few obelisks in the middle. Go close to them to activate them. Activate them in the order as shown in the picture below.
Upon having all the obelisks activated on the same time, the east and west gates will open.
You can choose yourself wich one you want to do first. I will go west for now.
Defeat the necromancer unit. he has a lifedraining ability, so you need to stun him in order to interupt it.
Go past him into the magical field that renders you invulnerable. Stay under the owls in order to get through this area. If you don't you will be killed fast.
In the third owl circle, there is a lever. Hitting cleears the path from the rockchunks. you need to hit it, and return under the owl.
Once past the owls, hit the lever, and pick up the rune wich grants you invisibility. You can now walk past all enemy buildings, and back out into the main chamber. Don't use any abilities, or the invisibility will break.
Next, go to the gate to the east. Avoid the blades, and kill the hives spitting out scarabs.
Once you get through the corridor, you'll find yourself in a room with three obelisks. they have a very short activation duration, so you'll have to wait until two skeletons spawn.
The skeletons are unkillable, but if they are reduced to critically low health, they will heal, makking them immobile. Make them heal close to two of the obelisks in order to keep them activated, and activate the third one yourself.
Head back to the main chamber and go south through the now open gates.
This puzzle in front of you is pretty hard. It is a pain to explain aswell, so I here is a link to a video tutorial if you get stuck here. Basically what you want to do, is organize the tiles in groups of colour. Once you have done that, the groups need to be on their respective color, blue being placed in the middle.
Next is the bossfight! You'll be fighting Solen, a Firelord. A more detailed guide on how to defeat him will be provided later.
Upon starting the game, you will find yourself on an icy mountain plateau.
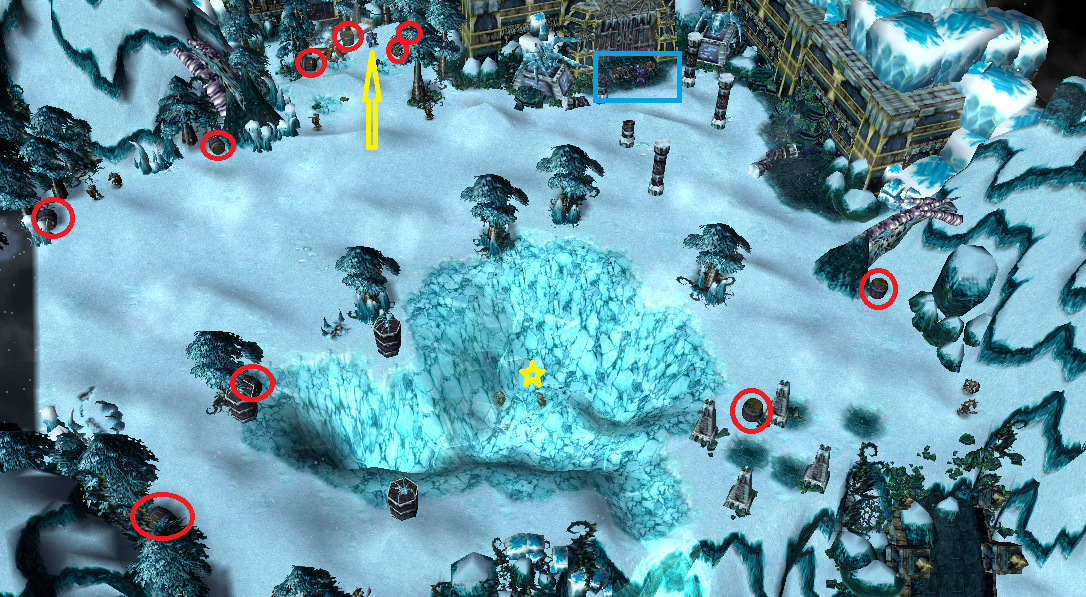
Go north to the camp with a ghostly footman. Kill him and he will tell you to find his journal.
Destroy barrels in the area until you find the journal. Red circles - All barrel positions. Yellow Arrow - Footman position Blue Square - Gate area
Bonus! A ghost with an extra permanent bonus drop can be found by the yellow star. Upon killing it, you are rewarded with a 0,5 bonus to health regeneration permanently.
Go to the gate leading into the fortress to the north east of the area. Aproach the gate. When a message displays "The gate is listening...", write "KoZu" as a text message, and the gate will open.
Once inside, fight your way through a few enemies in order to get to the main chamber, and go to the door on the bottom right of the room. Note: The ghost in the main chamber can not be defeated. You should simply avoid it.
Look at the rune by this gate. They are the same as the runes outside, in front of the gate leading in to the fortress. Enter "KoZu" again in order to open the gate and enter the library.
Slay the enemies, and walk over to the pedestal in the middle of the room. The runes around the pedestal will be translated to you. Try to remember them, or just continue to read this tutorial in order to open gates in the future. Two runes are obscured by a cave in, so you'll have to guess what they look like. If you just want a simple solution, look here:
Go out from the library. Unlock the door on your right with your new knowledge. Enter "TaRi".
Get through the ice traps straight ahead, and destroy the energy generator.
Bonus! If you go south instead, through the permanent frost traps, you will find yourself in a room with a ghost and a few skeletons. A permanent bonus plus a Soul Stone can be found in here. Grab it quickly and get out.
Go back to the main chamber and head north-west where an energy barrier now is gone.
Enter the door to the north by entering "MoDu"
Wait for the ghosts to rotate. There is a gap in their formation. use it to go in between them. Avoid the ghosts by dashing and get to the safe spots.
Once you get to the safe spot with a lever, attack it, and a gate will open.
Go through the ghosts again, and through the now open gate.
Bonus! There are three runes on the floor close to the gate. Say the syllable you stand on and then quickly move to the next. Say all the syllables (Ve, Gy and Ko) in the right places fast enough to get a Soul Stone.
Here you get a choice to go via the ledge straight forward, go north or go south. Begin by going south and enter the password made of runes as a text message. Enter "VeZuTaRi".
Fight your way through a few enemies, and enter the room to the south.
This rooms contain a changing labyrinth. Find the runes on the floor, speak the syllable, and it will unlock a new one that can be found somewhere else in the room.
Once all runes have been activated, a lever will be revealed somwhere in the room. Hit it, and get out of the room the same way you came in.
In this room, a gate has been opened, and anobelisk has been revealed behind it. You don't have to do anything with it yet, but go close to it if you are curious.
Head back to the room with the icy ledge. Cross the ledge by balancing on top of it and get to the other side. Strong channeled winds will push you back a little, so be careful.
On the other side, find the lever and hit it, and a bridge will raise, allowing you to cross the icy death pit easily. There is another obelisk to the north. Again, you don't have to do anything to it yet.
Head back to the other side of the room. Go north and enter the password made of runes. Enter "DuMoTaGy".
Once past, use dash two times quickly in order to get past the frost trap.
Go through the corridor and the caved in room, and go to the icy room with a large dead humanoid laying in it. It's mini-boss time.
Get close to it to engage the mini-boss. He has powerful attacks, so you need to get away from him or prevent him from attacking you by stunning and dashing. Make him go on top of the frost traps, but stay away yourself. once he is frozen, try to get a few attacks landed on him. Repeat until he is dead.
When he is defeated, it is time to solve the obelisk puzzle. Activate all three in order to solve it. You need to use dash as much as possible in order to activate them all in time.
Once that is done, head back to the main chamber, say the password on the floor. Enter "DuZu". You will encounter a closed gate and a couple of circles. Go north to the circles.
Circle positions:
NW
N
NE
W
M
E
SW
S
SE
Solution to the lock puzzle:
Step on the circles in the following pattern. s, e, m, se, e, nw, ne, s
If you mess up, use the lever to reset the puzzle.
Upon solving the puzzle, go south , through the gate, and p the elevator.
It's boss time.
Go close to the lich in order to start the fight.
Fight the boss until he is dead and you win.
Further information on what you need to do in order to beat him will be added soon.
Upon starting the game, you will find yourself in a glade of a thick forest.
Aproach the ancient that stands beside the dark log entrance. He'll be telling you this: "Follow the magical flute... Remember, the only way is forward."
Enter the log and try to listen where the music is the strongest. Enter the log where the music flows the strongest. If you enter the wrong hole, you'll have to start over.
The correct order of directions is as follows:
Left, Up, Left, Up, Up, Right, Up.
Once out on the other side, you'll find yourself in a glade with furbolgs and fast moving wisps. You'll need to kill all the wisps in order to make the forcewall infront of the temple entrance disappear.
Once inside, proceed with caution as there is an enemy ahead. It shoots waves forward, so you have to dash to the side to remain unhurt. Defeat him to make the next forcewall disappear.
In this large room, there are doors in all directions, two switches on the floor and a statue straight forward. Attack the statue to move it.
Place the statue on the right switch and enter the now open right door.
In this room, you need to stay clear of the poisonous gas. Stay under the protective owls to move through the room, and go through the door waiting on the other side.
In this next room there is a large magical stone, two switches and two furbolgs. Defeat the brown one, and make the orange one follow you to a switch.
Kill the orange one on the switch, making his body push the switch down, and hurry to stand on the other yourself. If both switches is pushed down at the same time, the stone of power to the right in the room will start to glow.
The force walls won't go down, instead this message is displayed: "Hmm. The forcewalls didn't go down... I could swear I heard one dissipate though. Maybe not in this room..."
Exit the way you entered, go through the owl room and enter the main-chamber again.
Now, move the statue to the left switch and enter the left door.
Avoid the magical blades using dash as much as possible and enter the door in the end of the room.
This room contain another magical stone like the one you activated earlier. Defeat the furbolg, and attack the lizard to stand atop a switch while you stand on the other. If done correctly, the magical stone should start glowing.
Enter the room to the south. here you will encounter the first out of four Guardians of the temple: a mini-boss.
This boss will throw projectiles from a distance. You'll need to dodge them as much as possible while getting closer and stunning him to land a few hits. Wips of power will occasionally be summoned. Attack them to prevent them to reach him, or they will heal him.
Once you defeat the guardian exit the room again and then go north, and you'll find yourself in a room with levers lined up on the floor.
Defeat the furbolg in this room, and then turn your attention to the levers. Attacking the levers will activate them. However, activating or deactivating a lever will do the same to other levers. All levers need to be activated at once in order to proceed.
When you activated all levers, go back to the main chamber, and enter the room to the right again. Go through the owl room, enter the next room and then go south. Here you'll find the second Guardian.
This guardian also have projecties that he will launch at you. Dodge and get closer. When he is attacked, he will teleport away, and then send a wave of energy towards you. Dodge it, or you'll take heavy damage.
Upon defeating him, exit the room and go north.
You'll find oyurself outdoors in a glade, with wisps similiar to the ones in the glade just outside the temple entrance. If you get close to those wisps, they will teleport away and turn grey for a moment. You have to aproach and attack them while they are grey, or else they can teleport again.
Once they all are defeated, go back to the main chamber and enter the door to the north. You'll find yourself in a corridor where there were forcewalls before, before you deactivated them using hte levers and killing the wisps. Enter the door to the North.
Time for mini-boss #3! This one has wisps rampagig through the room. Dodge the wisps, and bring her down by stunnng and slashing away.
Once the guardian is defeated, go north and you'll enter a semi-outdoor area. Enter the door to the east. There will be a lot of blades in this room. Avoid them, and get to the eastern door. Now, you'll fight the last guardian.
This one is a little different as it is the only Guardian with melee attack. He will run at you slashing away. Just dash away until your stun is ready, and then attack him a few times. Every now and then, the guardian will teleport to the middle, becoming invulnerable. Then you must run to an owl, and hide beneath it until his channel ends and he runs at you again, or you'll die. Repeat until he is dead and exit through the eastern door.
Avoid the blades in this room and go through the eastern room once more.
You'll find yourself back in the previous outdoor area wher you first went east. Now, enter the door to the north.
This room has ledges with deadly thorns underneath them. Balance on the ledges and hit the levers placed along the wall. Each lever will rotate your camera by 90 degrees, making it harder to control. Hit all four levers and then exit to the north.
This is the last room before the boss fight. Kill the furbolg. From his body, a large amount of colored wisps will spawn.
Kill the wisps by colour order. For example, you must kill both the orange wisps before you can move on to the pink ones, or else they will keep coming back.
Once all wisps are gone, the room will go dark, and you will be teleported into a grand white hall with large pillars and shaded edges. Entering the shaded edge will teleport you to the other side of the room.
Enter any edge, and a purple wisp will appear in the room. attack it, and the bossfight will start.
More info about the bossfight will be added on another occasion. Good luck!
Upon starting, you'll find yourself on a road in forest-like area.
Head south-east and go out on the cliff in the middle of the canyon with a bandit and a ruined tavern on it, kill the bandit and pick up the gold (1/8) behind the tavern.
Continue east and find a gold coin (2/8) just under the lantern beside the road. Also kill the bandit north-east of here, located just beside the black boundary.
Continue north until you find a house with a mage outside. Aproach him, and he'll tell you to help him find the code to his magical vault.
Go south from the house until you see the stone arcs reaching over the canyon. Walk on top of them to the other side.
Go north-west and do not go down the ramps, but continue west above them until you find another gold coin. (3/8)
Now, go back and go down the ramp. Follow the canyon until you encounter a small golem. Kill it and go up the ramp north-west of it, and pick up another gold coin. (4/8)
Continue along the canyon, killing all golems you encounter, until the canyon is blocked off with rock chunks.
Go south, into the roundish area with a factory in it. Kill hte golem here, and then pick up the explosives just outside the factory (inside the circle of power) by attacking it.
Run back to the area where the rock chunks were, and blow them up by dropping (attack again to drop) the explosives close to it.
Go through the narrow passage that was blocked before, and continue nder the stone bridge you crossed earlier.
Pick up the explosives from this factory, and let it explode just beside the rock chunks trapping a book behind them.
Pick up the book and retun to the mages house. Stand close to the vault, and enter the code you just learned: 16547.
Once it is open, you'll learn a new ability from the mage. Also pick up the gold that the vault contained.
Go back down the canyon, and use Rewind aproximately where you encountered the first golem. Then run as fast as you can (dash a lot) to the first factory and pick up the explosives.
As soon you have a hold of the explosives, use Rewind to teleport back to your previous location. Then run upwards to the rockchunks and drop the explosives beside it. Let it explode, and pick up a gold coin. (5/8)
Continue to the area just behind the narrow path that was blocked with rock chunks, and use rewind. Hurry to the north factory, pick up the explosives and Rewind back. Let the explosives destroy the rock chunks.
Continue south, kill the golems and then enter the cave.
Once inside, go straight east, and you'll encounter an infected and aggressive kobold. Kill it and all other kobolds you encounter in the cave.
A little bit to the south-east, there is a lever. Hit it and the bridge you crossed when you just entered the cave will go down, and another will rise, just north of your current position.
Cross the newly raised bridge, and hit the next lever on this platform, and continue to the next platform.
Go straight west, and you'll encounter two larg kobolds guarding a gold coin. Kill them and then pick it up. (6/8)
Hit the lever on this platform and move on to the next one. Kill the kobolds, hit the next lever, and cross to the next platform. Continue like this until you reach the factory on the last platform.
Now, you need to slowly make your way back, making sure that all bridges, except from the very first one of the cave, are raised at the same time, and stay that way.
The easiest way to do this is to use rewind on a platform, head to the next platform, hit the lever so that the bridge you just crossed goes down, and then rewind back to raise it again. Now you hsould have two bridges raised. Continue like this till all bridges are raised.
Now, use rewind and dash as smartly as you can in order to blow up two rock chunks barriers.
Fetch explosives from the factory, and blow up the northern rock chunk barrier, and collect the second last gold coin. (7/8)
Fetch the second batch of explosives and hurry down to the first platform, and blow up the second rock chunk barrier in the south, and pick up the last gold coin. (8/8)
Once you have all the gold coins, continue through the cave opening next to the factory in the north.
You'll end up in a kobold village. Go straight forward, and talk to their leader, the small guy with flies circling him, between two large kobolds. Attack him to start a conversation.
He will take your gold as a sign of good will, and indicate you to enter the mine entrance to the east of his position. Enter that cave just north of the mining carts filled with gold.
You'll find yourself trapped in an endless cave system. You need to go throgh one of the openings in order to proceed. Each time you do, your coordinates will change. You will start on the X10 Y10 Z0 coordinate, and your goal is to get to the X0 Y0 Z0 coordinate, which will get you out of the cave. You can never go back to the cave you just were in. I cannot tell you exactly how to solve this puzzle, as it is randomized, and different for everybody. This might be helpful though:
Going in a direction will change the coordinates as follows... North -X+1, Y+2, Z+0 West -X-2, Y+0, Z+1 East -X+0, Y-1, Z+1 South -X+1, Y-1, Z-2
Once out on the other side, you'll find yourslf in a dark cave.
Find all rune pieces on the island. Positions can be seen here:
Once all rune pieces have been collected, they will fuse, creating one big runestone. Put it somewhere close to the temple. We'll get back to this soon.
Enter the temple on the western part of the island, and clear all the vegetation.
Then get out, and get to the top of the temple.
Here you'll find five obelisks. You need to activate them in the right order to complete the puzzle. From right to left, the correct order of activatyion is: 1, 3, 5, 2, 4.
When the puzzle is solved, the gate on the level under will open. Collect your runestone, and enter the temple itself.
Once you are inside, put the runestone on a circle in the room. Then go north to the water stream leading west. Cross it, and you'll find yourself in a library.
Pick up the boxes around the room, and place them on their respective colored circles.
Two new circles have now been revealed close to the magical pen. Put the yellow box on its circle, and put both the red and the blue one in the purple circle.
Now, collect the runic box and bring it to the edge of the waterstream end.
Run back through the stream, and avoid the pulses of water by using rewind.
Once out on the other side, Use rewind, go back and pick up the runestone, and rewind back again. Place the runestone on a circle.
Use the catapult to remove the rock chunks close to the east wall, revealing two switches.
Stand on top of one of the switches, use rewind, and run to the second switch, then use rewind again, and the door will open.
Once on hte other side, run up the stream, dodge the missiles coming down, and get out in the next room.
Use the catapult to clear the skeletons out of the way, make it to hte end of the room, and pick up the runestone.
Bring the runestone back to the main chamber, and place it on another circle.
Now, direct the catapult to the very center of the room, to the red circle in the middle.
Stand ontop of the circle yourself, and use rewind.
Run to the catapult and activate it, hten instantly use rewind to make the catapult projectile kill you. A bloodoffering have been made.
A wall will open behind the catapult. Go there, and go through the teleport.
You'll end up in a room with a circular stream, swirling into its center. You need to position the boxes and yourself over the three switches simultaniously to open the northern gate.
Once you have cleared the water swirl, go through the gate, and you'll run into a crab. He'll hunt you down, going faster and faster the less health he has.
Kite the crab into certain positions in the room, and use the catapults to damage him. When all catapults have hit him succesfully, he will die, leaving another runestone.
Go back with the runestone to the main chamber and prepare for the bossfight.
When all runestones have been placed, a cutscene will follow, revealing the boss.
Run around the room, hit the elemental whenever he is not channeling too many abilities.
Once the boss is defeated, you need to escape the collapsing tomb. Remember to use dash as much as possible.
Run back to the crab room, and enter the newly revealed entrance to the west.
In the first room, remember the order of the levers!
Go east in the crossroad.
Balance on top of the ledge to get to hte other side of the room.
Take the northern corridor.
Go down the waterstream, and try to avoid getting caught in the pockets of rocks,
You'll enter a room with two gates and two switches. Use rewind in fornt of the first gate, run to the other switch, and use rewind again to get through the now open door.
Follow the corridor to the west, and enter the waterfilled room.
Go straight out into the middle, use the cataputle to destroy the western, and the southern rockchunks.
Follow the ledge and enter another corridor.
Go east, and you'll see a lots of levers. Activate the levers taht you saw was activated in the first room, and the rockchunks will be destroyed.
Go through, and you'll enter the room that you cleared much earlier. Go up the ramp, and you'll be done.
Travel west until you reach the elven village. In the north of it, there's a temple. Inside, you will find Felore.
After talking to her, head south into the village again, and find the treant with a exclamation mark above its head. Approach it.
Now, head south again, and locate a road with glimmering magic over it. Step into it, and you'll reach Solen's Sanctuary. (Solen's Sanctuary Walkthrough)
After clearing Solen's Sanctuary, head back to Felore, and she will tell you about her research.
Next, head head far to the north east of the temple, and locate an ice troll village. The leader will tell you about their home.
Head north within the troll village, and step into the glimmering magic zone, to get to Bonechiller Burrow. (Bonechiller Burrow Walkthrough)
After you clear Bonechiller Burrow, go just east of the entrance of Felores temple. You will find a page, giving you a hint on what to do.
Go east from where you found the page, and locate the pool of water. East of that, there is an entrance into the mountain: the druids lair.
Sneak past the druids:
Generally, you need to stay in the shadows, to avoid being detected here.
Wait for the first druid to ge close to the entrance, then follow him at distance.
Before the first torch (after the first pair by the entrance), step close to the wall, and wait for the druid to pass.
When he passes, continue into the room with hay and beds in it. Wait for the next duid to come out from the corridor in the east.
Follow the druid from the corridor when he returns, and dash south into the darkness before he turns.
Now, continue north, where the corridor forks. The left is guarded by a druid, so go to the right.
Hide to the east of the corridor, and wiat for the druid to pass you. Then continue into the enlighted room with a statue in it.
Wait for the druid to return, stun him, and hide in the corridor again.
The other guarding druid will come and help his brother out. When he does, pass him.
Continue through the corridor htat was guarded, and you'll find the Soul Gem.
Kill the druids, and get back out, and head to Felores temple. Felore will be upset with you, but agree to help you further.
Head to the south-east, locate the tree graveyard and talk to the great ancient with an exclamation mark above its head.
It will tell you about the Forest Temple, and its corruption. head south-east of the ancient, and step into the glimmering zone. (Forest Temple Walkthrough)
After clearing Forest Temple, head back to Felore one last time, talk to her, follow her to her secret garden, and step through the portal.
This site uses cookies to help personalise content, tailor your experience and to keep you logged in if you register.
By continuing to use this site, you are consenting to our use of cookies.