fladdermasken
Off-Topic Moderator
- Joined
- Dec 27, 2006
- Messages
- 3,689


On an opening note, if you don't know what the hell an alpha tile is, the alpha tile is a tile using alpha compositing to allow transparency. This enables us to "poke holes" in the ground texture. Or, more accurately, make it transparent. With this we can experiment with things like reflections without sleeping around with 3rd party image manipulation tools.
Example from my personal gallery:

The river boat reflects on the still surface.
What you actually see is the unseen (bottom) sides of the skybox and another river boat turned upside down.
Shouldn't be so hard to walk you, a fairly average terrainer, through this. I will step-by-step cover importing the alpha tile in the import manager, show you basic tile overgoes, teach you some basic principles of pitch and roll with negative values and finish with an overlook on reflected bodies and some properties they inherit.
NOTE: READ THIS IS YOU WANT TO USE IT FOR PLAYABLE MAPS
There is a question I have been getting about this since July 2010 when I first posted it. Does this work for playable maps i.e. with the standard isometric game camera? The answer is, yes. But you need one more thing for it. The standard WE skybox isn't a full box; it has two sides missing. The upper side and the lower side. This is because in game you only really see it from conventional angles in cinematics. So if you apply the alpha tile with the standard game camera on, you will see a tiny bit of sky texture and then pitch black. You are getting the lower side of the skybox. To fix this you need a skybox with no missing sides, alternatively a skysphere. I don't have one so I can't attach one here, but feel free to go to the Request forum and try your luck.
Now get on with the tutorial.
Tools & Requirements
Alpha Tile - View attachment Alpha Tile.rar
Background knowledge - At least average terraining experience and knowledge of the interchangeable concept of radians and degrees.
DungeonM's UTM - The Ultimate Terraining Map 3.0 - Wc3C.net
Amendment:
Actually you can use whichever template map you want to, just make sure you can reach the water level with the lower height brush alone.
Import the Alpha Tile
Open up your map. Open IM and import the Alpha Tile. Now we need to set the file path. Since I conveniently named my tile Outland_Abyss.blp we can replace the Outland Abyss tile with our alpha tile. So find Outland_Abyss.blp in IM and open up Imported File Properties (on right-click or double-click). Tick the box that says Use custom path. Notice that the text-field Full Path: becomes editable. Change this field to TerrainArt\Outland\Outland_Abyss.blp and hit OK.
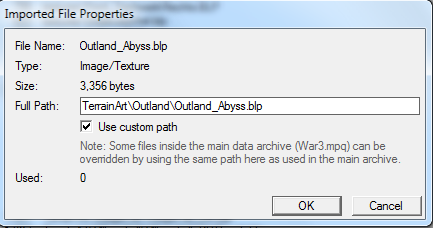
Now you're done. Save your map, exit world editor and start your map up again. The texture has now loaded.[/stable]
Amendment:
If you want to use a different path, be my guest.
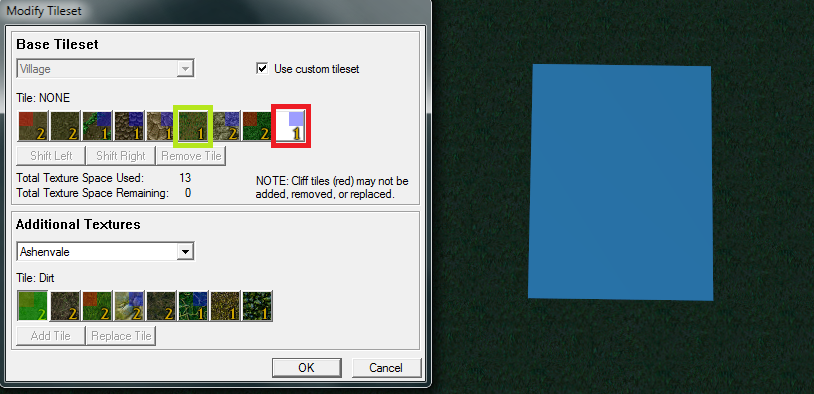
Select Advanced from the menu bar and go to Modify Tileset. Tick the box that says Use custom tileset and you can select Additional Textures. Under Cliff Base Tiles - Group 3, locate the Abyss tile and add it to your current tileset. Keep the window open for the next step.
Basic Tile Overgoes
Consider the Modify Tileset window.
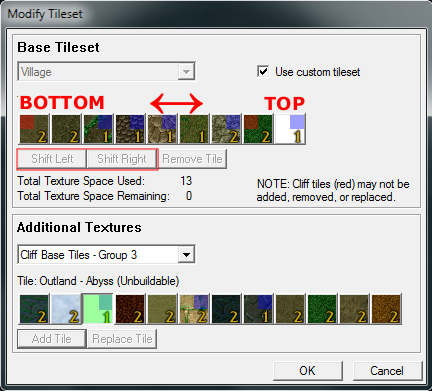
The Shift Right/Left option is key here. As displayed, tiles shifted to the right side of the set are on top, and conversely, tiles shifted to the left are underlying (on the bottom). More concretely, how two tiles interact (read: overgo) when placed next to each other is determined by their precedence. Demonstrated below.

This is helpful to create a natural interaction between land and water, e.g. for shorelines.
If you want to read more on the subject, read Terrain Overgoes - a small guide by Belgarath.
Pitch and Roll
The difference between pitch and roll is which axis the object rotates around.
Consider this simple system of axes
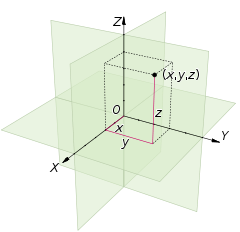
If the object faces along the X axis, pitch rotates the object along the X axis and Roll rotates it around the Y axis.
Also demonstrated here by Admiral Proudmoore.
https://www.hiveworkshop.com/forums...872978-terraining-principles-pitch-roll-2.png
(credits to Belgarath)
In this case black is the pitch angle and red is the roll angle.
Pitch and roll values are usually split in two: positive and negative values. Setting max pitch/roll to a positive integer tilts doodads/destructibles to fit the terrain gradient, or if the slope is too steep, the max value set by you in the object editor. Negative values on the other hand forces the object to rotate regardless of the terrain gradient.
We want the negative values.
To set a negative value, hold down SHIFT before you open Maximum Pitch Angle/Max Roll Angle.
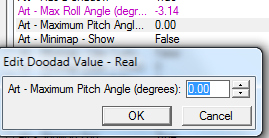
The editor claims to want the value in degrees, but what it actually wants is radians (or rather the decimal form of it). Here is a simple conversion table for some important values. The Decimal column is the value you input in the editor.
Reflected Bodies
A reflection is an optical illusion; a duplication of an object that appears identical but reversed. Formally, if a point of an object has coordinates (x, y, z) then the image of this point (as reflected by a mirror in the y, z plane) has coordinates (-x, y, z).
Start by doing a simple scene like the one below. Lower the ground so you reach water level where you placed your alpha tiles, then place a tree of your choice. Now create a duplica of the tree your picked, i.e. copy your tree model in the object editor and name the new object something along the lines of "Tree (Reflected)". Place the duplica in the exact same spot as the first tree you placed, with the same rotation and scaling.

Now the magic. We want to flip the other doodad upside down. From what we know already, all we need to do is set a negative pitch or roll value, i.e. set the value to -3.14. As you see below, the tree looks like it's reflected on the water surface. This is essentially all there is to it.

Closing
The rest is up to you. Think about how the light hits the object and how it is likely to reflect. Also, on a more recent note: I have noticed a trend in new terrainers. They ignore all the fundamentals of terraining and just add reflections. I know reflections are awesome and all, but don't overdo it, and don't skip the basics before you do this.
A shitty terrain with awesome reflections is still a shitty terrain.
I cannot stress this enough.
Have fun,
fladdermasken
Example from my personal gallery:
The river boat reflects on the still surface.
What you actually see is the unseen (bottom) sides of the skybox and another river boat turned upside down.
Shouldn't be so hard to walk you, a fairly average terrainer, through this. I will step-by-step cover importing the alpha tile in the import manager, show you basic tile overgoes, teach you some basic principles of pitch and roll with negative values and finish with an overlook on reflected bodies and some properties they inherit.
NOTE: READ THIS IS YOU WANT TO USE IT FOR PLAYABLE MAPS
There is a question I have been getting about this since July 2010 when I first posted it. Does this work for playable maps i.e. with the standard isometric game camera? The answer is, yes. But you need one more thing for it. The standard WE skybox isn't a full box; it has two sides missing. The upper side and the lower side. This is because in game you only really see it from conventional angles in cinematics. So if you apply the alpha tile with the standard game camera on, you will see a tiny bit of sky texture and then pitch black. You are getting the lower side of the skybox. To fix this you need a skybox with no missing sides, alternatively a skysphere. I don't have one so I can't attach one here, but feel free to go to the Request forum and try your luck.
Now get on with the tutorial.
Tools & Requirements
Alpha Tile - View attachment Alpha Tile.rar
Background knowledge - At least average terraining experience and knowledge of the interchangeable concept of radians and degrees.
DungeonM's UTM - The Ultimate Terraining Map 3.0 - Wc3C.net
Amendment:
Actually you can use whichever template map you want to, just make sure you can reach the water level with the lower height brush alone.
Import the Alpha Tile
Open up your map. Open IM and import the Alpha Tile. Now we need to set the file path. Since I conveniently named my tile Outland_Abyss.blp we can replace the Outland Abyss tile with our alpha tile. So find Outland_Abyss.blp in IM and open up Imported File Properties (on right-click or double-click). Tick the box that says Use custom path. Notice that the text-field Full Path: becomes editable. Change this field to TerrainArt\Outland\Outland_Abyss.blp and hit OK.
Now you're done. Save your map, exit world editor and start your map up again. The texture has now loaded.[/stable]
Amendment:
If you want to use a different path, be my guest.
- Ashenvale --
TerrainArt\Ashenvale\Ashen_Dirt.blp
TerrainArt\Ashenvale\Ashen_DirtRough.blp
TerrainArt\Ashenvale\Ashen_Grass.blp
TerrainArt\Ashenvale\Ashen_Rcok.blp
TerrainArt\Ashenvale\Ashen_GrassLumpy.blp
TerrainArt\Ashenvale\Ashen_Vines.blp
TerrainArt\Ashenvale\Ashen_DirtGrass.blp
TerrainArt\Ashenvale\Ashen_Leaves.blp
- Barrens --
TerrainArt\Barrens\Barrens_Dirt.blp
TerrainArt\Barrens\Barrens_DirtRough.blp
TerrainArt\Barrens\Barrens_Pebbles.blp
TerrainArt\Barrens\Barrens_DirtGrass.blp
TerrainArt\Barrens\Barrens_Desert.blp
TerrainArt\Barrens\Barrens_DesertDark.blp
TerrainArt\Barrens\Barrens_Rock.blp
TerrainArt\Barrens\Barrens_Grass.blp
- Cityscape --
TerrainArt\Cityscape\City_Dirt.blp
TerrainArt\Cityscape\City_DirtRough.blp
TerrainArt\Cityscape\City_BlackMarble.blp
TerrainArt\Cityscape\City_BrickTiles.blp
TerrainArt\Cityscape\City_SquareTiles.blp
TerrainArt\Cityscape\City_RoundTiles.blp
TerrainArt\Cityscape\City_Grass.blp
TerrainArt\Cityscape\City_GrassTrim.blp
TerrainArt\Cityscape\City_WhiteMarble.blp
- Dalaran --
TerrainArt\Dalaran\Dalaran_Dirt.blp
TerrainArt\Dalaran\Dalaran_DirtRough.blp
TerrainArt\Dalaran\Dalaran_BlackMarble.blp
TerrainArt\Dalaran\Dalaran_BrickTiles.blp
TerrainArt\Dalaran\Dalaran_SquareTiles.blp
TerrainArt\Dalaran\Dalaran_RoundTiles.blp
TerrainArt\Dalaran\Dalaran_Grass.blp
TerrainArt\Dalaran\Dalaran_GrassTrim.blp
TerrainArt\Dalaran\Dalaran_WhiteMarble.blp
- Dungeon --
TerrainArt\Dungeon\Cave_Dirt.blp
TerrainArt\Dungeon\Cave_Brick.blp Brick:
TerrainArt\Dungeon\Cave_RedStones.blp
TerrainArt\Dungeon\Cave_LavaCracks.blp
TerrainArt\Dungeon\Cave_Lava.blp
TerrainArt\Dungeon\Cave_DarkRocks.blp
TerrainArt\Dungeon\Cave_GreyStones.blp
TerrainArt\Dungeon\Cave_SquareTiles.blp
- Lordaeron Fall --
TerrainArt\LordaeronFall\Lordf_Dirt.blp
TerrainArt\LordaeronFall\Lordf_DirtRough.blp
TerrainArt\LordaeronFall\Lordf_DirtGrass.blp
TerrainArt\LordaeronFall\Lordf_Rock.blp
TerrainArt\LordaeronFall\Lordf_Grass.blp
TerrainArt\LordaeronFall\Lordf_GrassDark.blp
- Lordaeron Summer --
TerrainArt\LordaeronSummer\Lords_Dirt.blp
TerrainArt\LordaeronSummer\Lords_DirtRough.blp
TerrainArt\LordaeronSummer\Lords_DirtGrass.blp
TerrainArt\LordaeronSummer\Lords_Rock.blp
TerrainArt\LordaeronSummer\Lords_Grass.blp
TerrainArt\LordaeronSummer\Lords_GrassDark.blp
- Lordaeron Winter --
TerrainArt\LordaeronWinter\Lordw_Dirt.blp
TerrainArt\LordaeronWinter\Lordw_DirtRough.blp
TerrainArt\LordaeronWinter\Lordw_SnowGrass.blp
TerrainArt\LordaeronWinter\Lordw_Rock.blp
TerrainArt\LordaeronWinter\Lordw_Grass.blp
TerrainArt\LordaeronWinter\Lordw_Snow.blp
Northrend
TerrainArt\Northrend\North_dirt.blp
TerrainArt\Northrend\North_dirtdark.blp
TerrainArt\Northrend\North_rock.blp
TerrainArt\Northrend\North_Grass.blp
TerrainArt\Northrend\North_ice.blp
TerrainArt\Northrend\North_Snow.blp
TerrainArt\Northrend\North_SnowRock.blp
- Village --
TerrainArt\Village\Village_Dirt.blp
TerrainArt\Village\Village_DirtRough.blp
TerrainArt\Village\Village_Crops.blp
TerrainArt\Village\Village_CobblePath.blp
TerrainArt\Village\Village_StonePath.blp
TerrainArt\Village\Village_GrassShort.blp
TerrainArt\Village\Village_Rocks.blp
TerrainArt\Village\Village_GrassThick.blp
- Village Fall --
TerrainArt\VillageFall\VillageFall_Dirt.blp
TerrainArt\VillageFall\VillageFall_DirtRough.blp
TerrainArt\VillageFall\VillageFall_Crops.blp
TerrainArt\VillageFall\VillageFall_CobblePath.blp
TerrainArt\VillageFall\VillageFall_StonePath.blp
TerrainArt\VillageFall\VillageFall_GrassShort.blp
TerrainArt\VillageFall\VillageFall_Rocks.blp
TerrainArt\VillageFall\VillageFall_GrassThick.blp
- Underground --
TerrainArt\Dungeon2\GDirt.blp
TerrainArt\Dungeon2\GBrick.blp
TerrainArt\Dungeon2\GRedStones.blp
TerrainArt\Dungeon2\GLavaCracks.blp
TerrainArt\Dungeon2\GLava.blp
TerrainArt\Dungeon2\GDrakRocks.blp
TerrainArt\Dungeon2\GGreyStones.blp
TerrainArt\Dungeon2\GSquareTiles.blp
-Felwood--
TerrainArt\Felwood\Felwood_Dirt.blp Soil:
TerrainArt\Felwood\Felwood_DirtRough.blp
TerrainArt\Felwood\Felwood_Poison.blp
TerrainArt\Felwood\Felwood_Rock.blp
TerrainArt\Felwood\Felwood_Vines.blp
TerrainArt\Felwood\Felwood_Grass.blp
TerrainArt\Felwood\Felwood_Leaves.blp
- Dalaran Ruins --
TerrainArt\DalaranRuins\DRuins_Dirt.blp
TerrainArt\DalaranRuins\DRuins_DirtRough.blp
TerrainArt\DalaranRuins\DRuins_BlackMarble.blp
TerrainArt\DalaranRuins\DRuins_BrickTiles.blp Brick:
TerrainArt\DalaranRuins\DRuins_SquareTiles.blp
TerrainArt\DalaranRuins\DRuins_RoundTiles.blp
TerrainArt\DalaranRuins\DRuins_Grass.blp
TerrainArt\DalaranRuins\DRuins_GrassTrim.blp
TerrainArt\DalaranRuins\DRuins_WhiteMarble.blp
- Black Citadel --
TerrainArt\BlackCitadel\Citadel_Dirt.blp
TerrainArt\BlackCitadel\Citadel_DirtLight.blp
TerrainArt\BlackCitadel\Citadel_RoughDirt.blp
TerrainArt\BlackCitadel\Citadel_FlatStones.blp
TerrainArt\BlackCitadel\Citadel_SmallBricks.blp
TerrainArt\BlackCitadel\Citadel_LargeBricks.blp
TerrainArt\BlackCitadel\Citadel_SquareTiles.blp
TerrainArt\BlackCitadel\Citadel_DarkTiles.blp
- Icecrown --
TerrainArt\Icecrown\Ice_Dirt.blp
TerrainArt\Icecrown\Ice_DirtRough.blp
TerrainArt\Icecrown\Ice_DarkIce.blp
TerrainArt\Icecrown\Ice_BlackBricks.blp
TerrainArt\Icecrown\Ice_RuneBricks.blp
TerrainArt\Icecrown\Ice_TiledBricks.blp
TerrainArt\Icecrown\Ice_Ice.blp
TerrainArt\Icecrown\Ice_BlackSquares.blp
TerrainArt\Icecrown\Ice_Snow.blp
- Outland --
TerrainArt\Outland\Outland_Dirt.blp
TerrainArt\Outland\Outland_DirtLight.blp
TerrainArt\Outland\Outland_RoughDirt.blp
TerrainArt\Outland\Outland_DirtCracks.blp
TerrainArt\Outland\Outland_FlatStones.blp
TerrainArt\Outland\Outland_Rock.blp
TerrainArt\Outland\Outland_FlatStonesLight.blp
TerrainArt\Outland\Outland_Abyss.blp
- Shunken Ruins --
TerrainArt\Ruins\Ruins_Dirt.blp
TerrainArt\Ruins\Ruins_DirtRough.blp
TerrainArt\Ruins\Ruins_DirtGrass.blp
TerrainArt\Ruins\Ruins_SmallBricks.blp
TerrainArt\Ruins\Ruins_Sand.blp
TerrainArt\Ruins\Ruins_LargeBricks.blp
TerrainArt\Ruins\Ruins_RoundTiles.blp
TerrainArt\Ruins\Ruins_Grass.blp
TerrainArt\Ruins\Ruins_GrassDark.blp
Select Advanced from the menu bar and go to Modify Tileset. Tick the box that says Use custom tileset and you can select Additional Textures. Under Cliff Base Tiles - Group 3, locate the Abyss tile and add it to your current tileset. Keep the window open for the next step.
Basic Tile Overgoes
Consider the Modify Tileset window.
The Shift Right/Left option is key here. As displayed, tiles shifted to the right side of the set are on top, and conversely, tiles shifted to the left are underlying (on the bottom). More concretely, how two tiles interact (read: overgo) when placed next to each other is determined by their precedence. Demonstrated below.
This is helpful to create a natural interaction between land and water, e.g. for shorelines.
If you want to read more on the subject, read Terrain Overgoes - a small guide by Belgarath.
Pitch and Roll
The difference between pitch and roll is which axis the object rotates around.
Consider this simple system of axes
If the object faces along the X axis, pitch rotates the object along the X axis and Roll rotates it around the Y axis.
Also demonstrated here by Admiral Proudmoore.
https://www.hiveworkshop.com/forums...872978-terraining-principles-pitch-roll-2.png
(credits to Belgarath)
In this case black is the pitch angle and red is the roll angle.
Pitch and roll values are usually split in two: positive and negative values. Setting max pitch/roll to a positive integer tilts doodads/destructibles to fit the terrain gradient, or if the slope is too steep, the max value set by you in the object editor. Negative values on the other hand forces the object to rotate regardless of the terrain gradient.
We want the negative values.
To set a negative value, hold down SHIFT before you open Maximum Pitch Angle/Max Roll Angle.
The editor claims to want the value in degrees, but what it actually wants is radians (or rather the decimal form of it). Here is a simple conversion table for some important values. The Decimal column is the value you input in the editor.
| Degrees | Radians | Decimal |
360 | 2 π | 6.28 |
270 | 1.5 π | 4.71 |
180 | π | 3.14 |
90 | 0.5 π | 1.57 |
Reflected Bodies
A reflection is an optical illusion; a duplication of an object that appears identical but reversed. Formally, if a point of an object has coordinates (x, y, z) then the image of this point (as reflected by a mirror in the y, z plane) has coordinates (-x, y, z).
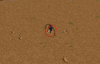
Start by doing a simple scene like the one below. Lower the ground so you reach water level where you placed your alpha tiles, then place a tree of your choice. Now create a duplica of the tree your picked, i.e. copy your tree model in the object editor and name the new object something along the lines of "Tree (Reflected)". Place the duplica in the exact same spot as the first tree you placed, with the same rotation and scaling.
Now the magic. We want to flip the other doodad upside down. From what we know already, all we need to do is set a negative pitch or roll value, i.e. set the value to -3.14. As you see below, the tree looks like it's reflected on the water surface. This is essentially all there is to it.
Closing
The rest is up to you. Think about how the light hits the object and how it is likely to reflect. Also, on a more recent note: I have noticed a trend in new terrainers. They ignore all the fundamentals of terraining and just add reflections. I know reflections are awesome and all, but don't overdo it, and don't skip the basics before you do this.
A shitty terrain with awesome reflections is still a shitty terrain.
I cannot stress this enough.
Have fun,
fladdermasken
Attachments


Last edited:


")
")


