- Joined
- Jul 1, 2009
- Messages
- 1,147
Key Words: Submenu, Custom Abilities, Custom Buttons
Difficulty: Easy
Length: Long
Author Forum Name: Rispetto
Author SC2 Name/Code: Rispetto.436
Welcome, tutorial forum forgoers! I wish to instruct you how to create a submenu based around custom abilities. This took me forever (no, seriously, forever) and about 10 forum topic threads on the editor help section to figure out, and so I've decided to make it easier on people trying to do what I did, so here it is:
Edit: If you download my map at the bottom, the custom icon will not show up on the ability. This is because I didn't properly make the icon 76x76 pixels, and thus it will not show up properly (I think it's 75x76). I've decided not to spend the time to go back and fix this. Simply make the image properly and you won't have an issue.
Note: If you change around the dependencies after creating any custom abilities, it is known to mess things up. For me, I decided later in map development to add a liberty campaign dependency so that I could add a few units such as "Colonist". If you do this, you will not be able to access your custom made abilities. There is an easy fix, of course; simply save and shut down the editor, then re-open it (thus disabled the view of any dependencies other than the default given ones). It is recommended you know going into the map you are creating whether or not you wish to use any dependencies, and if you do, turn them on before editing/creating any abilities/units/behaviors/attacks etc etc.
Content:
Step 1, P1 - Creating custom abilities
Step 1, P2 - Creating custom buttons
Step 1, P3 - Linking buttons & abilities
Step 2 - Giving a given unit those abilities
Step 3 - Putting those abilities into a submenu
Step 1: Abilities, Part 1 (Custom Abilities)
Some people find this difficult to do, and so that's why I've added this part to the tutorial.
If you already know how to make custom abilities and link custom buttons to those abilities (the linking part is essential) then just skip on ahead to Step 2.
A: Open up your editor, and click the "Data" tab located at the top.

B: Under "Data Type" at the top, click the drop-down menu, and select "Abilities".
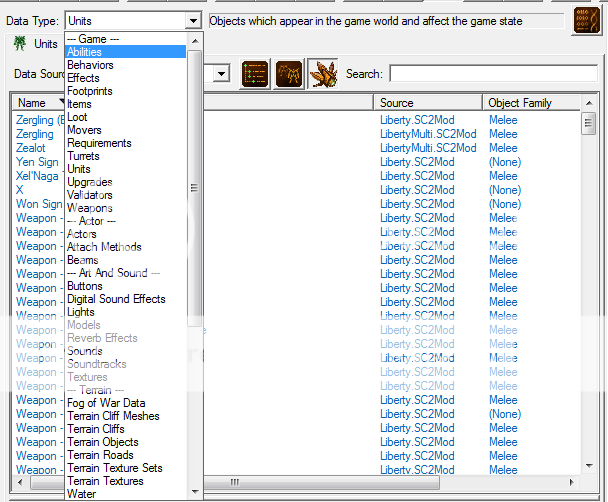
C: Right click anywhere inside the field box and select "Add Object"
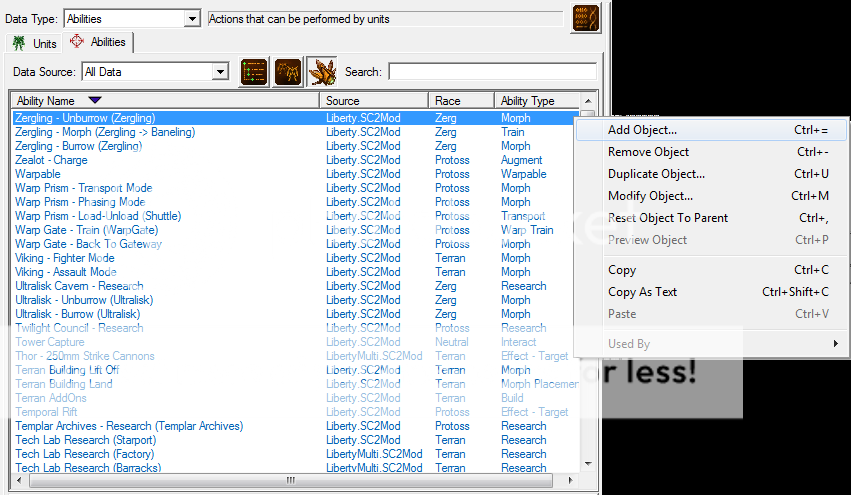
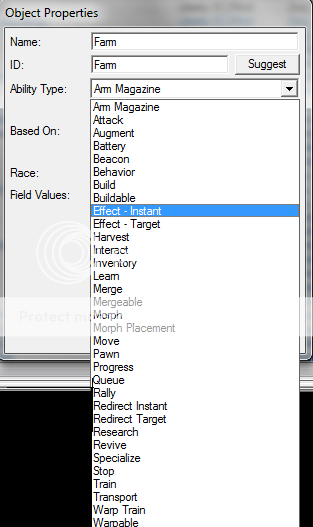
D: Select a name for your new ability, it can be anything you like. For my example, I'll be using the name "Farm", as in to begin farming crops. After this is done, select "Suggest" for the ID (makes it simple), and change the "Ability Type:" to "Effect - Instant" (this is a very general ability type. You can change this to whatever you like, if you know what you're doing. If you are new, I would suggest selecting this).
C: Either create a custom button, or use a pre-existing button to link with the Ability.
For this tutorial I will go out of my way to create a custom ability so that others may learn how to do so. After I have created the button, I will go back and link it with the ability in "Step 1: Abilities, Part 3". If you already know how to create a custom button, go ahead and skip to "... Part 3"
Note: Whatever button you choose to use to link with the ability, given it be a custom or existing one, it must be used as the "Ability Command" type (if you don't know what that is, I will cover it later in step 3) when assigning the ability to a unit.
Step 1: Abilities, Part 2 (Custom Buttons)
A: To create a new button, select "Data Type:" -> "---Arts and Sounds---" -> "Buttons".
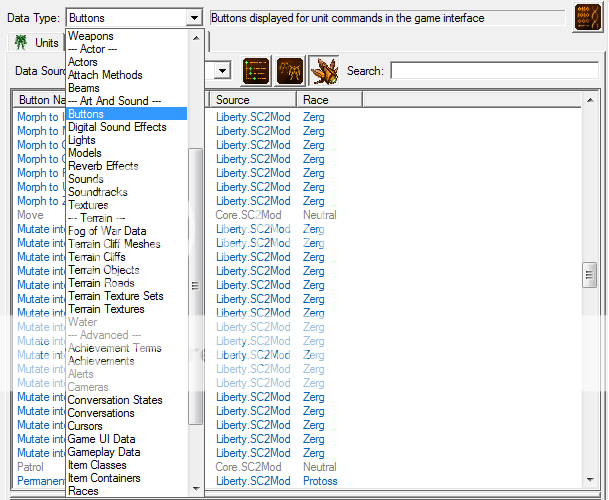
B: Right click, then select "Add Object".
C: Select and name, then press "Suggest" under ID.
D: After this is completed, select your new button, and change the properties around. This is where you can get creative, seeing as how you can import your own pictures and set them to the image icons.
I will not be covering how to import pictures here, but just an FYI they must be 76x76 in order to work as icons for buttons.
I've gone ahead and created my own button for the job.. it's a picture of a "Hoe" which is (obviously) commonly used in Farming.
To change the icon, click "Browse" under "Alert Icon - File:" and find the icon you wish to choose.
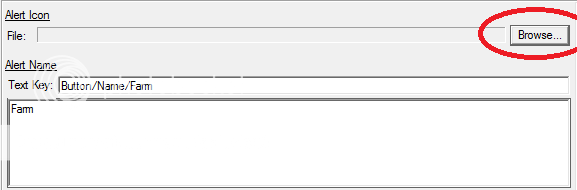
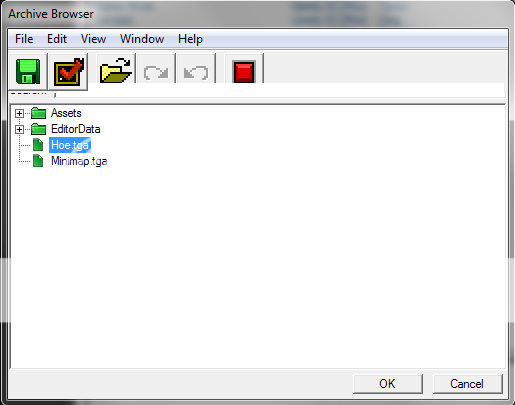
By default, it brings you to a list of icons used within the StarCraft II game itself. But for my custom icon, I closed the drop-down menu "EditorData" to view my imported .tga file more clearly, then selected it.
Once you've selected your icon, scroll down to "Icon - File:" and browse, then select the image again.
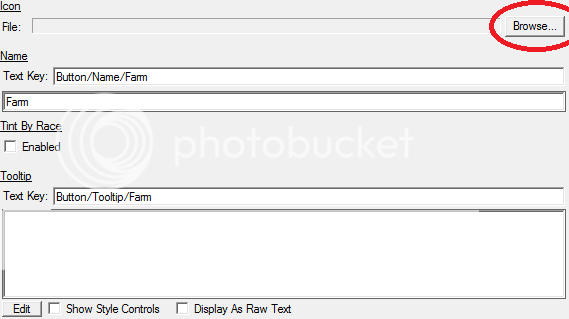
And wall-ah, you have your custom button completed.
Step 1: Abilities, Part 3 (Linking Custom Abilities & Buttons)
Now that you have your custom ability and button completed, it's time to link the two together. This is an extremely crucial role if you want your ability/button to work in a submenu. Many people skip this step, which is fine, but only if you want your ability to only work on the first command card.
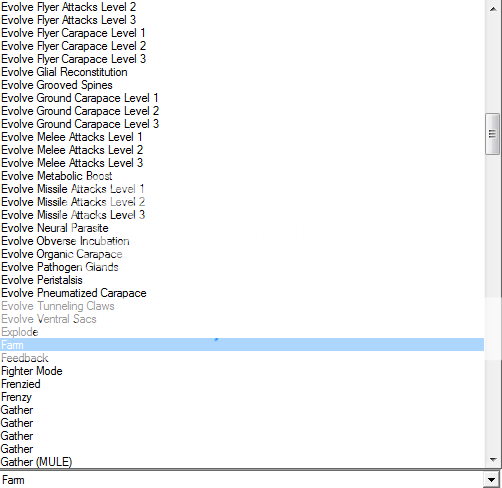
A: Head back over to "Abilities", and select your custom ability. For me, this is called Farm.
B: After selected, press the "Ability" tab located at the right hand side of the Data viewer.

C: After the "Ability" tab is selected, click on the "Execute" field, then look down at "Default Button". By default, this will be set to "(None)".
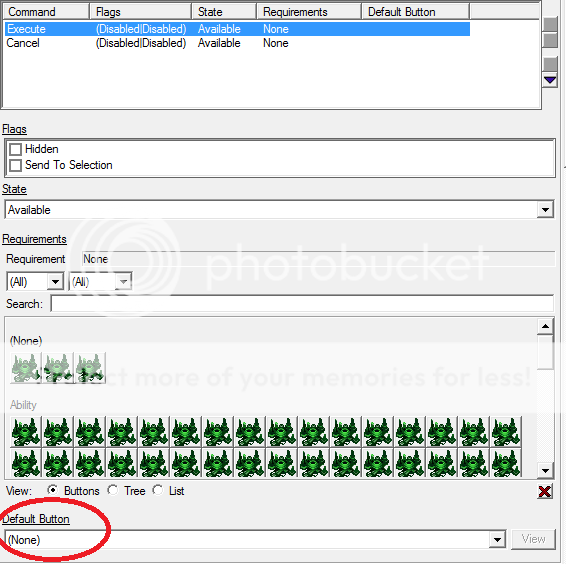
Change the field from "(None)" to your custom button. This can be done with a drop-down field after clicking it.
And wall-ah, your custom ability and button are linked. You can now go on to adding the ability to your custom unit, and then transferring that ability to a submenu.
Step 2: Unit (Adding Your Abilities & Buttons)
To add your custom abilities and buttons to a unit, you must first choose what unit will receive the honor of gaining these abilities. For my example, I'm just going to use a "Marine". He's not dependent upon any campaign dependencies, and he's an extremely simple unit.
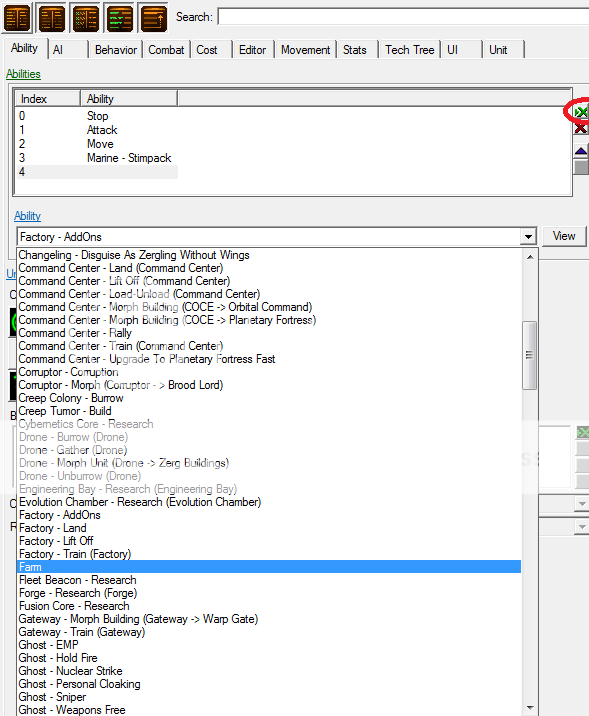
A: Select your unit, and give him the custom ability under "Abilities".
Note: For Step 2, I will be giving units the abilities and not putting them in submenus. I will add sub-menus in the third step.
B: Under command card, find a new location for your button, then press "Add Button", and locate your custom made button. Select it, and it will add it to the unit.
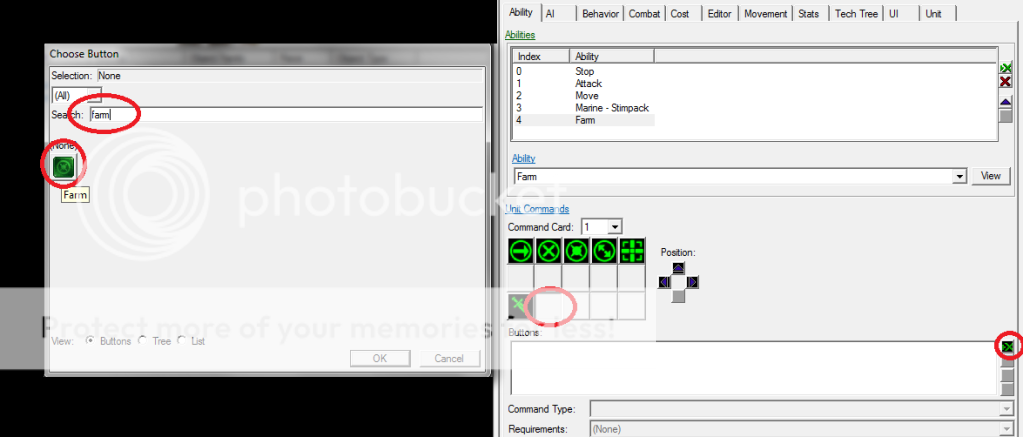
C: Select your newly created button on the command card, then under "Command Type", change it to "Ability Command". Once this is completed, change "Ability" to your custom ability, mine is labeled "Farm".
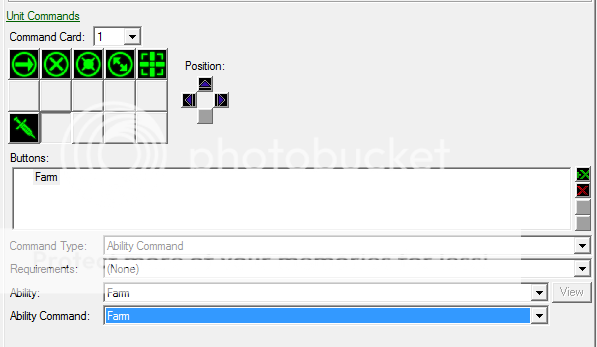
Note: If you've skipped linking your custom ability and custom button together, then at step C:, under "Ability Command:" it will remain blank. This is okay if you intend to keep the ability on the first command card. The only reason to have anything filled in other than just "Ability:" is if you wish to have submenus.
However, if you wish to have a submenu and there are no selections under "Ability Command:", please go back and re-do Step 1: Abilities, Part 3 (Linking Custom Abilities & Buttons) in order to fix this.
And wall-ah, my Marine unit now has the ability to "Farm"! Though at the current state, the actual ability doesn't do much.
This is where triggers come in. I will not be supplying you with a tutorial on how to create custom abilities using triggers, I am only showing you how to put an ability on a unit's command card, which can then be used, and in succession be used as an event in a trigger

Step 3: Submenu (Creating A Submenu, Adding Abilities To It)
Now that you know how to make custom abilities and buttons, and also apply them to a unit, I will now quickly teach you how to make a submenu for that unit (an example would be "SCV - Build Structure" is a submenu, though it is a lot more complicated, considering its buttons actually build structures. In my tutorial, only abilities are used in the submenu).
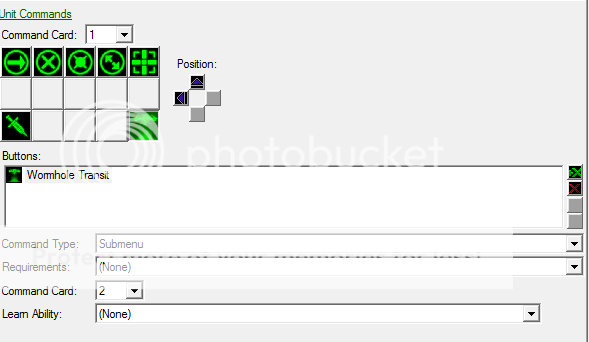
A: Select your custom unit in the Data editor, and open up it's Command Card. Add a new button (use whatever icon you want, it doesn't matter), but under "Command Type", instead of putting "Ability Command" put in "Submenu". Where it says "Command Card", select "2" in the drop-down field.
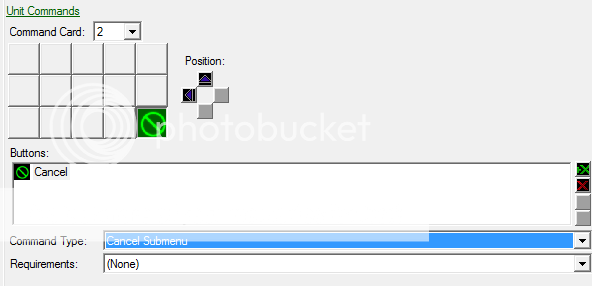
B: After this is completed, your submenu needs abilities and a cancel button (if you wish there to be one) allowing the user to go back to the first command card. To edit what's in the submenu, click "Command Card: 2", then add an ability (again whatever icon, doesn't matter) then give it the "Command Type - Cancel Submenu"
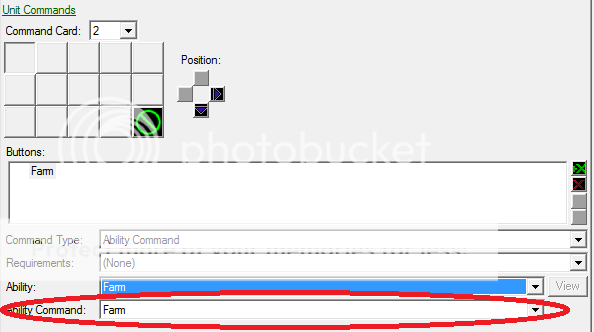
C: After that's completed, simply add the abilities you want to the command card. Before you finish however, there are two things you must check:
1: That the ability you are using is only on one command card at a time. If the ability is on more than one command card, it simply will not work.
2: The "Ability Command" field is filled in with the name of the custom or preset ability. If this field is blank, please go back and re-do "Step 1: Abilities, Part 3 (Linking Custom Abilities & Buttons)". If the "Ability Command" field remains blank, the ability simply may not work. As well, if the command card (aka submenu) has no actively working abilities, the button will not appear on the unit. It will appear that there simply is no submenu button.
And wall-ah, your unit is complete! If you've followed my steps to the 'T', you should have a working Submenu! If they didn't, well I suggest you start from the top and start reading again!")
Note: If my tutorial is flawed in any way/shape/form then please leave a comment below or send me a private message telling me of where it is exactly my tutorial is flawed. It's probably due to the fact it's 4:53 AM where I am as I write this, but still, I do not want mis-leading or inaccurate information in my tutorial (obviously).
Please note: I messed up the dimensions of the image. It's too small, and that's why it doesn't appear in the game. Rest assured if you make it 76x76 it will actually work (lol)
Attached to this post is a .zip file which contains the following:
1: The map in which I used to take screenshots with, it currently has the abilities and submenus.
2: The screenshots posted above to assist anyone further who needs it, but only needs the screenshots to understand what it is I'm teaching.
Thanks for reading!
Difficulty: Easy
Length: Long
Author Forum Name: Rispetto
Author SC2 Name/Code: Rispetto.436
Welcome, tutorial forum forgoers! I wish to instruct you how to create a submenu based around custom abilities. This took me forever (no, seriously, forever) and about 10 forum topic threads on the editor help section to figure out, and so I've decided to make it easier on people trying to do what I did, so here it is:
Edit: If you download my map at the bottom, the custom icon will not show up on the ability. This is because I didn't properly make the icon 76x76 pixels, and thus it will not show up properly (I think it's 75x76). I've decided not to spend the time to go back and fix this. Simply make the image properly and you won't have an issue.
Note: If you change around the dependencies after creating any custom abilities, it is known to mess things up. For me, I decided later in map development to add a liberty campaign dependency so that I could add a few units such as "Colonist". If you do this, you will not be able to access your custom made abilities. There is an easy fix, of course; simply save and shut down the editor, then re-open it (thus disabled the view of any dependencies other than the default given ones). It is recommended you know going into the map you are creating whether or not you wish to use any dependencies, and if you do, turn them on before editing/creating any abilities/units/behaviors/attacks etc etc.
Content:
Step 1, P1 - Creating custom abilities
Step 1, P2 - Creating custom buttons
Step 1, P3 - Linking buttons & abilities
Step 2 - Giving a given unit those abilities
Step 3 - Putting those abilities into a submenu
Step 1: Abilities, Part 1 (Custom Abilities)
Some people find this difficult to do, and so that's why I've added this part to the tutorial.
If you already know how to make custom abilities and link custom buttons to those abilities (the linking part is essential) then just skip on ahead to Step 2.
A: Open up your editor, and click the "Data" tab located at the top.
B: Under "Data Type" at the top, click the drop-down menu, and select "Abilities".
C: Right click anywhere inside the field box and select "Add Object"
D: Select a name for your new ability, it can be anything you like. For my example, I'll be using the name "Farm", as in to begin farming crops. After this is done, select "Suggest" for the ID (makes it simple), and change the "Ability Type:" to "Effect - Instant" (this is a very general ability type. You can change this to whatever you like, if you know what you're doing. If you are new, I would suggest selecting this).
C: Either create a custom button, or use a pre-existing button to link with the Ability.
For this tutorial I will go out of my way to create a custom ability so that others may learn how to do so. After I have created the button, I will go back and link it with the ability in "Step 1: Abilities, Part 3". If you already know how to create a custom button, go ahead and skip to "... Part 3"
Note: Whatever button you choose to use to link with the ability, given it be a custom or existing one, it must be used as the "Ability Command" type (if you don't know what that is, I will cover it later in step 3) when assigning the ability to a unit.
Step 1: Abilities, Part 2 (Custom Buttons)
A: To create a new button, select "Data Type:" -> "---Arts and Sounds---" -> "Buttons".
B: Right click, then select "Add Object".
C: Select and name, then press "Suggest" under ID.
D: After this is completed, select your new button, and change the properties around. This is where you can get creative, seeing as how you can import your own pictures and set them to the image icons.
I will not be covering how to import pictures here, but just an FYI they must be 76x76 in order to work as icons for buttons.
I've gone ahead and created my own button for the job.. it's a picture of a "Hoe" which is (obviously) commonly used in Farming.
To change the icon, click "Browse" under "Alert Icon - File:" and find the icon you wish to choose.
By default, it brings you to a list of icons used within the StarCraft II game itself. But for my custom icon, I closed the drop-down menu "EditorData" to view my imported .tga file more clearly, then selected it.
Once you've selected your icon, scroll down to "Icon - File:" and browse, then select the image again.
And wall-ah, you have your custom button completed.
Step 1: Abilities, Part 3 (Linking Custom Abilities & Buttons)
Now that you have your custom ability and button completed, it's time to link the two together. This is an extremely crucial role if you want your ability/button to work in a submenu. Many people skip this step, which is fine, but only if you want your ability to only work on the first command card.
A: Head back over to "Abilities", and select your custom ability. For me, this is called Farm.
B: After selected, press the "Ability" tab located at the right hand side of the Data viewer.
C: After the "Ability" tab is selected, click on the "Execute" field, then look down at "Default Button". By default, this will be set to "(None)".
Change the field from "(None)" to your custom button. This can be done with a drop-down field after clicking it.
And wall-ah, your custom ability and button are linked. You can now go on to adding the ability to your custom unit, and then transferring that ability to a submenu.
Step 2: Unit (Adding Your Abilities & Buttons)
To add your custom abilities and buttons to a unit, you must first choose what unit will receive the honor of gaining these abilities. For my example, I'm just going to use a "Marine". He's not dependent upon any campaign dependencies, and he's an extremely simple unit.
A: Select your unit, and give him the custom ability under "Abilities".
Note: For Step 2, I will be giving units the abilities and not putting them in submenus. I will add sub-menus in the third step.
B: Under command card, find a new location for your button, then press "Add Button", and locate your custom made button. Select it, and it will add it to the unit.
C: Select your newly created button on the command card, then under "Command Type", change it to "Ability Command". Once this is completed, change "Ability" to your custom ability, mine is labeled "Farm".
Note: If you've skipped linking your custom ability and custom button together, then at step C:, under "Ability Command:" it will remain blank. This is okay if you intend to keep the ability on the first command card. The only reason to have anything filled in other than just "Ability:" is if you wish to have submenus.
However, if you wish to have a submenu and there are no selections under "Ability Command:", please go back and re-do Step 1: Abilities, Part 3 (Linking Custom Abilities & Buttons) in order to fix this.
And wall-ah, my Marine unit now has the ability to "Farm"! Though at the current state, the actual ability doesn't do much.
This is where triggers come in. I will not be supplying you with a tutorial on how to create custom abilities using triggers, I am only showing you how to put an ability on a unit's command card, which can then be used, and in succession be used as an event in a trigger
Step 3: Submenu (Creating A Submenu, Adding Abilities To It)
Now that you know how to make custom abilities and buttons, and also apply them to a unit, I will now quickly teach you how to make a submenu for that unit (an example would be "SCV - Build Structure" is a submenu, though it is a lot more complicated, considering its buttons actually build structures. In my tutorial, only abilities are used in the submenu).
A: Select your custom unit in the Data editor, and open up it's Command Card. Add a new button (use whatever icon you want, it doesn't matter), but under "Command Type", instead of putting "Ability Command" put in "Submenu". Where it says "Command Card", select "2" in the drop-down field.
B: After this is completed, your submenu needs abilities and a cancel button (if you wish there to be one) allowing the user to go back to the first command card. To edit what's in the submenu, click "Command Card: 2", then add an ability (again whatever icon, doesn't matter) then give it the "Command Type - Cancel Submenu"
C: After that's completed, simply add the abilities you want to the command card. Before you finish however, there are two things you must check:
1: That the ability you are using is only on one command card at a time. If the ability is on more than one command card, it simply will not work.
2: The "Ability Command" field is filled in with the name of the custom or preset ability. If this field is blank, please go back and re-do "Step 1: Abilities, Part 3 (Linking Custom Abilities & Buttons)". If the "Ability Command" field remains blank, the ability simply may not work. As well, if the command card (aka submenu) has no actively working abilities, the button will not appear on the unit. It will appear that there simply is no submenu button.
And wall-ah, your unit is complete! If you've followed my steps to the 'T', you should have a working Submenu! If they didn't, well I suggest you start from the top and start reading again!
Note: If my tutorial is flawed in any way/shape/form then please leave a comment below or send me a private message telling me of where it is exactly my tutorial is flawed. It's probably due to the fact it's 4:53 AM where I am as I write this, but still, I do not want mis-leading or inaccurate information in my tutorial (obviously).
Please note: I messed up the dimensions of the image. It's too small, and that's why it doesn't appear in the game. Rest assured if you make it 76x76 it will actually work (lol)
Attached to this post is a .zip file which contains the following:
1: The map in which I used to take screenshots with, it currently has the abilities and submenus.
2: The screenshots posted above to assist anyone further who needs it, but only needs the screenshots to understand what it is I'm teaching.
Thanks for reading!
Attachments
Last edited: