• 🏆 Texturing Contest #33 is OPEN! Contestants must re-texture a SD unit model found in-game (Warcraft 3 Classic), recreating the unit into a peaceful NPC version. 🔗Click here to enter!
  • It's time for the first HD Modeling Contest of 2024. Join the theme discussion for Hive's HD Modeling Contest #6! Click here to post your idea!

[Tutorial #1] Starting off with Unity

Launching Unity3D for the first time is too confusing for most people. This thread's purpose is to explain the interface for you, and how stuff work.


Before launching Unity


Before we get into Unity, I want to point out some things.

Synonyms:
Game - Project
Projects are your game.

Definitions:
Scene:
Think of it as a level. Objects are saved on scenes. Since many of you have played the TFT Orc campaign, think of this like that. Projects are a compilation of scenes, as that campaign is a compilation of maps.

Launching Unity

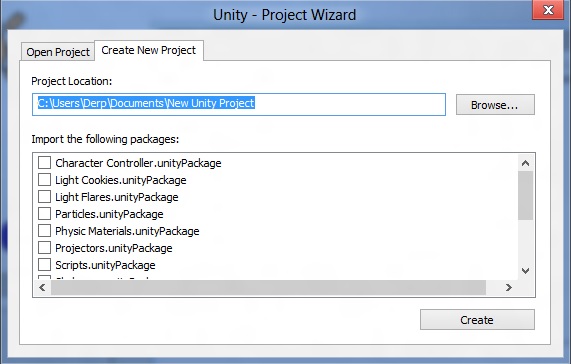
When launching Unity for the first time, it should ask you for a project. Simply click on "Create new Project", and then select a directory where your game's assets will be put in. My advice is to put it in your Documents folder.

Skip everything there, and directly click the "Create" button.
1.jpg


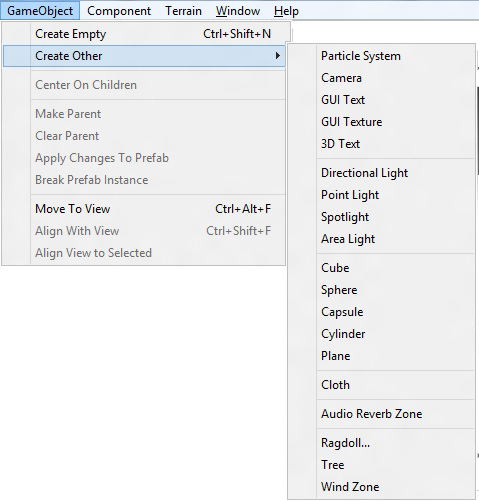
Getting to know the interface

2.jpg

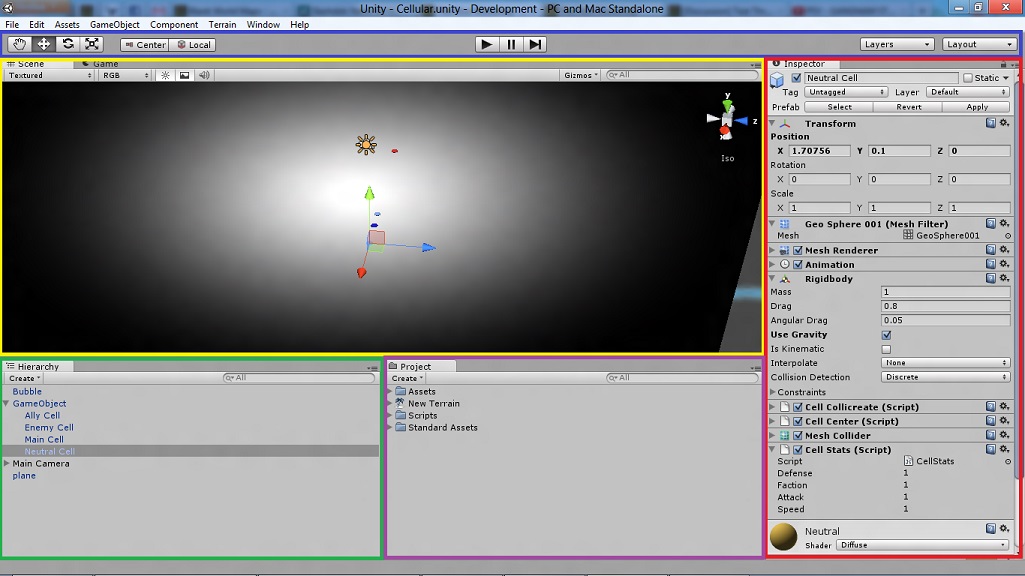
Unity's interface is simple.


The BLUE part is your Toolbar.
It has your basic tools there, such as Grab, Move, Rotate and Scale, in this order.

Past that, the next two buttons are the Transform Gizmo Toggles. You will learn to use them later on.

Next set of buttons are the Play/Pause/Step buttons. You should only use the first two for now.
The Play button launches your game inside unity, allowing you to test scripts and such, while the Pause button pauses the game simulation so that you can modify certain variables.

Next two are the Layer and Layout dropdown menus. The first one is for advanced users, and the second one controls how your Unity layout will look like.
The YELLOW part is your Scene. Here, you may view and alter your scene's looks.
Navigating through your scene is easy.
  • Hold the right mouse button to enter Flythrough mode. This turns your mouse and WASD keys (plus Q and E for up and down) into quick first-person view navigation.
  • Select any GameObject and press the F key. This will center the Scene View and pivot point on the selection.
  • Use the arrow keys to move around on the X/Z plane.
  • Hold Alt and click-drag to orbit the camera around the current pivot point.
  • Hold Alt and middle click-drag to drag the Scene View camera around.
  • Hold Alt and right click-drag to zoom the Scene View. This is the same as scrolling with your mouse wheel.
You may also consider using the Hand tool to drag through the scene (Shortcut Q).


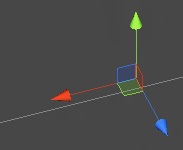
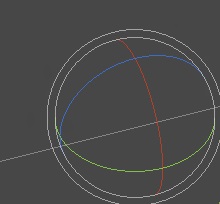
On the top right is the Gizmo tool.
LearningtheInterface-16.jpg

You may use it to quickly move to a certain viewpoint.

You should ignore everything else for now.
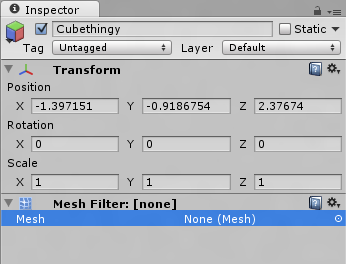
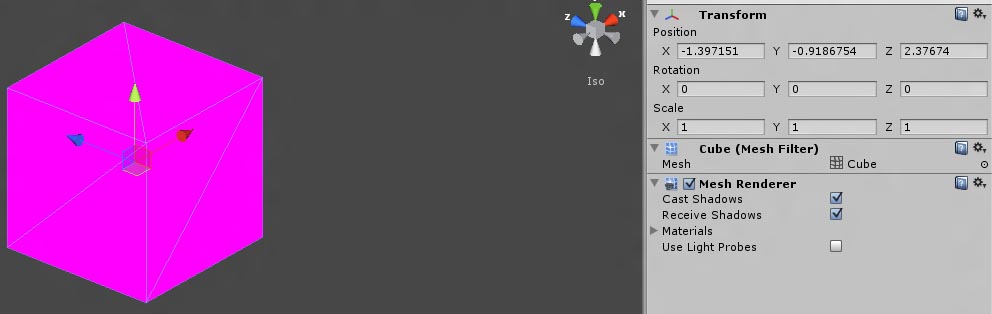
The RED part is your Inspector. Here you may edit your objects.
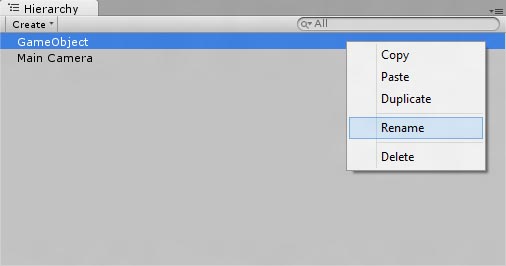
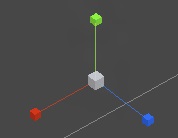
The GREEN part is your Hierarchy.


Unity uses a parent-child system.
Whatever you do to a parent affects the child. Scale parent, scales child. Scale child, parent stays the same.


In the main picture, you can see "Gameobject" and four cells listed under it.
"Gameobject" is the parent, and the cells are children.


The PURPLE part is your Assets.

Everything that's located inside the Assets folder of your project.
WARNING: DO NOT MOVE STUFF OUTSIDE THE UNITY EDITOR. METADATA ASSOCIATED WITH THE ASSETS WILL BE LOST.


This thread is under construction. If you want some explanation on something from the above, I will be happy to include it.
 
Getting to know how stuff works


Right now, you should be viewing a blank scene.

Start off by placing an empty Object.
3.png

Click on Create Empty.


This should create an empty Gameobject in your Hierarchy.

4.jpg

You should rename it to whatever you want.

(You should also notice the existence of Main Camera. We'll get to it later)

Now, all you have is an empty Game Object with a fancy name.
Let's spice things up.

Select your gameobject.
Then navigate to Component/Mesh/ and click on Mesh Filter.

5.png


You should notice a few changes in the inspector.
6.png


When clicked, the object is shown on the inspector.
You will now see components. These are all objects on their own, but unlike your gameobject, those don't exist in your scene, but in your objects themselves.

Before adding a Mesh Filter to your object, Transform showed up.
Transform is a core component. Transform contains the position, rotation and scale of your object.
Position is the location of your object in the game world.
Rotation and Scale do not really matter (special exceptions) unless you have visuals in your object, which we will be doing.

Let's take a look at the Mesh Filter component.

You will see the line "Mesh - None (Mesh)" and a circle with a dot in the middle.

That line means that no mesh is applied to the mesh filter. *damn*.
I call the circle thingy "The Target". Clicking on it will show you all the available meshes you can use for your Mesh Filter. Unfortunately, we only have primitives right now!
7.jpg

Click on the Cube for now.


You'll notice that the visuals of your game object haven't changed. *sadface*.
You only defined what mesh you want it to use. Not if you want it to render or not.

You will have to add the Mesh Renderer component under "Components/Mesh".
Doing so, will get you the following
8.jpg

Sadly, it's pink. That's because there are no materials assigned to it!

Click on the arrow on Mesh Renderer, then the arrow on Materials.
You could use a default one.

no-meme-rage-face.jpg


Go to Project. Remember? The thing that handles all your assets? That.

Click on Create and pick Material.
A material should pop up below. Select it.
9.jpg

This is your material.
Now, let's give it some visuals!

Right click your Material in the Project view, and click "Show in Explorer".
You should be in a folder called "Assets".
Now, drag a texture, any texture, into the folder. Make sure it's in JPG, DDS, PNG or TGA. Preferably PNG, as we'll have no problem with it.

You will notice them appearing in your Project view.

Now, see the part of the inspector that says "None (texture)" and has a button that says "Select"? Click it, and select your texture from the popup window.

You're not done. Go back to your Gameobject, Mesh Renderer, Material, and assign the material we just created.
10.jpg


Wooohooo! We now have a cube with a texture!
Let's not stop here.

If you're unfamiliar with it, "Normals" are a way to add definition without altering a model. Let's do that.

I already have a normal created, so I'm good!

Go back to your material.

11.jpg


See the part that says "Shader" and has a dropdown list with "Diffuse" selected?

Shaders are what actually decides the material's properties. In other words, Materials are what give Shaders the variables to handle how your object is rendered. Toony? Shiny? Whatever you want. You can create your own.

Click on the dropdown list, and go to "Bumped Diffuse".

In your material list, another material slot will pop up.
12.jpg

You know how to do that. You really do.

13.jpg

Woohoo! Our texture now has detail!

On the scene view, on the top left, you will see "Scene" and "Game".
Scene is where you edit stuff, and Game where you see how they look under a camera.
Click on Game.

You probably don't see anything, or a bit of your cube. Let's fix that!

Select your main camera in the hierarchy.
This should pop up on the bottom right of your Scene view
14.jpg

That's the Camera preview. In other word, what the camera sees.
Now, time for you to use the toolbar's tools for the first time!

Click on Move tool (shortcut W), and double click in the Hierarchy. It should take you to the camera's location.

An axis like this should appear on your camera's location
15.jpg


Now, clicking on an axis will allow you to move it on that plane.
Red is for X, Blue for Z and Green for Y.

You will also notice the small squares near the root of the arrows. Those allow you to manipulate your gameobject in the OTHER two planes.
If you click on the blue square, you can move on X and Y, if you click on the red, ZY, and green XZ.

Now, move your camera near your box. If it's already visible, you should skip that.

Now, click the Rotate tool (shortcut E).
16.jpg


The rotate tool allows you to manipulate the rotation of a gameobject. So with this, you can change the direction the camera is looking at.

You should ALWAYS use the red blue green lines to rotate your object.
When clicking on one, it means you will rotate your object on that axis. If someone were to look from East to West, he would turn around his height axis, which in Unity is Y.

Now, rotate your camera towards the GameObject (cube).

Your gameobject might be far from the camera... Let's scale it up... or down!

Click the Scale tool (Shortcut R)
17.jpg

Let's go through with this quickly. You can stretch an object by pulling the boxes. RGB, XYZ. You should have adapted to that already.

The gray box in the middle scales the object. In other words, stretches it to all directions.


Now your gameobject should be viewable. Click on Game!
18.jpg


Oh damn, your normals don't show!

That's because "Scene View" has a directional light that is attached to the your field of view. Game view doesn't have any lights!

Go to Hierarchy, Create, then click Directional Light.

Now, rotate and move it so that it's facing your GameObject!

Et voila!
19.jpg


You have created a cube with a texture!

Now, don't forget, click on File, and click on Save Scene, then click Save Project, and you're done!


Please post comments below and tell me your questions or if you have problems with a certain part of the tutorial!
 
Last edited:
Level 1
Joined
Dec 7, 2008
Messages
823
Followed the two and that was nice. I had followed some videos earlier but this was somewhat better. Now I am going to ask a dumb question. Sorry for that.

I didn't understand that part after bumped diffuse. So I just added the texture I had used earlier. After that there was something about that being incorrect and a button for fix. I clicked that and that made it kind of 3D. What actually needed to be done at that point?
 
Level 18
Joined
Mar 7, 2005
Messages
824
First of all normal maps are based on RGB, while every single color stands for an axis. blue is the main-color because it's the axis you look at (like Z). Those axis, stored in RGB will help the engine calculate shadows and light stuff to simulate more 3d details on your object. This allows you to simply use a plane and simulate pebbles on it without any 3d-deformations. You can create normal maps within the most 3D programs you're working with, like 3dsmax, blender, etc. or also from normal diffuse/greyscale textures with some plugins for example the nvidia tools for photoshop.

The "correct map" button can convert old "black-white" maps into the normal maps to make use of them. If you already created a normal-map and it still asks for correction, then the maps is not marked as "normal map" and instead as "texture map" for example. just go to the texture itself and manually correct it, while uncheck the box that says "use greyscale map". this will correct the info message for u without changing anything..
 
Level 1
Joined
Dec 7, 2008
Messages
823
First of all normal maps are based on RGB, while every single color stands for an axis. blue is the main-color because it's the axis you look at (like Z). Those axis, stored in RGB will help the engine calculate shadows and light stuff to simulate more 3d details on your object. This allows you to simply use a plane and simulate pebbles on it without any 3d-deformations. You can create normal maps within the most 3D programs you're working with, like 3dsmax, blender, etc. or also from normal diffuse/greyscale textures with some plugins for example the nvidia tools for photoshop.

The "correct map" button can convert old "black-white" maps into the normal maps to make use of them. If you already created a normal-map and it still asks for correction, then the maps is not marked as "normal map" and instead as "texture map" for example. just go to the texture itself and manually correct it, while uncheck the box that says "use greyscale map". this will correct the info message for u without changing anything..

I understood the first paragraph but I am not so sure about the second paragraph. "black-white" maps? Do you mean the older 2D games with the 2-axes? I don't understand about what you are saying regarding "texture map" and "use greyscale map". Are you talking about the scenes in unity or the properties of the texture images that I am using?
 
I understood the first paragraph but I am not so sure about the second paragraph. "black-white" maps? Do you mean the older 2D games with the 2-axes? I don't understand about what you are saying regarding "texture map" and "use greyscale map". Are you talking about the scenes in unity or the properties of the texture images that I am using?

I've no experience in B&W normal maps. Texture Maps are your Diffuse textures. Greyscale maps, as I believe, were a way to add shading on a model through textures.
 
Level 1
Joined
Dec 7, 2008
Messages
823
I've no experience in B&W normal maps. Texture Maps are your Diffuse textures. Greyscale maps, as I believe, were a way to add shading on a model through textures.
Normal textures are what I used in the beginning. Then to add details I used the conversion to make it into texture map. Greyscale maps are outdated.

Did I get it correct?
 
Level 18
Joined
Mar 7, 2005
Messages
824
"normal" maps are the colored maps that define the heights and depths. "bump" maps are the black-white maps, they are simply modified greyscale versions of the origional diffuse while black is full height and white 0 height (or was it the other way round?) means grey would be a middle height. today they are still used as "heightmaps" for terraining. You can also use them with unity. Just save them as ".raw" file and load them into the terrain as heightmap.

@Statharas
as said before normal maps are full RGB maps, while each color stands for an axis and stores height information of the high-detail model and simulates shadow and light onto the low-poly model. you could for example use X as red, Y as green and Z as blue color. so from bottom to up and left to right might be red color, and the other way round green, while blue fills the height and the rest of the map.

@Zelda.Alex
Diffuse = normal textured RGB color that gives textures and color to the model
Normal = Currently used heightmaps for models to simulate high details without 3d-deformation on the model. normally you get those maps from high-poly models or from textures
Bump = old heightmaps, where 1 color stands for 100% height and the other for 0%. Neutral grey would be 50%
heightmap = similar to bump maps, but they are still used. for example for terrains, to create mountains etc.

There are still a lot other maps to use: Decal, Detail, Specular, Color-Specular, Vertex, etc.

Normal maps are way more then the old greyscale bumbmaps, cause the only show heights. normal maps are way more complicated. Hope this brings some light into it ^^


*EDIT*

a simple plane with 2 faces.same plane with normal map applied
example3n.jpg
dddtt.jpg

And here are the maps I used. I simply created a black box and blurred it a bit so i get a better normal map
(never use straight heights, like walls (when u look from top to bottom) do it more like hills with smooth steps)
example2q.jpg
exampledy.jpg


as you can see the normal map has red colors for upper right corners and green colors for the bottom left corners. blue fills the rest of the map.
 
Last edited:
Level 1
Joined
Dec 7, 2008
Messages
823
Normal maps are the ones that we make in unity normally when we are making any game. They are the 3D part that we design in unity GUI. bump maps are pictures with illusion of height added. The starting map that I made is "normal map" and the bumped texture that the tutorial had is the "bump map". Am I correct this time?

I am having confusion regarding what is the word "map" being used for?
1. When we are talking about maps are we talking about maps such as the map of a nation but in this case it is the landscape of the game that we are designing.
2. Or when we are talking about maps we are talking about colormaps representing the details of the landscape. These colormaps are being simulated by the unity engine to make the 3D illusion.

I read your explanation 2 times and it seems the actual thing that you are saying is somewhere between these two. The confusion is because we are talking about heights which is a feature related to landscapes or any 3D thing and we are talking about RGB maps. Also the pictures shown are maps? How?

Too many questions and confusion? I am totally new.
 
Level 18
Joined
Mar 7, 2005
Messages
824
yeah basically it's just a "trick" so illusion or simulate heights and depths on something. So you can save faces and just show some more details with just having a simple plane. So maps in combination with normals or bumps are texture maps. just the colors vary as they extract different values from them.

Sorry when I'm confusing you, I'm not that good in explaining stuff ^^
 
Top