Follow along with the video below to see how to install our site as a web app on your home screen.
Note: This feature may not be available in some browsers.
Listen to a special audio message from Bill Roper to the Hive Workshop community (Bill is a former Vice President of Blizzard Entertainment, Producer, Designer, Musician, Voice Actor) 🔗Click here to hear his message!
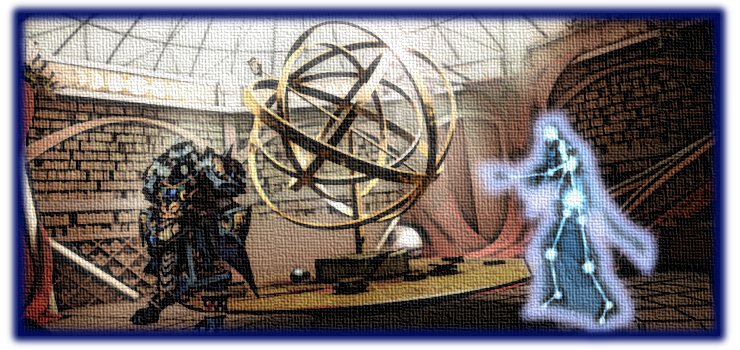
Iceborn is a fully voice acted and quite difficult single player RPG by APproject. Puzzle elements, unique environment, intense RPG action and a completely custum plot is what Iceborn has to offer at its best. Gameplay may contain various mind games, RPG-like quests, hidden items, complex abilities and unique, but simple, systems. Its storyline is marked with the spice of ego, treachery, love, grief, soreness and blind courage. Take a role of frost-energy spellcaster and dive into the cold and charming world of Frostsky that may demand observation, puzzle solving and combat skills.
Simple, but effective, systems are also a fine feature of Iceborn. Hero may gain level only by acquiring certain items, killing creeps provides no experience. Spells are notable of its universality. All spells have only one level, but it strongly depends on Hero's attributes, life and mana points. During leveling, you may choose certain attribute to rise and it may determine the effectiveness of your spells. Spells become stronger when hero becomes stronger. Game is separated into 4 Acts (parts) and every Act may slightly differ in gameplay: one might be more RPG orientated, another more puzzle-like while other more intense action orientated. Gameplay has two difficulty levels: normal and advanced. Advanced should be picked when attempting to replay the map with an extra challenge and the challenge lies within intensified combat, sadly puzzles may remain the same. There is also a statistics display system. Different kind of leveling, universality of spells, method of gaining them and a strong link to Hero's attributes may certainly provide a decision based experience.
The development started on 6th of December 2012 and ended on 15th of April 2014 having a decent amount of time dedicated to project's polishing, reaching the size of nearly 190 MBs. Project's size is tremendous due to the amount of imported materials such as plenty lines of voice acting, sound effects, music, game ripped materials and most space consuming high quality models.
Haste and inobservance may lead to game disbalance due to weakened Hero, that is why it is truly important to pay attention to the environment and other details. Map is not protected and it is free for everyone to explore, because this is a modding community and not a competitive business. Project contains over 16 000 doodads, 380 regions, 230 cameras, over 500 triggers, 550 variables, over 300 custom sounds, 430 custom doodads, 260 custom units, nearly 70 custom items, 260 custom abilities and total of 1850 imported materials. Coding may contain leaks, yet it is not being noticed, because it is single player. There is also an anti-cheat system for certain cheat codes. Map has been tested by Lordkoon, who is noted for participating in map contest events as a demanding judge, and received a generous appraisal. I thank him for his long time spent on testing Iceborn. Thank you for everyone who followed the updates, commented, shared thoughts and supported the development of Iceborn. In case map doesn't load at all, set video settings to high and it will solve the problem. (4660 downloads & 400 comments in month after release)
Frostsky world is one of unexplored corners of the 9th realm. Cold, harsh and yet charming land of Frostsky may pose threat to many life forms and only the most adapted to the cold may continue to dwell. There are total of 11 realms in the universe of Araripe and all of them are watched over by Boetherians, who keeps them in equilibrium. These higher beings are far away from the surface of realms and links worlds and universes, creates portals, manipulates endless cosmic energies and has the power to create life, worlds or do the complete opposite. Boetherians watches over different aspects of nature due to unstable and fragile environment of the realm. They are tremendously powerful, wise and huge titan-like creatures, yet very human-like and they are also affected by emotions and feelings. There are many Boetherians, some of them belong to other universe, others to other realm. Boetherians also have their chosen ones as the most powerful and influential towards the balance of realms.
Several years ago, Onthu the ruler of the Frostsky Sanctuary and entire Frostsky world started his research on yet unexplored realms and universes. He realised that many secrets and knowledge of universes are held away from them all, his attempts to reveal it all was blocked by the equilibrium created by Boetherians. And it had to be that way in order to maintain balance of nature and realms, yet Onthu did not understand it. He managed to send the call for help to the unknown darkness of universes and it was answered. After several months Onthu was visited by the unseen being named Andalgon. Andalgon was cunning and knew what is he going to tell Onthu very well. Andalgon told Onthu he was the one who is going to free him and enable him to escape this realm and gain the power and knowledge of the distant universes and with that enlightenment Frostsky would reborn. Onthu had to start digging the conjured crystonite and with the deep freeze powers collect its boundless energies and open a portal. Onthu's eyes filled with joy and even bigger thirst for achieving his aim.
Onthu had two sons: Tyotho and Urathol. He shared his ideas with his sons yet that was the point where their opinions separated. Tyotho did not support Onthu, he studied the ways of Boetherians well and knew that breaking the equilibrium created by Boetherians would doom all realms, making it impossible to be reached and the realms would get swallowed by the eternal storms. Yet Urathol saw a great potential in his father's thoughts, but did not take any resposability leaving it all to be achieved by father in his own honor. Tyotho started a serious conflict with Urathol and Onthu leading to the dismantlement of the family, because they were certain that the powers and knowledge gained would suppress anything. Onthu immediately started gathering the conjured crystonite and using it towards his plans with the help of Andalgon creating obvious signs of damage towards the balance of nature. Even being the ruler of the Frostsky, Onthu still had to answer before Boetherians, but Onthu did not listen to them, he was blinded by the influence of Andalgon.
Tyotho, with the help of Boetherians, found out what truly lies within Andalgon's wish to help his father. Andalgon desire to trick Onthu, let him escape to the unknown and using the energy gathered from precious material of Frostsky open a link to his own dwelling enabling his army of dark beings swarm the Frostsky, because they all suffer from terrible conditions of their own world. They all want to make Frostsky their own home. Frostsky would eventually perish in their brute hands and soon they would look for another realm to bring calamities upon. Tyotho tried to convince his father and pull Urathol to his side, yet his attempts were fruitless, they would not listen but their own desires and this would make the conflict even worse. Tyotho had no other chance but to do the worst. With an agreement from Boetherians, Tyotho killed his father and took the Throne of Frostsky, banishing Andalgon and destroying the remnants of crystonite gatherings.
Urathol could not believe that it happened and that Boetherians allowed it. Boetherians did not stop the cruel act of murdering the ruler himself and it drove Urathol insane, opening another opportunity for Andalgon. Andalgon compelled Urathol to complete the undone and reach for goals of his father. Urathol was ambitiuos and even more cunning than Onthu, he did not stood idle and started progressing with his plans towards Frostsky and most importantly - revenge. His painful grief towards the death of beloved father blinded him even more than the thirst for achieving his goals. His mind currupted beyond limits and even Andalgon could barely control him. Andalgon was angry with Urathol, because he suspected Urathol gathering materials more for his own ambitions to gain strength and slay the ones who decided father's death than for opening the Dread Portal. Collapse of trims created by Boetherians would banish them from the realm for eternity and that is what Urathol sought to do along killing his brother, then to his mind Frostsky would rise to the peak of prosperity when there would be no more injustice. In order to predetermine Urathol's actions, Andalgon had to be quick-witted and so he was.
Boetherians sensed the tremendous danger for entire universe and all 11 realms and knew that Urathol is far worse than Onthu. The strongest Boestherians Northorum, Anara and Thardomus with the current ruler of the Frostsky and the brother of Urathol gathered at the Boat of Divines to settle the future actions towards the growing threat of Urathol who certainly would not do the same mistakes as his father. Boetherian Thunar shall summon an Iceborn being who soon will be set on path against Urathol, but firstly certain tasks needs to be completed before the clash of two equally strong forces. And so the story continues...
Special Credits
Special thanks to
Lordkoon - map testing and assistance PurgeandFire & GreeN!X - useful support for modeling Anvil & UgoUgo - model edit request TwoVenomous - icon request AL0NE & APproject - 2D Art Paladon - knockback system Juliano - damage detection system Snippet - unit property adjustment system Kwaliti - custom UI
Voice acting
APproject's sister (Anara) APproject (All the rest)
Music
Joshua Buck - Forest Tales Joshua Buck - Vanguard Joshua Buck - Death's Chant Grifion Daveram - Through the Icy Mountains
Baldur's Gate Candelkeep
Exam (2009) Phrenitis - Faces of War Blizzard Entertainment - 7 WoW Tracks Epic Score - They Hit Without Warning
As it is written in VALVE's Steam Subscriber Agreement:
G. Restrictions on Use of Software
You may not use the Software for any purpose other than the permitted access to Steam and your Subscriptions, and to make personal, non-commercial use of your Subscriptions, except as otherwise permitted by this Agreement or applicable Subscription Terms. Except as otherwise permitted under this Agreement (including any Subscription Terms or Rules of Use), or under applicable law notwithstanding these restrictions, you may not, in whole or in part, copy, photocopy, reproduce, publish, distribute, translate, reverse engineer, derive source code from, modify, disassemble, decompile, create derivative works based on, or remove any proprietary notices or labels from the Software or any software accessed via Steam without the prior consent, in writing, of Valve.
Your Subscription(s) may include access to various Valve tools that can be used to create content ("Developer Tools"). Some examples include: the Valve software development kit (the "SDK") for a version of the computer game engine known as "Source" (the "Source Engine") and the associated Valve Hammer editor, The Source® Filmmaker Software, or in-game tools through which you can edit or create derivative works of a Valve game. Particular Developer Tools (for example, The Source® Filmmaker Software) may be distributed with separate Subscription Terms that are different from the rules set forth in this Section. Otherwise, you may use the Developer Tools, and you may use, reproduce, publish, perform, display and distribute any content you create using the Developer Tools, however you wish, but solely on a non-commercial basis.
According to these quotes it is fine to use their material because:
1. I do not use this material for any profit based purpose, merchandise or product promotion.
2. Models were obtained through developer tools that are designed to rip models from VALVE's products.
3. I do respect Valve's work and give it a proper credit without deeming their work as my own.
4. My work is free for everyone to obtain, because it is a fruit of a hobby, which is modding for fun.
5. These materials are to be used only to increase the overall gameplay quality of a map absent any other purpose.
6. I would not abuse it in any way and this use of materials pose no threat to any material used.
Adjusted selection scales of many units, wrongly set selection scale value stored a serious amount of memory and it played a major role in crashing Warcraft, chance to crash now may be significantly smaller
Scroll of Verthostrike can no longer be destroyed by Bombards
Fixed Iceborn's level set to 10 by mistake
v1.8
Increased Crystarachnid's attack damage by a slight amount
Advanced mode's Crystarachnid's movement speed increases when low on health
Now Enhyli is being teleported to hero instead of killed when is out of range
Reduced Enhylicall's lag by 4 times
v1.7
Glyph of Tremorfrost is now run by a different trigger avoiding Wait confusion
Blossoms in panel now has PAS icon instead of BTN
Glyph spawned Rune's damage increased
Removed Upkeep notice and replaced it with map's version notice
Recoded Thun'Tharok battle scene's quest
Thun'Tharok's battle scene now may take 9 minutes
Sonic Orbs at Thun'Tharok area no longer credit Player 1 for dealing damage
Improved Sonic Orbs at Thun'Tharok area
Crystarachnid's abilities won't loop after its death
Crystarachnid's spawned glyph cause much more harm
Cirratho Elemental's death should stop creep spawns
Cirratho Elemental's water tentacle spell will not work while immune to magic
v1.6
Adjusted Icegrenade coding leaving no delays between actions
Advanced mode is now notably harder
Serpent has longer range of attacks
Neutralizing Machine has its HP points increased, but lost spell immunity
v1.5
Icegrenade and Glyph of Tremorfrost variable confusion fixed
Khnartho summoned Iceguards no longer has abilities
Cirratho Elemental is now harder to defeat
Thun'Tharok battle is now easier
Attribute reset system is now available
Difficulty of Act 4 slightly increased
v1.4
Adjusted pathing blocker structure in some areas
Changed Glyph's hotkey to Z instead of S due to confusion
Mannatholic Ring now restore mana points under invulnerability
Icegrenade spell does not fail while casting on the move
Advanced mode no longer removes 3rd scroll for the Pylon puzzle
Some hints are no longer hidden in advanced mode
v1.3
Fixed preview image typo
Minerals model animation has been fixed
Glyph of Tremorfrost spell has been fixed
Adjusted some of units' properties
Added a notice about the path to the east of Tree
v1.2
All cinematics of Acts are now skippable at the beginning
Eye's Neosphere no longer kills itself
Eye's Neosphere now last for 5 seconds longer
Eye's Neosphere now has a bigger scale of size
v1.1
Weakened Frostsky Sanctuary Golems
Tyotho no longer attacks Golems
Fixed Cirratho Elemental item drop
Increased Northorum's mana regeneration rate
Weakened Icemancer
Tol Ring is no longer hidden
Chest at Sky Boethery is now more easily spotted
Arachnid battle can not be started prematurely anymore
Killing Golem no longer triggers cheat detection
Removed a part of leaks reducing the chance of crashing the game
Valnamdeoyior last piece is now more easily spotted
v1.0
Primal upload
WARNING: SPOILERS BELOW!
This is a walkthrough guide of Iceborn, it will reveal all secrets and solutions to the problems as well as advice on every aspect of the game. It will look through entire game divided into 4 major parts - 4 Acts, all acts are separated by long cinematics. This guide started since version 1.3 and it might not be that correct in upcoming versions, but basis is the same. This will be updated in case of a major change.
Part 1: Sky Boethery
You control a weak being and you need to become a true Iceborn firstly. You will notice a chest on the highest level of platforms and the chest will be invulnarable. It can not be opened just now, so remember that chest, because it will become essential after some time. Go to the east until you bump into a big NPC named Thunar, come close and the dialogue will start. After his talks you are to absorb 30 essences from wanderers. Wanderers are blinking randomly and moving making them hard to click on. Using Q spell named Weak Soulbolt, kill 30 of them, then go and see Thunar again. You will be set on path on acquiring 2 Boeth Omens. Go west of Thunar and you will see 3 obelisks. This is the first and the easiest puzzle of the game. You need to rotate orbs around obelisks so that three of the same color would appear in the middle. Fire orbs and Frost orbs summon an item that needs to be carried to Thunar, Acid orbs do nothing. When you have both items, see Thunar once again. He starts talking and and the beginning is over, he turns you into an Iceborn and teleports you to the Hill of Crystalic Tree.
Part 2: Frostsky Sanctuary and the Thief
Once you appear as Iceborn, nearby there will be an NPC who sells items, some of them might be handy, especially the Bag and Orbs. Go south and not to the east, because eastern path is blocked and can not be entered just yet. You will enter Icebrick Fort, nearby an Icethorn Blossom. Blossoms will be needed in Act 3 so make sure to collect them all. There will be some resistence, but these hostiles aren't hard to kill with Soulbolt, just keep the distance from them. At the bottom of the area there is a lane that is blocked with rocks. Destroy the rock and enter the path, collect another Blossom and go forward, there will be a chest with Orb that might increase stats and an item. Priority of stats should always be Willpower, then Vitality and least important will be Protection. Once you have those items, go back to the east until you see an NPC frozen wolf named Ortuk. Take his quest. Now go to the west and another gang of Fer hostiles will show up. When you make your way up hill, there will be two Orb-like targets nearby, these holds gates closed, destroy them to open the gates. In advanced mode there is another Orb to be destroyed which is located near Ortuk.
Enter the sanctuary, every lane ends up with glass statue and you are to collect rubies as quest of thief says. Snap off the orb from the necks of statues when Golems are far, for example not visible or on the edge of screen so that they would not attack you as they would not detect you stealing. In case of detection, they all will aggro you. They are strong, but not too strong and they can be killed, but it will be hard. It is better not to taunt them and wait until they go far enough. With all three rubies see Ortuk and get the reward. Missing pieces of artifact will be acquired in the Act 2. Near glass statues are chests, collect the loot. North-eastern statue has two chests, one is with item and another is hidden behind the column, so walk around and spot it. Visit Tyotho and begin the dialogue. In the end a quest will be given as well as item Globe of Teleportation. Use the globe to appear in Sky Boethery and go to the highest platform, there is a chest that is not invulnarable anymore, collect the loot and acquire the second spell - Enhylicall. Then return to Crystalic Tree via Globe.
Part 3: Canyon and Giant's Bed
You are now able to go to the eastern path from the Tree. Make sure to summon Enhyli unit, because that area is full of ambush. Look through every bit of area to spot chests and Blossoms. Some chests are hidden in the bushes and these are hard to spot at first look. Always have your elemental summoned, heal it up before advancing or resummon. Teleporting to the Tree might generate HP and MP points rapidly in case you need it. At the second big turn of the path in the bushes there is an item that might add some protection, it is not in chest. When going up the hill and after dealing with hostiles, there will be a glowing circle to one side and other - gates with barrier. Also look for chests in the bushes. At first you should go to the circle. Make sure you are full in stats and have your elemental summoned before stepping on the circle. Once you do, you will be teleported into Giant's Bed area, it is a tight area with swarm of hostiles. Once you deal with them, do not attack chests, because you will not be able to reach the loot. There is a cannon unit, use it to drag chests nearby, then collect the loot. There will be the third spell - Nether Bonds. Use globe to go back to the Tree, there will be some ambush again. Once you make your way to the barrier, you can not cross it. Just over the barrier, on top of the construction is a glowing orb, attack it and barrier goes off. Always remember to look around for the loot. There is a chest in the construction foundation as well as in bushes again, blossoms should also be the target for looting. When you make your way up the stairs, to your right you see a blue orb in the air over the big head familiar to Boeth Mask. Attack the orb and collect the loot, there will be the first artifact which will be essential in the upcoming boss fight. Going up the stairs you will be noticed to save the game.
Part 4: Battle with Crystarachnid
Once you saved the game, make sure to have your elemental summoned when going up the stairs. In terms of strategy, I suggest having one potion bought and in case of difficulty an additional item bought from Jik NPC. Also when going forward to the area, send elemental sideways and not your way so that Arachnid would not stomp your elemental with crystal strike immediately. Once battle begins, pay attention to orbs that are moving all around the area. Destroying them damages the Arachnid and destroy those orbs as quickly as you can to burst the Arachnid. Your elemental summon might tank the boss for a while, but eventually you will need to resummon. In order to resummon successfully, I suggest summoning elemental while under effect of Nether Bonds that makes you magic immune so that summon would not deal damage to one's life points. Also collect Spheres of Recovery that appears constantly all over the area so keep yourself high in mana. You may also try to hasten the burst by attacking the arachnid yourself, but it might cost lots of mana. Attacks of boss are easily avoidable by staying on the move. However, the second phase of Arachnid enables to trap you and then deal damage. In order to avoid the damage, you may use Shield item ability as well as Nether Bonds as it also makes you magic immune. Nether Bonds can be combined with resummoning the elemental. In case of all abilities in cooldown, heal up instantly after damage to reduce damage taken, stay high on HP to make healings stronger. When boss dies, under big constructions on the end of area are some Blossoms, in the bushes a well hiden and valuable chest. After defeating boss, Act 2 begins and a cinematic starts. It can be skipped for first few minutes.
Part 1: Horthodamus
Once Act 2 starts after cinematic, make sure to collect the loot from Crystarachnid and around the area itself. There is a well hidden chest as well as two Blossoms in those large constructions. You also should be able to buy an additional backpack with 6 slots now if you collected all the loot. Once you're done, go back to Tyotho. He will start talking and a new quest will emerge concerning the capturing of Northorum. After his dialogue use the Globe of Teleportation and go to Horthodamus area. Be ready as enemy spawns without any notice. Around the area there will be 4 circles with chest containing loot, these are easy to spot. Every circle has a teleportation aura, by stepping on one you are teleported into another areas. Three of those auras teleports into small areas just with loot. Make sure to visit all of those areas to gather the loot. However, one area will be designed to advance further into the game. Once you appear near old frozen giant named Bor, the next aura will teleport into completely another area, do not go there just yet. Near Bor is a chest with 4th spell called Icegrenade, collect it. Then begin the quest by coming close to Bor.
Part 2: Mannatholic
Once the quest from Bor is acquired, you will need to buy a ring from him and that will cost you a good amount of crystonite as well as conjured crystonite. If all loot is collected from previously explored world, you should be able to buy the ring and progress with the quest. Once ring is bought, you will need to go back and come close to one of pillars in that circular area where teleportation auras are set nearby. Once you are close to it, make sure to be ready for a fight. Be full on points, have your elemental summoned. Use the item and a hero-hostile shall appear. Make sure to keep the distance due to his powerful spell that attacks to all sides. Avoid those missiles if possible. You will need to make it busy with your elemental, but it dies rather fast. The key is to burst it quickly, for that you must be full on mana points and have your Willpower attribute quite higher than the rest. Around Horthodamus there is an item that reduce magic damage taken by 25%, make sure to have it during the fight. Once hostile is dead, you will have to go to the second pillar and repeat the fight by using the ring. Two of them needs to be slain. If you struggle in a fight, most likely it is due to the lack of attribute power so make sure to stack that Willpower, do not forget Vitality as well, protection is important, but the least. When two beasts are slain, go back to Bor, finish the quest and take the reward. Then you can go to another area, down to the teleportation aura where you found Bor.
Part 3: Upper Level of Narsetrodamus
Once you appear into the upper level of Narsetrodamus, do not rush. Collect the loot from nearby chest. Then be ready to be assaulted. When entering the circular area with a hole in the middle, pillars with lightnings concentrated into one point, the orb from that point shall start striking you brutally. Run forward until that orb named Sparkguard is visible. Then immediately cast Nether Bonds spell to become magic immune and so that Sparkguard will not be able to strike you. Using Iceborn's Guard shield will not be that good, because it works for too short period of time and Nether Bonds lasts much longer. Once spell is casted, you can easily snap Sparkguard off with Soulbolt and the threat is gone. Go forward, collect the loot from chests that are located near the walls. Confront resistence and enter The Twelve Pylons area.
Part 4: The Twelve Pylons
This is a serious puzzle and it would require a really good insight in order to solve it. Hint says, you need to turn on the right combination of pylons in order to open a portal and advance forward. First of all, walk around that area and collect the loot. There are 3 ends with chests, one end has two chests. There will be clue items - scrolls with paintings. There will be 3 scrolls in total. When you have the scrolls and all the loot, go to the middle of pylons area. Look closely to these paintings in the icons of scroll items. Use them all at one time and you will spot certain curves appearing in the middle of area. Compare those curves with the ones that are in paintings and you will find it exactly the same. The key is to realise that those shapes, that are in the paintings, added up makes a circle that represent the circle of pylons. Black circles at side of each piece shows which pylonds needs to be turned on. You will have to use your imagination and rotate those shapes in mind as to put it in order that curves in the middle of pylons shows. Then you will have to select the right pylons and turn them on, portal should open from that area immediately. Step on the portal and you will appear into a completely new area.
Part 5: Lower Level of Narsetrodamus & Varglo
Go east. Try to spot chests, because these will be hard to detected due to chests blending with the enviroment and fog. Go east until you counter the resistence, there will be a path upwards and sideways. Do not go up just yet. Go east until you meet an NPC named Varglo, begin the quest. During his dialogue you can look around for chest in that area. A dialogue window will appear with answers to Varglo. Never pick the decline option, because it will shut down the quest forever and it is essential. If you do not feel ready for quest to happen, pick the second option, but the right one would be to begin the quest. Once it begins, follow Varglo to the cage area. Before doing the quest, you should do side stuff first. Make sure to kill hostiles in cage number 3. In the second cage there is a teleport and two shields up the wall. Destroy both of them and the cage will open. Step on the portal and you will be teleported into a narrow and tight area with a lot of chests. Go further and an enemy boss will appear - a serpent. Serpent can not be damaged and it it invulnarable. There will appear an aura, step on it and you will gain a certain vision, but only on that aura. Orbs will become visible, you will have to shoot them. They will divide into smaller ones and these also will have to be shot eventaully, then harm will be dealt to the serpent. You will have to repeat the process several times until the serpent dies. Serpent doesn't do lots of damage and his spells can be easily avoided. Collect the loot, there will be the second piece for the artifact that needs to be forged. Also you will find a book with a hint towards completion of the quest given by Varglo. It says that torches needs to be lit in order to open the cage. Go back to that area where Varglo waits, On top of the pillars you will find urns. Attacking them it lights on, but fades soon. The key is to light them all before at least one of them fades away. For that you will need to shoot Soulbolt at all urns with no pauses, it is easily achieved. Once it is done, Varglo will be attacked by those you just rescued. Run to the third cage immediately and collect the loot from chests, there will be the 5th spell that is essential in dealing harm to the enemies. Have your elemental summoned. You will get attacked by hostiles, be ready for a fight. Once the quest is completed and hostiles are down, go west. Walk around the area and collect loot from chests. There will be an important item, a Spellbooster meaning it will improve one of the spells. Attack at glowing orbs between crystals to charge them up. When all three Syons are charged, the portal will open to another area.
Part 6: Cirrathodamus
A new area will emerge. Go forward and deal with hostiles, take the loot from nearby chest. Go south down the path and you will bump into a deadend. There will be a barrier and chests on other side. You will be able to go through that barrier only after completing a side quest in later game. However, there is a hidden chest near the barrier, just behind the yellow box. It is hardly visible due to camera angle, look for it there and you will find it. There will be a valuable item in the chest that will reduce mana required to cast spells, it is really important item as it drasticly reduce mana drained by Soulbolt, because it is being casted many times. Go up and turn other path. You will face resistence again, also do not forget to crack those chests. If you go north-east you will spot a damage meter named Theobox. If order to pass you need to destroy the Theobox. For that to achieve you need to have some serious burst power and you may not have it just yet. So turn other way and find Thun'Tharok NPC with a side quest. Before quest stars look for chests in that room where Thun'Tharok stands. There is a hidden chest to Thun'Tharok's left behind the pillar and close to the big yellow box. It is hard to spot due to camera angle again. Chest holds another Spellbooster that improves Soulbolt itself and it is a really powerful item that should be carried. Approach Thun'Tharok and start the quest.
Part 7: Stone of Farsight
Thun'Tharok will lead you to the puzzle of letters. You will have to enter the password by clicking Enter button in order to open the wall. Letters are written on the wall and there are 3 pairs of letters with different color and colors are linked with letter position switching. In order to solve this puzzle you have to switch the positions of the same colored letters with each other. So for example U letter goes into C position and C letter goes to the U position, same with other two pairs. In the result you will get the word, type it down as an exact match and doors shall open.
Get ready for a fight. Escort Thun'Tharok through hostiles and enable him to start channeling, then you will have to protect him for given time. Grab the loot from chests immedaitely as one of them shall contain the last piece for the artifact, make sure to forge it because you will need it in an upcoming battle. The chest with artifact is located to the north of the Stone. Make sure to trigger red crystals as these will support you in dealing harm to the hostiles. Follow the path to the end where enemies spawns, there will be a hidden chest as well just behind the column. During the fight make sure to keep yourself high in mana and have your elemental summoned so it could manipulate its ability combined with Icegrenade. Start the fight at area where enemy spawn so that enemies would have to travel longer distance to Thun'Tharok. Use freshly forged artifact to increased damage dealt. Always kill the big guys first. At this point total of 5 spells should be acquired, three Artifacts should be carried as well as two Spellboosters and Aetris Jewel for the maximum efficiency during the battle. When timer expires all enemies dies instantly, so in case of having troubles at dealing with enemies in the end, you can attempt to hold them for as long as you can so they would die eventually when timer expires.
Part 8: Theobox & the Quest-starter
Once quest is completed you should be having a decent amount of conjured crystonite to spend. Thun'Tharok sells powerful items that can be bought for crystonite you found. Since you will have to deal with Thoebox, I suggest you to buy Critical Strike scroll firstly, you should have enough of conjured crystonite for that. If not, then another option is still okay. In one of the chests around Rockwonder you probably found an item quest-starter. Now is the time to complete it just before dealing with Theobox. Go to those lightning columns outiside Rockwonder where lightning sound effect occurs. Come close to it and use the book until it lose all of its energy, do the same with all of those generators and then the quest should be completed. When the side quest of book is done, go south to the place where barrier was placed, the barrier protected the vault. Since the generators are shut down, barrier is gone. Go into the vault and collect the loot. There will be the 6th spell called Glyph of Tremorfrost with a bunch of effects, it will be handly in dealing with Theobox. Now that everything is done, go to the Theobox to the north. You will have to burst it in order to open the gates. In order to cause the best burst Glyph of Tremorfrost should be casted on the Theobox for it to get freezed so it increases its damage taken drasticly. Then immediately Valnamdeoyior artifact should be used to increase damage taken by Thoebox even more. To deal maximum damage, immediate cast of Verthostrike on Theobox is required so that Soultbolt would get the boost and then immediately Soulbolt should be casted right after Verthostrike. All these actions should be done really quickly. In case Theobox would still hold tight, you can send another Soultbolt or combine summoned elemental ability on it as the final blow until it is still frozen. In case of a Critical Strike during empowered Soulbolt by Verthostrike when target it frozen and with buff by Valnamdeoyior, Theobox should fall quickly. When the Thoebox is taken down, gates opens, go forward and begin Act 3 with a cinematic.
Part 1: Cirratho Elemental
Once cinematic of Act III is over or skipped, battle with Cirratho Elemental begins immediately. At start Cirratho Elemental will be protected by a shield and it will be invulnerable, it would not be able to attack you either. Enemies shall spawn constantly as long as C'Elemental is under shield. In order to break the shield you have to destroy 3 crystals placed in three different directions. Once all of those crystals are taken down, shield shall break enabling C'Elemental to attack you for certain amount of time. Once shield is broken I suggest you having no enemy spawns around during that moment so that Boss would receive fire right away. It is important to burst it as hard as you can before it turns invulnerable again. When shield breaks, an orb appears for some time that moves around. Killing an orb shall stun C'Elemental and deal fair amount of damage. Watch out for his Tidal Wave attacks as it might be brutal, so keep distance. C'Elemental also spawns mines that detonates randomly and deals damage to nearby targets during detonation so make sure not to stand on one. If you are well prepared, it should be enough to break shield twice to kill the Boss. However, if you fail to burst him or you lack attributes or items, this might become challenging. During the second phase you might get trapped by giant water tentacle and receive damage that can be blocked by magic immunity or invulnerability. In order to deal fair amount of damage to C'Elemental you must not be disturbed and concentrate on bursting, yet his spells always keeps the distraction on. For that to achieve I suggest using Nether Bonds spell and then when you are magic immune for a decent amount of time you can cause a serious harm to your target since his attacks are powerless. Glyph of Tremorfrost is handy in clearing up the creeps when it is combined with Shatter spell from your summoned elemental. When the Boss is dead, collect the loot and a portal shall open to the north-east where one of crystals was standing, step on it and you will be teleported into nother area.
Part 2: Puzzles of Northorum
You will appear into an area where Northorum has been imprisoned and only few steps left in completing the quest given by Tyotho. This area is full of various puzzles. First of all, collect the loot as there are several chests on the edges of platforms. The next thing is you shoud notice upper and lower pillars with 4 mirrors and an orb with certain color on top of the pillar. There is a smaller orb that is a trigger, attacking the small orb rotates all those mirrors making one appear on the beam of light. Depending on the big inactive orb on top of the pillar you need to set the right mirror. At start, upper pillar has the red orb so a red mirror is needed, lower pillar has yellow orb, so yellow mirror is needed to be set on the beam of light. Once both are in order, another puzzle should appear, a triangles puzzle. You will be told to remove 3 beams to leave 7 triangles in total and you also will be noted that selected beams can not touch each other, this should be easy. Only one chance is given so make sure to save the game. The key is to destroy one beam on every corner of the triangle, it should be the the beam that is the closest to the corner, but not beams that makes a corner, this should be done to all three beams near corners. To make it more clear, look at the whole triangle and look at the ends - corners. Every corner is made of a small triangle made of 3 beams, you need to destroy the inner beam that is inside the big triangle and not at sides. Do the same with all 3 corners. This should be solved now.
When Triangles puzzle is solved you will need to rotate mirrors once again, but different colors now. Look at the orb on top of the pillar and decide what color is needed to be set. When it is done again, a blue electric orb shall appear that is named Marun as well as a scroll with a hint. Scroll has a text that can not be read properly. In order to read the text you have to read words backwards as well as the sentences from the bottom of the text backwards, different direction as you are used to read. Then an english text will emerge. It will tell you to stand on north / east / sauth / west annulus in some kind of order and when standing on one attack Marun once per annulus. Do as it says. Annulus are those blue spinning auras at the corners of the platform on which Northorum and Marun stands. Make sure to stand on those auras precisely and then attack Marun ONCE with Soulbolt, then do the same from another Annulus as it is described in the scroll as it tells on which Annulus to stand. When it is done, Northorum should break free and start his dialogue. After talking to him, use Globe of Teleportation to teleport into Boethsoul Deeps.
Part 3: Sargon and the Doors
You will appear into a mysterious dungeon. You will be attacked by Sargon that is almost impossible to kill, yet it is not Hero meaning it can be killed by Glyph of Tremorfrost, but it should be striked by Glyph when frozen. Sargon becomes magic immune so watch out not to waste a spell and pick the right moment to strike him. Use Icegrenade to freeze him and then finish him with Glyph of Tremorfrost. Walk around and collect the loot from chests, in one of the chests you will find a scroll with a clue how to open the gates. It is just a scroll with number order. There are 6 Spheroidic Sahs that works familiar like Marun. The scroll shows an order which Sah should be shot and which should be shot after. Sahs are placed in two columns with 3 Sahs and this order is shown in the scroll. The number shows which Sah should be shot starting from 1 as the first, 2 as the second and so on. Shoot Sahs in order shown in the scroll and doors shall open summoning another Sargon that will need to be dealt with. Go forward and encounter with hostiles, there will be two quests that will be described in a separate parts.
Part 4: Capturing the Dragon
Go forward and enter a snowy area. Walk around that area and collect the loot. There are plenty of chests near rocks, one is really well hidden in the bushes up the hill near large spike that offers powerful item. Go through small bridge and up the hill near waterfall a chest may contain item as well. Collect all Blossoms, there are few of them there, you should have total of 14 Blossoms right now. You will notice an NPC Mertherio with a side quest. Accept his quest then use an item that will call the dragon. You will have to capture it using trap designed by Mertherio. This quest will require a really good precision so make sure to save the game as fail chance is high. You will have to drag the dragon in the middle of those traps and destroy orbs to release the shot. Dragon must be exactly in the middle or shot will be missed. To check if one is in the middle you can compare dragon's selection scale that is on the ground and tells where dragon is very well. Keep yourself healed during the procress as damage might be high. You can use invulnerability and that will force dragon to go to your position or use Perpythus items to orientate the dragon. You can also do it just by adjusting the distance between you and the dragon, it would be harder with the last trap though. When dragon is trapped, see Mertherio and complete the quest, you will be given this dragon as your companion. Remember that if dragon dies it can no longer be summoned.
Part 5: Curing the Infection
You will meet Atantrimedius who will ask you to cure the infection that holds gates closed to the Alcazar where Mask shall be found. Accept the quest once you are ready. Now the path that was blocked by a barrier is now open, go there. Atantrimedius will follow. There will be enemies attacking so make sure to heal Atantrimedius as he should not die. There also will be a puzzle, but quite simple. You have to manipulate 4 orbs are sides to light all beams. Every orb has a pattern, but it would be hard to spot it during the bettle that would end only when puzzle is solved. Just try various combinations until all beams are lit. When these are lit, Atantrimedius will start channeling and curing the infection, you will have to protect him for some time. Enemies spawns on chance and it is based on luck if strong enemy spawns or not, so in case of a fail a retry might prove to be better or completely not. In case of having troubles, freeze them and heal Atantrimedius until timer is expired. When quest is completed, go up the stairs behind the Cube and crack open a nice looking chest. It will have the last Blossom so you should have 15 in total as well as the last spell. When you have all of the blossoms, go back where you found Atantrimedius and approach that spinning ball called Boetheart, it will charge and doors shall open. Go into the Alcazar.
Part 6: Boeth Mask and the Last Puzzle
Once entering the Alcazar you should spot giant rotators. Before dealing with the puzzle, walk around the area and collect the loot from chests. There will be giant statues with weapons and on weapons you may spot glowing orbs, attack those and it will drop a piece of conjured crystonite. Now back the puzzle. This is a sound puzzle. The middle rotator selects which orb to eliminate while side rotators with certain order set destroys the orb, you will need to do it for 4 orbs. Select the orb or leave the one that is currently selected and go to the side rotators and rotate one of them until you hear a lock-up sound, make sure you can hear it clearly and no music or other sound do not interfer. Once you hear the lock-up sound, leave it at that position, do the same with the rest of rotators, eventually when all rotators are in those positions, orb will collapse. Do the same with remaining orbs and puzzle is solved.
You will hear beeping sound, make sure to save the game immediately and prepare for the battle. Boss will appear, a really powerful one. Always stay on the move, use your elemental to support you and deal damage to the boss. Your dragon companion would serve a great deal and it would help you very much in this tough fight. Avoid his blast spell that damage area and never let it come close to you even though it constantly teleports to you. This is just a brutal fight, burst and survival wins. When boss dies, it drops the Boeth Mask. Take it and use it.
Boethguard will appear and start talking to you. They will offer to teleport with them where Boetherians awaits and attack Urathol himself. If you accept immediately you will be teleported and Act 4 will start, there will be no way to go back as Globe of Teleportation would teleport only to that area. So at start I suggest you to decline the dialogue window and get ready for a fight. You should have a lot of conjured crystonite and it should be spent on scrolls from Thun'Tharok. I suggest selling some of items that are not needed that much for you to gain conjured crystonite. What I would suggest, is to sell Iceborn's Guard, keep both Spellboosters, keep both items that reduce mana cost of spells by 2% so it makes 4% in total and add Eye Stone from Thun'Tharok to your main backpack as well as in case of lack for space put the Ring artifact into your second backpack as it would be used just to boost mana. That's my personal suggestion, but you can do as you wish. You also should be able to buy all of those scrolls by now if certain item secrifice is made. You also can buy a potion from Jik, but that's optional. Go back to Boethguards and tell them that you are ready. Act 4 and a cinematic will start.
9:17, 2nd Feb 2015
StoPCampinGn00b: This SRPG is truly worthy. It's packed with some of the most impressive visuals in a playable map, unique gameplay, and a compelling story told through greatly executed voice acting.
11:18, 23rd Apr 2014...
Map updated with some fixed. I suppose Icegrenade did not work, becuause during the casting player order Hero to move and it ruins the spell, now it runs okay, I hope this was the case. I also updated Walkthough and all 3 Acts are described, last Act remains.
@edo
Oh, okay. Give it a try and I'm almost sure the error would not repeat.
@MSchild
Have a nice game.
@OneXu
Well, first of all you should kill Urathol's companion and then deal with Urathol himself, because if picking Urathol first, that big blue guy gonna make some troubles in a long run. As for the item pick I would suggest having both of those Spellbooster items that improve Nether Bonds and Soulbolt as well as Aetris Jewel to reduce mana cost of Soulbolt, so it would cost only 3% of mana per cast, becasue you would have two items that reduce mana by 2%. But I guess that Quickness item is also a quite good pick. I would also suggest selling Iceborn's Guard instead of those Spellboosters. That's my personal suggestion only. Have towers allied of course, do not provoke Urathol prematurely, but follow the quest, because then it would be almost impossible to kill him. You can also acquire Iceneedles around the map from chests that would help to deal damage. In the blocky-stone area there is a scroll of Avatar that boost Willpower greatly. That's pretty much it, I hope you succeed. Don't forget to share your statistics after completing the map, I'm just curious.
Started disasembling iceborn Nice trick of meta tiles confusing but good... u could have used another non walkable terrain such as abyss as meta tile could have saved pathing doodads ... why have written dialogs in trigger comment are u using it in conversation... .?
@FaLLeN
Well, I don't mind using pathing blockers since I still never reached the limit of destructibles. Yes, I write all text there so then I can adjust it whenever I want and paste it to the triggers immediately, everything is in one place. I am also planning to add entire walkthrough guide there as well.
@OneXu
well my lv at that time was about 25 )
You just keep using your second spell to summon your pets in order to stop Urathol and his buddy moving forward, like @APproject said, killed Urathol's buddy first, then went after Urathol, but be careful, at about 10% hp, he casts so many skills that may kill you instant, and must destroy the black ball whenever he uses! Good luck with that ) Oh, and remember to summon the dragon too )
The orb in phase 1 just before the boss fight, after destroying it, the loots are hidden in the ground or something, took some time finding the items.. :/
Edit: OMG! The giants gotta stop attacking me :/ Do they resurrect? I killed all of them :/
@Aerox
What orb? That one before Arachid? It depends on where your stand during destruction of the orb, it drops items where you stand and if you stand on an area where it is not so smooth, it might happen. And what giants are you talking about?
@~Nightmare
Thanks. I understand, it might be annoying, but if I made checkpoint system lots of coding would get ruined, because you should not revive during the boss fight, also trying and trying with endless life to achieve something would be cheaty. Game should change big time in order to add those checkpoints. Sorry, but the only option is to save often.
The giants around the second place where Tyotho stands.. I gt caught stealing the red orb and killed them all. Went to fight the spider and come bk to talk to him and then there are 3 giants chasing me.. :/ I wanted to say to them, get over it XD
Hmm I gotta admit that this is harder than I thought. Btw good music choice. I'm only at the beginning, well in the crystal hills (I think the area is called), I died a few times, blame my off guard for that I'll inform you if I find any bugs.
---------------
Blame my laziness for such a slow progress ;_;
@OneXu[/B]
Well, first of all you should kill Urathol's companion and then deal with Urathol himself, because if picking Urathol first, that big blue guy gonna make some troubles in a long run. As for the item pick I would suggest having both of those Spellbooster items that improve Nether Bonds and Soulbolt as well as Aetris Jewel to reduce mana cost of Soulbolt, so it would cost only 3% of mana per cast, becasue you would have two items that reduce mana by 2%. But I guess that Quickness item is also a quite good pick. I would also suggest selling Iceborn's Guard instead of those Spellboosters. That's my personal suggestion only. Have towers allied of course, do not provoke Urathol prematurely, but follow the quest, because then it would be almost impossible to kill him. You can also acquire Iceneedles around the map from chests that would help to deal damage. In the blocky-stone area there is a scroll of Avatar that boost Willpower greatly. That's pretty much it, I hope you succeed. Don't forget to share your statistics after completing the map, I'm just curious.
@OneXu
well my lv at that time was about 25 )
You just keep using your second spell to summon your pets in order to stop Urathol and his buddy moving forward, like @APproject said, killed Urathol's buddy first, then went after Urathol, but be careful, at about 10% hp, he casts so many skills that may kill you instant, and must destroy the black ball whenever he uses! Good luck with that ) Oh, and remember to summon the dragon too )
thx guys for advice, @icekid how the fuck you take 25?)) late in the third act, I run around the entire map to find crystals.
@APproject
yep 3% soulbolt its nice, but 20% evansion+15%block+10 sec invisibility 4th act of doing simple, i just buy mp potions in all slots^^
i find box with scroll avatar but did not notice the scroll, because all in a hurry to close the portal.
and yes I followed the quest initially, but did not need to do that. Following your advice, I returned to the already broken box and found a scroll ^_^ then began to run from the battlefield to Urathol (dragon return there) until it killed him. after that I went to continue the quest and turned absorbing machine. As a result, the final battle with the Avatar was very very simple, the problems were only on tornadoes, my save skills were on the cd in some time.
so for me, the most difficult place in the game Thun'Tharok quest on advantsed mode. all 4th act + final battle take less time than one quest^^
summing up: The map turned out one of the best RPG I have ever seen, (though of course she have some flaws) but has done tremendous work and minor tweaks be corrected in future versions.
i'm cannot write about terrain, because I'm sure you have already heard a lot of good words about it. I'm adding just that I know a girl crazy about you, after just looked at this amazing work. ^ _ ^
You wrote that maybe it's your last map, but would like to see more of your wonderful works, Warcraft alive because of guys like you.
@Aerox
Oh, its okay, you can kill them, no problem.
@Heinvers
Take your time.
@OneXu
Oh, I never considered having using Shield and that evasion item combined, it does save one's skin indeed. I'm really glad you finished the game, I guess this map calls for some balancing on advanced mode, hehe. I may increase some difficulty in Act 4. At the matter of fact, I barely tested Act 4, played it all only once and still failed when Urathol was like at 5% HP so I was like *that will be good* and uploaded, hehe.
I am truly thankful for your kind words and I'm happy you enjoyed the game, if at least few people really enjoyed it and spent hours on it, I did not waste all those months on developing this project, it means I succeed. Thank you again.
now i am stuck at protecting this dude while he channels his spell to get he orb of far sight i can only keep him save untill min 2 -.-
any idea or hints ? and when will get that cool wings ?
now i am stuck at protecting this dude while he channels his spell to get he orb of far sight i can only keep him save untill min 2 -.-
any idea or hints ? and when will get that cool wings ?
if you talking about Thun'Tharok quest then you need to read the earlier pages.
briefly
you must have studied 2 3 4 5 skills.
you should have items:
The ring (of the 2th act by 100% restoration mp.)
The sword (from in Search quest last piece to be just above the place where the caster Thun'Tharok simply turn the camera)
spellbuster for soulbolt (In the area where you found Thun'Tharok behind yellow box.)
spellbuster armor for bones (lies on the lower level of the 2nd act about the portal in one of the circles where the monsters guarding the crystals)
Well as desirable to have a necklace on a 2% decrease in the cost of spells (being about 3 boxes behind the wall light well as turn the camera behind yellow box), and all the additional slots bags buy Star of Juice it will greatly simplify your life.
Tactics is quite simple but will have trouble.
try to stand closer to the mob respawn, then they do not run directly on Thun'Tharok, Always try to keep mana closer to the maximum (Unforgettable use mana potion and the ring) Use it-that would quickly kill large mob always kill them first.
Between rounds, call an Elemental summon(2 Skill), actively uses his ability to kill small mob, is also in this battle plays the role of the tank while he is alive mobs run at him, at the last minute you just need survive and kite with your elemental summon.
First try to reach the 3-4 minutes before the end of caste with mp Botlhe and save. You'll know how to get it just trying again and again.
p.s. "that cool wings " you can get after passing the quest, it's for motivation ^_^
@xzxz
If you get stuck, you can read a Walkthrough guide in the first post of this thread at the bottom of it, there are total of 3 Acts described there so far. Good luck.
The map has been great, until i'm stucked in ACT II where a place simulating Ulduar of WOW.
It took me about ten more S/L to escort Thun'Tharok through hostiles,because there're at least 4 giant-troll and 10 wolves in our pass. When I managed to make it,i found my nightmare wasn't over. Protecting Thun'Tharok for another 10 minutes? Jesus...
I tried my best to trigger three towers and combined 3 artifacts as fast as i could.I could hang on for 5 minutes,but always failed when a giant-giant-troll coming out.I just don't know how much attributes do you need the player to upgrade.I've found its almost impossible to deal enough damage to kill those trolls.
I'm a SC2 player and confident of my APM,which is 200 or higher.It's not my problem. I know how to make my elemental summoned to manipulate its ability combined with Icegrenade.However,my elemental couldn't survive for 5 seconds facing hound of enemies.
@nuck001
please read my post has slightly higher or read the tips from the first page, if you put a screen would be easier to sort out your problem.
You need not be a player with 200apm, you just need to keep track of your cooldowns and mana. No one is forcing you and your summon to stand still and fight against monsters, remember you're a mage.
@nuck
I'm glad you enjoyed it. First post contains a walkthrough with some essential tips as OneXu said. I suppose you play an Advanced mode. It can be completed, because several people alreasy did. Considering what you told, the pronlem may lie with the items and perhaps your attributes, mainly items that would be. You should be having 3 artifacts, 2 spellboosters and Aetris Jewel for the maximum efficiency during the battle. It is really an overstatement saying you are good at SC so all this is not your problem. You are in charge if your actions so it might be yours after all, plus games are too different. Do not accept this offensive, it is not. A screenshot with your attributes, items and spells would help indeed.
Unfortunately I didn't keep my screenshot, I have even deleted those savedatas too. However I can remember my basic Vitality/Protection/WillPower is somthing around 22/22/39.
As a matter of fact, I found it already difficult to kill enemies in the early ACT II,not only in the Thun'Tharok part. I had to save game constantly to remember every spawn point of minions in order to place my Icegrenade first.Without my summoned elemental, I wouldn't even survive to see Thun'Tharok.
In my opinion, or in my stats, protecting Thun'Tharok is the worst part of this map though it seems perfect at first glance. How many feedback of ACT II did you get? Maybe a little,Why?
I've just noticed your introduction on the first page,it says "Priority of stats should always be Willpower, then Vitality and least important will be Protection. " Since there will always be a best upgrading scheme in such a single player map,why letting us to choose ourselves? Look,i've upgraded my Protection a lot, as well as Vitality.God knows is there someone else only upgrade Vitality?
Is there enough time to do such a thing? We have to:
a) Follow Thun'Tharok to the top platform and make sure he does't die before starting channel.
b) Light up three towers,one on the platform,another besides the stairs,the other in the middle corridor.
c) Find and open that hidden chest to get the final piece of artifact.Then spend a lot of time to combine them and pick up since every player's inventory should be full at the moment.
d) Go downstairs and head towards the mob respawn. You kidding me? The enemies should be already respawn two waves and attacking Thun'Tharok at that moment.
As a matter of fact, I found it already difficult to kill enemies in the early ACT II,not only in the Thun'Tharok part. I had to save game constantly to remember every spawn point of minions in order to place my Icegrenade first.Without my summoned elemental, I wouldn't even survive to see Thun'Tharok.
In my opinion, or in my stats, protecting Thun'Tharok is the worst part of this map though it seems perfect at first glance. How many feedback of ACT II did you get? Maybe a little,Why?
this is one of the most difficult places but does not mean that it is the worst, just something to pass it is necessary to have certain things, stats and patience.
I've just noticed your introduction on the first page,it says "Priority of stats should always be Willpower, then Vitality and least important will be Protection. " Since there will always be a best upgrading scheme in such a single player map,why letting us to choose ourselves? Look,i've upgraded my Protection a lot, as well as Vitality.God knows is there someone else only upgrade Vitality?
if you upgrade protection you increase only the resistance against physical damage only, but if you same vitality you increase the survival rate against any damage, plus if you read the first skill he treats 30% of your current life, so the more you have Vitality the stronger your healing...
you have plenty of time to collect all the chests, summon elemental and ice Grenada, after you can stand another 5-10 seconds, the first wave is 30-40 seconds after start of casting, not to be confused with a mobs who already be there, moreover the first three waves are only small mobs on them you do not spend mana and cd.
if you do not have time try to treat Thun'Tharok, getting healed he runs back, and you have time to collect the sword.
this is one of the most difficult places but does not mean that it is the worst, just something to pass it is necessary to have certain things, stats and patience.
So you agree with me about that there must be a certain stats to go through this place? I'm interested in what excactly is your stats and the others who succeeded to pass Thun'Tharok part.
If there is a BEST stats,is it possible to add a stats-reset system?
So you agree with me about that there must be a certain stats to go through this place? I'm interested in what excactly is your stats and the others who succeeded to pass Thun'Tharok part.
If there is a BEST stats,is it possible to add a stats-reset system?
I mean that you need to find more hidden chests that will allow you to have high-stats, and collect recommendedthings to facilitate the completion of this quest.
my stats spoiler and I still missed 3+ Chest ... the problem is not that you upgrade protection(my so-well was 22).
@nuck
Pretty much everything has been said by OneXu. Comparing your stats with OneXu you missed a ton of chests and basically only because of chests you become stronger, since mainly chests contains orbs and items that is the core of your strength. Because of this you struggled against creeps that obviously should not create any difficulties. I made this game so that it would require observation in order to succeed, I want players to put their time and effort into this by different ways. And I agree, this game is not for everyone's taste. I'm just slightly disappointed, because you gave up, surely another try could have been given.
I did have collected every chest before Thun'Tharok's part.Thanks to the Globe of Teleportation, I have plenty of time to search hidden chests,which is one of the interesting part of this map.But still,my basic stats was 22/22/39,maybe higher when i carried items.The problem is about which way does a player upgrade his stats,not how many chests does he miss. If he doesn't upgrade stats properly,he will be stucked in some places sooner or later just like me.Therefore,a stats-reset system is highly recommended,which could make up mistakes we've made and let players try different stats flexibly,not restarting the game from the very beginning.
Speaking of which,I think the item system still needs optimization.You know,the items in our secondary bag does't work.Players could benefit from these items only by switching to the certain bag.For example,I put a stats+3 Orb in my secondary inventory and a stats+2 Orb in my first inventory. How much stats do you think I have?
This map is great,however not perfect in some details.Pros doesn't help you with this map, only Cons could. Perhaps you need time to wait for more feedback of the Thun'Tharok's part.
In fact,I'm from China and willing to translate this map when the version is stable.I've already recommend this map to a lot of friends.They were shocked by such a masterpiece,good job!
Help ! my save games have been destroyed .... when i load my last save game my spells have no special effect they just work without a spell model or something like when i use icebolt on myself i must see awater explosion ... but now i dont please help i dont want to start all over again
@nuck
Stats reset system sounds interesting, I may add such a thing in an upcoming version. I agree, Thun'Tharok part might be the most difficult in entire game on advanced mode, this certainly calls for balancing. Translation has been taken over by anby, he wanted to translate the game and he did, but if you want to you can contact with him and see if it can be improved or something, you are free to do whatever you wish. Thank you very much, nuck.
@zxzx
That's weird. I have no clue why that happens. Perhaps restart WC3 or your PC for that, try cleaning it up perhaps. But if it is only one special effect, it should not be a problem.
I did have collected every chest before Thun'Tharok's part.Thanks to the Globe of Teleportation, I have plenty of time to search hidden chests,which is one of the interesting part of this map.But still,my basic stats was 22/22/39,maybe higher when i carried items.
Man)) i give you creen there i have 32 22 48 basic stats on this quest, and I know that I've missed more than 3 + chests, I found them later, and you say: "I did have collected every chest before Thun'Tharok's part." with 22 22 39 stats...
version 1.4 came out so it's time to make bug report ^ _ ^
1. => icegrenade
something you should do with it already)) is the oldest and very bad bug...
possible to remove the dependency on units near, that would-if you use grenade she must appeared in any case, even if there is no mobs or iceborn run away there lifetime will do the trick. because it affects all the other skills more than anything on Z skill with his cd in 50 seconds
1.1 => moreover I discovered that it spontaneously explodes by any enemy AoE damage, which leads to the inability to adequately use it in conjunction with the Z skill at some pack of mobs
2.1 => water Elemental
if you have time to kill him for two laps at the end phase without shield, the shield is restored. small Elementals with crystals respawn but boss is dead =))
2.2 => icy tentacle
works on invulnerability, receiving a blow from her for a while you die from any one wave and this debuff well as not a dispel with invulnerability.
3 => small white mobs (Ancient Apparition model from dota) having a melee attack but somehow begin to shoot at a great distance if called upon summons or dragon of iceborn.
my opinion:
the last skill is practically useless, has long cast, freezes only when treating yourself, plus when you get it you already have two necklaces that make soulbolt virtually free, so do not see any reason to use an expensive skill that is not worth the costs.
p.s. Guys I got the idea for those who have already passed advensed mode, let's try to timerun this map =)). pass the map and lay out screens with game statistics speed is important.
@OneXu
Thanks for these reports. I still don't understand what is wrong with Icegrenade. I need a really good explaination what is going on with it, I try myself - it works, I check coding - it looks pretty much fine. Well, that tentacle may deal harm and it might be avoided by shield, but I see your point, it would be logical if it did not happen at all. I will try to adjust elemental battle. Apprariton you mean in Act 4? It is melee, but it has a spell that shoots to nearby enemies. Last ability is desgined to take down masses of creeps, designed for Act 4, especially for the first wave. But if you manage not to use it, it calls for balancing. Woah, really impressive time you got here! I will make advanced mode harder in an upcoming versions.
my timerun strategy^^
the last boss of Act 3, the first call to dragon to leave boss with 5100 hp and run away, wait cd and call again, and then quickly kill the Lich on 2-3 wave mob? that in theory ^ ^ In fact, I had just loaded with 30 time on 5100hp just because I have been called summons, I could not even stand close to the battle, a couple of seconds with no saves and you're dead, they inflict enormous damage.
so why you cant dodge from this skill?))
Go to any place where a lot of the mobs (last 3 minutes Thun'Tharok's quest, the water Elemental boss, the last boss of the third act, almost the whole of the 4th act, etc.) And try to combine ice grenade with Z skill 5 times ^ ^ then you will understand.
@OneXu
I see, thanks for these reports, will make some adjustments for v1.5. Interesting idea with another mode, I'll see what I can do about that. I spotted a bug with Icegrenade and is it strongly liked with Glyph spell as you said. When Icegrenade circle explodes and an orb is about to summon, it has a time gap of 1 second and during that gap if Glyph is casted, Icegrenade screws up and it won't summon, mainly because of variable confusion. Is that the bug? Is it the only one? Grenade orb would not summon when it is about to once Glyph is casted at the same time?
Help!! when I open the map nothing happens just a chain lifting on. And it is supposed have a title "just another warcraft map" and no picture at the minimap just a questioon mark.
@Kim
That's weird, it still must be your Warcraft, I always get this issue when I try opening map saved with later patch. Perhaps a letter in front of 1.26 is not the latest?
@lolkevin
Well, Azothan miss a lot of loot in his first 3 episodes, plus he tried advanced game mode at start. You could give it a shot and play it without rushing. You will not be making a video so you could take your time.
Perhaps attempt to repatch the game, download the latest patch from here and see if it gonna solve it. But wait, you said it doesn't show name and preview, so how do you know it is Iceborn map? Maybe you selected other file? For me no matter the patch I still could see name and preview.
I've done it, nothing happens. The name does show on the list but the title just says "Just another warcraft map" and no preview and the description says "nondescription"
This site uses cookies to help personalise content, tailor your experience and to keep you logged in if you register.
By continuing to use this site, you are consenting to our use of cookies.

 Approved


") Give it a try and I'm almost sure the error would not repeat.
Give it a try and I'm almost sure the error would not repeat.


 I gt caught stealing the red orb and killed them all. Went to fight the spider and come bk to talk to him and then there are 3 giants chasing me.. :/ I wanted to say to them, get over it XD


 i read some and i got past that anoying quest
 i dont want to start all over again