- Joined
- Jul 30, 2007
- Messages
- 888
This tutorial will explain a very easy way to create lightning in photoshop.
Difficulty=2/10
Begin by creating a rectangular image, mine was 500px by 200px. Then pick black and white as your foreground and background colors and use the gradient tool to create a gradient from the top of the image down to the bottom. It should look like this:

The next thing you want to do is Filter>Render>Difference Clouds. Now it will look like this:

The third step is to press Ctrl+I to invert the colors in the picture. Your image should now look slightly like lightning:

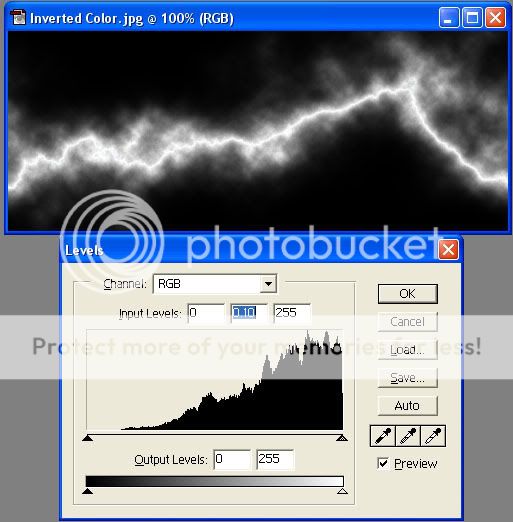
Now to really make it look like lightning you must press Ctrl+L to bring up the Levels box. Then drag the arrow that is in the middle of the bar all the way to the right, now it should look like there are only two arrows and you should have some nice looking white lightning like this:
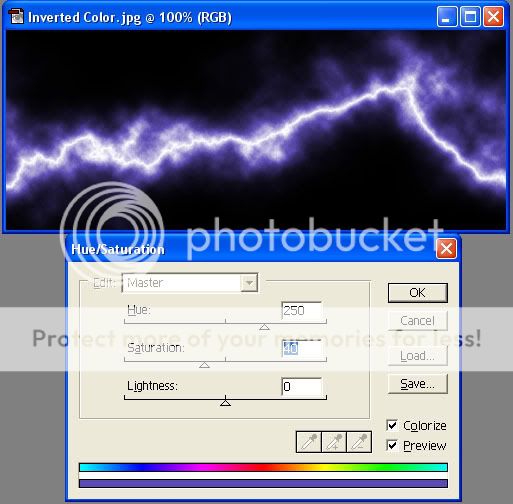
A final optional step that will really add some pizazz is to change the color of the lightning. To do this, press Ctrl+U to bring up the Hue/Saturation box. Put a check mark in the colorize box and then adjust the bars as you wish. I decided to go with some awesome purple lightning and it turned out like this:
I hope this tutorial was helpful. If you want to use the lightning in another picture just CnP it over there and change the layer's blending type to screen. This will get rid of the black box and you will be left with nothing but lightning.
Difficulty=2/10
Begin by creating a rectangular image, mine was 500px by 200px. Then pick black and white as your foreground and background colors and use the gradient tool to create a gradient from the top of the image down to the bottom. It should look like this:
The next thing you want to do is Filter>Render>Difference Clouds. Now it will look like this:
The third step is to press Ctrl+I to invert the colors in the picture. Your image should now look slightly like lightning:
Now to really make it look like lightning you must press Ctrl+L to bring up the Levels box. Then drag the arrow that is in the middle of the bar all the way to the right, now it should look like there are only two arrows and you should have some nice looking white lightning like this:
A final optional step that will really add some pizazz is to change the color of the lightning. To do this, press Ctrl+U to bring up the Hue/Saturation box. Put a check mark in the colorize box and then adjust the bars as you wish. I decided to go with some awesome purple lightning and it turned out like this:
I hope this tutorial was helpful. If you want to use the lightning in another picture just CnP it over there and change the layer's blending type to screen. This will get rid of the black box and you will be left with nothing but lightning.


 , but, the guy shown in the tutorial was different.


