- Joined
- Jun 6, 2008
- Messages
- 987
How to Make Proper Collision Shapes/How to Make Your Model Easily Selectable:
1. First open your model with War3ModelEditor (Magos).
2. Then go to Edit>Properties.
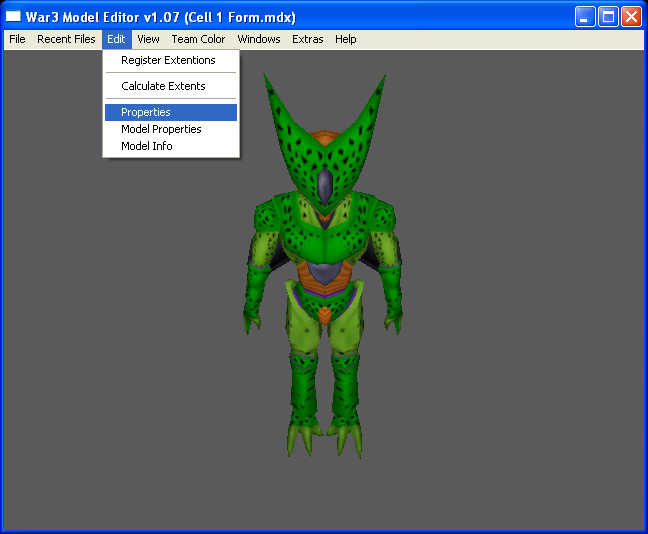
This will open up a window which looks like this:
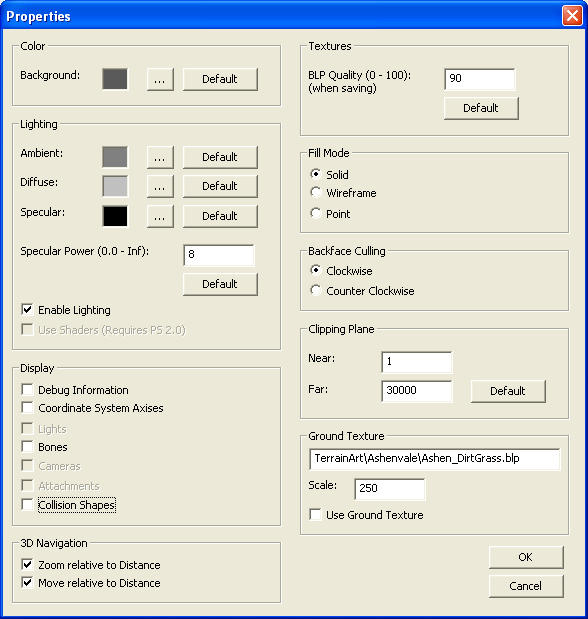
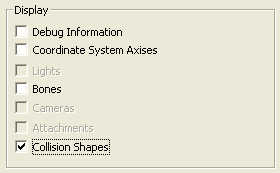
3. Check the Collision Shapes Box under the display category on the left side.
4. Now press the Okay button. You may or may not see anything different. If you don't see anything then move onto the next step.
5. Go to Windows>Node Manager.
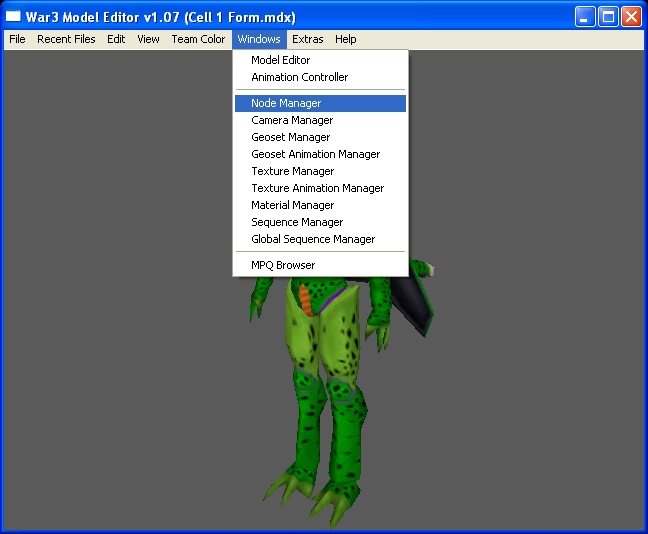
6. Right click at the bottom and choose Create Collision Shape.
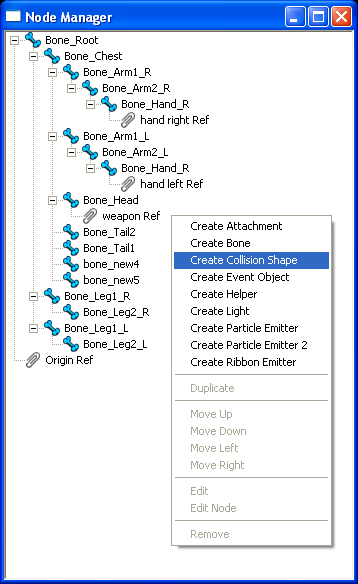
7.A new blue box will appear at the bottom. Make sure it's all the way over to the left so it isn't attached to anything. Double click it or right click it and choose Edit.

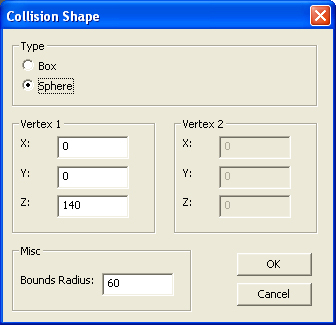
A window will appear like this:
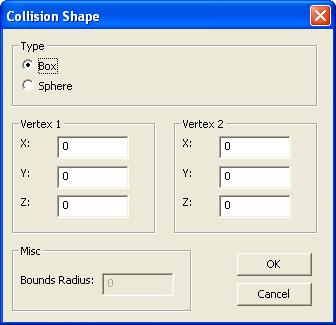
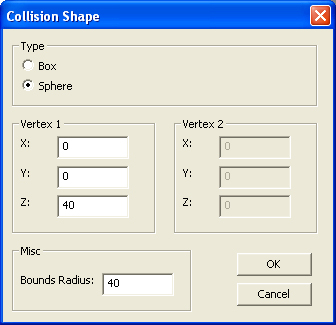
8. Choose Sphere as we'll start out with that as they are easier to do and more widely used.
9. For starters set your Bonus Radius to 40 and the Z coordinate to 40 as well. Typically you can leave X and Y alone for most models unless they aren't centered properly.
10. Press Okay and then go back to your main model window. You should now see a blue sphere like this:
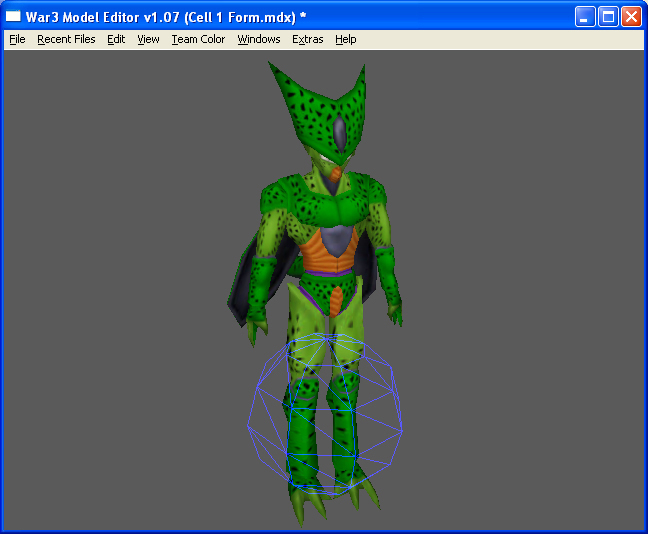
Now most likely your sphere will not cover your entire model. This is usual and varies between model. That blue sphere is the area that will be selectable on your model. We want the entire model or most of the model to be covered so your unit is easily selectable.
11. So to finish up we go back to Node Manager and you can either expand your Bonus Radius and set the Z coordinate to the same amount as your Bonus Radius, (Keep in mind having the same Z coordinate as the Bonus Radius isn't required but I find it usually keeps the sphere positioned well.) Or you can create a second sphere. I'm going to create a second sphere for this model because he is somewhat tall and I don't want too much space to be selectable around him.
12. Just experiment to try to make your sphere's cover the model. For this specific model I found that spheres of Bonus Radius 60 worked best. So I created a second one and put it's Z coordinate at 140 like so:
My model now looks like this:
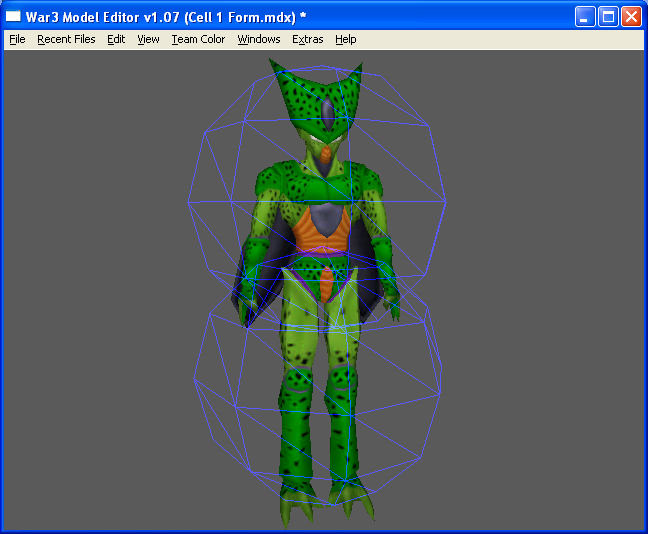
See how the spheres expand out beyond the model a bit? This is totally okay because your model will be moving around and will at times occupy that space. This is about how you want your spheres to look on your model. But you don't want to make your sphere's too large.If you make it so your sphere so huge it expands way beyond the model players will select it when they aren't trying to and that can be really frustrating. To show you an example of what you don't want look at this:
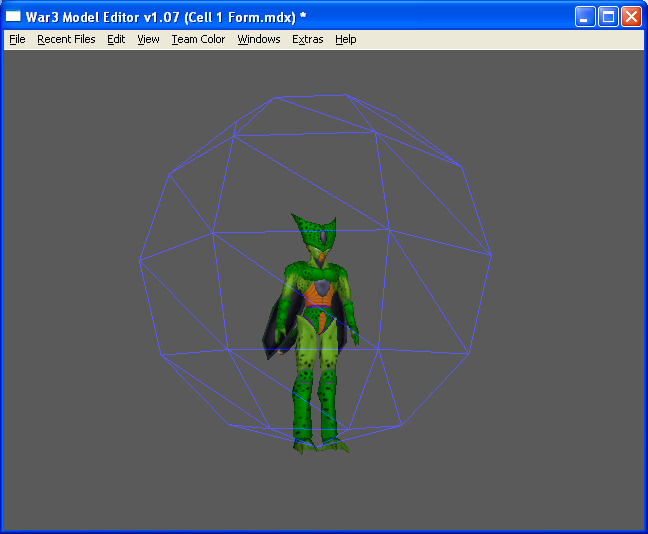
You should easily be able to tell the difference.
13. Now go back to Node Manager and right click your collision shapes that currently say UNNAMED. Choose 'Edit Node' not 'Edit'.
14. You now can enter a name for the collision shape. You could just leave it as it is because the name doesn't affect anything. Or you could put CollisionSphere1 or something of that sort. But what I like to do is put my model's name and "By Zerox", so that if someone deprotects a map my model is in or just takes it out of an non-protected map they can still open up my model and have a chance to see who made it.
Don't bother messing with the Vertex Coordinates in here (X, Y, Z). They don't make any difference to your collision shape.
15. Now you can save your model and your done. Your model will now be selectable in-game. You may want to go back to Edit>Properties and uncheck the collision shapes box so you don't have to look at the collision shapes while your just viewing models. But it's up to you.
Collision Boxes:
Now I'll attempt to explain Box collision shapes. Here is an example of where one should be used:
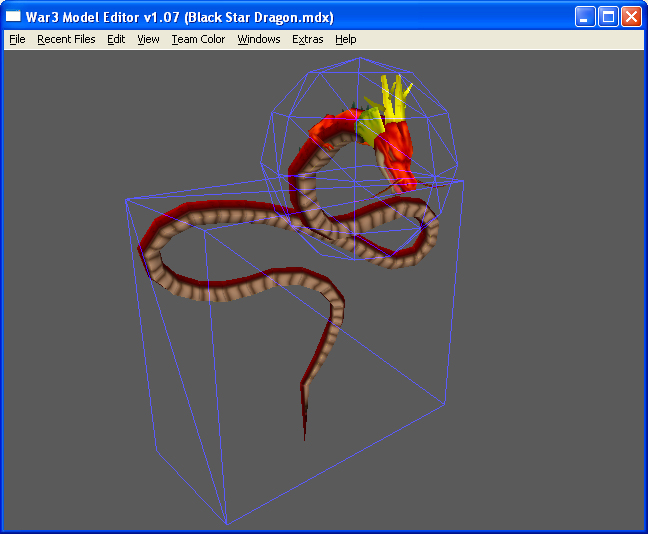
The box goes around the Dragon's long body that is tall and wide. The box is the better choice here because the dragon's body doesn't move much and is too tall and wide for a sphere to be really effective without making it take up too much space you wouldn't want as shown with the over-sized sphere with Cell above. You may also notice that the dragon has a sphere as well on it's head.
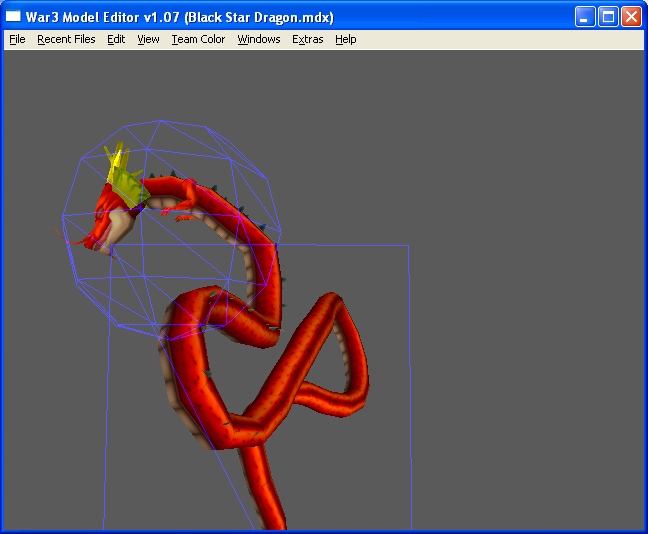
This is because it extends away from the rest of the body and is more easily covered in a separate sphere. That way too much excess space isn't used. Don't ever be afraid to try a combination of boxes and spheres. Now moving on to how you set up your own box.
1. Repeat steps 1-7 above and then select Box rather than Sphere.
Now boxes work pretty differently as far as setting them up goes. You now have Vertex 1 and Vertex 2. These will be the extents of your box. Always start Vertex 1's Z coordinate at 0. That will keep the bottom of the box at the bottom of the model. Obviously if your doing a box for something elevated this doesn't apply but just keep it at the bottom of the model.
Look at how I've set up my box for this model:
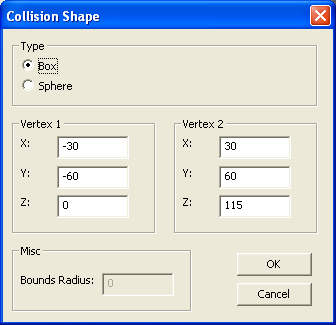
See how the X's and Y's are identical except for one is negative (-) and the other is positive? This is how I recommend you set them up because this causes the box to extend in equal distances both ways. Now the to figure out which direction is which you may have to experiment with them for yourself. But I'll try to explain them as best I can. X is from front to back and Y is from side to side, Z is up and down.
2. Now set your Z so it goes to the proper height so it is just above where the model ends. You may have to play around with all of these until you get the box to fit your model properly.
Also having identical X's and Y's isn't always going to work. For this model equal Y's didn't work because the back of the model was still outside the box so I had to adjust it to fit like so:

3. After you've got your box set up the way you want it save and then your done.
Notice: Boxes should be used on mostly stationary objects. In most cases spheres are typically better because they allow for a full range of movement. Use good judgment for what your model needs. But keep in mind most of the time you should be using spheres rather than boxes. Boxes more often than not will be used on doodads not characters/units.
Hopefully my tutorial has helped you and if you have any questions just ask.
1. First open your model with War3ModelEditor (Magos).
2. Then go to Edit>Properties.
This will open up a window which looks like this:
3. Check the Collision Shapes Box under the display category on the left side.
4. Now press the Okay button. You may or may not see anything different. If you don't see anything then move onto the next step.
5. Go to Windows>Node Manager.
6. Right click at the bottom and choose Create Collision Shape.
7.A new blue box will appear at the bottom. Make sure it's all the way over to the left so it isn't attached to anything. Double click it or right click it and choose Edit.
A window will appear like this:
8. Choose Sphere as we'll start out with that as they are easier to do and more widely used.
9. For starters set your Bonus Radius to 40 and the Z coordinate to 40 as well. Typically you can leave X and Y alone for most models unless they aren't centered properly.
10. Press Okay and then go back to your main model window. You should now see a blue sphere like this:
Now most likely your sphere will not cover your entire model. This is usual and varies between model. That blue sphere is the area that will be selectable on your model. We want the entire model or most of the model to be covered so your unit is easily selectable.
11. So to finish up we go back to Node Manager and you can either expand your Bonus Radius and set the Z coordinate to the same amount as your Bonus Radius, (Keep in mind having the same Z coordinate as the Bonus Radius isn't required but I find it usually keeps the sphere positioned well.) Or you can create a second sphere. I'm going to create a second sphere for this model because he is somewhat tall and I don't want too much space to be selectable around him.
12. Just experiment to try to make your sphere's cover the model. For this specific model I found that spheres of Bonus Radius 60 worked best. So I created a second one and put it's Z coordinate at 140 like so:
My model now looks like this:
See how the spheres expand out beyond the model a bit? This is totally okay because your model will be moving around and will at times occupy that space. This is about how you want your spheres to look on your model. But you don't want to make your sphere's too large.If you make it so your sphere so huge it expands way beyond the model players will select it when they aren't trying to and that can be really frustrating. To show you an example of what you don't want look at this:
You should easily be able to tell the difference.
13. Now go back to Node Manager and right click your collision shapes that currently say UNNAMED. Choose 'Edit Node' not 'Edit'.
14. You now can enter a name for the collision shape. You could just leave it as it is because the name doesn't affect anything. Or you could put CollisionSphere1 or something of that sort. But what I like to do is put my model's name and "By Zerox", so that if someone deprotects a map my model is in or just takes it out of an non-protected map they can still open up my model and have a chance to see who made it.
Don't bother messing with the Vertex Coordinates in here (X, Y, Z). They don't make any difference to your collision shape.
15. Now you can save your model and your done. Your model will now be selectable in-game. You may want to go back to Edit>Properties and uncheck the collision shapes box so you don't have to look at the collision shapes while your just viewing models. But it's up to you.
Collision Boxes:
Now I'll attempt to explain Box collision shapes. Here is an example of where one should be used:
The box goes around the Dragon's long body that is tall and wide. The box is the better choice here because the dragon's body doesn't move much and is too tall and wide for a sphere to be really effective without making it take up too much space you wouldn't want as shown with the over-sized sphere with Cell above. You may also notice that the dragon has a sphere as well on it's head.
This is because it extends away from the rest of the body and is more easily covered in a separate sphere. That way too much excess space isn't used. Don't ever be afraid to try a combination of boxes and spheres. Now moving on to how you set up your own box.
1. Repeat steps 1-7 above and then select Box rather than Sphere.
Now boxes work pretty differently as far as setting them up goes. You now have Vertex 1 and Vertex 2. These will be the extents of your box. Always start Vertex 1's Z coordinate at 0. That will keep the bottom of the box at the bottom of the model. Obviously if your doing a box for something elevated this doesn't apply but just keep it at the bottom of the model.
Look at how I've set up my box for this model:
See how the X's and Y's are identical except for one is negative (-) and the other is positive? This is how I recommend you set them up because this causes the box to extend in equal distances both ways. Now the to figure out which direction is which you may have to experiment with them for yourself. But I'll try to explain them as best I can. X is from front to back and Y is from side to side, Z is up and down.
2. Now set your Z so it goes to the proper height so it is just above where the model ends. You may have to play around with all of these until you get the box to fit your model properly.
Also having identical X's and Y's isn't always going to work. For this model equal Y's didn't work because the back of the model was still outside the box so I had to adjust it to fit like so:
3. After you've got your box set up the way you want it save and then your done.
Notice: Boxes should be used on mostly stationary objects. In most cases spheres are typically better because they allow for a full range of movement. Use good judgment for what your model needs. But keep in mind most of the time you should be using spheres rather than boxes. Boxes more often than not will be used on doodads not characters/units.
Hopefully my tutorial has helped you and if you have any questions just ask.
Last edited by a moderator:


 But it's true I'm more active there, 900 posts here 7000+ there.


