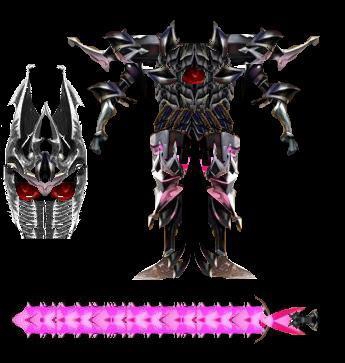
The skin lacks the back, which you obviously already have been told... and yes, a cloak would be a good way around that.
What you need to do though, when creating a skin without the model, is to think about what kind of area the skin is going to wrap around, and how you should stretch out your texture to suit.
For example, take a look at your feet. They are drawn side on, which isn't so bad or so hard to wrap, but it may come up looking odd. Think about it... in war 3 you are looking down on the unit, so the most detail you would want to put on the feet would be what you see from the top (ie look down at your own feet). With the feet you have there luckily you could just add it to the model by mirroring it onto both sides of the foot, and it shouldn't look too bad.
It becomes a problem though when you look at your leg area, as it has highly detailed armor pieces of which you have seem to have drawn to look like they are already in 3d. This doesn't make it easier to wrap, it just makes it look odd when you apply it to the model. Again, you need to think of all off the surfaces of that piece of armor and stretch it out to suit. You might want to draw the top surface in high detail, and then add bits all around the sides so they can be wrapped around the edges of the armor piece on the model.
Also, to reinforce that point yet again, you can't just draw a higly detailed suit of armour and hope it will wrap well on a 3d model. It most likely wont. You need to think about which pieces will be raised, like a shoulder pad or a loincloth or whatever, and draw the skin to cover all visible sides of that object, as well as a skin for the parts underneath. No point in drawing a detailed loincloth over the top of the armour without considering that once modelled, you are going to be able to see the legs behind the loincloth from different angles. What you would do in this example is draw the armour for the legs, and beside it draw the loincloth. The modeller can then model the legs using the skin, and then add the loincloth over the top for a better finish.
A good way to get a grasp on raised areas of a model is to put on a wrist watch, and pretend that is an important feature of your model. Looking at the wrist watch, it is obvious that the face of the watch is the most important part, so you would draw the top of the watch first in high detail. But then what about the sides of the watch? They are less important, but they cant look the same as the face. So you would draw them in less detail... and most importantly you need to know that they dont need to be in place, or even connected to the face of the watch if you dont want to. You can draw it anywhere on the texture, the top left, right, bottom right, anywhere... and the modeller can attach them to the sides of the watch later. Then, the least important part would be the strap going under the wrist. The logical place for skinning this would be on the underside of the arm skin. You are not going to see the skin under the watch strap, so you dont need to draw that or worry that the strap is covering it.
Another thing you need to know is that you dont have to double up on the same parts. If the front of the left arm is the same as the right, you only need to draw 1 arm. The modeller can then put that 1 arm skin on both of the arms, or even 5 arms if he wanted to. Any part of your texture that is going to be used more then once only needs to be drawn once. This helps you save space in your skin.
I think the best thing to do is to request a model to be made before you start the skin, and then once the modeller has completed the model he can give you the UV map and you can then draw the skin to fit the model correctly.
Hope this helps