- Joined
- Jun 3, 2010
- Messages
- 100
TABLE OF CONTENTS:
Introduction & Setup
Creating your Unit
Creating your Units' Weapon & Effects
Creating your Units' & Weapons' Actor
Creating your Upgrades
Things to be Aware Of
This tutorial will show you how to recreate units that are independent from their source. This enables you to create unique units, with their own abilities, without having to alter the base data of the game. There are many options available with this type of approach. Think marines with a brood lord ability to create "squads" as just one example. You will only be limited by your own imagination and I look forward to seeing the many creations to come. Please keep in mind that Blizzard has made things a lot more convenient since this was originally written, so Copy/Paste will save you a lot of time in areas I may not make it obvious.
I have the following View Buttons Set:
Show Object Explorer: (Shift+Alt+E)
Table View: (Ctrl+1)
Sort fields by Source: (Ctrl+E)
Sort Basic Field Label: (Ctrl+Shift+L)
Show Field Categories: (Ctrl+Shift+F)
Combine Structure Values: (Ctrl+Shift+n)

Now open the following tabs within the editor:

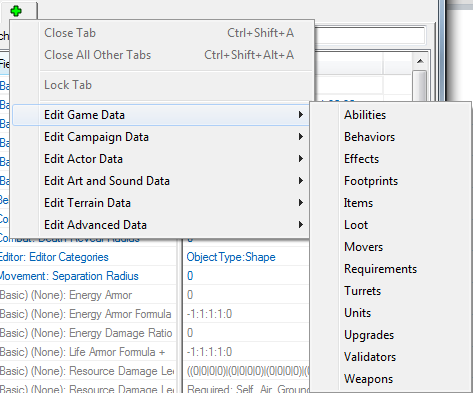
I know of two ways to do this, but I will show the way that requires less explaining. Simply locate the green "+" tab and click it. Then choose the tab you wish to open. For now all the tabs but actors will be located in the Edit Game Data section shown below.
Note: The second method will be explained further within this tutorial.
Once you have your views setup to your liking we will begin creating our unit. I will be using the Marauder as our template.
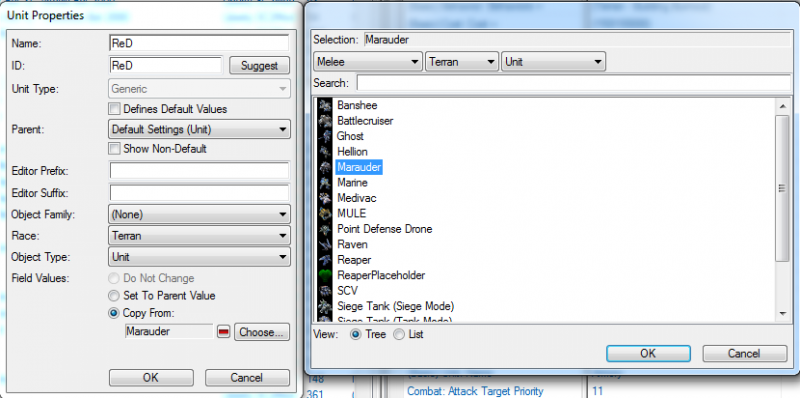
To begin we will need to open the Data Editor if not done already, this can be done by pressing F7 on your keyboard, or by clicking on the marine icon within the SCII editor. Once done we will also customize our views and prepare our tabs. Right click in the Units tab and select Add Unit... (Ctrl+=)
I've named my unit ReD, and copied the data from the Marauder. Although not needed on a unit, I highly recommend using the Prefix and Suffixes to keep yourself organized moving forward. In addition I have set the following values:
Object Family: Melee
Race: Terran
Object Type: Unit
These all function mainly as organizational units for searching/filtering. However, there are exceptions to this rule. An immediate example that come to mind are that Race can effect Pickup/Dropoff due to validators.
It should look like this:
Next lets customize our Hero.
Ability -Abilities + This is where you can add in Custom Abilities (Spells) to be used by your character.
Ability - Command Card + This is where you add your Buttons for Abilities you have created. Be sure to add your ability first.
Behaviors +: This field can be used for many different things i.e. Veterancy (XP levels), and is not limited to just one Behavior. Added Reaper - Reaper Jump
Combat - Attack Target Priority "Threat" Level. Higher = Greater Priority.
Combat - Weapon: My weapon is already created and set, for now leave yours at the Default setting.
Cost Not certain what this applies to, as the Cost of the unit is Dictated by the Train ability which is covered in my Building Tutorial.
Editor - Description: Information message given to you when hovering over the unit. New units will say nothing when created.
Movement - Acceleration This field will give the effect of gradually reaching maximum speed. Have not played with it much, but an example would be a Zergling reaches maximum speed immediately.
Movement - Collide This field is what changes Clipping effects to your units. i.e. Cannot pass through.
Movement - Inner Radius Unknown
Movement - Mover: I chose Cliff Jumper, but there are options to change your unit to air, ground, etc. as well. take a look")
Movement - Plane Array Used to show which units it would block. I.e. Ground will not block Air.
Movement - Radius Unkown
Movement - Speed Maximum speed of Unit.
Stats - Cargo Size: Dictates minimum space the unit takes up in a Bunker/Transport. If set to 0 unit cannot be picked up. (Left at Default Value.)
Stats - Energy Maximum/Starting amount Like they Sound.
Stats - Energy Regeneration Rate Play with this to find a suitable regen rate for your Unit(s)
Stats - Life Armor: This is the base Armor Value before any upgrades are applied. Added value of 3.
Stats - Life Armor Level This will add levels to the icon on the Units Status. 1 = Lvl 1 etc.
Stats - Life Max/Starting Amount: Changed values to 600
Stats - Race This is used for certain requirements. I.e. Medivac can only pickup Terran units, or Bunker can't load them? I forget which of those two scenarios is correct, maybe both
Stats - Score - Kill/Produce The amount of Points awarded for end game recaps.
Stats - Shield Armor Same as Life Armor but applies to Shield.
Stats - Shield Armor Level Same as Life Armor Level.
Stats - Shield Max/Starting Amount
Stats - Shield Regen Rate Same as Energy Regen.
Stats - Sight Radius: Total viewing space. (Left at Default Value.)
UI - Fidget + Unknown
UI - Life Armor Name: This is the name that will appear when hovering over the Icon in game. Make sure this is set correctly. I've had odd instances of this changing.
Unit - Attributes: This field is used for incoming Damage types. If a unit does +4 Light damage and your unit is Light you will take the additional Damage. Added Heroic
Unit - Flags: Added Hero. Allows unit to be auto hotkeyed. Can have 8 at one time i.e. f2-f9
Unit - Leader Alias: Name displayed in Replays, and Scoreboard.
Unit - Select Alias: Allows multiple units to be selected with a double click. You can set any two units together but, commonly, this is used used for things similar to a Zergling and Burrowed Zergling.
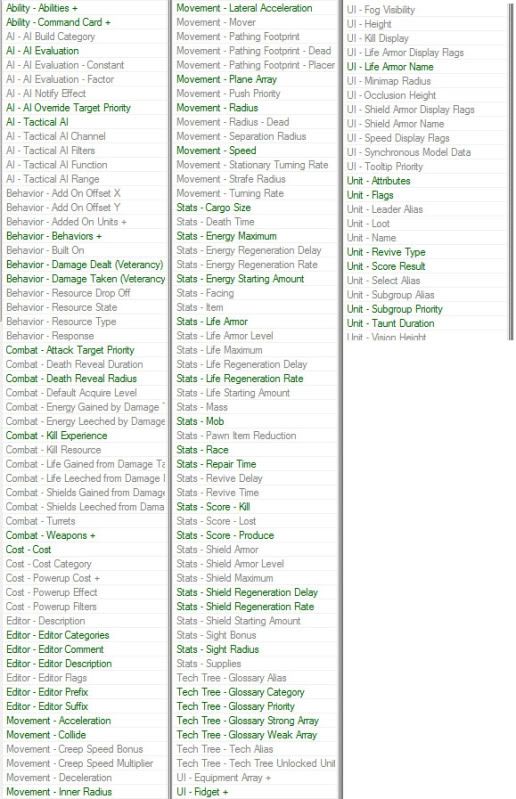
Since I've explained the Fields, the screenshot provided shows only the Fields Name and not the editable data. This was done to save space and hopefully reduce confusion while looking at it. Feedback always appreciated.
See below:
Lets now move to the Weapons tab of the Data Editor to create us a new toy. If I didn’t have my tabs already opened I would use the method of opening tabs that was skipped above. Simply select or right click on the equipped weapon (scroll to the bottom of your unit) and select the View Linked Weapon option or press (Ctrl+Alt+V).
This is the typical method that I use when working and I open the tabs as I need them, but remember that the same hotkey works for every equipped actor/effect etc. by selecting it first.
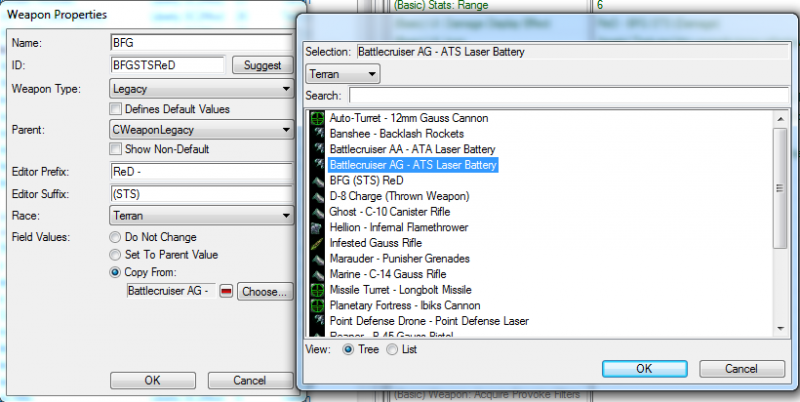
You can choose virtually any weapon you want to, and I'm going to be using a Battlecruiser ATS attack for this Example. Switch to the Weapons tab and right click then select Add Weapon... (Ctrl+=)
I've named my weapon the BFG, and copied from the Battlecruiser ATS weapon. It should look like this:
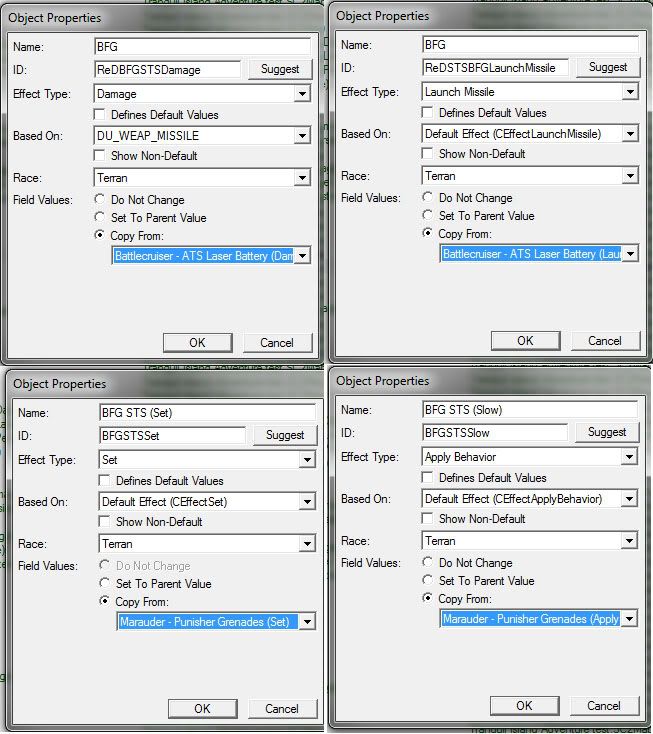
To make things more fun and interesting, we are also going to set the Marauder Behavior of Slow to this Battlecruiser attack. To do so, we'll need to add two additional Effects by moving over to the Effects Tab now. Right click and select Add Effect... (Ctrl+=)
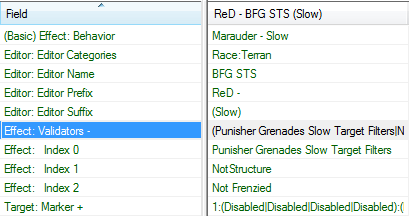
I've shown exactly what each effect that needs to be added should look like here:
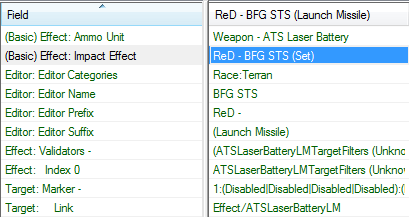
Currently your abilities are tied to their parent values and any changes made will affect their parent. Since we are creating a custom unit we now need to setup our Effects to work individually from their parents.
Choose your newly created BFG STS (Launch Missile): Change Impact Effect to BFG STS (Set).
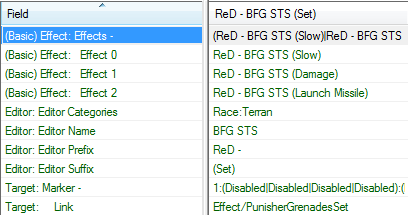
Now, with BFG STS (Set), Change Effects to show:
BFG STS (Damage)
BFG STS (Launch Missile)
BFG STS (Slow)
With BFG STS (Slow): Remove the Validator "Marauder - Punisher Grenades Researched" this will allow you to slow enemies without Researching.
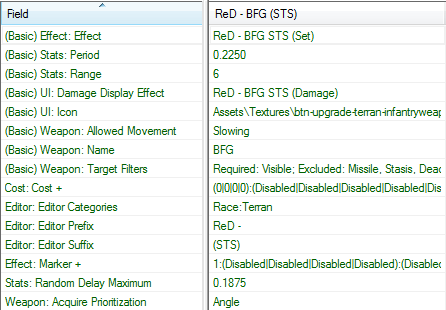
Great, now let's apply our Effect to our weapon by returning to the Weapons Tab:
Effect: This can be a bit more advanced but for now we will be using our BFG STS (Set) effect.
Period: Increment, in seconds, between attacks. 1.00 = 1 Second
Range: Maximum Range that can be achieved with Vision.
Damage Display Effect: Set to your weapons (Damage) Effect. In this case ReD - BFG STS (Damage)
Icon: Sometimes this is reset, or in this case, we used a Terran Ship Weapon on an Infantry unit. So make sure you set it to the correct unit Type.
Target Filters: Can change from air to ground targets or both etc.
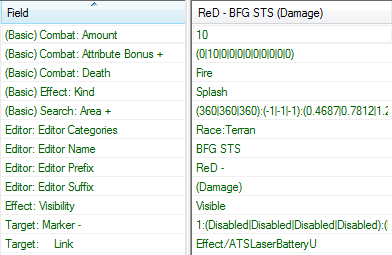
Now that you've setup your weapon the way you want. You can still modify the (Damage) Effect to apply splash damage, or change it from Fire to Electrical. I'll leave it up to you to explore. Here's how I've set it up:
Amount: Base Damage caused per attack.
Attribute Bonus: Modifies damage effects to Class Types. Added +10 to armor
Death: Changes the Death damage effect applied by your weapon to change.
Kind: Changes type of attack from Ranged, Melee, Splash, or Spell.
Area +: Modifies the Area of Effect of the attack. Copied value from the Crucio Shock Cannon "Blast" effect.
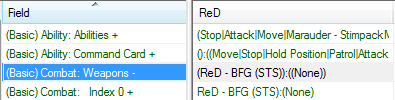
Once you are satisfied with the changes you've made. Go to your unit and equip the weapon.
Now that you have your effects set, if you compare them to the normal Battlecruiser attack, you'll feel a bit naked. You should notice that there is an actor along with upgrades. Let's go get those added to our weapon!
As stated by DSG below in his reply, there is an alternative method to attaching actors. The method I am going to be showing allows users to create "copies" of units that are completely independent from their host.
Open your Actors tab in the Data editor. Adding an actor should be relatively easy at this point. The one thing to be mindful of is the type of unit base you are creating. I know what we'll be using for the units and Weapons, but always double check your base unit that you are copying from. Choosing an incorrect value can cause for some headaches.
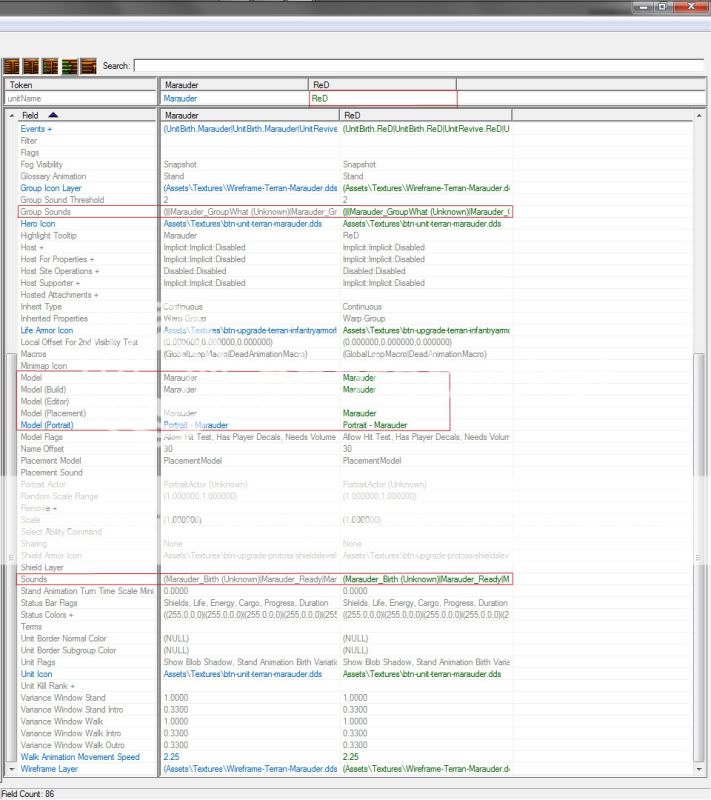
Lets add our Heroes' Actor first. It should look like this:
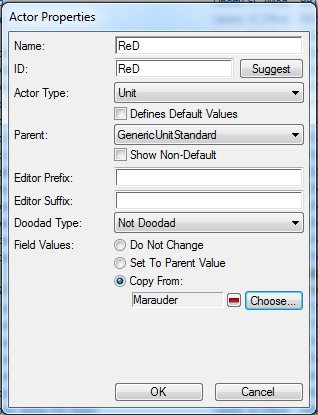
At this point I generally will select both Actors using Ctrl. In the bottom (the Token section), both unit name Tokens should be referencing your Parent Actor, in this case Marauder.
On your actor, change the token from Marauder to your own unit.
Note & Warning:: It may be renamed to your parent unit at this point due to a bug from the editor. It will require you rename your Unit again. Also, this will reset some values of the newly created actor!
This will reset the following fields:
(Basic) Sound: Sounds +
Sound: Group Sounds +
Do not touch the Events + section of your units actor.
All you need to do is simply copy/paste the field from one unit to the other, and if done right, your unit should now be able to be placed on the map.
Let's repeat this process for our weapon, this time it's a little less complicated. Here's what your actor should look:
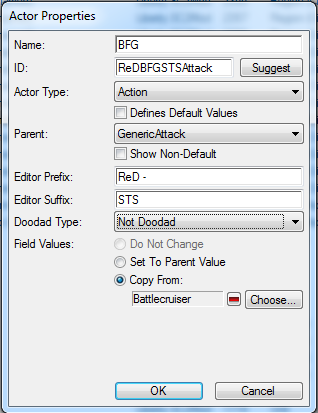
Similar to how we had to manually set the Actor to our Unit we must do the same thing for our Weapon Effects. This time we won't have to worry about any values resetting. It should look like this:

Now all that's left are setting up your Upgrades.
Why is ReD feeling left out while all the other units are getting new toys to play with? Let's help him jump on the Upgrade bandwagon!
This time around we won't be creating a brand new Upgrade, that will be included in the Building Creation tutorial. So today we'll be working with Terran Infantry Upgrades.
Switch to the Upgrades tab of your Data Editor.
Select Terran Infantry Armor Level 1. Now, add your unit to the Affected Unit Array then copy/paste the array into the remaining upgrades that are relevant.
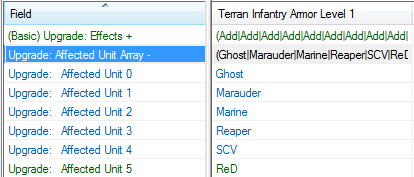
Once done, you need to open the Effects + section of the upgrade. You will be greeted by a lot of text that might seem confusing at first, but it is rather easy to understand.
Note: Unless you create an individual Upgrade you should not copy paste the Effects+ sections because you will have to manually change Icons for each unit in the affected arrays.
Data Reference: This field is modified with both the Type: and Object: fields in addition to the "Field" field. There are many Variations/options, you can find many ways to apply effects or changes using the upgrades.
Operation: This field is modified by the Operation field, and depending on which you select, it will modify the Value field. Whether you Set a texture for a level, or Add values to the Unit, this is where it is done.
Type: Allows you to choose what type of source your object is.
Object: Allows you to specify the Object upgrade will be applied to.
Field: Selects the Data that will be Modified. i.e. icons, life armor, energy, or UI icons
Value: Can be used to Add or Subtract modifications to the Unit, or apply textures.
It's important that you make the change per upgrade the same. i.e. If you add 3 Life Armor on level 1, then Level 2, 3, etc. must also be the same.
Now that you have a little idea of what you are getting into, Right Click on an Upgrade Effect and select Add Effect.
If you accidentally hit Remove Effect, then just Reset the Value to Parent Object and restart the process.
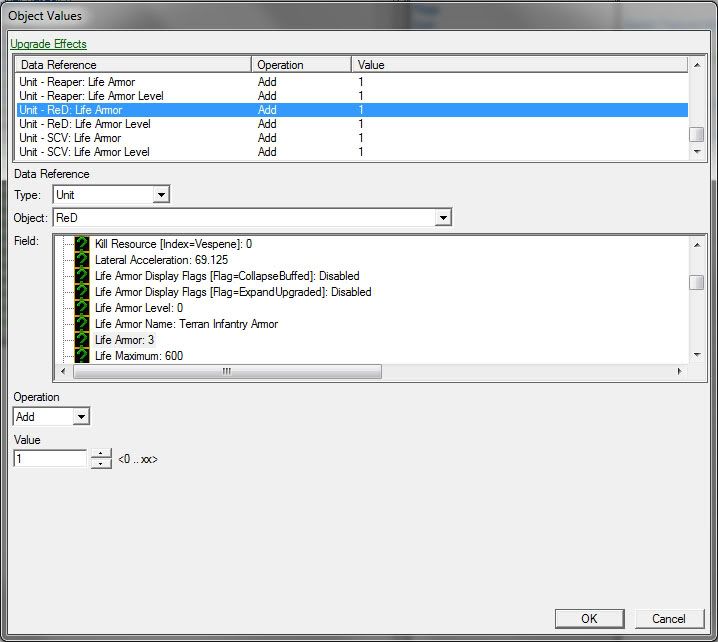
Using the newly created blank effect, modify it to read like so, remember we have modified the Type, Object, Operation, and Value fields.:
Data Reference:
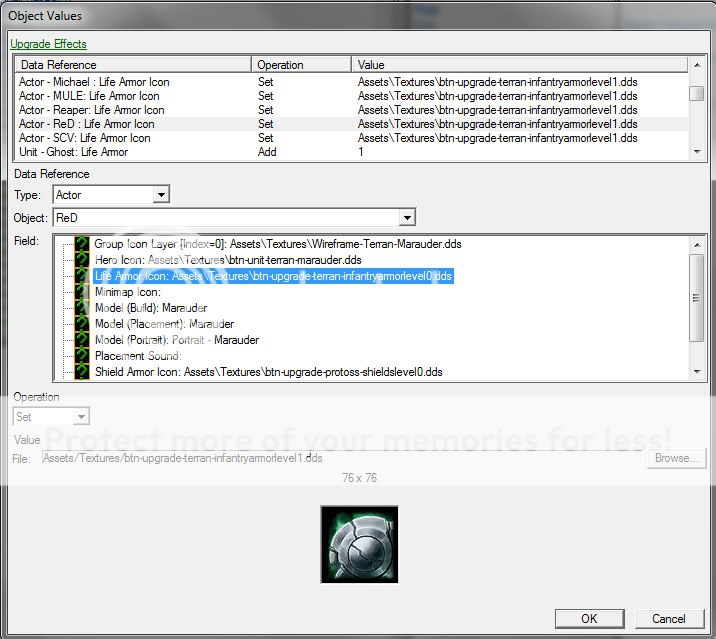
What this has just done, is told the upgrade to apply a texture to reflect a Level 1 upgrade.
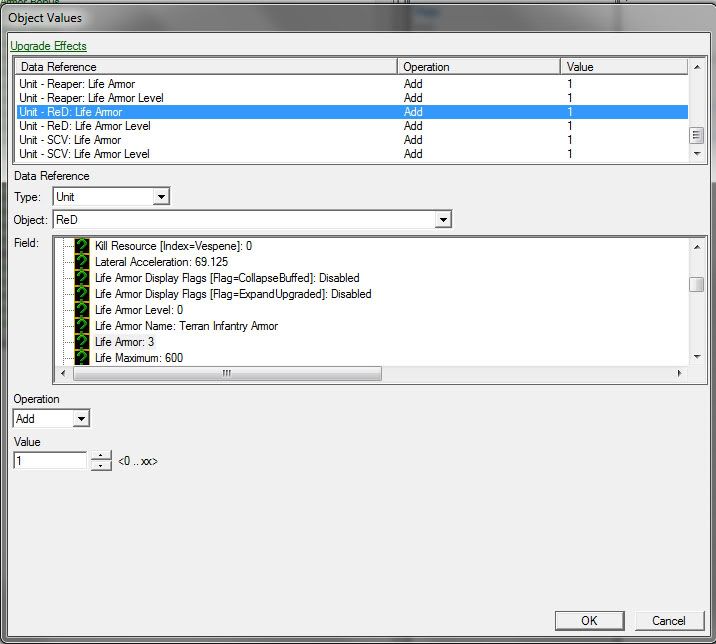
Now, add two more Effects and make them look like the following:
This time you have added the actual Level and Life Armor increase values. We are using 1 for the example but you can set it to whatever you desire. Repeat this process for Levels 2 and 3. Once finished with the set of Three levels, now find TerranInfantryArmors (Unnamed) and add these two values:
Done with armor! Always test your upgrades and their applied affects.
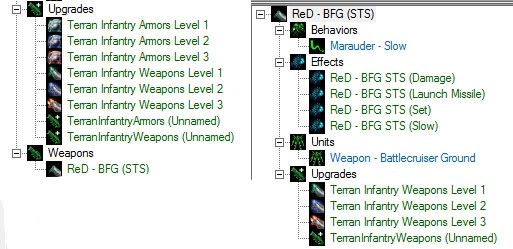
Weapons upgrades are the same idea but different values are added. Reference the other upgrades to make sense of them, but if you got this far then you should have no problems. Your unit and weapon should now have this information listed:
Hope this all made sense to everyone! Thanks for your time and criticisms! Really, any advice is welcomed heh
Things to be Aware of
These are things that I have found will make the editor glitch out or create a mess, confirmed in Beta have not been tested since:
1. Do NOT ever Duplicate an item. This will create a bunch of additional copies of its values within the Editor and make things less organized.
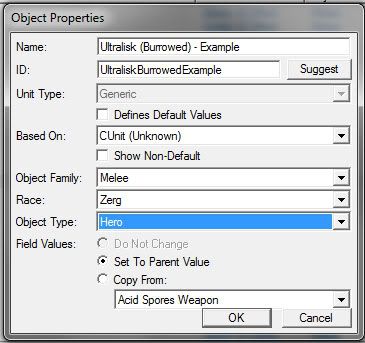
2. When creating a multi form unit that only has one Actor only use the "Copy from" option on the first unit. For instance, if you copy Ultralisk and then try to copy Ultralisk (Burrowed) it will cause the Ultralisk unit to rename itself to your newly created unit, making it difficult to spot out the difference. While this is only the beginning of the headache it will look like this:

Oddly enough any changes you make to your Units Name will reflect on the Original. Furthermore, Trying to reset it back to normal will set the Ultralisk to a generic unit value. To be sure you avoid this, when you get to this point:

Make sure you create a brand new Unit and as said before dont copy:
If successful, then your base ultralisk should be fine. it should look like this.

Now you will have to copy over the values of the burrowed unit to your blank unit. Actions command card, the whole unit! Ya this sucks for sure, but it's the only way I've found that prevents the glitch.
Units I have found that are affected by this include (but are not limited to):
Command Center
Orbital Command
Barracks
Starport
Factory
Zergling
Reactor
Tech Lab
3. Ive run into another issue regarding Multi Form Units. This time specifically with the Actors and their animation effects. I've only started to look into the fix and progress has been made but it's not a simple solution. Ill include it with my Building tutorial, because it pertains mostly to construction animations.
Introduction & Setup
Creating your Unit
Creating your Units' Weapon & Effects
Creating your Units' & Weapons' Actor
Creating your Upgrades
Things to be Aware Of
Introduction & Setup
This tutorial will show you how to recreate units that are independent from their source. This enables you to create unique units, with their own abilities, without having to alter the base data of the game. There are many options available with this type of approach. Think marines with a brood lord ability to create "squads" as just one example. You will only be limited by your own imagination and I look forward to seeing the many creations to come. Please keep in mind that Blizzard has made things a lot more convenient since this was originally written, so Copy/Paste will save you a lot of time in areas I may not make it obvious.
I have the following View Buttons Set:
Show Object Explorer: (Shift+Alt+E)
Table View: (Ctrl+1)
Sort fields by Source: (Ctrl+E)
Sort Basic Field Label: (Ctrl+Shift+L)
Show Field Categories: (Ctrl+Shift+F)
Combine Structure Values: (Ctrl+Shift+n)
Now open the following tabs within the editor:
I know of two ways to do this, but I will show the way that requires less explaining. Simply locate the green "+" tab and click it. Then choose the tab you wish to open. For now all the tabs but actors will be located in the Edit Game Data section shown below.
Note: The second method will be explained further within this tutorial.
Once you have your views setup to your liking we will begin creating our unit. I will be using the Marauder as our template.
Creating your Unit
To begin we will need to open the Data Editor if not done already, this can be done by pressing F7 on your keyboard, or by clicking on the marine icon within the SCII editor. Once done we will also customize our views and prepare our tabs. Right click in the Units tab and select Add Unit... (Ctrl+=)
I've named my unit ReD, and copied the data from the Marauder. Although not needed on a unit, I highly recommend using the Prefix and Suffixes to keep yourself organized moving forward. In addition I have set the following values:
Object Family: Melee
Race: Terran
Object Type: Unit
These all function mainly as organizational units for searching/filtering. However, there are exceptions to this rule. An immediate example that come to mind are that Race can effect Pickup/Dropoff due to validators.
It should look like this:
Next lets customize our Hero.
Ability -Abilities + This is where you can add in Custom Abilities (Spells) to be used by your character.
Ability - Command Card + This is where you add your Buttons for Abilities you have created. Be sure to add your ability first.
Behaviors +: This field can be used for many different things i.e. Veterancy (XP levels), and is not limited to just one Behavior. Added Reaper - Reaper Jump
Combat - Attack Target Priority "Threat" Level. Higher = Greater Priority.
Combat - Weapon: My weapon is already created and set, for now leave yours at the Default setting.
Cost Not certain what this applies to, as the Cost of the unit is Dictated by the Train ability which is covered in my Building Tutorial.
Editor - Description: Information message given to you when hovering over the unit. New units will say nothing when created.
Movement - Acceleration This field will give the effect of gradually reaching maximum speed. Have not played with it much, but an example would be a Zergling reaches maximum speed immediately.
Movement - Collide This field is what changes Clipping effects to your units. i.e. Cannot pass through.
Movement - Inner Radius Unknown
Movement - Mover: I chose Cliff Jumper, but there are options to change your unit to air, ground, etc. as well. take a look
Movement - Plane Array Used to show which units it would block. I.e. Ground will not block Air.
Movement - Radius Unkown
Movement - Speed Maximum speed of Unit.
Stats - Cargo Size: Dictates minimum space the unit takes up in a Bunker/Transport. If set to 0 unit cannot be picked up. (Left at Default Value.)
Stats - Energy Maximum/Starting amount Like they Sound.
Stats - Energy Regeneration Rate Play with this to find a suitable regen rate for your Unit(s)
Stats - Life Armor: This is the base Armor Value before any upgrades are applied. Added value of 3.
Stats - Life Armor Level This will add levels to the icon on the Units Status. 1 = Lvl 1 etc.
Stats - Life Max/Starting Amount: Changed values to 600
Stats - Race This is used for certain requirements. I.e. Medivac can only pickup Terran units, or Bunker can't load them? I forget which of those two scenarios is correct, maybe both
Stats - Score - Kill/Produce The amount of Points awarded for end game recaps.
Stats - Shield Armor Same as Life Armor but applies to Shield.
Stats - Shield Armor Level Same as Life Armor Level.
Stats - Shield Max/Starting Amount
Stats - Shield Regen Rate Same as Energy Regen.
Stats - Sight Radius: Total viewing space. (Left at Default Value.)
UI - Fidget + Unknown
UI - Life Armor Name: This is the name that will appear when hovering over the Icon in game. Make sure this is set correctly. I've had odd instances of this changing.
Unit - Attributes: This field is used for incoming Damage types. If a unit does +4 Light damage and your unit is Light you will take the additional Damage. Added Heroic
Unit - Flags: Added Hero. Allows unit to be auto hotkeyed. Can have 8 at one time i.e. f2-f9
Unit - Leader Alias: Name displayed in Replays, and Scoreboard.
Unit - Select Alias: Allows multiple units to be selected with a double click. You can set any two units together but, commonly, this is used used for things similar to a Zergling and Burrowed Zergling.
Since I've explained the Fields, the screenshot provided shows only the Fields Name and not the editable data. This was done to save space and hopefully reduce confusion while looking at it. Feedback always appreciated.
See below:
Lets now move to the Weapons tab of the Data Editor to create us a new toy. If I didn’t have my tabs already opened I would use the method of opening tabs that was skipped above. Simply select or right click on the equipped weapon (scroll to the bottom of your unit) and select the View Linked Weapon option or press (Ctrl+Alt+V).
This is the typical method that I use when working and I open the tabs as I need them, but remember that the same hotkey works for every equipped actor/effect etc. by selecting it first.
Creating your Units' Weapon & Effects
You can choose virtually any weapon you want to, and I'm going to be using a Battlecruiser ATS attack for this Example. Switch to the Weapons tab and right click then select Add Weapon... (Ctrl+=)
I've named my weapon the BFG, and copied from the Battlecruiser ATS weapon. It should look like this:
To make things more fun and interesting, we are also going to set the Marauder Behavior of Slow to this Battlecruiser attack. To do so, we'll need to add two additional Effects by moving over to the Effects Tab now. Right click and select Add Effect... (Ctrl+=)
I've shown exactly what each effect that needs to be added should look like here:
Currently your abilities are tied to their parent values and any changes made will affect their parent. Since we are creating a custom unit we now need to setup our Effects to work individually from their parents.
Choose your newly created BFG STS (Launch Missile): Change Impact Effect to BFG STS (Set).
Now, with BFG STS (Set), Change Effects to show:
BFG STS (Damage)
BFG STS (Launch Missile)
BFG STS (Slow)
With BFG STS (Slow): Remove the Validator "Marauder - Punisher Grenades Researched" this will allow you to slow enemies without Researching.
Great, now let's apply our Effect to our weapon by returning to the Weapons Tab:
Effect: This can be a bit more advanced but for now we will be using our BFG STS (Set) effect.
Period: Increment, in seconds, between attacks. 1.00 = 1 Second
Range: Maximum Range that can be achieved with Vision.
Damage Display Effect: Set to your weapons (Damage) Effect. In this case ReD - BFG STS (Damage)
Icon: Sometimes this is reset, or in this case, we used a Terran Ship Weapon on an Infantry unit. So make sure you set it to the correct unit Type.
Target Filters: Can change from air to ground targets or both etc.
Now that you've setup your weapon the way you want. You can still modify the (Damage) Effect to apply splash damage, or change it from Fire to Electrical. I'll leave it up to you to explore. Here's how I've set it up:
Amount: Base Damage caused per attack.
Attribute Bonus: Modifies damage effects to Class Types. Added +10 to armor
Death: Changes the Death damage effect applied by your weapon to change.
Kind: Changes type of attack from Ranged, Melee, Splash, or Spell.
Area +: Modifies the Area of Effect of the attack. Copied value from the Crucio Shock Cannon "Blast" effect.
Once you are satisfied with the changes you've made. Go to your unit and equip the weapon.
Now that you have your effects set, if you compare them to the normal Battlecruiser attack, you'll feel a bit naked. You should notice that there is an actor along with upgrades. Let's go get those added to our weapon!
Creating your Units' and Weapons' Actor
As stated by DSG below in his reply, there is an alternative method to attaching actors. The method I am going to be showing allows users to create "copies" of units that are completely independent from their host.
Open your Actors tab in the Data editor. Adding an actor should be relatively easy at this point. The one thing to be mindful of is the type of unit base you are creating. I know what we'll be using for the units and Weapons, but always double check your base unit that you are copying from. Choosing an incorrect value can cause for some headaches.
Lets add our Heroes' Actor first. It should look like this:
At this point I generally will select both Actors using Ctrl. In the bottom (the Token section), both unit name Tokens should be referencing your Parent Actor, in this case Marauder.
On your actor, change the token from Marauder to your own unit.
Note & Warning:: It may be renamed to your parent unit at this point due to a bug from the editor. It will require you rename your Unit again. Also, this will reset some values of the newly created actor!
This will reset the following fields:
(Basic) Sound: Sounds +
Sound: Group Sounds +
Do not touch the Events + section of your units actor.
All you need to do is simply copy/paste the field from one unit to the other, and if done right, your unit should now be able to be placed on the map.
Let's repeat this process for our weapon, this time it's a little less complicated. Here's what your actor should look:
Similar to how we had to manually set the Actor to our Unit we must do the same thing for our Weapon Effects. This time we won't have to worry about any values resetting. It should look like this:
Now all that's left are setting up your Upgrades.
Creating & Applying Upgrades
Why is ReD feeling left out while all the other units are getting new toys to play with? Let's help him jump on the Upgrade bandwagon!
This time around we won't be creating a brand new Upgrade, that will be included in the Building Creation tutorial. So today we'll be working with Terran Infantry Upgrades.
Switch to the Upgrades tab of your Data Editor.
Select Terran Infantry Armor Level 1. Now, add your unit to the Affected Unit Array then copy/paste the array into the remaining upgrades that are relevant.
Once done, you need to open the Effects + section of the upgrade. You will be greeted by a lot of text that might seem confusing at first, but it is rather easy to understand.
Note: Unless you create an individual Upgrade you should not copy paste the Effects+ sections because you will have to manually change Icons for each unit in the affected arrays.
Data Reference: This field is modified with both the Type: and Object: fields in addition to the "Field" field. There are many Variations/options, you can find many ways to apply effects or changes using the upgrades.
Operation: This field is modified by the Operation field, and depending on which you select, it will modify the Value field. Whether you Set a texture for a level, or Add values to the Unit, this is where it is done.
Type: Allows you to choose what type of source your object is.
Object: Allows you to specify the Object upgrade will be applied to.
Field: Selects the Data that will be Modified. i.e. icons, life armor, energy, or UI icons
Value: Can be used to Add or Subtract modifications to the Unit, or apply textures.
It's important that you make the change per upgrade the same. i.e. If you add 3 Life Armor on level 1, then Level 2, 3, etc. must also be the same.
Now that you have a little idea of what you are getting into, Right Click on an Upgrade Effect and select Add Effect.
If you accidentally hit Remove Effect, then just Reset the Value to Parent Object and restart the process.
Using the newly created blank effect, modify it to read like so, remember we have modified the Type, Object, Operation, and Value fields.:
Data Reference:
What this has just done, is told the upgrade to apply a texture to reflect a Level 1 upgrade.
Now, add two more Effects and make them look like the following:
This time you have added the actual Level and Life Armor increase values. We are using 1 for the example but you can set it to whatever you desire. Repeat this process for Levels 2 and 3. Once finished with the set of Three levels, now find TerranInfantryArmors (Unnamed) and add these two values:
Done with armor! Always test your upgrades and their applied affects.
Weapons upgrades are the same idea but different values are added. Reference the other upgrades to make sense of them, but if you got this far then you should have no problems. Your unit and weapon should now have this information listed:
Hope this all made sense to everyone! Thanks for your time and criticisms!
Really, any advice is welcomed hehThings to be Aware of
These are things that I have found will make the editor glitch out or create a mess, confirmed in Beta have not been tested since:
1. Do NOT ever Duplicate an item. This will create a bunch of additional copies of its values within the Editor and make things less organized.
2. When creating a multi form unit that only has one Actor only use the "Copy from" option on the first unit. For instance, if you copy Ultralisk and then try to copy Ultralisk (Burrowed) it will cause the Ultralisk unit to rename itself to your newly created unit, making it difficult to spot out the difference. While this is only the beginning of the headache it will look like this:
Oddly enough any changes you make to your Units Name will reflect on the Original. Furthermore, Trying to reset it back to normal will set the Ultralisk to a generic unit value. To be sure you avoid this, when you get to this point:
Make sure you create a brand new Unit and as said before dont copy:
If successful, then your base ultralisk should be fine. it should look like this.
Now you will have to copy over the values of the burrowed unit to your blank unit. Actions command card, the whole unit! Ya this sucks for sure, but it's the only way I've found that prevents the glitch.
Units I have found that are affected by this include (but are not limited to):
Command Center
Orbital Command
Barracks
Starport
Factory
Zergling
Reactor
Tech Lab
3. Ive run into another issue regarding Multi Form Units. This time specifically with the Actors and their animation effects. I've only started to look into the fix and progress has been made but it's not a simple solution. Ill include it with my Building tutorial, because it pertains mostly to construction animations.
Last edited: