• 🏆 Texturing Contest #33 is OPEN! Contestants must re-texture a SD unit model found in-game (Warcraft 3 Classic), recreating the unit into a peaceful NPC version. 🔗Click here to enter!
  • 🏆 Hive's 6th HD Modeling Contest: Mechanical is now open! Design and model a mechanical creature, mechanized animal, a futuristic robotic being, or anything else your imagination can tinker with! 📅 Submissions close on June 30, 2024. Don't miss this opportunity to let your creativity shine! Enter now and show us your mechanical masterpiece! 🔗 Click here to enter!

Female Skirt

Status
Not open for further replies.
Level 31
Joined
Jun 27, 2008
Messages
2,557
Hey.

I am in need of model editing and I do seem to be capable to solve it myself. PROXY, who usually helps me on these matters seems to be gone at the moment, so I turn to request section.

This female model has legs and a long skirt geoset, usually when skirt is on, legs are removed, because those geosets collide and legs peaks out from the skirt, making things look bad. What I seek to do is to maintain legs and skirt, adding alpha channel to the skirt skin and changing it, making part of legs visible.

Could anyone edit the legs or skirt to make it look smooth so that legs does not peak out from the skirt? Legs must exist under the skirt. If butt cheeks are too problematic to edit, I can make them transparent so that they hide under the skirt, mainly the legs needs work.

Proper credits will be given, thank you.

qxZnj14.png


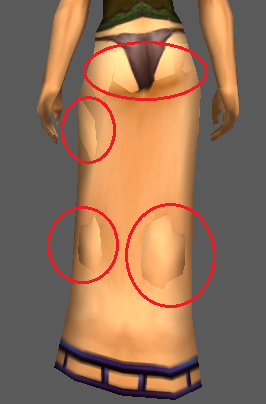
EDIT: I noticed during animations it becomes terrible, legs are going staight across the skirt, I think it needs a better way to solve the skirt problem.

I managed to partly solve the problem by enlarging the skirt around the legs, it still glitches when walking, but it seems decent. If anyone is willing to polish it to perfection, I would appreciate it.
 

Attachments

  • Female.rar
    726.7 KB · Views: 54
Last edited:
Well, you could make two model versions. One with skirt- other without. You then are able to switch models in-game using Bear Form ability. I think this is one of the most effective methods without doing serious animation work on the geoset.

So when you need her without skirt, just use a triggered or customized Bear Form ability and change the unit to the one with no skirt.
 
Level 31
Joined
Jun 27, 2008
Messages
2,557
Well, that's not exactly what I want. I want a skirt hanging at the side and see legs visible at another side, so both must exist. Except that it glitches when moving. I partly solved it, it seems acceptable, but not perfect (screenshot on Acheron thread).
 
Well, that's not exactly what I want. I want a skirt hanging at the side and see legs visible at another side, so both must exist. Except that it glitches when moving. I partly solved it, it seems acceptable, but not perfect (screenshot on Acheron thread).

Can't you just move the leg geosets further from the skirt in the position you want? I think that works too, then it should fix clipping.
 
Give her a bigger skirt. It is far too tight on her (so clips inside the leg geometry). WC3 lacks cloth physics so you might need special skirt bones (to distort it not to clip in the legs).
I agree with that. Add 4 lines of 3-4 bones each to follow the skirt starting from the torso, then animate the movement of the skirt seperate from the movement of the legs.

It's a little bit of extra work, but it will look much much better.
 
That might solve it, but I completely have no knowledge on Bones. I failed to transfer animations to another mesh several times. I did widen it up, but only vertices, clipping still happens, but not as much.
Creating the bones is easy:
You open the model in Magos, go to the node editor, right click to add a new bones, then use "move up/down" or "move left/right" to nest them all under the pelvis or root bone (depends on where your legs are attached to... not all models are exactly the same here). Obviously, they should be nested in a fashion that creates kind of like a "line".

So basicly

Bone_Root
--> Skirt Left 1
------> Skirt Left 2
-----------> Skirt Left 3
--> Skirt Right 1
------> Skirt Right 2
-----------> Skirt Right 3
--> Skirt Front 1
------> Skirt Front 2
-----------> Skirt Front 3
...

you get the idea. Don't overdo it. 4 lines with 3 bones each should be enough.

Then you just go into MDLVis, go to the Sequence Editor and go to the "Bones" tab.
All your bones will be at [0,0] after adding them in Magos. So look in the dropdown menu on the right for the names of your bones and select them one by one.
Then you can move them around to the correct positions. Basicly, move them so they follow the mesh of your skirt. Imagine it like the wire skeleton of an umbrella.


When you're done moving them into the correct places, select the skirt vertices that are very close to the bone (make sure you have the right bone selected dropdown!).
Then click on "reattach vertices". Do that for all nearby skirt vertices for each bone. Make sure to assign all vertices to at least one bone. Unassigned vertices will basicly not follow your animation, so will create ugly spikes as soon as you move your skirt around.

For the vertices that are halfway between two bones, it is recommended to add influence from both nearby bones to them.
Just select the vertices on the overlapping sections and check which bone they are attached to. Then select the other bone and click on "Add vertices to bone". This will make the vertices in the cross-sections be influences by two bones at the same time, creating a smoother look.

When you are done distributing your vertices to all the skirt bones, go to the animation tab and select the animation you want to edit the movement for.
I recommend starting with "Stand" as a basis.

Switch to the "Movement" tab after selecting "Stand". The frame slider at the bottom should have adjusted now to only show the frames of the "stand" animation.
Select the leftmost frame.
Now move/rotate your skirt bones around so that they look great.
When you're done with the setup of the initial frame, copy the entire frame (press "C" or select it from the menu on the top of the screen), move the frame slider to the rightmost frame and paste the entire frame.

This will make sure that your start and ending frame of your stand animation are 100% equal, creating a "smooth" loop.

Now that you have the start and end frame set, scroll the frame slider to something in the middle; then move/rotate the skirt bones around a bit to accomodate for the change of posture from your character.
You can then move the frame slider around and add even more frames to it. But I recommend not overdoing it. 3-4 keyframes is enough for a smooth "flapping" look of the skirt. You don't want it to jerk around like crazy when the character is standing still, right?

Then repeat the process for all other animations. Physics are your best friend if you want to create some convincing animations. If your character arches forward, obviously have your skirt follow the motion. If your character raises her leg, make the skirt follow the leg movement, if she jumps, make the skirt follow the direction of the resulting force, etc.
 
Last edited:
Level 31
Joined
Jun 27, 2008
Messages
2,557
Thank you for this information, I hope things will get more clear when attempting to deal with those bones. I used to learn animating with Biped on 3Ds Max, but I suppose importing MDX into 3Ds max is a complete disaster, it doesn't seem to get the animations. I am more comfortable with Biped, but will try Mdlvis. At this point I am not sure if this is worth it considering a better model alternative may be found.
 
Thank you for this information, I hope things will get more clear when attempting to deal with those bones. I used to learn animating with Biped on 3Ds Max, but I suppose importing MDX into 3Ds max is a complete disaster, it doesn't seem to get the animations. I am more comfortable with Biped, but will try Mdlvis. At this point I am not sure if this is worth it considering a better model alternative may be found.
You should definitely give this a try. The workflow is actually quite easy once you get the gist of it; don't let the wall of text discourage you. And the skills you pick up along the road when doing this are extremely valuable when you're mostly working alone on a project.

I just learned how it works a couple of months ago and I wouldn't want to miss this skill now. Now; when making a character, you probably still want to start in 3ds max, simply because bipeds are more practical as they provide some sanity checks in bone movement, but for simpler stuff like skirts, hair or capes, MDLVis is perfect.
 
Status
Not open for further replies.
Top