- Joined
- Jul 30, 2007
- Messages
- 888
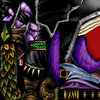
This is a skinning tutorial documenting how to create exposed muscle, which means muscle that you can see because the skin has been torn or cut away. This technique is very useful for creating Undead units. Follow the simple step by step instructions and look at the attached thumbnail for a picture reference as to what your work should like like during the various steps.
1. Select the area you wish to turn into muscle.
2. Cover the area with a base color.(You can use any color, but I usually go with a dark red.)
3. Use the burn tool size 3; range shadows; exposure 50% to draw a dark line down the middle(or slightly offset to make it look more natural) of the area, then make other lines coming off of it and extending to the sides of your area. Make sure to add some irregularities in the lines, it will look fake and unnatural if all of the lines are exactly the same.
4. Use the dodge tool size 3; range shadows; exposure 50% to draw highlights above approximately 80-90% of the dark lines, once again don't do it on every single line or it will look weird.
5. Use the burn tool size 15-20; range shadows; exposure 10-15% to go all the way around the edges of the area and make them darker. Be sure to go over several times the areas that should be darker than the others I.E. places where the muscle goes under armor, or under flesh, or under bone.
6. Use the burn tool size 2; range shadows; exposure 60% to make some of the lines stemming from the middle one darker, also make some light burns through the dodged lines to break them up a bit, muscle isn't very shiny in real life.
7. Now use the burn tool on the same settings as the first time we used it to significantly darken the first line we made, the one in the middle of your area. Make sure to go over it several times until it is almost black.
8. Final step: Once again take our burn tool size 15-20; range shadows; exposure 10-15% and go around the edges of the area one last time and darken them up. I cant stress enough that you need to make areas where the muscle goes under something darker than the rest of the muscle, or it will look unnatural. One more thing you could do is take the smudge tool size 5; mode normal; pressure 25% and smudge the middle line a bit like I did. This will slightly lighten it and make it so all the smaller lines going into it come together better and look more natural.
Congratulations, you have created some good looking exposed muscle for your next Undead skinning project.(I like my muscle to look dark, like the color of real blood. But if you want it to be lighter you can simply start over with a lighter base color, or quicker and easier just select the muscle area, press CTRL+U and drag the lightness meter to the right until it reaches your satisfactory level.)
If you found this tutorial useful please give credit and +respect to CombatTheWombat. Have fun!