- Joined
- Dec 29, 2004
- Messages
- 597

Skinning Tutorial: Hair
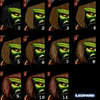
This tutorial use Hellscream.blp as an example with 512x512 resolution.
1. Select an area that you want to edit using selection tool.
2. Cover the whole area with base color.
3. Use Burn tool with brush size 3px, Range Shadows, and exposure 50%. Scratch it in whole area with hair-liked pattern.
4. Now use Dodge tool with brush size 3px, Range Shadows, and exposure 50%. Scratch it again with same pattern.
5. Use smudge tool to blend dark scratches with light scratches. You don't need to do this step in whole part, just do it in some area where you think they don't blend together. Use 5px brush, Mode Normal, and Strength 50%.
6. Burn all edges of the area with 19px brush, Range Shadows, and exposure 10%. Notice that in this part I reduce the exposure but use bigger brush size.
7. Dodge some area inside the selection where you think the light should hit, again use 19px brush, Range Shadows, and exposure 10%.
8. Now smudge them again so the light from the center blend with hair color, together with dark area from the edges. Use 5px brush, Mode Normal, and Strength 25% (reduced). Again, just do it on some parts where you think don't blend with nearby color.
9. Recolor the hair if needed and deselect the area. You will notice that some edges don't blend with the face (see an area inside the red curve).
10. Burn those edges with 5px brush, Range Shadows, and exposure 10%.
11. Smudge the edges so they blend with the face.
Remember, practice makes perfect!

Last edited by a moderator:
