- Joined
- Nov 11, 2006
- Messages
- 7,518
Tips 'n' Tricks for the Cinema
Introduction:
Welcome to the Tips 'n' Tricks thread. Here, you can find many tricks for creating cinematics.
Links:
- Basics of A Cinematic -- Archian
- Cinematics -- Bob27
- Cinematics -- XXXconanXXX
- Cinematics -- Purgeandfire (me)
- Exact Cinematic Timing (Trigger Queue and Timers) -- Waldbaer''
- Cameras -- Purgeandfire (me)
Index:
- Make Units Fly
- Black Interface
- Cameras
- Unskippable Transmissions
- Blank Portrait for Transmissions
- Applying filters for one player
How to make units fly
Simply using "Set Unit's Fly Height" won't do. The thing is, that the unit must have a "flying" movement type, otherwise it won't work. The only way to achieve this is to add the Storm Crow Form/Crow Form.
The Storm Crow Form adds the "flying" movement type to the unit. So that is the key.
This is what to do:
GUI:
This adds the Storm Crow Form, sets the unit's flying height, then it removes the Storm Crow Form, but still has the unit flying.
Fly
Events
Conditions
Actions
Unit - Add Storm Crow Form to <UNIT>
Animation - Set <UNIT>'s Flying Height to <height> at <rate>
Unit - Remove Storm Crow Form from <UNIT>
----- Note that some of these actions might not be exact -----
JASS:
I believe 'Arav' is the raw code of the Storm Crow spell. I remember it because it is like 'A raven'. That is just easy to remember. You can also use 'Amrf', which is basically the same thing.JASS:function Fly takes unit u, real height, real rate returns nothing //Function call UnitAddAbility(u,'Arav') //Adds the ability call SetUnitFlyHeight(u,height,rate) //Sets the flying height call UnitRemoveAbility(u,'Arav') //Then it removes the ability because it is not needed, adding/removing it once will suffice to give them the flying movement endfunction
You can either use this code or inline it to fit your needs, which is faster but takes a little more lines of coding.
Remember, you only need to add/remove the ability once. You can easily get this auto-done with libraries such as:
AutoFly.
Black Interface
If you have watched some famous cinematics such as Creatures of the Knight, Cult of the Damned, and The Spirit of Vengeance, you'll realize that they have black borders that are used at least once. The borders make your cinematic look much better and look as if they are an actual cinematic. To do this, go to Advanced | Game Interface

Then click Use Custom Game Interface.

Scroll down and wait until you see at least one of these:Click on each value, click "Use Custom Path", then type out or copy 'n' paste this text:
- Image - Cinematic Border

- Image - Console Background

- Image - Game Menu Background

UI\Widgets\EscMenu\Human\blank-background.blp
If you don't want a black cinematic border, but instead something else such as the border used in "Shipwrecked 1 Revamped - by Med. Map Maker" (Or number 2, I forgot) you can replace only one of them with it. You can keep messing around with those three to see the effects and choose the one you like.

Cameras
This is simply a brief explanation of cameras, with a little more odd animations. For a better explanation, and example usage (and better animations), refer to:
Cameras.
Cameras are extremely important to cinematics. To create a camera, open the camera palette then click "Create Camera". If you do that, it should say something like "Camera 001". If you right-click it then click "Rename Camera", you can modify it to fit your needs. I will tell you what each field means below:
Camera Name:
Simply the name of the camera, try to make it relevant to what it is doing such as "Park Bench Camera 1".

- Target X - This is the X-coordinate of the camera's target point. Maps are created by several thousands of coordinates, similar to a standard graph. The origin is 0, and it spreads out across the map into tons of coordinates of the quadrants. The "x" value denotes the horizontal location of the camera. These are changed simply by moving the camera around. (changing its position)
- Target Y - This is the Y-coordinate. In graphs, you have ordered pairs (x,y). This is the y-coordinate, basically the vertical location of the coordinate. Together with x-y coordinates, you can have a point on the map. These are changed simply by moving the camera around. (changing its position)
- Z-Offset - The height the camera is from the ground. The entire camera is moved upward, and thus has an increased "Z" value. Z-coordinates are basically the height of objects, how high something is from a standard ground-position of 0.

- Rotation - This rotates the object. The values to input should be in the range from 1-360 degrees. 90 degrees is facing north, 180 degrees faces west, 270 degrees faces south, and 360/0 degrees faces east.

- Angle of Attack - This modifies the angle of viewing. This does not modify the angle from left to right like rotation, but rather from up to down. The range of values is 1-360. 360/0 degrees is directly horizontal, and it parallel to flat ground. As you increase it from 0, it will begin to sink underground and keep changing its angle. At 90 degrees, it will be underground and looking directly upward. At 180 degrees, you'll have an upside down camera that is parallel to flat ground. At 270 it will face directly down at the ground. 304 degrees is the standard game camera AoA. Approximately 345 degrees or so is usually used for RPG-like cameras.

- Distance - The distance the camera is from the target point. This has a standard value of 1650. You can get very close though, and pretty far by modifying this value.

- Roll - Roll is just like doing a barrel roll in a plane. Or a dog rolling over. The camera rolls over according to the input angle, and can even go upside down. Rolling can create amazing camera effects if used well.

- Field of View - This just basically controls the amount of area you see in your camera. Increasing it is kind of like a zoom out. It doesn't really affect the camera itself, but it makes kind of a zoom out effect so more things are on screen.
- Far Z - This modifies the range in which far objects can be seen. So say there is a tree 10,000 coordinates away. You can set this to 10,000 to be able to see that tree. The maximum is actually 10,000. Even if you set it higher in triggers, it will most likely have the same effect as 10,000. Be careful when doing this though, it may enhance terrain screenshots, but in actual games, you will just be sending a death note to the players. This is probably one of the most impacting visual effects created. If you set it too high, and there are too many objects in view, it can reduce the FPS (frames per second, type /fps in-game) by 20's or possibly more. It depends on the Angle of Attack ultimately, but if there are too many objects seen, then it will generally cause a large amount of lag.
- Preview Values in Main Window - Basically allows you to actually see what you are altering in the editor while you have the options open. This is very useful for making minor tweaks, without having to rename -> change -> exit -> rename -> change etc. over and over.
Applying Cameras:
You can apply cameras with simple triggers:
This will apply the camera for the player and will take X seconds to apply. Before you apply another camera, you should wait then apply it:
Camera - Apply <Camera> for Player 1 (Red) over 0.00 seconds
The reason why I only waited 2.00 seconds was because if I set it to 3.00, the camera will stop then apply. I want it to be much smoother.
Camera - Apply Camera 1 for Player 1 (Red) over 3.00 seconds
Wait 2.00 seconds
Camera - Apply Camera 2 for Player 1 (Red) over 2.00 seconds
For more about cameras, click here

Unskippable Transmissions
Many people get angry when some random starts pressing "ESC" repeatedly to skip the transmissions, it can completely ruin a cinematic. However, there is one easy snippet of code which can make all your transmissions unskippable:
JASS:call DisableTrigger(bj_cineSceneBeingSkipped)
This will basically disable it. To do it in GUI, you use this:
To enable it for whatever reason, use this:
Custom script: call DisableTrigger(bj_cineSceneBeingSkipped)
JASS:call EnableTrigger(bj_cineSceneBeingSkipped)
However, you have to wait until you've made at least one transmission before calling that function. I recommend that you use this neat little snippet:
http://wc3jass.com/5248/snippet-disable-transmission-skip/msg40200/topicseen/#new
Simply place the code in your header (copy the Vanilla JASS Version), and make a trigger on map initialization:
And the ESC skipping will be disabled for the rest of the game! (or at least until you call EnableTransmissionSkip())
My Trigger
Events
Map Initialization
Conditions
Actions
Custom script: call DisableTransmissionSkip()
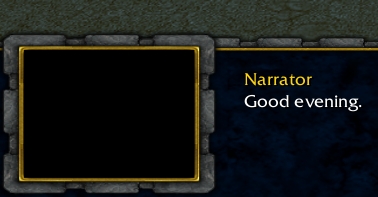
No Portrait For Transmissions
Sometimes we don't always want portraits to be displayed for our transmissions. You can use these for subtitles, narrators, whatever you want.
Now, this is a very easy method, but many people probably haven't discovered it yet.
To make a transmission with a portrait, you'd do something like this:
Basically, it sends a transmission from a preplaced unit saying "Good evening". Now, what we want to do is make <Footman 0003> become null, or basically we want no unit.
Cinematic - Send transmission to (All players) from Footman 0003 <gen> named Narrator: Play No sound and display Good evening.. Modify duration: Add 0.00 seconds and Wait
So replace "Footman 0003" with "Preset: No unit" (or you can use an event response to some event the current trigger doesn't apply to, since that too will return a null value)
And voila. It is done.
Cinematic - Send transmission to (All players) from No unit named Narrator: Play No sound and display Good evening.. Modify duration: Add 0.00 seconds and Wait

Filters for One Player/Force
Not too related to cinematics, but many people look for this so I will post the method. Now, there are somewhat two methods (actually, there are many methods branching off the method I discuss), however, the other one might interfere with other GUI functions so I won't discuss it.
For One Player:
We will use GetLocalPlayer() to create it for the player we need.
Basically, we will do this:
Just modify TempPlayer with whatever player you want to be able to see the filter.
Set AlphaReal = 0
Set TempPlayer = Player 1 (Red)
Custom script: if GetLocalPlayer() != udg_TempPlayer then
Set AlphaReal = 100
Custom script: endif
Cinematic - Fade out and back in over 2.00 seconds using texture Black Mask and color (0.00%, 0.00%, 0.00%) with AlphaReal transparency
Custom script: call EnableUserUI(true)
What this will do is, if the local player (the player executing the trigger currently) is not Player 1 (Red), then it will set the AlphaReal variable to 100. Basically, this will make the AlphaReal variable out of sync, allowing it to have a different value for Player 1 (Red) opposed to the other players. Thus, it will apply a filter with 0% transparency for Player 1 (Red), and a filter with 100% transparency for everyone else. This way, you can avoid desyncs. If you were to move the "Cinematic - Fade..." into the local player block, it would desync from destroying the timers. Since timers are normally allocated variables with an id > 0x100000 (1048576) it will desync when created/destroyed locally. For more info, view the tutorial I've linked above.
JASS:function AbortCinematicFadeBJ takes nothing returns nothing if (bj_cineFadeContinueTimer != null) then call DestroyTimer(bj_cineFadeContinueTimer) endif if (bj_cineFadeFinishTimer != null) then call DestroyTimer(bj_cineFadeFinishTimer) endif endfunction
The last line is optional, but in playable maps you don't want the UI to be disabled by the filter function for all players. If it is intended for a cinematic, you can probably leave that line out or apply it only for the players who don't have the filter displayed:
Place that below the filter function.
Custom script: if GetLocalPlayer() != udg_TempPlayer then
Custom script: call EnableUserUI(true)
Custom script: endif
Note: This will work, but it may bug out (it won't display the filter) if you try to do two filters simultaneously for different players. It won't desync, but one of the filters may not work. Thus, this solution only works if it is being run by itself. For a solution that does not have this issue, see:
http://www.hiveworkshop.com/forums/1676883-post6.html
For One Force:
Sometimes we want to make it for a specific amount of players, and it'd be a little bit stressful to do it with justGetLocalPlayer() == Player(#). This is why we can use forces instead:
Now, if the local player is in the force, we will make the transparency 0, and for everyone else it will remain 100. (TempForce) can be whatever you want, you can manually add it or whatever. All you need to modify is
Actions
Set TempForce = (All allies of Player 1 (Red))
Set AlphaReal = 100
Custom script: if IsPlayerInForce(GetLocalPlayer(),udg_TempForce) then
Set AlphaReal = 0
Custom script: endif
Cinematic - Fade out and back in over 2.00 seconds using texture Black Mask and color (0.00%, 0.00%, 0.00%) with AlphaReal transparency
Custom script: call EnableUserUI(true)
udg_TempForce, just modify after the "udg_" with whatever the name of your force variable is.
About the last line "EnableUserUI()", see the note above under "filter for one player".
Please feel free to post more tips 'n' tricks as well!
Attachments
Last edited:


