Mr.Goblin
Art & Graphics Design Moderator
- Joined
- May 26, 2008
- Messages
- 4,446


Chronicles of the Second War

For this tutorial you must have photoshop, gimp, or any programs that as the commends to change the opacity and the size of your pencil.
My tutorial.doc = GOOGLE DOC DOCUMENT
^Since this Tutorial is really old, This document is the only version available with images. ^
DESCRIPTION:
Greetings ladies and gentlemen, today, at this exact moment you are probably reading this message. Well than, I will take your attention to explain you the story of this tutorial. Once upon a time my true identity as a human, had to do a school project for his school. I had two options. Either creating something: a sculpture, a painting, a dress, anything, and than I had to describe this creation in a text of 3000 words that would explain my steps from beginning to end. Or, to do a research and explain what I had found in an essay of 4000 words. Well, I guest you just figured out that I chose to make a creation!
I decided to make a Skinning tutorial for my beloved Hiveworkshop! I asked if this was possible and my teacher said yes! So that’s why you’re here today reading my school project! This idea started during the summer where I slowly started drawing and showing my art in creating skins as a new skinner. Than I started to receive some private messages of members asking me to ‘’teach them how to make these different skins. I started by saying that I didn’t I have the time, but as the demands kept coming I finally said “Hey you know what? I will make a skinning tutorial!’’ I hope you will enjoy it as much as I have had in making it!
Now, let me explain the structure of my tutorial, I will show you how to make shadow properly on your skins. Than, I will explain you, how you should always follow the shape of your model to have a better skin when you’re doing your textures. Finally, I will show you how to reproduce 30 textures separated in 4 categorises. Which are: Structure, Clothing, Fauna and Forest. In these 30 textures you will learn how to make, fur, metal, leather, marble, linen, insect’s carapace, bamboo, rocks and many others.
So as mention, let’s start with the creating of shadow effects.
SHADOWS AND HIGLIHTS
In texturing, even if your texture will be added to a 3D model, the goal is to make it look as real as possible. I would say a texture without shadows and highlights is like a sandwich without anything in it. Shadows and highlights is what makes the illusion of the shape, so it’s with the representation of the lightning or absence of it –the shadow- that gives so much more to the form.
Shape and polygons:
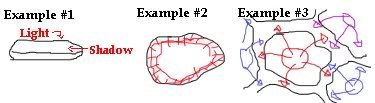
Spheres, cones and cylinders have circular surfaces, represented by variations tones. The graduation of your lightning from darkness to sunlight and the adding of shadows will give you the impression of a solid and curved object. The lightning reflects on a side and the shadow on the other side is what gives the volume to your textures.
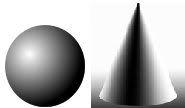
As for plain surfaces, you should never see the degradation between the lightning and the shadow on your textures. Only different tons depending on the place they are. So for cubes or prisms it should be like the example below.
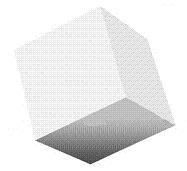
Note:
When you’re texturing a model for warcraft3 you should always remember that the source of lightning is the sun. So the light always comes from above, so over the head.
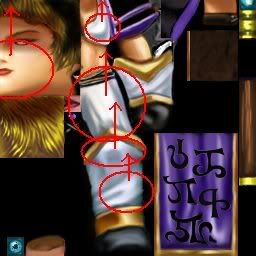
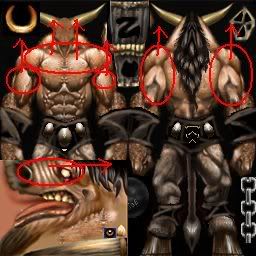
SHAPES AND CURVES
When you’re making a texture you should always remember the shape of your model. Because even with shadows and lightings, your texture will look unreal if you don’t follow the form of the model. Here are some examples.
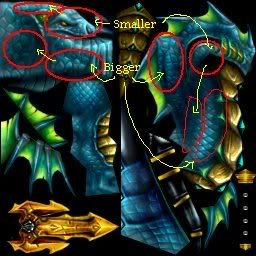
As you can see, at some places your texture looks bigger, and in other places, it looks smaller. You must work in perspective. Because farer an object is, you must make smaller details, and as you get closer, you must make the same details bigger. Doing so you will realise that you will be improving a lot your texture.
TEXTURES
If you look closely at most dead natures, you will notice that they are different kind of objects, each of them having their own specific texture. If you want your texture to be well done, it is important that you be able to reproduce this texture to give realism to your drawing. The goal is not to obtain the quality of a picture, but to combine the lines and the tons necessary to reproduce the image of the initial surface, and at the same time, to gives the feeling of the texture.
You can reproduce a texture by doing several lines, but also by representing the way the lightning reflects on it. For example, to make the hardness or the smoothness of the metal, you can improve the contrast between the tons (shadows and highlights). You can also add some cracks to give a more realistic feeling. As for the wood, it doesn’t reflect the light as much as the metal does. Wood is also viewed as a rough texture compare to the smoothness of the metal, you have cracks, fissures, ripped of parts etc. and you can represent them with hard lines with different directions and shapes.
IMPORTANT NOTICE:
In my tutorial, you have several things that you should know before you start. So take time to look at these next comments.
-I made this tutorial with several images and for each image I took time to describe each step, one by one.
-Also, when necessary to help understanding, I added some “clue pictures” that show with more details the progression of a drawing. For example, you will notice when I treat “textures” I added such additional drawings.
-For each texture you will have important information as, the level of difficulty of realising such a texture.
HARD | AVERAGE | EASY
-As the time it should take you to do it, if you respect my steps.
Easy skins = 5-10 minutes
Average skins = 10-15 minutes
Hard skins= 15-20 minutes
Ex: Fur = Takes 5 to 10 minutes to make.
-I also added notes about texture; sometimes it tells you important information or tips about improving it.
Some examples of tips:
-Fur = you can also use this texture for human hair.
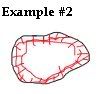
-Stone walls = A rock found in the nature will never be a total square, or a complete sphere.
Now, that you have understood these different details, I invite you to have fun and enjoy my tutorial!
Welcome to my tutorial, you can select what ever skin you want to reproduce by clicking on it, or by simply scrolling down!
Enjoy!
Leaves /// Grass /// Sand /// Ice /// Rocky ground /// Snow.
------------

Fur /// Hard Skin (Elephant) /// Hooves /// Feather /// Insect Scale /// Horn /// Turtle Shell.
------------

Leather /// Smooth cloth /// Linen Cloth /// Bamboo Armour /// Plate Armour.
------------
Bricks /// Wood planks /// Stone Wall /// Marble ///Metal Structure.
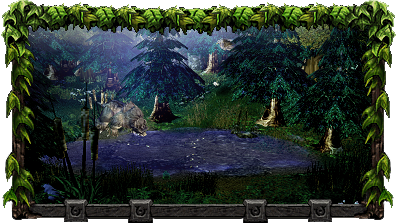
FOREST
---------
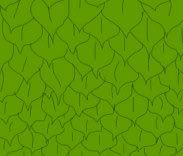
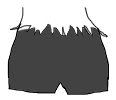
LEAVES

Step #1 = We will start by recovering the region you want with a green color at an opacity of 85%. (Because we want to see the shape of the texture.)
---------
Step #3 = Select the black color and draw leaves.
*Note* The leave should be almost the same size.
---------
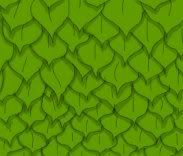
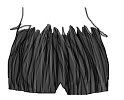
Step #5 = Select the black color and draw the shadow under each leaves, as in the example.
---------
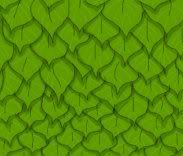
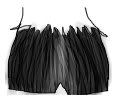
Step #7 = Select a bright green, and draw lines on each leaves that starts from the heart of the leave and goes to its side. Be shure to
respect the shape of the leaf as shown in the example.
---------
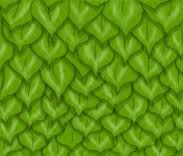
Step #9 = Select the white color and add the lightning, as seen in the example.
Final Step= Select the finished region, and play with the HUE/SATURATION/LIGHTNING or with the BRIGHTNESS/CONTRAST tools until you have the result you wish.
AVERAGE /// Time = 10 – 15 minutes
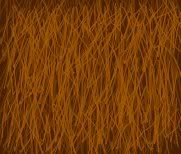
GRASS

Step #1 = We will start by recovering the region you want with a dark brown color at an opacity of 85% (Because we want to see the shape of the texture.)
---------
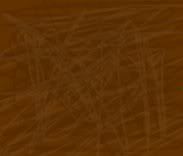
Step #3 = Take a darker brown than the one you choosed in step #1, than recover the region of step #1 with random lines.
Step #4 = Use the same pencil and take a lighter brown than the one you choosed in step #1, than redo the same thing as the step #3.
---------
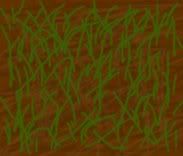
Step #6= Select the same pencil of the step #2.
Step #7 = Now, draw some curved lines, as seen in the example, so it recovers the most of the skin.
*Note* = Each herbs should always be almost the same size.
---------

Step #9 = With the same pencil of step #2, redo the same thing in steps #7 but with this new color.
---------
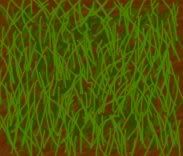
Step #11 = With the same pencil of step #2, redo the same thing in step #7 or in step #9 but with the new color.
---------

Step #13 = With the same pencil of step #2, redo the same thing in Step #7 or in step #9 or in step #11 but with the new color.
---------
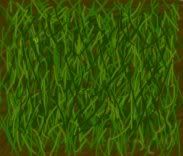
AVERAGE Time = 10 - 15 minutes
SAND

Step #1 = We will start by recovering the region you want with a skin color at an opacity of 85%. (Because we want to see the shape of the texture.)
---------

Steps #3 = Select the original color you have choosed in step #1, but take 2 or 3 tons darker.
Steps #4 = Draw random lines so it recovers 90% of the region.
---------

Step #6 = Select a pale peach color and redo the same thing as told in step #4.
---------

Step #8 = Select the white color and redo the same thing as told in step #4.
---------

Step #10 = Select a brown color and draw some smudge areas randomly.
---------
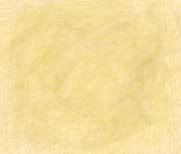
Step #12 = Select a yellow color and redo the same thing as told in step #10.
---------

Step #14 = Select the original color you choosed in step #1, and draw over the hole region to make the variation less noticeable.
---------

AVERAGE Time = 10 - 15 minutes
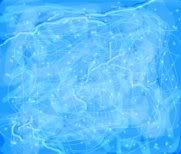
ICE

Step #1 = We will start by recovering the region you want with a dark blue color with an opacity of 85%. (Because we want to see the shape of the texture.)
---------
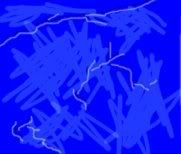
Step #3 = Take the black color and draw some cracks, but not to many, just 1 or 2.
Step #3 = With the same pencil of Step #2, take the white color and follow the cracks you did in step #3 with the black pencil to make a cracks with 2 different colors (white and black).
Step #4 = With the same color (white) now select the pencil with size of ''5 px'' at an opacity of 15%.
Step #5 = Create some ''hatched" regions so it recovers 75% of the region of step #1.
---------
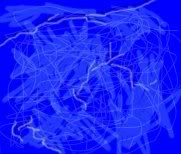
Step #7 = Draw some random lines until you recover all the region of step #1
---------

Step #9 = Recover the region of step #1 completely. So it gives you a light blue-purple color as seen in the example.
Steps #10 = Take the white color again. Select the pencil with a size of ''1 px'' at an opacity of 75%.
Step #11 = Draw dots here and there, until it recovers all the region of step #1
*Note* Do not draw too many dots because it might ruins your texture.
---------
HARD Time = 15 - 20 minutes
ROCK(Ground)
Go see at the Structure cathegorie the ''STONE WALL'' section.
SNOW

---------

Step #3 = Recover the region of step #1 as you want.
Step #4 = Redo steps #2 until you want to stop.
*Note* You want your texture to have some place that are completely white, others that are less white, and other that are still the light blue of step #1.
---------

Step #6 = Redo Steps #3 and 4#
*Note* DO NOT ABBUSED on the dark blue, as showed in the example, you only see some parts that are darker.
---------

Step #8 = Redo steps #3 and #4.
Step # 9= Select the finished region, and play with the HUE/SATURATION/LIGHTNING or with the BRIGHTNESS/CONTRAST tools until you have the result you wish.
EASY Time = 5 - 10 minutes
FAUNA
---------
FUR

---------
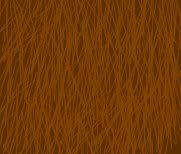
Step #3 = With the same color as in steps #1 , select the same color but 2 or 3 tons lighter.
Step #4 = Draw random lines from the top to the bottom of your texture as you follow the shape of your texture.
*Note* If you want long hair fur, draw longer lines, if you want short hair fur, draw smaller lines.
---------
Step #6 = With the same color of step #3 (the new brown). Select the same color but 2 or 3 tons lighter.
Step # 7 = Do the same thing as asked in step #4.
*Note* If you want long hair fur, draw longer lines. If you want short hair fur, draw smaller lines. (If you choosed long hair in step #4, be shure to redo long lines.)
Final step= Select the finished region, and play with the HUE/SATURATION/LIGHTNING or with the BRIGHTNESS/CONTRAST tools until you have the result you wish.
EASY Time = 5 - 10 minutes
HARD SKIN
Step #2 = Select the pencil with the size of ''1px'' with an opacity of 45%.
Step #3 = Select the black color, and draw a line of circular shapes as seen in the example at the place you want.
*Note* you should always follow the shape of your texture if you want a better quality.
Step #4 = Do the same thing as told in the step #3 but make smaller circular shapes next to the first row of circles as seen in the example.
Step #5 = Do the same thing as told in step #4 but draw your line now next to the circle line of step #5.
Step #6 = Draw as many rows of circles as you wish by respecting the obligation of going from big to small.
---------
Step #8 = Select the black color, and draw random lines until you recover 75% of the region in steps #1.
Step #9 = Redo the step #8 as many times as you wish, but DO NOT OVER DO IT.
---------
Step #11 = Select the white color, and redo the same thing as told in step #8.
Step #12 = Redo the same thing as told in step #9 but with the white color. But DO NOT OVER DO IT.
---------
Step #14 = Select the black color and draw the shadows, beside the circular lines you have done in step #3, #4 and #5. Your shadows are supposed to be stronger as show in the example or in the ''Clue image''.
Step #15 = Do the shadow again in each circular shapes you have draw in step #3, #4 and 5#.
Step # 16 = Select the same pencil as told in step #13.
Step #17 = Select the white color and do the lightning, as seen in the example or in the ''clue image''.
---------
Step #19 = Select a brown color and draw some dots at random places to add a small dirt effect.
*Note*you are not obliged to follow step #19.
Final Step = Select the finished region, and play with the HUE/SATURATION/LIGHTNING or with the BRIGHTNESS/CONTRAST tools until you have the results you wish.
HARD Time = 15 - 20 minutes
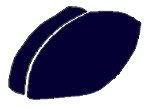
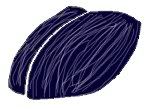
HOOVES
---------
Step #3 = Select the black color, and draw lines that start from the top of each hooves and finish at their base, as seen in the example.
Step #4 = Select the same pencil as told in step #2.
Step #5 = Select the white color and do the same thing as told in step #3
---------
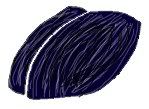
Step #7 = Select the white color and add lightning. Draw once again from the top of each hooves and finish at their base. But stay in the middle of the hooves, as seen in the example.
Step #8 = Select the same pencil as told in step #6.
Step #9 = Select the black color and add the shadows. Continue drawing some lines from the top of each hooves and finish at their base, by staying on the sides of the hooves as shown in the example.
*Note* When your doing the shadows or lightning, always remember to start with a strong color and slowly make it vanish, so we have a smooth variation of tones that go from darkness to light.
Final Step = Select the finished region, and play with the HUE/SATURATION/LIGHTNING or with the BRIGHTNESS/CONTRAST tools until you have the result you wish.
EASY Time = 5 - 10 minutes
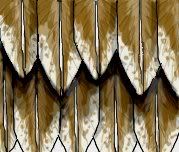
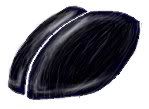
FEATHERS
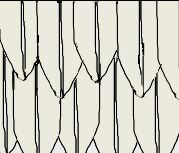
Step #2 = Select the pencil with a size of ''1ptx'' and with an opacity of 100%.
Step #3 = Select the black color and draw your feathers, as seen in the example, and by following the shape of your texture.
*Note* Try to make your feathers the same size.
---------
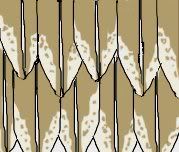
Step #5 = Select a brown color, and draw on each feathers a design of your choice. (You can also observe some bird feathers images to give you a clear idea of what you want your design to look like.)
*Note* For each feather, you should draw the same design.
---------
Step #7 = Select the same brown color as told in step #5, and draw over your design, but do not touch the extremity of the initial design of step #5, as seen in the example.
---------

Step #9 = Select the black color and draw lines that starts from the heart of your feather to the extremity of your feather, as seen in the example.
*Note* To have a better quality, do not draw the lines at the same place on each feather.
Step #10 = Select the same pencil as told in step #8.
Step #11 = Select the white color and draw lines next to the other lines you have done in steps #9.
---------
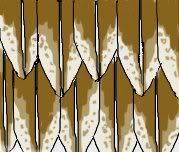
Step #13 = Select the white color and do the lightning on each feather. Draw the lightning close to the heart of your feather.
Step #14 = Select the same pencil as told in step #12.
Step # 15 = Select the black color and add the shadows on each feathers. Draw the shadows on each feather, as seen in the example.
For help, look at the ''clue image''.
---------
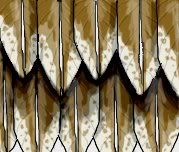
Step #17 = Select the same color as told in step #5, and draw some lines next to the lightning you added in step #13 for a special effect.
*Note* You are NOT obliged to do step #17.
Final Step = Select the finished region, and play with the HUE/SATURATION/LIGHTNING or with the BRIGHTNESS/CONTRAST tools until you have the result you wish.
HARD Time = 15 - 20 minutes
INSECT SCALE
---------
Step #3 = Select the white color, and draw lines, from top to bottom of the scales, by following the shape of your texture.
---------
Step #5 = Select the Black color. Repeat the same steps as told in step #3.
---------
Step #7 = Select the white color and add the lightning.
Step #8 = Select the same pencil as told in the step #6.
Step #9 = Select the Black color and add the shadows.
---------
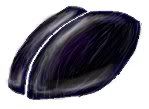
Step #12 = Select a yellow color, and follow the lightning you added in step #7, to give a shiny effect.
Step #13 = Select the same pencil as told in steps #6, #8 or #10.
Step #14 = Select a purple color, and follow the shadows you added in step #9, to give a shiny insect effect.
Final Step = Select the finished region, and play with the HUE/SATURATION/LIGHTNING or with the BRIGHTNESS/CONTRAST tools until you have the result you wish.
EASY Time = 5 - 10 minutes
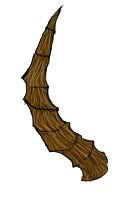
HORN

Step #2 = Select the pencil with the size of ''1px'' and with the opacity of 15%.
Step #3 = Select the black color, and draw lines that start from the top of each section of the horn to the bottom of the same section. As seen in the example.
*Note* If you doing a strait horn like the Taurens, simply go from top to bottom.
---------
Step #5 = Select the white color and do the same thing as told in step #3
*Note* If you doing a strait horn like the Taurens, simply start from the top to the bottom.
---------
Step #7 = Select the white color and add lightning at the bottom of each horn's section.
*Note* If you are doing a strait horn like the Taurens, DO NOT FOLOW step #6 and #7.
Step #8 = Select the same pencil as told in step #6.
Step #9 =Select black color and add shadows from top to bottom of each horn's sections, to make a variation from dark to light.
*Note* If you are doing a strait horn like the Taurens, DO NOT FOLOW step #8 and #9.
---------

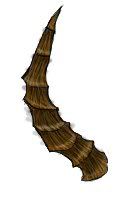
Step #11 = Select the white color and add lightning. Draw a few lines from the top to the bottom of the horn, by staying in the middle of the horn as shown in the example.
*Note* Even if your doing a horn like the Taurens, you HAVE to do this step.
Step #12 = Select the same pencil as told in step #6.
Step #13 = Select the black color and add the shadows. Draw a few lines from the top to the bottom of the horn, by staying on the sides of the horn, as shown in the example.
*Note* Even if your doing a horn like the Taurens, you HAVE to do this step.
---------

AVERAGE Time = 10 - 15 minutes
TURTLE SCALE
Step #2 = Select the pencil with the size of ''1 px'' at an opacity of 25%.
Step #3 = Select the black color, and draw some circular shapes as seen in the example.
---------

Step #5 = Select the black color again, and draw some random lines until it recovers 85% of each circular shape in step #3.
Step #6 = Do step #5 again and again until you have what you want.
Step #7 = Select the pencil with the size of your choice at an opacity of 75%
Step #8 = Select a brow color, and recover the crack between the circular shapes of step#3.
---------
Step #10 = Select the white color, and do the same thing as step #5 (draw some random lines)
Step #11 = Repeat steps #10 until you have what you wish.
Step #12 = Select the crack between the circular shapes with the ''magic wand tool''
Step #13 = Select the same pencil as in steps #9
Step #14 = Select the black color, and draw some strait lines from the middle of each circular shapes to the outside of it. You should recover 75% of the crack.
*Note* There is a clue picture to show you what you should do.
Step #15 = Select the same pencil as in steps #13 or #9.
Step #16 = Select the white color, and redo the same thing as told in step #14.
*Note* There is a clue picture to show you what you should do.

---------
Step #18 = Select the black color and draw around each circular shapes but without going outside of it.
Step #19 = Select the same pencil as told in steps #17.
Step #20 = Select the white color and recover the middle of each
circular shapes. Until you get what you want.
---------
Step #22 = Select a dark brown color and draw small lines from the outside of the circular shapes to the inside.
*Note* follow the Clue image; it’s how you should do it.
Step #23 = Draw a line that follows the contour of the circular shapes.
*Note* Follow the clue image, its how you should do it.
Step #24 = Select the pencil with the size of ''3px'' at an opacity of 10%
Steps#25 = With the same dark brown color of the steps #22, draw some random dots on the circular shapes. Be careful not to overdo.
---------
HARD Time = 15 - 20 minutes
CLOTHING
---------
LEATHER

---------

Step #3 = Select the black color and draw some random lines until you recover the 90% of your region you have recovered in step #1.
Step #4 = Do step #3 as many times as you want, but DO NOT OVER DO IT!.
---------

Step #6 =Select the white color and redo the same thing as told in step #3.
Step #7 = Do step #6 as many times as you want, but DO NOT OVER DO IT!.
---------
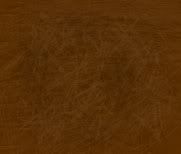
Step #9 = Select the black color and draw some hatched regions, as seen in the example or the ''clue image''.
Step #10 = Select the same pencil as told in step #8.
Step #11 = Select the white color and do the same thing as told in step #9.
---------

Step #13 = Select the black color and draw some smudge regions as seen in the example or in the ''clue image''.
Final Step = Select the finished region, and play with the HUE/SATURATION/LIGHTNING or with the BRIGHTNESS/CONTRAST tools until you have the result you wish.
AVERAGE Time = 15 - 20 minutes
SMOOTH CLOTH

---------

Step #3 = Select the white color, and draw your lightning. As seen in the example, you should go from darkness to the light.
*Note* = When your doing lightning on a piece of cloth, it change on each cloth.
Step #4 = Select the same pencil as told in step #2.
Step #5 = Select the black color, and draw the shadows. As seen in the example, the shadows are between each sources of light, and you should make it so to permit it goes to the dark to the light.
---------

Step #7 = Select the white color and draw lines that follow the lightning and the shadows, as seen in the example or in the ''clue image''.
---------

Step #9 = Select a pink color, and smudge it across each source of lightning as seen in the example, or in the ''clue image''.
---------

AVERAGE Time = 10 - 25 minutes
LINEN CLOTH

---------
Step #3 = Select the black color and draw a squared pattern. As seen in the example.
---------
Step #5 = Select the black color and draw the first steps of the shadows. (Make a shadowy effect that starts from each side to the middle.)
Step #6 = Select the same pencil as told in step #4.
Step #7 = Select the white color and draw the first step of lightning. (Make the light in the middle of each square.)
---------
Step #9 = Select the white color and draw lines that follows the original lines you have made in Steps 3. As seen in the example or in the ''clue image''.
---------
Step #11 = Select a bright brown color, and draw over each 2 squares as seen in the example. To give the effect that your cloths have 2 different colors of threads.
*Note you can take whatever color you want for this step: black, orange, purple, red or etc...
---------
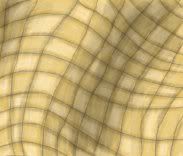
Step #13 = Select black color and draw the shadow. As seen in the example.
---------
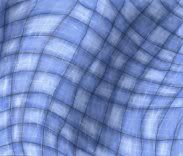
AVERAGE Time = 10 - 25 minutes
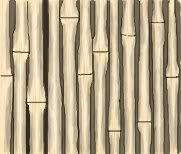
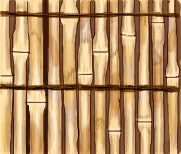
BAMBO ARMOR
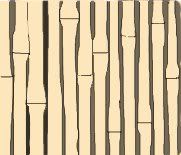
Step #2 = Select the pencil with the size of ''1px'' with an opacity of 85%.
Step #3 = Select the black color, draw bamboos next to each other with similar sizes.
Step #4 = Select the pencil of your choice at an opacity of 85%
Step #5 = Select the black color again, and now recover the spaces between the bamboos that you have drawn in step #3.
---------
Step #7 = Select the black color, and make some random lines that start from the top to the bottom of each bamboo's sections.
---------
Step # 9 = Select the black color, and make your shadows. Draw a ton of variations that goes from pale to dark on each side of each bamboo to give the circular effect.
Step # 10 = Select the same pencil as told in step #8.
Step # 11 = Select the white color, and make the lightning. Draw a ton of variations that go from strong to pale. Doing this from the middle of each bamboo, to each side. Giving a circular effect again.
---------
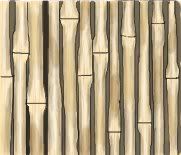
Step #13 = Select the brown color of your choice, and draw over the bamboo at random places, to recreate the different layers the bamboo normally has.
Step # 14 = Do step #13 as much as you want if you want different tons like I did in the example, but DO NOT OVER DO IT.
---------
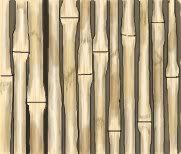
Step # 16 = Select the black color, and as seen in the example, draw some random lines everywhere, to give the effect of the different layers the bamboo has also. As seen in the ''clue image''.
---------
Step #18 = Select different regions on your bamboos (by holding the ''Shift'' bottom, you can select different regions)
Step #19 = Now that the sections are selected, go in the HUE/SATURATION tool, and change the SATURATION so it decrease (it gets less colored), to give the effect of an old, and used bamboo.
Step #20 = Do step #19 as much as you want, but DO NOT OVER DO IT.
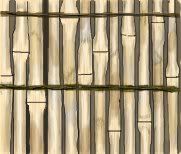
Step #21 = Select the pencil with the size of ''2ptx'' and with the opacity of 85%.
Step #22 = Select a dark brown of your choice, and draw the rope that holds ''normally'' the bamboo together. As seen in the example.
Step #23 = Select the pencil with the size of ''1px'' and with the opacity of 90%.
Step #24 = Select the Black color, and draw lines on the rope you have draw in step #22.
---------
EASY Time = 5 - 10 minutes
PLATE ARMOR
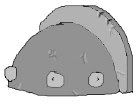
Step #2 = Select the pencil with the size of ''2px'' with an opacity of 15%.
Step #3 = Select the black color, and draw some cracks here and there, to remind that it’s an armour after all.
Step #4 = Select the same pencil as told in step #2.
Step #5 = Select the White color, and draw next to the black cracks you have done in step #4.
---------
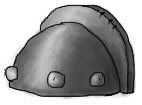
Step #7 = Select the black color, and make the shadows, by making variations of tons, from a dark to a pale grey.
*Note* = Always remember that a shoulder pad like this one is always circular.
Step #8 = Select the same pencil as told in step #6.
Step #9 = Select the white color, and make the lightning, by making a variations of tons, from white to a pale grey.
*Note* = Metal reflects light a lot, so you need a lot of contrasts between the shadows and the lightning.
---------
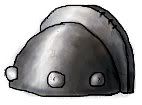
Step #11 = Select a yellow color, and smudge gently around the source of lightning. This will give a more shiny effect.
Step #12 = Select the same pencil as told in step #10.
Step #13 = Select a light blue color, and smudge it around the shadowy places. This will give a sky reflection effect.
Final Step = Select the finished region, and play with the HUE/SATURATION/LIGHTNING or with the BRIGHTNESS/CONTRAST tools until you have the result you wish.
AVERAGE Time = 10 - 25 minutes
STRUCTURE
---------
BRICKS

---------
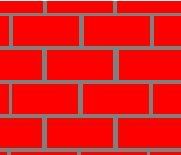
Step #3 = Draw a rectangle on the region.
Step #4 = Copy and paste the rectangle you have drew in steps #3 everywhere. Each rectangle must be at the same distant from each other.
---------
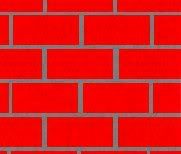
Step #6 = Select the black color and do random line in each bricks, until it recovers 75% of each bricks.
---------
Step #8 = Select the white color, and redo the same thing as told in
Step #9 = Select with the ''wand tool'' the grey regions.
Step #10 = Redo the same thing as told in Step #6 and #8 but instead of doing random lines on the bricks, you do it on the grey regions.
---------
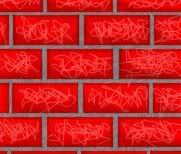
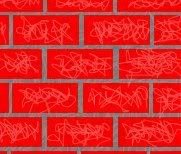
Step #12 = Select the black color, and draw the shadows. Each bricks must have a different shadow than the other, but the shadows must be at the same place on each brick (bottom and sides)
Step #13 = Select the same pencil as told in step #11.
Step #14 = Select the white color, and draw the lightning. Each bricks must have a different lightning than the other, but the lightning must be at the same place (middle and top)
---------
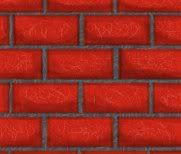
AVERAGE Time = 10 - 15 minutes
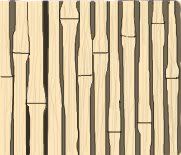
WOOD PLANKS
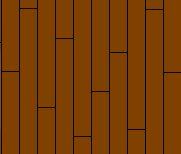
Step #2 = Select the pencil with the size of ''1px'' and with the opacity of 100%
Step #3 = Select the black color, and draw wood planks. (They HAVE to be of identical of similar sizes.)
---------
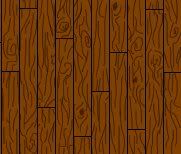
Step #5 = Select the black color, and draw on each planks, carvings, that resemble wood.
---------
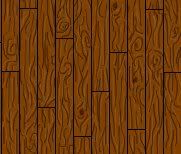
Step #7 = Select the white color and draw next to the cravings you have drew in step #5, lines that follows the same carvings, as seen in the example.
---------
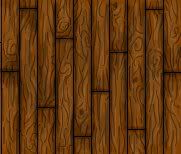
Step #9 = Select the black color, and make the shadows. Shadows are not really needed for wood planks, but it gives them a nice effect so… why not?
*Note* = The shadow is needed on the side of each wood panels and also on the top and the bottom of each wood panel.
Step #10 = Select the same pencil as told in step #8.
Step #11 = Select the white color, and make the lightning. The lightning is not really needed for the wood planks, but it gives a nice effect so... why not?
*Note* = The lightning is supposed to be in the middle of each.
EASY Time = 5 - 10 minutes
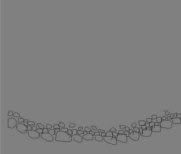
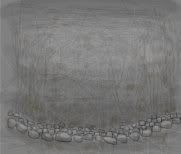
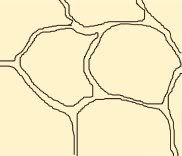
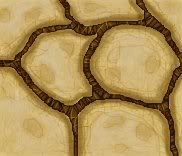
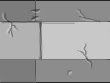
STONE WALL

Step #2 = Select the pencil with the size of ''5px'' and with an opacity of 100%.
Step #3 = Select a grey color (lighter than the one selected in step #1), and draw different shapes that looks like rocks.
*Note* = Remember, you will never find completely rectangle or completely sphere rocks.
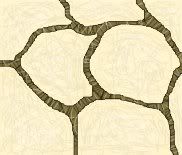
---------
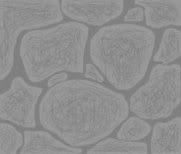
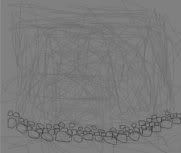
Step #5 = Select the black color, and draw random lines on each rocks, until it recovers 80% of it.
Step #6 = Do the steps #5 as many time as you want, but DO NOT OVER DO IT.
Step #7 =Select the same pencil as told in step #4.
Step #8 = Select the white color; redo the same thing as told in step #5.
Step #9 = Do the step #8 as many time as you want, but DO NOT OVER DO IT.
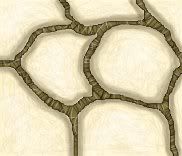
---------
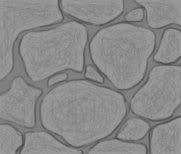
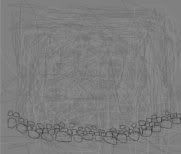
Step #11 = Select the black color, and define the shapes of each rocks, as seen in the example.
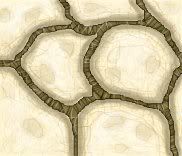
---------
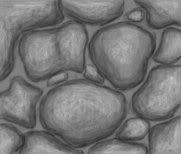
Step #13 = Select the black color, and draw the shadows on each rocks.
*Note*: Each rock is different, so the shadows must not be the same for each one.
Step #14 = Select the same pencil as told in step #12.
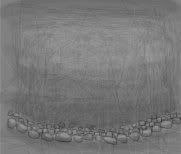
Step #15 = Select the white color and draw the lightning on each rock.
*Note* = It must work with the shadows that you drew on each rock.
---------
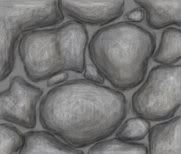
Step #17 = Select a brown color and add some smudge here and there to give a dirty effect.
---------
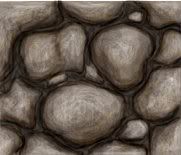
AVERAGE Time = 10 - 15 minutes
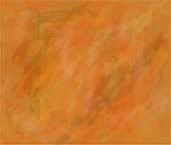
MARBLE

---------
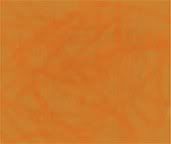
Step #3 = Select a bright orange and make some random lines until it recovers 75% of the region.
Step #4 = Select the same pencil as told in step #2.
Step #5 = Select a dark brown color, and redo the same thing as told in Step #3.
---------
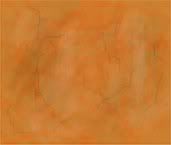
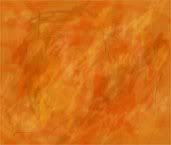
Step #7 = Select the black color and draw some small cracks here and there.
Step #8 = Select the pencil with the size of ''3px'' and with the opacity of 8%.
Step #9 = Select the white color and draw some smudge at some random places as seen in the picture.
Step #10 = Select the same pencil as told in step #8.
Step #11 = Select the black color and redo the same thing as told in step #9.
---------
Step #13 = Select the white color and draw some hatched section of your skin. As seen in the example.
Step #14 = Select the same pencil as told in step #6.
Step #15 = Select the black color and redo the same thing as told in step #13.
---------
HARD Time = 15 - 20 minutes
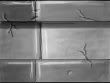
METAL STRUCTURE
Step #2 = Select the pencil with the size of ''2px'' with an opacity of 15%.
Step #3 = Select the black color, and draw some cracks here and there, to reminds that its an metal structure after all.
Step #4 = Select the same pencil as told in step #2.
Step #5 = Select the white color, and draw next to the black cracks you have made in step #4.
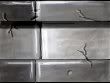
---------
Step #7 = Select the black color, and make the shadows, by making variations of tons from a dark to a light grey.
Step #8 = Select the same pencil as told in step #6.
Step #9 = Select the white color, and make the lightning, by making a variations of tons, from white to a pale grey.
*Note* = Metal reflects the light a lot, so you need a lot of contrasts between the shadows and the lightning.
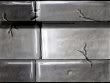
---------
Step #11 = Select the pencil with the size of ''3px'' with an opacity of 15%.
Step #12 = Select a yellow color, and smudge it a little bit around the source of lightning. To give a more shiny effect.
Step #13 = Select the same pencil as told in step #10.
Step #14 = Select a light blue color, and smudge it around the shadowy places. To give a reflection of the sky effect
---------
Step #16 = Select the black color and draw some random lines here and there to remind the old scratched metal.
Step #17 = Select the same pencil as told in Step #14.
Step #18 = Select the white color and do the same thing as told in step #15.
Final Step = Select the finished region, and play with the HUE/SATURATION/LIGHTNING or with the BRIGHTNESS/CONTRAST tools until you have the result you wish.
AVERAGE Time = 10 - 15 minutes
My tutorial.doc = GOOGLE DOC DOCUMENT
Attachments
Last edited:


