In the editor open up the terrain pallet. From your upper menu click on Layer, that will draw down an extended menu select Terrain.
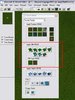
In my attachment you will see the pallet. I outlined the Terrain Type in red.
The tool pallet is divided into three sections, Texture, Cliff and Height.
Texture can be applied by itself (by checking the little box above and unchecking the Cliff box) or with a Cliff Type (by checking both boxes)
The texture area is broken down into two sides: The left side is the texture tile set you have selected - to change the tiles you need to click on Advanced, they click on Modify tile set - you can select from the default tile sets from different maps that Blizzard Created (ergo they are named "ashenvale, Lorderon, Northrend, etc) or you can customize your tile set. I believe that the Modify tile set option is self evident.
The right side of the Texture or Tile section of the Terrain Tool area relates to boundaries and blight. Blight is what the Undead units create when they are build - the 'dead' zone that spreads out from the building units. Boundries are best left to another tutorial.
In my attachment I outlined the middle section, Cliff Type.
From Left to right, top to bottom:
Down 2 - Creates a "hole" in the map being two cliff levels deep
Down 1 - Creates a "hole" in the map being one cliff level deep
Level - Allows you to drag a selected cliff height making the terrain raise or lower to that cliff height. Useful for removing cliffs.
Up 1 - Creates a Raised cliff one cliff level
Up 2 - Creates a Raised cliff two cliff levels
(Next row)
Water 1 - Creates a water filled hole one cliff level deep
Water 2 - Creates a water filled hole two cliff levels deep
Ramp - it will usually create a ramp between single levels of cliff. Works best on straight segments. Does not work too well on corners, or areas where the cliff is jagged.
Height:
Left to Right: Raise (creates a hill) Lower (creates a depression) Plateau (levels the terrain starting from the center of your tool outward) Noise (generates roughness to th terrain) Smooth (as implied "smooths" the area)
Check the Box: Most often you can check the box by clicking on the tool - in the combination of a texture and a cliff click the cliff type you want and the terrain type you want. To deselect you have to click on the box next to the Section's Name.
You can go back at anytime with just one tool and do that action. EXAMPLE: lets say you have laid in ramps of a stone texture and want the ramps to be grass - you select the grass texture only and spread it out over the ramp.
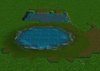
Most people do not use cliffs anymore. Instead they make water, go to advanced then deselect Enforced Water Height Limits, then pull the land over the area of water using the Cliff - Flat tool, then go back with the height lower tool - as the terrain is depressed water is revealed. Works best while showing your pathing (hit p on your key board or select from the top menu bar , View/Pathing Ground) Blue is where units can walk, but most units can not be plopped or built there. Pink is where no unit can walk (being too deep of course) After lowering and using the platue tool to widen the water area, people go back with smooth and smooth the shoreline (See second attachment). You will see that using just the ramp makes a rather ugly shore - the other method makes a more natural shore. Pathing is controlled by the depth of the water.
Gold mines are located in the Unit Pallet, Neutral Passive Buildings. You can select and "plop" in the editor where you want them.
You can also create a trigger that creates units in the game. Most commonly is using a region and using the Create unit at point command:
Unit - Create 1 Gold Mine for Neutral Passive at (Center of GoldMine<gen>) facing Default building facing degrees
Where 'Goldmine' is a region I laid in with the region tool.
I hope some of this helps.
Listen to a special audio message from Bill Roper to the Hive Workshop community (Bill is a former Vice President of Blizzard Entertainment, Producer, Designer, Musician, Voice Actor) 🔗Click here to hear his message!
Read Evilhog's interview with Gregory Alper, the original composer of the music for WarCraft: Orcs & Humans 🔗Click here to read the full interview.
We're thrilled to announce that our upcoming texturing contest is in the works, and we're eager to hear your suggestions! Please take this opportunity to share your ideas in this theme discussion thread for the Texturing Contest #34!
🏆 Hive's 7th HD Modeling Contest: Icecrown Creature is now open! The frozen wastes of Icecrown are home to some of Azeroth’s most terrifying and resilient creatures. For this contest, your challenge is to design and model a HD 3D monster that embodies the cold, undead, and sinister essence of Icecrown! 📅 Submissions close on April 13, 2025. Don't miss this opportunity to let your creativity shine! Enter now and show us your frozen masterpiece! 🔗 Click here to enter!