- Joined
- Jul 20, 2004
- Messages
- 2,759


Graphics Tutorials - Chapter 1 ‘Static shapes’ (GUI)
Table of Contents
1. Introduction
2. Basic Functions
3. First graphic - a circle
4. Creating a line
5. More advanced geometrical shapes: wheels and spirals.
6. Some tips & tricks
7. Working with coordinates (new)
8. Going further
1. Introduction
It is clear that graphics (or eye-candy) are a very important element for every spell. Even though many of you have absolutely no idea how to make your own effects, don’t have the program to do that, or simply don’t want to increase map’s size. However, that doesn’t mean that you can’t make new effects, with a bit of coding knowledge and a lot of imagination. This tutorial will help you with the first phase. The second one is up to you. You will learn here how to make unmovable shapes. When and if next chapters will be revealed, you will also learn how to move the units, obtaining even more unique effects.
What you need to know before starting? Well, some basic knowledge in triggering. If you know how triggers work and know basic actions (such as creating an unit) then that’s all you need.
Warning: This tutorial does not treat memory leaks and so the codes inside the tutorial are not leak-free. This is purely because that way the codes are less crowded and much cleaner (visually speaking), and so easier to understand. To avoid memory leaks, search for a tutorial helping you clean them.
2. Basic functions
First thing to know about graphics is some extremely basic functions which we will mostly use when building our codes. The algorithms will mostly rotate around them so it is very important that you have good control upon them.
Convention: In this chapter functions are analyzed theoretically. The parameters are in the same order that are in the graphical interface and are separated by commas (,)
a) Distance Between Points
This function is pretty simple to understand. Given two points as parameters, it will calculate the distance between the two points. There isn’t much to explain about it. To understand more about distances in Warcraft 3, a screen in warcraft 3 is approximately 1900*1250.
Example: In the image below there are three points: a,b and c. Here is what function’s value would be for each of them (square roots are actually calculated so in reality only the final result is displayed):
dist(a,b) = 25 dist(b,c)=√149 = 12,2065 dist(c,a) = √52 = 7,211

Note: Function is commutative. dist(a,b) = dist(b,a).
b) Angle Between Points
A more complicated and relative function especially for those who already have some geometry knowledge. Angle between points would return the angle at which the second point is situated from the first point. To make it easier to understand, consider an unit placed in the first point facing the second one. Unit’s facing angle is the angle between the two points.
Note: Function is not commutative. angle(a,b) is not the same with angle(b,a). Actually angle(a,b) = angle(b,a)-180.00.
Example: In the image below there are three points: m,n and p. Here is what function’s value would be for each of them.
angle(m,n) = 0 angle(n,m) = 180 angle(m,p) = 270 angle(p,m) = 90
angle(n,p) = 225 angle(p,n) = 45

c) Polar Offset
This is a special function we will use a lot. Given a point p, distance d and angle a it will create a point p’ by the following conditions:
dist( p,p’ )=d
angle( p,p’ )=a
The use of this function is quite unclear right now but you will understand really soon why this function is so important for creating geometrical graphics for spells.
Example: Let there be point a(3,3). Generate points b = PolarOffset(a,100,60), c=PolarOffset(a,200,225),
d=PolarOffset(c,150,90), e=PolarOffset(b,170, 270) Below you can find the solution:

Note: Angles are drawn in red, and distances in blue.
3. First graphic – a circle
Now that we have discussed the important triggers it is time we started making our first graphical simple shape: a circle. I assure you that we will not be working with complicated coordinates and stuff like that. We will be mostly using the functions above.
First question now for some of you would be “but how do we create the shape? Do we have to use special effects?”. Answer is no, I am completely against special effects rather because they are hard to manipulate and can have a relative result. I would go for units instead mainly because they can be grouped together (unit groups) and have a shadow, but also because they are interactive objects with loads of events. Though I won’t bother to explain you how to combine the graphics with the functionality of spells, I’m sure you will be able to handle it on your own. And it will be more fun that way too.
So, how do we create a “missile unit”? Actually, it is very simple. If you worked with spells before, you surely heard about dummy units. Well, missile units are similar. They are units which cost no food, cannot attack or move, cannot be selected and are invulnerable. The only difference is that unlike dummy units they always have a model assigned (which is most of the time but is not limited to missiles), most of the time a shadow, and sometimes visibility and flying height (usually hovering at about 100 off the ground).
For our circle I assigned the unit a classical fire effect. Now before we can begin to actually code the circle, we should think at the coding and how we should create our circle. It is clear that it is made out of units. Usually when working with graphics it is very important to think from the beginning approximately how many units should the eye-candy be composed off. Shouldn’t be too many (300) or too few (10). Keep in mind that if the graphical shape increases in size, so should either the units or their number. For a 400 radius circle I believe 36 units are enough. If the radius is greater so should the number of units be.
What is the definition of a circle? It is the geometrical shape made out of an infinity of points all situated at an equal distance from a central point. It is clear that we cannot use any kind of infinities in programming but we already know something important: that the units are at equal distance from the center.
Another important thing is that the distance between our units from which the circle is composed should be equal (the arc between them). So we would create our circle like this:

Now let’s study the graphic since it is quite hard to understand it otherwise. The yellow (r) represents the distance from the center to the points, which clearly is constant. The numbers on the rays represent an index of the element on the circle. Depending on it, the value of the angle between the center and the point (found outside the circle in orange) varies in size. “a” is definitely a constant that also depends on the number of the units forming the circle (equal with n).
It is clear that the angle between the center and the last point is equal with 360 degrees (circle is closed). So a*n=360 => a = 360/n, n!=0 (we cannot have no units on the circle). The most important part is the general point “k”, because based on it we can determine the whole formula of the angle. Since angle for k is equal with ak, and a=360/n => angle = 360k/n.
Now, doesn’t the stuff above look a bit like multiple polar offsets? Well, infact it is. Having the central point p, radius r and index k (which goes from 1 to n) the formula is like this:
Code:
Point = Polar Offset (p, r, (360/n)*k). (k=1,n)Now we can easily put this into code. We can easily do a repetitive FOR (replacing k with (Integer A)) and this is what we obtain:
-
 For each (Integer A) from 1 to 36, do (Actions)
-

 Loop - Actions
-


 Unit - Create 1 Missile for Player 1 (Red) at (Circle_Center offset by 400.00 towards ((Real((Integer A))) x (360.00 / 36.00)) degrees) facing Circle_Center)
-
-
In this case the formula can be improved by replacing 360.00/36.00 with 10.00 directly (calculating it yourself saves the computer from calculating it 36 times). There may be cases however when the number of the units on the circle may also vary.
Believe it or not, you have just learned how to create a circle.
4. Creating a line
Now we finally come to another very important geometrical shape: creating a line between two points. Complicated as it sounds, it is pretty simple as well. Like always, first I will present you with the formula and then we will just apply it.

The angle even though it is not so obvious, is the same for all the points: g. The “moving” element here is the distance. For the general term, you can notice that the distance is equal with k*d, where d is a constant and k is the index. Now all we have to do is determine the constant.
We know that n*d = dist, where n is the number of points on the line and dist is the distance between the initial points (a and b). => d = dist/n, n!=0 (we cannot have no units on the line).
Getting back to the general term, we get dist(k) = k*(total_dist/n).
Okie dokie. Let’s apply this in warcraft. We have two variables for the two points (StartPoint and EndPoint). Here is how the code would look:
-
For each (Integer A) from 1 to 36, do (Actions)
-
Loop - Actions
-
Unit - Create 1 Missile for Player 1 (Red) at (StartPoint offset by ((Real((Integer A))) x ((Distance between StartPoint and EndPoint) / 36.00)) towards (Angle from StartPoint to EndPoint) degrees facing EndPoint)
-
-
Code:
Number_of_points = Round_Up(total_distance/25)Make sure you fully understood chapters 2 and 3 before you go further to the next chapters because they will present more complicated shapes that reuse these codes. Not understanding them can lead to problems.
5. More advanced geometrical shapes: wheels and spirals
Now that we can finally do a simple circle & line let’s just go further and try more complex shapes. First one is a classical wheel which has a pretty obvious shape: a circle with a couple of radiuses. It shouldn’t be hard to code at all.
Now, just a foreword before we start combining elements (multiple circles, multiple lines, circles & lines, etc.). Never struggle too much to find a single formula for the whole shape. It is easier to draw the elements one by one, so what will be left for you will be to determine the stats of the circles and/or lines.
I posted like always a suggestive graphic, this time for our wheel.

We first create a circle with a radius r from a central point, with the method mentioned in chapter 3. Then, we have to add the radiuses. Notice that the number of units on the circle should be different than the number of radiuses (which normally should not exceed 20 unless there is a big radius). The only problem left is creating the lines. We notice that we do not have to add all the radiuses. It is enough to add radiuses/2 diameters and problem is solved.
The polar coordinates of the two points between which the diameters are built are these:
Center = center of the circle. Distance = radius of the circle.
Angle = k*a and 180+k*a. a=360/2n.; k=1,(n-1); n=total number of diameters.
It is really simple to put this into warcraft. The whole code goes like this:
-
//first create the circle
-
For each (Integer A) from 1 to 36, do (Actions)
-
Loop - Actions
-
Unit - Create 1 Missile for Player 1 (Red) at (Circle_Center offset by 400.00 towards ((Real((Integer A))) x (360.00 / 36.00)) degrees) facing Circle_Center)
-
-
-
//and now the diameters
-
For each (Integer A) from 1 to 8, do (Actions)
-
Loop - Actions
-

 Set StartPoint = (StartPoint offset by 400.00 towards ((Real((Integer A))) x (360.00 / 20.00)) degrees)
-
Set StartPoint = (StartPoint offset by 400.00 towards ((Real((Integer A))) x (180.00 + (360.00 / 20.00))) degrees)
-
//ofcourse we need to create multiple lines
-
For each (Integer B) from 1 to 36, do (Actions)
-
Loop - Actions
-
Unit - Create 1 Missile for Player 1 (Red) at (StartPoint offset by ((Real((Integer B))) x ((Distance between StartPoint and EndPoint) / 36.00)) towards (Angle from StartPoint to EndPoint) degrees facing EndPoint)
-
-
-

It is starting to look quite logical, eh? There are two very important things to take in account. Firstly the number of the units constructing the circle should be relatively low. If it is too high and the circle is continuous you will lose the spiral itself. A spiral with 10 spires is decent but 20 spires are already too much.
Secondly you should notice that the angle at which the first element of each circle increases as we add yet another circle. I called this angle difference “deviation angle” and it is actually a constant based on which the spires will be more or less curved (you will be able to experiment with it once our spiral is finished).
Creating the circles should not be a problem. The only thing to take account of is the angle at which you create the elements (because of the deviation angle) and the distance between the circles. Here is how the angle & distance formula would look like:
Angle = e*n+(a*k). a=360/number_of_spires. e = constant real value (deviation angle). k=1,number_of_spires. n = index of current element of the spire.
Distance = r+(c*n). r = radius of circle at the center of the spiral. c = constant real value (distance between the elements of the same spire). n = same as above.
So, let’s just apply it. Here we go.
-
For each (Integer A) from 1 to 20, do (Actions)
-
Loop - Actions
-
For each (Integer B) from 1 to 7, do (Actions)
-
Loop - Actions
-
Unit - Create 1 Missile for Player 1 (Red) at (CENTER offset by (100.00 + (8.00 x (Real((Integer A))))) towards (((360.00 / 7.00) x (Real((Integer B)))) + (6.00 x (Real((Integer A))))) degrees) facing CENTER
-
-
-
-
Note: you may also add a deviation distance if you feel like. Just multiply the initial distance with the index of the current spire element.
Voila, you may now build the shapes you want (ehh… almost). I’ll give you a little task and it should be pretty easy to deal with. Try to create an arc of circle between two angles from the center, made out of an exact number of units. If you can handle this then I guess you can combine the elements to obtain a lot of stuff.
6. Some tips & tricks
a) Stock the missiles into a group. That way it will be easier to transpose them between triggers, and eventually remove them. It’s more efficient than an array of units.
b) Even though this tutorial does not explain memory leaks I want to emphasize the fact that you should always remove for a Offset both the center and the location returned by the function. And always store both into variables. Doing something like “RemoveLocation(PolarProjection([…]))” will simply create another location and immediately destroy it. It’s completely wrong!
c) Work with coordinates… somehow. Yep, even though at this point is pretty complicated, there is a way to work with coordinates without using custom scripts. Even though it still uses locations and so the efficiency is terrible, it may be something interesting for some of you.
How you do it? Simple. There is a function “Conversion – Convert Coordinates to point”. Even though you still get to a point/location, you are able to use coordinates. You can moreover use the “Point with offset” function which adds the X/Y coordinate to the current value of the location’s X/Y.
d) If you use more than 2 nested loops then don’t be desperate that you don’t have more predefined variables. Define your own loop variables (integer type) and use them.
7. Working with coordinates (new)
Some shapes can be created as a combination of lines and circles. However, in the case of some shapes it is really difficult to obtain the shape you want. You may have seen some on math sites, and saw some formulae for them, but at this point Polar Offset is not that helpful. In truth, Polar Offset also uses coordinates and some mathematical formulas to obtain the point, but the output is a point. In our case, we will have to generate our point using the function “Conversion – Convert Coordinates to point”. You can also individually take the X and Y coordinate of a point using the functions “X Of Point” respectively “Y Of Point”.
Warning: Deducting formulas may require advanced math knowledge. It is highly recommended that you either study extensively analytical geometry or take the formulae from the internet.
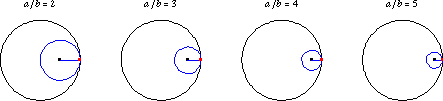
Completely arbitrarily, I have decided to start with the hypocycloids. Why? Because hypocycloids are really good looking shapes and are yes, when I say “are”, I mean that there is more than one.
Mathworld said:The curve produced by fixed point P on the circumference of a small circle of radius b rolling around the inside of a large circle of radius a>b.
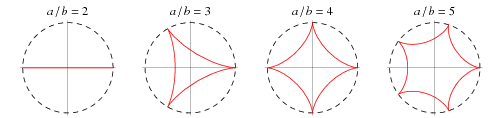
Images linked from http://mathworld.wolfram.com
© 1999 CRC Press LLC, © 1999-2006 Wolfram Research, Inc.
Quite complex, eh? Well… no need to get scared. We have already done this, just that all we had to do was use some parameters for a function, and now all we have to do is add the formulas ourselves in the loop. We will start with a deltoid (three cusps hypocycloid). It has the following expressions for the coordinates:
Code:
x=[2/3 cosφ – 1/3 cos(2φ)]a
y=[2/3 sinφ + 1/3 sin(2φ)]aWarning: The center of the circle is normalized to (0.0). To make it work for the circle with the center (x0,y0) just add x0 to x, and y0 to y.
Here is the code (I know it looks messy, but that’s how GUI is when it comes to formulae and calculations…):
-
For each (Integer A) from 1 to 36, do (Actions)
-
Loop - Actions
-
Set X = (((2.00 / 3.00) x (Cos(((Real((Integer A))) x 10.00)))) - ((1.00 / 3.00) x (Cos((2.00 x ((Real((Integer A))) x 10.00))))))
-
Set X = ((X x 400.00) + (X of (CENTER)))
-
Set Y = (((2.00 / 3.00) x (Sin(((Real((Integer A))) x 10.00)))) + ((1.00 / 3.00) x (Sin((2.00 x ((Real((Integer A))) x 10.00))))))
-
Set Y = ((Y x 400.00) + (Y of (CENTER)))
-
Unit - Create 1 Missile for Player 1 (Red) at (Point(X, Y)) facing (CENTER)
-
-
Astroid (4 cusps hypocycloid)
Code:
x=x0+a*cos^3(φ) = x0+a*cosφ*cosφ*cosφ
y= y0+a*sin^3(φ) = y0+a*sinφ*sinφ*sinφ
Cardiod (1 cusp epicycloid)
Code:
x=x0+a*cos φ(1-cos φ)
y=y0+a*sin φ(1-cos φ)
Nephroid (2 cusps epicycloid)
Code:
x=x0+a*(3cosφ-cos(3φ))
y=y0+a*(3sinφ-sin(3φ))
Lemniscate
Code:
x=x0+a*cosφ / 1+sin^2(φ)
y=y0+a*sinφ*cosφ/1+sin^2(φ)
Note: epicycloids are generated outside the circle, so the area they cover will be bigger than the value of the parameter a.
There is one more thing I have to teach you in this chapter: mirroring. You can easily mirror the effect by rotating them with 90 degrees, 180 degrees or even 270 degrees from their initial position. Here are the coordinates you have to use (first is location’s x, second is location’s y):
Code:
0 – (x1,y1) 90 – (y1,x1) 180 – (-x1,-y1) 270 – (-y1,-x1)There. You can obtain a nice effect by creating a 0 degrees lemniscate, and then a 90 degrees. You will obtain a four petals rose. You can now experiment with unique shapes to obtain some really good looking and original special effects.
8. Going further
Well, you can now experiment as much as you want with circles & lines in order to obtain unique effects. I suggest you do not abuse coordinates because not only are they difficult to obtain in GUI but they are also extremely inefficient. If you want curved graphical elements (for example: Astroid, Cycloid, Triquetra) you will most likely have to take a step further and learn JASS.
If you have questions, suggestions or complaints about this tutorial, do not hesitate to post them here.


