Follow along with the video below to see how to install our site as a web app on your home screen.
Note: This feature may not be available in some browsers.
Listen to a special audio message from Bill Roper to the Hive Workshop community (Bill is a former Vice President of Blizzard Entertainment, Producer, Designer, Musician, Voice Actor) 🔗Click here to hear his message!
The wurst team is excited and curious to see what the new PTR changes will mean for the wc3 modding community. We are anticipating the release to the stable battle.net realms, and will add support to the wurst toolchain as soon as possible.
At this time, we do not plan to have a separate branch to support PTR installs. However, if the classic team continues to make extensive use of the testing realm, we may consider that option in the future.
We are actively thinking about what the PTR changes will mean for us and how it should affect 2018's timeline. For example, now that 24-player maps are coming, we will prioritize support for editing map player metadata from vscode.
24 unique player-colors, in wurst!
UPDATES
We are quite a bit late with our blog post this month, as there were no major updates to present and we were focusing on quality work as well as keeping an eye on Wurst's stability. That being said, in march we revamped the lambda syntax for more flexibility and cleaner code. Additionally we again have received a number of contributions from the community.
Type inference plus new block handling for lambda expressions and closures
We resolved several opened issues (#44, #45, #48) and merged 7 pull requests (#47, #49, #50, #51, #51, #54, #55, #56) for the standard library.
The Wurst Setup received several stability updates and we are working on further integration with the wurst tool suite.
Types are now optional when writing lambda expressions:
Wurst:
interface UnitFunction
    function run(unit u)

function group.foreach(UnitFunction closure)
    ...

// Before:
g.foreach((unit u) -> print(u.getName()))
// Now also possible:
g.foreach(u -> print(u.getName()))
// Works for multiple params too:
list.foldl((x,y) -> x+y)
Additionally, you can now get rid of begin and end keywords for statement lambdas if the lambda is the last argument in the current line. The lambda is them moved behind the function call like so:
Wurst:
// Before:
doAfter(10.0, () -> begin
    u.kill()
    createNiceExplosion()
    doMoreStuff()
end)

// Now also possible:
doAfter(10.0) ->
    u.kill()
    createNiceExplosion()
    doMoreStuff()
With the new syntax the indentation defines the block. This allows one to define customized control flow, which looks very similar to a construct built into the language.
The begin and end syntax will of course remain for backwards compatibility and for when the lambda isn't the last argument.
WURST SPELL EXCURSION
Spells are a very popular choice to script in wc3, and most maps have at least some scripted abilities.
Here we will show a concise example of how to combine object-editing, event listening and the use of closures to create a decent spell without much hassle.
In this case we are making a timed explosion spell called "Conflagration". The explosion applies a burn debuff to hit enemies, which causes successive conflagration hits to deal bonus damage. We aim to make the spell easily configurable and in the end upload it to github so it can be easily imported into a wurst project.
CONFIGURATION PACKAGE
To make a nicely configurable spell, it can sometimes help to think about the configuration package first. Based on the concept, we know in what way we want to allow the user to customize the ability, like:
To put this into wurst code, we create a new package with the variables from the list. In order for them to be configurable by the user, we must annotate them with @configurable.
Wurst:
package ConflagrationConstants
import public Assets

@configurable public let BASE_DAMAGE = 50.
@configurable public let BONUS_DAMAGE = 50.

@configurable public let SPELL_EFFECT_PATH = Units.infernalBirth
@configurable public let BONUS_EFFECT_PATH = Abilities.fireBallMissile
@configurable public let SPELL_EFFECT_DURATION = .75
@configurable public let SPELL_RADIUS = 256.

@configurable public let SPELL_ICON = Icons.bTNBreathOfFire
@configurable public let SPELL_NAME = "Conflagration"
@configurable public let SPELL_TT_NORMAL = "Cast Conflagration"
@configurable public let SPELL_TT_EXTENDED = "Conjures a firey explosion at the " +
    "target, damaging nearby enemies and applying a buff, which will cause them to " +
    "take more damage on succeeding hits of this spell."

@configurable public let BUFF_DURATION = 7.5
@configurable public let BUFF_EFFECT_PATH = Abilities.incinerateBuff

@configurable public let BUFF_NAME = "Conflagrated"
@configurable public let BUFF_TT = "This unit has weakness to fire"
Clearly, the above paints a picture of a quick, unit-style spell with fairly low damage and duration.
SPELL OBJECTS
Next we'll generate the required objects for our spell. We will be needing an ability object for the unit that uses the spell, and a buff object that displays the presence of conflagration visually and as status.
Thus we create a new package:
Wurst:
package ConflagrationObjects
import public ConflagrationConstants
import public BuffObjEditing
import ChannelAbilityPreset

public let SPELL_ID = compiletime(ABIL_ID_GEN.next())
public let BUFF_OBJ = compiletime(createDummyBuffObject(BUFF_NAME, BUFF_TT,    Icons.bTNFireBolt, Abilities.incinerateBuff, "chest"))

@compiletime function genObj()
    new ChannelAbilityPreset(SPELL_ID, 4, true)
    ..setName(SPELL_NAME)
    ..presetTooltipNormal((int lvl) -> SPELL_TT_NORMAL)
    ..presetTooltipNormalExtended((int lvl) -> SPELL_TT_EXTENDED)
    ..presetIcon(SPELL_ICON)
    ..presetButtonPosNormal(0, 0)
    ..presetManaCost((int lvl) -> 0)
    ..presetCooldown((int lvl) -> 4.)
    ..presetHotkey("Q")
    ..presetTargetTypes(Targettype.POINT)
    ..presetAreaofEffect((int lvl) -> SPELL_RADIUS)
    ..presetOption(Option.TARGETIMAGE, true)
SPELL EFFECT
Finally we create the actual effect. At the map's initialization we register a spell event listener, which will fire when any unit casts our generated spell.
Wurst:
package Conflagration
import ConflagrationObjects
import ClosureTimers
import ClosureForGroups
import RegisterEvents
import EventHelper
import HashMap

let buffId = BUFF_OBJ.abilId
let buffMap = new HashMap<unit, CallbackSingle>()
init
    registerSpellEffectEvent(SPELL_ID) ->
        let caster = GetTriggerUnit()
        let tpos = getSpellTargetPos()
        flashEffect(SPELL_EFFECT_PATH, tpos)
        doAfter(SPELL_EFFECT_DURATION) ->
            forUnitsInRange(tpos, SPELL_RADIUS)  u ->
                if u.hasAbility(buffId)
                    caster.damageTarget(u, BONUS_DAMAGE)
                    flashEffect(BONUS_EFFECT_PATH, tpos)

                caster.damageTarget(u, BASE_DAMAGE)
                u.addAbility(buffId)
                if buffMap.has(u)
                    destroy buffMap.get(u)
                let cb = doAfter(BUFF_DURATION) ->
                    if buffMap.has(u)
                        buffMap.remove(u)
                        u.removeAbility(buffId)
                buffMap.put(caster, cb)
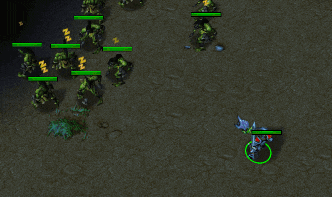
The spell in action
CREATING A REPOSITORY FOR OUR PROJECT
Finally, let's create a git dependency from our wurst project. We will be using GitHub and it's corresponding desktop app which requires a free account. If you don't already have one, please create an account and setup the app.
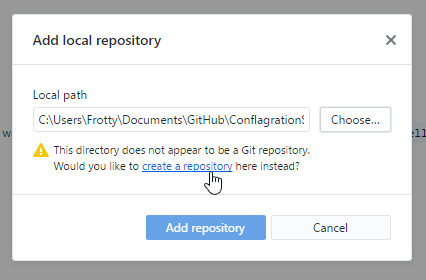
Once you have the app setup, we can create a new git repo inside our project folder by choosing File -> Add Local Repository. Select the root of your project and then select create a repository:
Leave all settings as is and create the repository:
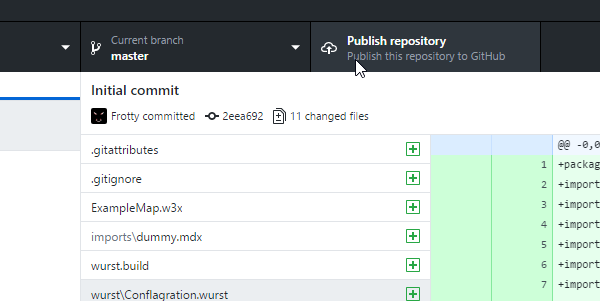
Hooray, our repository is created. All our existing files have been added to an initial commit. Files that shouldn't be versioned are automatically ignored by the configuration generated by the setup tool. We can now publish our repository:
If everything went well, you repository is now published. You can view the repository we created in this blog post here: Frotty/ConflagrationSpell
Note If you want to know more about the git workflow, you can checkouts everal tutorials online, like this one.
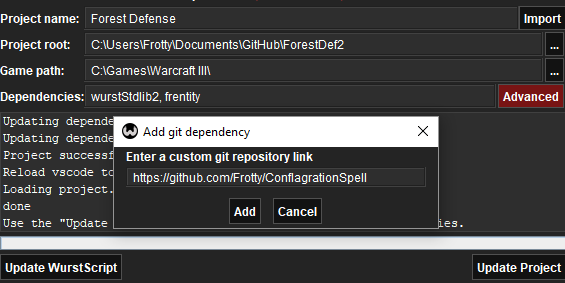
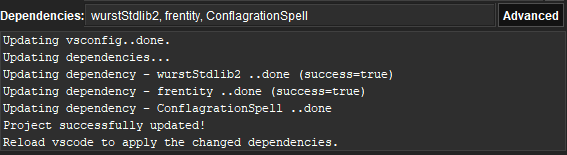
USING THE REPOSITORY AS WRUST DEPENDENCY
Open the setup tool and import the wurst.build file of some other project. Under Advanced you can now enter the link to the repository that we created above. Hit Update Project to update the dependencies.
Reload VSCode and you should be able to import the spell as necessary.
And that's it! Thanks for reading another Best of the Wurst blog-thing.
Yea we have thought about adding "You got $(goldVal) gold" but it's not a priority right now.
If you want Java-like auto usage of .toString() you could overload the + operator for those types. Though not really recommended.
There also exist the .format() functions.
That Looks so Easy Now , as _OBJ Spell && Effect
(if someone doesnt know what is OBJ , go search in the WEB for Coders what is OBJ and how can i use it)
This site uses cookies to help personalise content, tailor your experience and to keep you logged in if you register.
By continuing to use this site, you are consenting to our use of cookies.


")


