Archian
Site Director
- Joined
- Jan 1, 2006
- Messages
- 3,153


NOTE THIS TUTORIAL IS OUTDATED
Creating Custom Skins
By Archian
Preface
I were just looking through some old text archives and stumbled over this half-finnished tutorial I once started. Thought I'd finnish it, but am now posting it here to get feedback and suggestions as I work further on this.
The title "Creating Custom Skins" isn't really correct, but people who wish to learn these things will probably be looking for a simillar title, isn't that right kids? A more suitable title would probably be "Editing Textures".
Click the images for larger versions.
Table of Content:
What is Texturing?
Texture mapping (a.k.a. "skinning") is a method for adding detail, surface texture, or colour to computer-generated graphics e.g. 3D models.
A texture map is applied (mapped) to the surface of a shape, or polygon.
This process is akin to applying patterned paper to a plain white box.
In this example, a texture of the Lich Blademaster model (created by Whitehorn) is applied to the model to create the illusion of color detail that would take very many additional polygons to realize otherwise.

This tutorial will take place as a starting-point regarding how to edit a texture for an existing 3D model (unit) within Warcraft 3.
Example, a total conversion of Arthas's face texture:
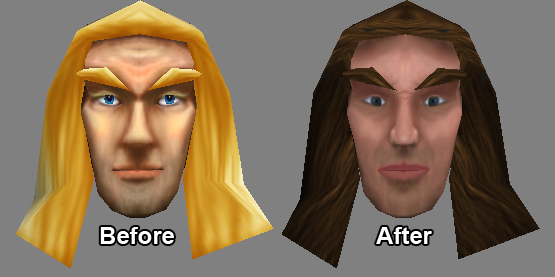
(Texture made by me)
A Slightly Note
Users at sites such as this or www.wc3campaigns.net, can upload custom created skins for others to download and use as a replacement for an existing unit within Warcraft. However, in order to get a skin approved; the resource submission must obey to certain criterias.
Mainly that the textures have been modified significantly, atleast 75% freehand created (usually estimated by the respective texture or resource moderators). "Freehand" indicates that techniques e.g. Hue / Saturation or CnP (Copy and Pasting) is prohibited.
The texture also needs to work properly in-game, that means no alpha corruption. And finally, since nobody wish to use flat/matte textures, the skins you create and put up for download should have decent lighting and shading")
Required Tools
In order to do all the above mentioned, you should first acquire a few tools. So first things first, you need a image-editing program. Something like Photoshop, if you do not have Photoshop installed on your hard-drive, you can download a 30 days trial version for free:
Paint Shop Pro or Fireworks is ideal as well. If you have none of these, you can download the GIMP for free.
Next, you need to download a Warcraft III 3rd party tool.
This is used to convert Warcraft image files (.BLP) into editable image files (such as .TGA, .JPG & .BMP).
I recommend that you generally work with .TGA rather than .BMP or .JPG (it's more suitable and most people do that).
Extract and Convert .BLP to .TGA
We now need to get posession of the texture we want to edit. So, open up the Warcraft 3 Viewer.
Now, since I want to edit a texture from the Frozen Throne expansion I'm going to open the War3x.mpq.
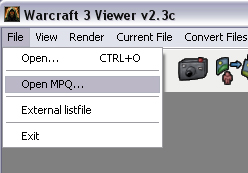
Choose File | Open MPQ...
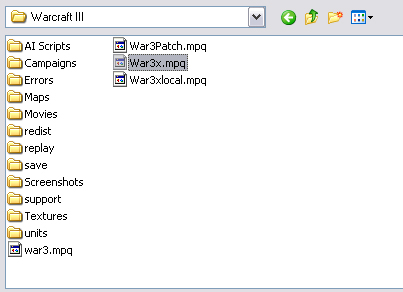
Then navigate to your Warcraft 3 folder (usually found under C:\Programs\Warcraft III) and select the War3x.mpq.
If you wanted to edit a texture from Warcraft III: Rain of Chaos it would be the War3.mpq.
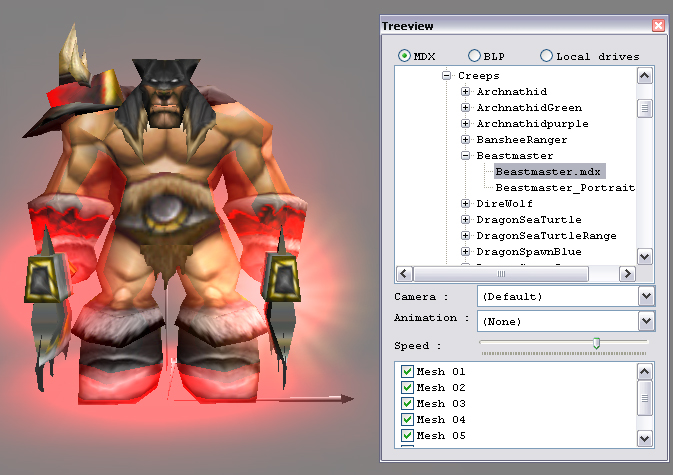
Make sure that the Treeview is displayed. (Choose the View | Treeview window command or press Ctrl + H)
Browse the BLP or MDX files in the treeview and choose a unit you wish to reskin. I'm going to reskin the Beastmaster model.
If you browsed through the BLP files you can extract a texture, by right clicking it and select Extract (and Convert) BLP.
In my case, I browsed through the MDX files (just to see the texture wrapped on the model).
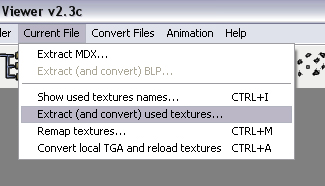
If you did it the same way I did, you can right click the file and select Extract (and convert) used textures...
Or choose Current File | Extract (and convert) used textures...
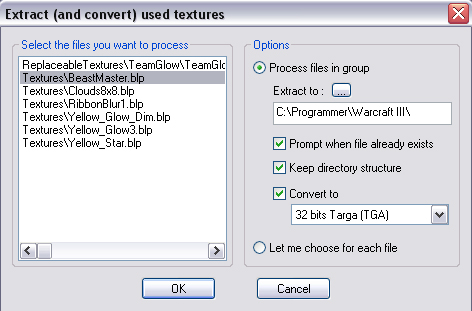
Then deselect all used textures except the Textures\BeastMaster.blp.
Then choose a folder you wish to extract the file to and click on the OK button.
Texturing Techniques
It is time to start texturing, yah!
Open the .TGA file with your image-editing program and start skinning.
It's always good to have an idea of what to make before you start something random, be creative.
Another good idea to start off with is choosing the basic colors for the texture, you will probably come to discover that as you gain more experience. Just remember, practice makes perfect.
Here's a few links which may prove useful:
As a result of approximately 2 hours total of texturing, here is the outcome.
Convert .TGA to .BLP
.BLP files are texture files used by games made by Blizzard Entertainment.
.BLP graphics are used for Warcraft III, and are also stored within MPQs.
What we need to do now is to convert the .TGA file into a .BLP file format, so convert the file as follows:
Open the Warcraft 3 Viewer (if you havn't done so already).
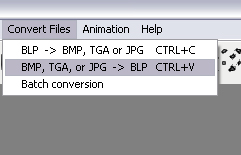
Then click on Convert Files | BMP, TGA or JPG -> BLP CTRL+V, like so:
Then browse through your files and select your skin (in .TGA format).
Next, you will be able to set the quality / depth settings during the conversion (I usually go with 99%).
You're done! :emote_grin:
Now it's time to import your texture into the World Editor (thus playable ingame).
Import into the World Editor
Reading the tutorials stated below is recommended.
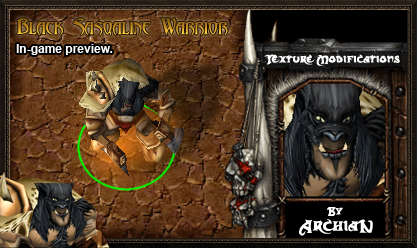
Here's my Sasqualine Warrior skin viewed ingame:
Creating Custom Skins
By Archian
Preface
I were just looking through some old text archives and stumbled over this half-finnished tutorial I once started. Thought I'd finnish it, but am now posting it here to get feedback and suggestions as I work further on this.
The title "Creating Custom Skins" isn't really correct, but people who wish to learn these things will probably be looking for a simillar title, isn't that right kids? A more suitable title would probably be "Editing Textures".
Click the images for larger versions.
Table of Content:
- What is Texturing?
- A Slightly Note
- Required Tools
- Extract and Convert .BLP to .TGA
- Texturing Techniques
- Convert .TGA to .BLP
- Import into the World Editor
- Alpha Corruption
- Using Multiple Skins on the Same Model
What is Texturing?
Texture mapping (a.k.a. "skinning") is a method for adding detail, surface texture, or colour to computer-generated graphics e.g. 3D models.
A texture map is applied (mapped) to the surface of a shape, or polygon.
This process is akin to applying patterned paper to a plain white box.
In this example, a texture of the Lich Blademaster model (created by Whitehorn) is applied to the model to create the illusion of color detail that would take very many additional polygons to realize otherwise.
This tutorial will take place as a starting-point regarding how to edit a texture for an existing 3D model (unit) within Warcraft 3.
Example, a total conversion of Arthas's face texture:
(Texture made by me)
A Slightly Note
Users at sites such as this or www.wc3campaigns.net, can upload custom created skins for others to download and use as a replacement for an existing unit within Warcraft. However, in order to get a skin approved; the resource submission must obey to certain criterias.
Mainly that the textures have been modified significantly, atleast 75% freehand created (usually estimated by the respective texture or resource moderators). "Freehand" indicates that techniques e.g. Hue / Saturation or CnP (Copy and Pasting) is prohibited.
The texture also needs to work properly in-game, that means no alpha corruption. And finally, since nobody wish to use flat/matte textures, the skins you create and put up for download should have decent lighting and shading
Required Tools
In order to do all the above mentioned, you should first acquire a few tools. So first things first, you need a image-editing program. Something like Photoshop, if you do not have Photoshop installed on your hard-drive, you can download a 30 days trial version for free:


| Adobe Photoshop, or simply Photoshop, is a graphics editor developed and published by Adobe Systems. It is the current market leader for commercial bitmap and image manipulation, and is the flagship product of Adobe Systems. It has been described as "an industry standard for graphics professionals." Although originally designed to edit images for paper-based printing, Photoshop can also be used for a wide range of other professional and amateur purposes. |
Paint Shop Pro or Fireworks is ideal as well. If you have none of these, you can download the GIMP for free.
Next, you need to download a Warcraft III 3rd party tool.
This is used to convert Warcraft image files (.BLP) into editable image files (such as .TGA, .JPG & .BMP).
I recommend that you generally work with .TGA rather than .BMP or .JPG (it's more suitable and most people do that).
 | Warcraft 3 Viewer [Recommended] |
- Can display MDX and BLP files
- Can export MDX or BLP files from the MPQ.
- Can convert BMP, JPG, TGA to BLP
- Can convert BLP to BMP, JPG, TGA
- Allows quality and depth settings during conversions
- Allows you to choose to view different .MPQ files (Such as War3.mpq and War3x.mpq)

- Model Viewer
- Model Editor
- Geoset Importing/Exporting
- Can save/load the model formats *.mdl and *.mdx
- Can save/load the texture formats *.bmp, *.tga, *.png, *.jpg, *.jpeg, *.pcx and *.blp
- Can import other model formats (importers stored in DLLs)
- Ability to convert between the model formats
- Ability to convert between the texture formats
- MPQ Browser (very fast loading)
- Support for custom listfiles
- Support for custom MPQ filters & icons
Extract and Convert .BLP to .TGA
We now need to get posession of the texture we want to edit. So, open up the Warcraft 3 Viewer.
Now, since I want to edit a texture from the Frozen Throne expansion I'm going to open the War3x.mpq.
Choose File | Open MPQ...
Then navigate to your Warcraft 3 folder (usually found under C:\Programs\Warcraft III) and select the War3x.mpq.
If you wanted to edit a texture from Warcraft III: Rain of Chaos it would be the War3.mpq.
Make sure that the Treeview is displayed. (Choose the View | Treeview window command or press Ctrl + H)
Browse the BLP or MDX files in the treeview and choose a unit you wish to reskin. I'm going to reskin the Beastmaster model.
If you browsed through the BLP files you can extract a texture, by right clicking it and select Extract (and Convert) BLP.
In my case, I browsed through the MDX files (just to see the texture wrapped on the model).
If you did it the same way I did, you can right click the file and select Extract (and convert) used textures...
Or choose Current File | Extract (and convert) used textures...
Then deselect all used textures except the Textures\BeastMaster.blp.
Then choose a folder you wish to extract the file to and click on the OK button.
Texturing Techniques
It is time to start texturing, yah!
Open the .TGA file with your image-editing program and start skinning.
It's always good to have an idea of what to make before you start something random, be creative.
Another good idea to start off with is choosing the basic colors for the texture, you will probably come to discover that as you gain more experience. Just remember, practice makes perfect.
Here's a few links which may prove useful:
- The Hive Workshop's 2D Art Tutorials
[*]Wc3Campaigns 2D Art Tutorials
[*]Skinning Techniques
[*]The TEXTURE TUTORIALS and FREE TEXTURES Thread - CGSociety
[*]Painting an eye (tutorial/exercise) - CGSociety
[*]http://www.furiae.com/tutorials.php
As a result of approximately 2 hours total of texturing, here is the outcome.
Convert .TGA to .BLP
.BLP files are texture files used by games made by Blizzard Entertainment.
.BLP graphics are used for Warcraft III, and are also stored within MPQs.
What we need to do now is to convert the .TGA file into a .BLP file format, so convert the file as follows:
Open the Warcraft 3 Viewer (if you havn't done so already).
Then click on Convert Files | BMP, TGA or JPG -> BLP CTRL+V, like so:
Then browse through your files and select your skin (in .TGA format).
Next, you will be able to set the quality / depth settings during the conversion (I usually go with 99%).
You're done! :emote_grin:
Now it's time to import your texture into the World Editor (thus playable ingame).
Import into the World Editor
Reading the tutorials stated below is recommended.
Here's my Sasqualine Warrior skin viewed ingame:
Last edited:


