- Joined
- Jul 20, 2004
- Messages
- 2,760
Modeling - Basics of Special Effects (SFX)
1. Introduction
At the time I am writing the tutorial, special effects are growing extremely popular in modeling. However, special effects have been an important part of unique projects ever since Warcraft 3 modding (and not only) has even existed. For example, a spell will hardly be attractive if it doesn’t look good, and instead of improvising with the already existent effects, it will have a greater impact if you add a totally new special effect.
2. Requirements
This tutorial is only for those who have 3dsmax with Art Tools (so 4 or 5 with Art Tools plug-in installed). I do not know how much knowledge you should have in modeling. Probably know how to work with max, but you won’t need to know a lot!
For editing the paths of the skins, in the case you are using in-game textures, you can check MDX Pather which can automatically change the paths even though the file is still in MDX format.
To extract in-game textures, I heartily suggest that you get Warcraft 3 viewer. Even though it has some problems when it comes to visualizing particles and ribbons, it is excellent for browsing through the Blizzard textures.
3. Getting Started
Okie dokie, there are a lot of things to tell but I will focus on the most important. In this chapter I will teach you the basics, such as creating basic meshes, giving them a material and then animating them. Keep in mind that this chapter must be mastered in order to go on, because the following areas will be more complex.
3.1 Getting the mesh running
Ok, some things about meshes. You should probably know that an object is made out of points (named vertices), which can be linked three by three to form triangles (or polies). The top and bottom (also named back & front) are considered different triangles. So sometimes you may have a single faced triangle, or other times you may want it with both the faces. Multiple triangles form a mesh.
Tip
Even though at first it may look completely random, there is a rule by which when creating a triangle you get the top or the bottom. If you look at the triangle you are about to create from above, if you click on the vertices (when creating the triangle) trigonometrically (anti-clockwise) the front is created. If you click on them anti-trigonometrically (clockwise) you get the bottom. That’s why sometimes when you may try to create a triangle, you may have the feeling that you messed something up and that is why the triangle was not created. In truth, you just created the back part of your triangle.
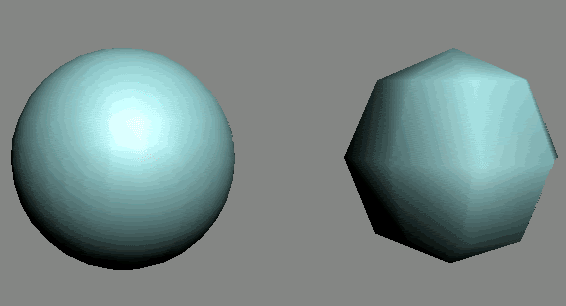
What’s great about 3dsmax is that you do not need to create your whole model polygon by polygon. The program can create some standard shapes (called primitives) for you, are they boxes, pyramids or even spheres. What’s great is that you can even choose how many triangles (polies) they should have. For example, a 32 segments sphere looks much smoother than one with only 8 segments. However, in-game, all these details are not that visible, and it’s best to keep in mind that polycount is important too. It’s easy to create high-poly models, but creating efficient models is true art. And in my opinion, going from 960 to 48 polies is worth losing some smoothness.
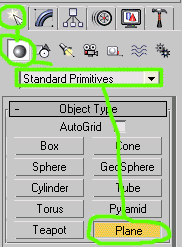
Since this is a special effects tutorial, I will focus mostly on planes. Even though many may laugh at the thought that you can create fantastic effects with planes, infact you can. Planes require very few polies (down to 2) and with a good texture are as good as a 3d models. With some tricks, you can create a sphere in no-time with just 1 plane. We shall get into details later. For now, let’s create a simple plain.
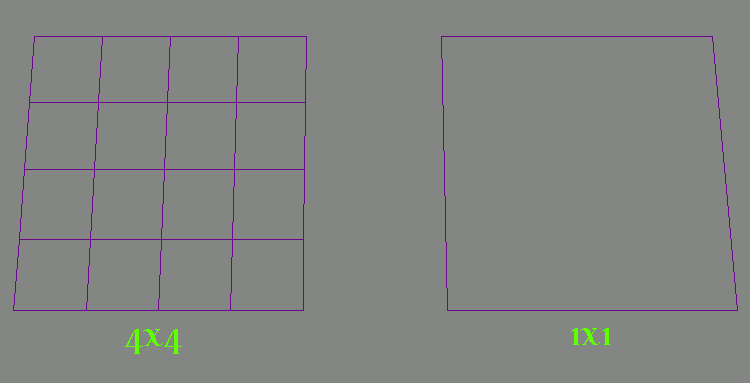
Let’s have a look at the parameters. We are interested in “Length Segs” and “Width Segs”. These parameters allow you to make your plane more complex, by splitting it into multiples squares. For now, we only need one simple square, so set these two to 1. Now draw your plane.
Now let’s turn it into a perfect square. Go to Modify panel, and change both Length and Width parameters to 140.0. To center your square, choose the “Select and move” tool and then at the bottom of the screen set the coordinates to X:0, Y:0, Z:0. Finally, let’s rotate the square so that it’s perpendicular to the ground. Select the “Select and Rotate” tool, and then rotate it 90 degrees on the X axis. Voila, it doesn’t look like a deadly skull but it is a good start for a SFX mesh.
3.2 Adding a texture
It’s time we turned our plane into something more appealing. To do so, we must first learn how to add a texture to the mesh. First we need to create a material. I can’t really give you a definition for it, but it practically interprets the texture in such a manner that it can go well with the model. There are some important properties of the materials that I must explain first.
Go to Rendering – Material Editor. A new window with a lot of spheres should appear. The window with the first sphere should be selected. The spheres are like a preview of how the material would look on a spherical model. We need to make our material compatible with warcraft 3. Click on the button on which “Standard” is written. Then from the list, pick “Warcraft 3”.
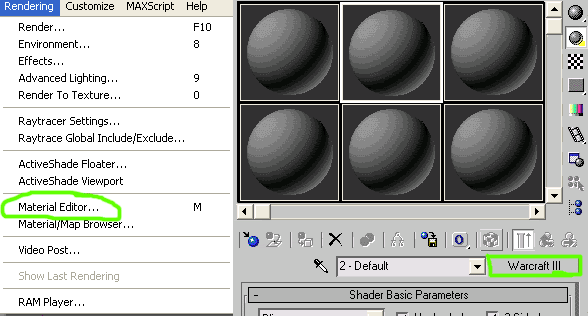
More checkboxes should have appeared in the menu. They are additional properties of the mesh. The most important are:
Unshaded – The texture has no shades on the model. Practically there are no shadows generated when the model appears in game. It is excellent for light effects and is extremely used when modeling SFXs.
2-Sided – If this is selected, even though the triangle has only one face (so no backfacing), when you give it a 2-sided material, both the sides are generated.
Unfogged – If active, the texture is no longer affected by the distance fog.
Now, for our effect you should select all three checkboxes. You can later experiment with them by unselecting one or another. Now, before attributing a texture to the material, click on the bar where you see “Extended Parameters” written. There isn’t much I can tell you about this panel. You can usually choose “Additive” if you want your material to turn the black parts of the texture transparent and generally turn your mesh ghostly-transparent. You will work a lot with this property, starting now. So set the advanced transparency from “Opaque” to “Additive”
And finally, let’s give our material a texture. First, let’s extract our texture. Use Warcraft 3 Viewer and grab (& convert to TGA) Textures\Rune1d.blp from war3.mpq archive. Click on empty square button near diffuse, choose Bitmap, and then search for the texture you’ve just extracted. Now, in the menu, click on the checker box (Show map in viewport). Finally select the material (the preview sphere) and drag it on the square you have just created.
Right now you should see that your texture appears on plane. However, it is not transparent, how come? That’s because 3dsmax cannot recognize Additive material. However, if you go to Utilities – More – Warcraft 3 preview, and click on Preview Model button (“Ok” all the error messages). You should now see something like this (I clicked on “X” to make the grid disappear).
This is a great start. However, keep in mind that right now you used the entire texture on the entire plane. You may later want to use only part of it and on a more complex shape. We’ll discuss a bit later about mapping.
3.3 Animations (part 1)
Right now, our effect looks quite dull. It is a really nice rune, and it could go well as a buff, but it is just too static. In order to make our model “move”, we need to animate it. In warcraft 3 there are three ways you can manipulate a mesh during animations: Move it, Rotate it, and Scale it. Scaling is the simplest, for it does not require any additional settings, so we’ll start with it.
What we will practically do is make our effect pulsate (increase-decrease in size). First, you need to know that animations on warcraft 3 models use keys. What do these keys do? Well, practically if you want to let’s say move a model from one corner of the grid to another, it is enough to set a key for its initial location, and the end point, where it must reach. All the points through which it must move are automatically assigned by the program. It’s quite the same with scaling. You can create a key with the object’s initial size, and then another one with the size after scaling it. Between the keys, the program will create all the intermediate phases through which the mesh must go in order to “grow”. Now what’s with that bar and all those lines and numbers at the bottom of the screen? Well, that’s where you will set the keys. Consider the bar as an axis of the time, and the numbers/lines as different moments. The in-game period of time between two nearby moments (or frames) is equal with 0.03 seconds. So, practically if your animation lasts between 0 and 20 (so 21 frames), it will last 0.66 seconds

Let’s think about our animation. I believe around 1.95 seconds are enough. 1.95/0.03=65. So our stand animation needs 65 frames (from 0 to 64). The timeline has 100 frames. To shorten it, right click on the “Go to end” button and change the “end time” to 64. Then click on “Ok”.
Great, now let’s make the rune pulsate. First click on “Auto Key”. It will automatically generate a new key when you scale/move/rotate your model. Go to frame 32, select the plane and set its scale value to 135.0. You should notice that two yellow squares have been created on the timeline. Those are the keys. Now we need one more key to rescale the rune to its initial size at the end of the animation. Go to frame 64 and scale it to a size of 100.0. Another key should appear.
Note: The color of keys is representative for the way you are manipulating the model. Therefore, yellow is for scaling, red is for moving and green is for rotation.
Now preview your model. You should see the rune pulsating. Congratulations, you have just made our first basic SFX. It is still very simple and has some problems, but it is a good start.
What may seem amazing to some of you is the fact that the animation cycles. Well, unless you specify that you do not want a non-looping animation, it will be considered as a repetitive one and so, you do not need to worry about it. However, keep in mind that cyclic animations need to have the first key equal with the last, or else it won’t really look like a cycle.
4. Pivot points and billboarding
If you checked you checked your model ingame (probably as a buff), you will notice that it rotates with the unit making it look ugly. Buff effects usually do not rotate when the character rotates. We can fix this by adding a billboard effect to our plane. What billboarding does is rotate the model with the camera, in such a manner that it looks the same watched from all directions. There are more types of billboarding, but before you can truly understand how it works, we need to focus a bit on pivot points.
While having selected an object, go to Hierarchy menu. Click on “Affect Pivot Only”. You should notice that three axis similar to those when you want to move the object appear at the center of the object. The point in which they intersect represents the pivot point of the object. Based on its position when moving the object, the coordinates on the lower part of the screen are actually its own coordinates. That is why sometimes in order to center an object in the scene, you will have to first center the pivot point. You can do this by clicking “Reset Pivot” button, while having “Affect Pivot Only” selected.
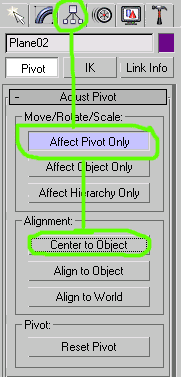
However, pivot points also have another important property, which relates them to billboarding. When rotating an object, you also involve pivot points. That’s because the object is actually rotated around based on where the pivot point around the center of the scene. That is why most of the objects when initially created will rotate around their own axis. In many cases it is more recommended to use bones (we will discuss them a bit later) than pivot points for animations, but in the case of the billboarding, there is no alternative.
So how does billboarding work? Well, full billboarding rotates the object with the camera no matter how the camera itself rotates. So whether you move on the X,Y or Z axis, the object “follows” you. The other type of billboardings act on a single axis. So how can you tell on which axis should you billboard your object? Hard to tell. Depends on your mesh. For example, our effect must definitely remain fixed regardless of the facing of the unit. If the unit moves, all attached effects rotate with it. We can prevent this to happen by activating billboarding on the Z axis. But if you view the unit from above, the plane will actually look like a plane. You may want to prevent this by activating a full billboarding.
Next question would probably be “why use billboarding when you can make an actual 3d model”? Simple. For most effects a single plane is enough. It saves a lot of space, a lot of memory, and is actually much more efficient than a dozens more polies. I heartily recommend that you combine planes with billboarding whenever possible.
5. Particle Emitters and Ribbons (part 1)
Let’s learn something interesting special for Warcraft models, and available only if you have Art Tools. If you feel your model too static, these new elements will surely make it a bit dynamic for you. Let’s see what they are and how we can use them.
a) Particle Emitters
What these do, is already mentioned in the name: they generate particles, more specific fully billboarded planes that are automatically generated from a rectangular area and spread into different directions. You can select from the angle of emission, size of particles, color, number and even speed.
To create a Blizzard particle emitter, go to Geometry – Particle Systems, and then select BlizPart. Draw the emitter just like a normal plane. Deselect, then go to Modify and click on the emitter again. First, let’s make it a square. In the menu, search for size options. Then change width and length to 25.00, each. Now center our emitter on the screen (like any other object, coordinates (0, 0, 0)).
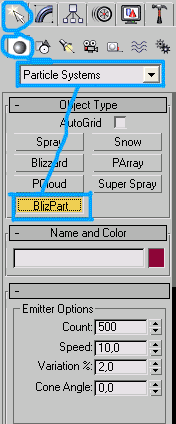
Preview the model. You should see the squares being emitted. They don’t look appealing, but we said the same thing about our rune too, didn’t we? Let’s add a texture. Extract star4.tga from War3x.mpq. Then in the particle’s properties search for Texture Filename and browse for the image you just extracted. Preview again. It looks better already, doesn’t it?
Ok, now the first problem you may have already noticed is the speed and number of particles. Aren’t they moving too fast and are simply too many? No problem. Lower their number by changing the value of the field Parts/Sec. 50.00 is a bit too high, so lower it to 10.00. Next, for the speed, I would go for 2.25. You can of course experiment with both these properties until you get what you are looking for. Now preview again. That’s more like it.
Now, the next problem we may be facing is the lifetime of the particles. You may want your particles to move slower yet last longer. Like in our case, I would go for 1.80. Preview again, and it should look even better.
Warning: Keep in mind that particles can boost the polycount of the model in no time. Each particle has 2 polies. To calculate the maximum polycount take the number of particles generated per second and multiply it with the lifetime of the particles. In our case, 10.00*1.80 = 18.00. Not bad.
Now let’s learn about angle of emission. We can change the value of Cone Angle field, and I heartily suggest that you do so for this effect. I gave it the maximum value, 180.00, making the emitter generate the particles in the shape of a sphere. Try it! Sometimes, when you increase the angle, you also increase the surface on which particles are generated, so you may want to increase the number of particles. I personally like it the way it is, in this case.
Now back to material properties, in most cases the particles may look faint, and if this is not the effect you want to obtain, you may consider turning on “unshaded” property. The planes will then ignore shadows. I did so for this model too.
Now, our particles look quite awkward compared to the rune. They are white while the rune is yellow. What do you say about turning the particles yellow too? You will notice three white squares under color. They determine the color of the particles in different stages. First stage is the “start” stage and it is the stage in which particles are created. You may want to give the particles a brighter yellow (243,233,174 in RGB). Next we have the “middle” stage which lasts the longest period of time and which takes place up to the point where particles start to fade. For this stage I choose a more intense yellow (247,209,0 in RGB). Last, the “end” stage takes place as the particles fade out, disappear. For this stage you may want to choose darker or less intense colors (in our case: 213,180,0 RGB). Test the model now. The particles are almost perfect.
Scaling our particles is another important property you need to learn. Sometimes you may just want to increase or decrease the particles in size, statically (same size from the point when they are generated, up to the point when they vanish). But other times, you may want their size to fluctuate (increase at start, decrease at the end). We may do that just now. Set a start value of 2.00, middle value of 12.00 and end value of 4.00. Once again, you may experiment with the properties as you like. I am mostly giving you an example.
There is one more thing you may not notice unless you try your effect ingame (and you may want to try and do so right now). As the particles are right now, if the effect is attached, let's say... to a unit, and that unit moves, it will leave the particles behind. You may, or you may not want that to happen. For this effect, I prefer to have the particles actually follow the effect. You can do back by checking “particles in model space”. That way, every time you move the emitter, the particles follow it (even if it is model animation, or ingame movement).
There. You now know have the basics of particle emitters. They will most likely spice your effects by adding an extra you seek and sometimes do not know how to obtain. However, keep in mind that particles are one of the most poly-boosting methods in special effects. Even if sometimes a lot of particles may look awesome, keep in mind that they still “cost” polies, even though you cannot count them with the polygon counter.
b) Ribbons (part 1)
Unlike Particle Emitters, Ribbons are effects generated by moving the object itself. What a ribbon does is leave a trace behind, everytime it is moved (either through animations, or ingame). To create a ribbon go to Helpers – BlizzRibbon. Center it to the object too. Now go to properties and first thing to do is change the Vertex Color to White. Black as it is, the model is invisible, as you’re going to use an additive material.

For the material, create a Warcraft 3 one, double sided, unshaded, and additive. As a texture, use Demon_Rune_RibbonB from war3x.mpq. Name the material Ribbon_Runes. Now back to the properties of our ribbon click on the button under Material. At the radio boxes from the left, select Mtl Editor, and choose the material you just created.
Warning: Next time you want to create a new Warcraft material in the material editor, you will need to change back to “New” from the same menu.
As the ribbon is not animated (and you do not know yet how to do that), you may only test it ingame, by attaching the effect on a unit and moving that unit. If you do so, you will see the rune trace it leaves. But we are going to get back to ribbons after we learn how to make animations by rotation. Only then we can actually preview and modify the ribbon as well like, in the previewer.
6. Animations (part 2)
Last time we talked about animations we learned how to scale a model. That way easy and required no advanced knowledge. However, as rotation and movement are not possible simply by creating keyframes, we need to modify some more properties.
First, let’s study the concept of bone. We already know that a pivot point is the center of the object, and that when we rotate the object we rotate around that pivot point. So yes, if you do not want to rotate an object around its axis, you can change its pivot point. But what if you want to keep the pivot point centered because of billboarding? No problem, in that case (infact, not only then, I never do pivot point animation), you can use bones.
What are bones? They are meshes which act as pivot points and allow you to rotate, scale or move objects along with them. All will use as a reference the pivot point of the bone, instead of the one of the object. Animating the object does not affect the bone, but animating the bone automatically animates all objects linked to it.
What is a bone? A plain box which has the “bone” property, in the user property editor. That way, the animations of the box will be taken in consideration, but it won’t be rendered (will not appear, therefore does not need a texture or a specific shape). Create a bone now.
Now, to link the object to the bone, select the “Select and Link” tool, then click on the ribbon, and drag it to the box. Now try moving the box. If the ribbon mimics the movement, you’ve done it! If not, try again. Keep in mind that you need to drag from the ribbon to the bone. If you succeed, some white corners will appear around the box for a second (as if it were selected for a second).
Now center our bone, as we will be rotating our ribbon around the rune. Next, correctly place the ribbon to its initial position (80,0,0). Before we can start rotating the bone, we need to change one more setting. Select the bone, then go to Motion – Assign Controllers and select “Rotation”. Click on the squared button above, and select TCB Rotation. If you want to move an object, you may consider doing the same thing for “Position”. Why? Because Warcraft 3 engine does not recognize the initial system of animations.
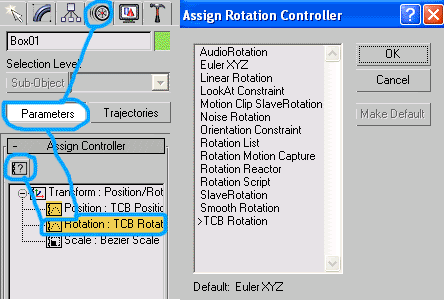
Note: When rotating a model, never attempt to rotate it more than (or atleast) 90.00 degrees between two keyframes, as the system may interpret it wrongly. Split the rotation into multiple keyframes if you have to.
Since the animation repeats, rotating the ribbon 360 degrees once (or twice, depends how fast you want it) should do it, for the looping will then take care of repeating it for you. So, click on the bone, and start rotating it 45 degrees by 45 degrees, on the Y axis. You have 64 frames (frame 0 has to be equal with frame 64 because we have a cycle), and a rotation is equal with 360/45 = 8 keyframes. If you want a rotation, it’s 64/8=8 (distance between two frames), while if you want tow rotations, it will be 64/16=4 (distance between two frames). I chose to spin it twice but it’s up to you.
You can rotate it clockwise, or anti-clockwise (I chose clockwise). It may be a little bit tough at first, but you will get the hang of it in time. You will notice that the keyframes (clockwise example) should have the values 0, 45, 90, 135, -180, -135, -90, -45 and 0. What happens is that rotation values cannot go over 180, because negative values have to be used as well (incase you start rotating the model and you should get negative values).
Note: Sometimes it may be difficult to combine multiple parts of the animation (loops, scaling, movements)
7. Particle Emitters and Ribbons (part 2)
Now we can clearly see our ribbon, and it surely doesn’t look that great. It’s far too big and… simply forms a circle (not to mention that it’s a very ugly circle). We will need to work on size, lifetime and complexity. Let’s start with the size. You will notice that the ribbon is created both to the left and the right of the center axis (above and below). The Above and Below fields determine the size of the ribbon. At the moment, it is obnoxiously high (40). Let’s lower it down to 12, so it would be 6 to above, and 6 to below. You can also stick 6 to above and 0 to below or vice-versa. You choose.
Now let’s work on the duration of the edges. The “tail” surely lasts long. How about setting its lifetime to 0.5 for double speed (two loops in 64 frames)? Keep in mind that duration may depend on how fast you spin the ribbon (which depends on the distance between two keyframes of the animation of the bone of course). So experiment with it yourself and see what you get.
Lastly, we are interested in the detail of the ribbon. Edges are practically parts of the ribbon. When rotating it you can see them clearer, they are planes one in the tail of the other generating the whole ribbon tail. Therefore, each edge equals 2 polies. Polycount can be estimated just like for emitters (number of edges per second * edge lifetime). And just like for duration, the number of edges may also depend on the speed with which you move the ribbon. For the double speed version, I’d go for 35 per second.
Now it will look crystal. You may want to check the behavior of the ribbon when placing the effect on a unit moving. Lastly, I would billboard the ribbon too. To do so, first you will have to group the bone and the ribbon together (select both of them and then go to Group – Group). Center the pivot point of the group to the center of the scene, and then fully billboard the group. There you go!
As we’ve reached the right chapter, I believe you can also experiment with emitter ribbons. Check my tutorial here.
8. Final Notes
I believe we’ve studied enough for now. You should have the bases to create some basic effects. You can experiment now with planes, animations, ribbons and emitters in order to obtain some decent scratch effects. There may be a lot of things to add, but if I remember anything basic that could belong here, I will update this tutorial.
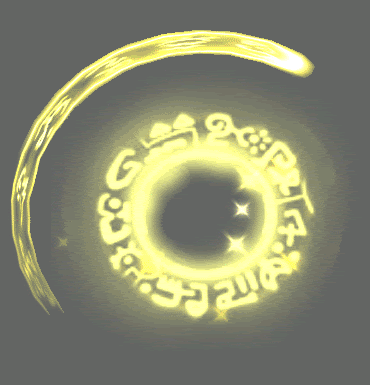
Do not expect to be able to make effects after you’ve read this tutorial. You need a lot of practice before you can do so. With time, it will become easier and easier for you. Sometimes you may need to reread several chapters or parts multiple times before you can understand certain concepts. If you have any questions or suggestions, post them here. I have also attached the model we have been making during this tutorial so you can examine it too. Have fun modeling.
~Daelin
1. Introduction
At the time I am writing the tutorial, special effects are growing extremely popular in modeling. However, special effects have been an important part of unique projects ever since Warcraft 3 modding (and not only) has even existed. For example, a spell will hardly be attractive if it doesn’t look good, and instead of improvising with the already existent effects, it will have a greater impact if you add a totally new special effect.
2. Requirements
This tutorial is only for those who have 3dsmax with Art Tools (so 4 or 5 with Art Tools plug-in installed). I do not know how much knowledge you should have in modeling. Probably know how to work with max, but you won’t need to know a lot!
For editing the paths of the skins, in the case you are using in-game textures, you can check MDX Pather which can automatically change the paths even though the file is still in MDX format.
To extract in-game textures, I heartily suggest that you get Warcraft 3 viewer. Even though it has some problems when it comes to visualizing particles and ribbons, it is excellent for browsing through the Blizzard textures.
3. Getting Started
Okie dokie, there are a lot of things to tell but I will focus on the most important. In this chapter I will teach you the basics, such as creating basic meshes, giving them a material and then animating them. Keep in mind that this chapter must be mastered in order to go on, because the following areas will be more complex.
3.1 Getting the mesh running
Ok, some things about meshes. You should probably know that an object is made out of points (named vertices), which can be linked three by three to form triangles (or polies). The top and bottom (also named back & front) are considered different triangles. So sometimes you may have a single faced triangle, or other times you may want it with both the faces. Multiple triangles form a mesh.
Tip
Even though at first it may look completely random, there is a rule by which when creating a triangle you get the top or the bottom. If you look at the triangle you are about to create from above, if you click on the vertices (when creating the triangle) trigonometrically (anti-clockwise) the front is created. If you click on them anti-trigonometrically (clockwise) you get the bottom. That’s why sometimes when you may try to create a triangle, you may have the feeling that you messed something up and that is why the triangle was not created. In truth, you just created the back part of your triangle.
What’s great about 3dsmax is that you do not need to create your whole model polygon by polygon. The program can create some standard shapes (called primitives) for you, are they boxes, pyramids or even spheres. What’s great is that you can even choose how many triangles (polies) they should have. For example, a 32 segments sphere looks much smoother than one with only 8 segments. However, in-game, all these details are not that visible, and it’s best to keep in mind that polycount is important too. It’s easy to create high-poly models, but creating efficient models is true art. And in my opinion, going from 960 to 48 polies is worth losing some smoothness.

Since this is a special effects tutorial, I will focus mostly on planes. Even though many may laugh at the thought that you can create fantastic effects with planes, infact you can. Planes require very few polies (down to 2) and with a good texture are as good as a 3d models. With some tricks, you can create a sphere in no-time with just 1 plane. We shall get into details later. For now, let’s create a simple plain.

Let’s have a look at the parameters. We are interested in “Length Segs” and “Width Segs”. These parameters allow you to make your plane more complex, by splitting it into multiples squares. For now, we only need one simple square, so set these two to 1. Now draw your plane.

Now let’s turn it into a perfect square. Go to Modify panel, and change both Length and Width parameters to 140.0. To center your square, choose the “Select and move” tool and then at the bottom of the screen set the coordinates to X:0, Y:0, Z:0. Finally, let’s rotate the square so that it’s perpendicular to the ground. Select the “Select and Rotate” tool, and then rotate it 90 degrees on the X axis. Voila, it doesn’t look like a deadly skull but it is a good start for a SFX mesh.
3.2 Adding a texture
It’s time we turned our plane into something more appealing. To do so, we must first learn how to add a texture to the mesh. First we need to create a material. I can’t really give you a definition for it, but it practically interprets the texture in such a manner that it can go well with the model. There are some important properties of the materials that I must explain first.
Go to Rendering – Material Editor. A new window with a lot of spheres should appear. The window with the first sphere should be selected. The spheres are like a preview of how the material would look on a spherical model. We need to make our material compatible with warcraft 3. Click on the button on which “Standard” is written. Then from the list, pick “Warcraft 3”.

More checkboxes should have appeared in the menu. They are additional properties of the mesh. The most important are:
Unshaded – The texture has no shades on the model. Practically there are no shadows generated when the model appears in game. It is excellent for light effects and is extremely used when modeling SFXs.
2-Sided – If this is selected, even though the triangle has only one face (so no backfacing), when you give it a 2-sided material, both the sides are generated.
Unfogged – If active, the texture is no longer affected by the distance fog.
Now, for our effect you should select all three checkboxes. You can later experiment with them by unselecting one or another. Now, before attributing a texture to the material, click on the bar where you see “Extended Parameters” written. There isn’t much I can tell you about this panel. You can usually choose “Additive” if you want your material to turn the black parts of the texture transparent and generally turn your mesh ghostly-transparent. You will work a lot with this property, starting now. So set the advanced transparency from “Opaque” to “Additive”
And finally, let’s give our material a texture. First, let’s extract our texture. Use Warcraft 3 Viewer and grab (& convert to TGA) Textures\Rune1d.blp from war3.mpq archive. Click on empty square button near diffuse, choose Bitmap, and then search for the texture you’ve just extracted. Now, in the menu, click on the checker box (Show map in viewport). Finally select the material (the preview sphere) and drag it on the square you have just created.
Right now you should see that your texture appears on plane. However, it is not transparent, how come? That’s because 3dsmax cannot recognize Additive material. However, if you go to Utilities – More – Warcraft 3 preview, and click on Preview Model button (“Ok” all the error messages). You should now see something like this (I clicked on “X” to make the grid disappear).
This is a great start. However, keep in mind that right now you used the entire texture on the entire plane. You may later want to use only part of it and on a more complex shape. We’ll discuss a bit later about mapping.
3.3 Animations (part 1)
Right now, our effect looks quite dull. It is a really nice rune, and it could go well as a buff, but it is just too static. In order to make our model “move”, we need to animate it. In warcraft 3 there are three ways you can manipulate a mesh during animations: Move it, Rotate it, and Scale it. Scaling is the simplest, for it does not require any additional settings, so we’ll start with it.
What we will practically do is make our effect pulsate (increase-decrease in size). First, you need to know that animations on warcraft 3 models use keys. What do these keys do? Well, practically if you want to let’s say move a model from one corner of the grid to another, it is enough to set a key for its initial location, and the end point, where it must reach. All the points through which it must move are automatically assigned by the program. It’s quite the same with scaling. You can create a key with the object’s initial size, and then another one with the size after scaling it. Between the keys, the program will create all the intermediate phases through which the mesh must go in order to “grow”. Now what’s with that bar and all those lines and numbers at the bottom of the screen? Well, that’s where you will set the keys. Consider the bar as an axis of the time, and the numbers/lines as different moments. The in-game period of time between two nearby moments (or frames) is equal with 0.03 seconds. So, practically if your animation lasts between 0 and 20 (so 21 frames), it will last 0.66 seconds

Let’s think about our animation. I believe around 1.95 seconds are enough. 1.95/0.03=65. So our stand animation needs 65 frames (from 0 to 64). The timeline has 100 frames. To shorten it, right click on the “Go to end” button and change the “end time” to 64. Then click on “Ok”.
Great, now let’s make the rune pulsate. First click on “Auto Key”. It will automatically generate a new key when you scale/move/rotate your model. Go to frame 32, select the plane and set its scale value to 135.0. You should notice that two yellow squares have been created on the timeline. Those are the keys. Now we need one more key to rescale the rune to its initial size at the end of the animation. Go to frame 64 and scale it to a size of 100.0. Another key should appear.
Note: The color of keys is representative for the way you are manipulating the model. Therefore, yellow is for scaling, red is for moving and green is for rotation.
Now preview your model. You should see the rune pulsating. Congratulations, you have just made our first basic SFX. It is still very simple and has some problems, but it is a good start.
What may seem amazing to some of you is the fact that the animation cycles. Well, unless you specify that you do not want a non-looping animation, it will be considered as a repetitive one and so, you do not need to worry about it. However, keep in mind that cyclic animations need to have the first key equal with the last, or else it won’t really look like a cycle.
4. Pivot points and billboarding
If you checked you checked your model ingame (probably as a buff), you will notice that it rotates with the unit making it look ugly. Buff effects usually do not rotate when the character rotates. We can fix this by adding a billboard effect to our plane. What billboarding does is rotate the model with the camera, in such a manner that it looks the same watched from all directions. There are more types of billboarding, but before you can truly understand how it works, we need to focus a bit on pivot points.
While having selected an object, go to Hierarchy menu. Click on “Affect Pivot Only”. You should notice that three axis similar to those when you want to move the object appear at the center of the object. The point in which they intersect represents the pivot point of the object. Based on its position when moving the object, the coordinates on the lower part of the screen are actually its own coordinates. That is why sometimes in order to center an object in the scene, you will have to first center the pivot point. You can do this by clicking “Reset Pivot” button, while having “Affect Pivot Only” selected.

However, pivot points also have another important property, which relates them to billboarding. When rotating an object, you also involve pivot points. That’s because the object is actually rotated around based on where the pivot point around the center of the scene. That is why most of the objects when initially created will rotate around their own axis. In many cases it is more recommended to use bones (we will discuss them a bit later) than pivot points for animations, but in the case of the billboarding, there is no alternative.
So how does billboarding work? Well, full billboarding rotates the object with the camera no matter how the camera itself rotates. So whether you move on the X,Y or Z axis, the object “follows” you. The other type of billboardings act on a single axis. So how can you tell on which axis should you billboard your object? Hard to tell. Depends on your mesh. For example, our effect must definitely remain fixed regardless of the facing of the unit. If the unit moves, all attached effects rotate with it. We can prevent this to happen by activating billboarding on the Z axis. But if you view the unit from above, the plane will actually look like a plane. You may want to prevent this by activating a full billboarding.
Next question would probably be “why use billboarding when you can make an actual 3d model”? Simple. For most effects a single plane is enough. It saves a lot of space, a lot of memory, and is actually much more efficient than a dozens more polies. I heartily recommend that you combine planes with billboarding whenever possible.
5. Particle Emitters and Ribbons (part 1)
Let’s learn something interesting special for Warcraft models, and available only if you have Art Tools. If you feel your model too static, these new elements will surely make it a bit dynamic for you. Let’s see what they are and how we can use them.
a) Particle Emitters
What these do, is already mentioned in the name: they generate particles, more specific fully billboarded planes that are automatically generated from a rectangular area and spread into different directions. You can select from the angle of emission, size of particles, color, number and even speed.
To create a Blizzard particle emitter, go to Geometry – Particle Systems, and then select BlizPart. Draw the emitter just like a normal plane. Deselect, then go to Modify and click on the emitter again. First, let’s make it a square. In the menu, search for size options. Then change width and length to 25.00, each. Now center our emitter on the screen (like any other object, coordinates (0, 0, 0)).

Preview the model. You should see the squares being emitted. They don’t look appealing, but we said the same thing about our rune too, didn’t we? Let’s add a texture. Extract star4.tga from War3x.mpq. Then in the particle’s properties search for Texture Filename and browse for the image you just extracted. Preview again. It looks better already, doesn’t it?
Ok, now the first problem you may have already noticed is the speed and number of particles. Aren’t they moving too fast and are simply too many? No problem. Lower their number by changing the value of the field Parts/Sec. 50.00 is a bit too high, so lower it to 10.00. Next, for the speed, I would go for 2.25. You can of course experiment with both these properties until you get what you are looking for. Now preview again. That’s more like it.
Now, the next problem we may be facing is the lifetime of the particles. You may want your particles to move slower yet last longer. Like in our case, I would go for 1.80. Preview again, and it should look even better.
Warning: Keep in mind that particles can boost the polycount of the model in no time. Each particle has 2 polies. To calculate the maximum polycount take the number of particles generated per second and multiply it with the lifetime of the particles. In our case, 10.00*1.80 = 18.00. Not bad.
Now let’s learn about angle of emission. We can change the value of Cone Angle field, and I heartily suggest that you do so for this effect. I gave it the maximum value, 180.00, making the emitter generate the particles in the shape of a sphere. Try it! Sometimes, when you increase the angle, you also increase the surface on which particles are generated, so you may want to increase the number of particles. I personally like it the way it is, in this case.
Now back to material properties, in most cases the particles may look faint, and if this is not the effect you want to obtain, you may consider turning on “unshaded” property. The planes will then ignore shadows. I did so for this model too.
Now, our particles look quite awkward compared to the rune. They are white while the rune is yellow. What do you say about turning the particles yellow too? You will notice three white squares under color. They determine the color of the particles in different stages. First stage is the “start” stage and it is the stage in which particles are created. You may want to give the particles a brighter yellow (243,233,174 in RGB). Next we have the “middle” stage which lasts the longest period of time and which takes place up to the point where particles start to fade. For this stage I choose a more intense yellow (247,209,0 in RGB). Last, the “end” stage takes place as the particles fade out, disappear. For this stage you may want to choose darker or less intense colors (in our case: 213,180,0 RGB). Test the model now. The particles are almost perfect.
Scaling our particles is another important property you need to learn. Sometimes you may just want to increase or decrease the particles in size, statically (same size from the point when they are generated, up to the point when they vanish). But other times, you may want their size to fluctuate (increase at start, decrease at the end). We may do that just now. Set a start value of 2.00, middle value of 12.00 and end value of 4.00. Once again, you may experiment with the properties as you like. I am mostly giving you an example.
There is one more thing you may not notice unless you try your effect ingame (and you may want to try and do so right now). As the particles are right now, if the effect is attached, let's say... to a unit, and that unit moves, it will leave the particles behind. You may, or you may not want that to happen. For this effect, I prefer to have the particles actually follow the effect. You can do back by checking “particles in model space”. That way, every time you move the emitter, the particles follow it (even if it is model animation, or ingame movement).
There. You now know have the basics of particle emitters. They will most likely spice your effects by adding an extra you seek and sometimes do not know how to obtain. However, keep in mind that particles are one of the most poly-boosting methods in special effects. Even if sometimes a lot of particles may look awesome, keep in mind that they still “cost” polies, even though you cannot count them with the polygon counter.
b) Ribbons (part 1)
Unlike Particle Emitters, Ribbons are effects generated by moving the object itself. What a ribbon does is leave a trace behind, everytime it is moved (either through animations, or ingame). To create a ribbon go to Helpers – BlizzRibbon. Center it to the object too. Now go to properties and first thing to do is change the Vertex Color to White. Black as it is, the model is invisible, as you’re going to use an additive material.

For the material, create a Warcraft 3 one, double sided, unshaded, and additive. As a texture, use Demon_Rune_RibbonB from war3x.mpq. Name the material Ribbon_Runes. Now back to the properties of our ribbon click on the button under Material. At the radio boxes from the left, select Mtl Editor, and choose the material you just created.
Warning: Next time you want to create a new Warcraft material in the material editor, you will need to change back to “New” from the same menu.
As the ribbon is not animated (and you do not know yet how to do that), you may only test it ingame, by attaching the effect on a unit and moving that unit. If you do so, you will see the rune trace it leaves. But we are going to get back to ribbons after we learn how to make animations by rotation. Only then we can actually preview and modify the ribbon as well like, in the previewer.
6. Animations (part 2)
Last time we talked about animations we learned how to scale a model. That way easy and required no advanced knowledge. However, as rotation and movement are not possible simply by creating keyframes, we need to modify some more properties.
First, let’s study the concept of bone. We already know that a pivot point is the center of the object, and that when we rotate the object we rotate around that pivot point. So yes, if you do not want to rotate an object around its axis, you can change its pivot point. But what if you want to keep the pivot point centered because of billboarding? No problem, in that case (infact, not only then, I never do pivot point animation), you can use bones.
What are bones? They are meshes which act as pivot points and allow you to rotate, scale or move objects along with them. All will use as a reference the pivot point of the bone, instead of the one of the object. Animating the object does not affect the bone, but animating the bone automatically animates all objects linked to it.
What is a bone? A plain box which has the “bone” property, in the user property editor. That way, the animations of the box will be taken in consideration, but it won’t be rendered (will not appear, therefore does not need a texture or a specific shape). Create a bone now.
Now, to link the object to the bone, select the “Select and Link” tool, then click on the ribbon, and drag it to the box. Now try moving the box. If the ribbon mimics the movement, you’ve done it! If not, try again. Keep in mind that you need to drag from the ribbon to the bone. If you succeed, some white corners will appear around the box for a second (as if it were selected for a second).
Now center our bone, as we will be rotating our ribbon around the rune. Next, correctly place the ribbon to its initial position (80,0,0). Before we can start rotating the bone, we need to change one more setting. Select the bone, then go to Motion – Assign Controllers and select “Rotation”. Click on the squared button above, and select TCB Rotation. If you want to move an object, you may consider doing the same thing for “Position”. Why? Because Warcraft 3 engine does not recognize the initial system of animations.

Note: When rotating a model, never attempt to rotate it more than (or atleast) 90.00 degrees between two keyframes, as the system may interpret it wrongly. Split the rotation into multiple keyframes if you have to.
Since the animation repeats, rotating the ribbon 360 degrees once (or twice, depends how fast you want it) should do it, for the looping will then take care of repeating it for you. So, click on the bone, and start rotating it 45 degrees by 45 degrees, on the Y axis. You have 64 frames (frame 0 has to be equal with frame 64 because we have a cycle), and a rotation is equal with 360/45 = 8 keyframes. If you want a rotation, it’s 64/8=8 (distance between two frames), while if you want tow rotations, it will be 64/16=4 (distance between two frames). I chose to spin it twice but it’s up to you.
You can rotate it clockwise, or anti-clockwise (I chose clockwise). It may be a little bit tough at first, but you will get the hang of it in time. You will notice that the keyframes (clockwise example) should have the values 0, 45, 90, 135, -180, -135, -90, -45 and 0. What happens is that rotation values cannot go over 180, because negative values have to be used as well (incase you start rotating the model and you should get negative values).
Note: Sometimes it may be difficult to combine multiple parts of the animation (loops, scaling, movements)
7. Particle Emitters and Ribbons (part 2)
Now we can clearly see our ribbon, and it surely doesn’t look that great. It’s far too big and… simply forms a circle (not to mention that it’s a very ugly circle). We will need to work on size, lifetime and complexity. Let’s start with the size. You will notice that the ribbon is created both to the left and the right of the center axis (above and below). The Above and Below fields determine the size of the ribbon. At the moment, it is obnoxiously high (40). Let’s lower it down to 12, so it would be 6 to above, and 6 to below. You can also stick 6 to above and 0 to below or vice-versa. You choose.
Now let’s work on the duration of the edges. The “tail” surely lasts long. How about setting its lifetime to 0.5 for double speed (two loops in 64 frames)? Keep in mind that duration may depend on how fast you spin the ribbon (which depends on the distance between two keyframes of the animation of the bone of course). So experiment with it yourself and see what you get.
Lastly, we are interested in the detail of the ribbon. Edges are practically parts of the ribbon. When rotating it you can see them clearer, they are planes one in the tail of the other generating the whole ribbon tail. Therefore, each edge equals 2 polies. Polycount can be estimated just like for emitters (number of edges per second * edge lifetime). And just like for duration, the number of edges may also depend on the speed with which you move the ribbon. For the double speed version, I’d go for 35 per second.
Now it will look crystal. You may want to check the behavior of the ribbon when placing the effect on a unit moving. Lastly, I would billboard the ribbon too. To do so, first you will have to group the bone and the ribbon together (select both of them and then go to Group – Group). Center the pivot point of the group to the center of the scene, and then fully billboard the group. There you go!
As we’ve reached the right chapter, I believe you can also experiment with emitter ribbons. Check my tutorial here.
8. Final Notes
I believe we’ve studied enough for now. You should have the bases to create some basic effects. You can experiment now with planes, animations, ribbons and emitters in order to obtain some decent scratch effects. There may be a lot of things to add, but if I remember anything basic that could belong here, I will update this tutorial.

Do not expect to be able to make effects after you’ve read this tutorial. You need a lot of practice before you can do so. With time, it will become easier and easier for you. Sometimes you may need to reread several chapters or parts multiple times before you can understand certain concepts. If you have any questions or suggestions, post them here. I have also attached the model we have been making during this tutorial so you can examine it too. Have fun modeling.
~Daelin
Attachments
Last edited:


