- Joined
- Jun 3, 2005
- Messages
- 6,982
What you need to know before using this tutorial for full efficiency!
The Base texture/form. The thing you want to bandage.
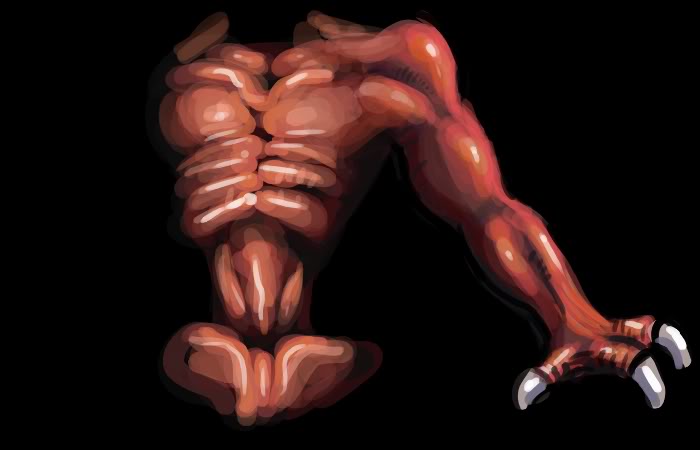
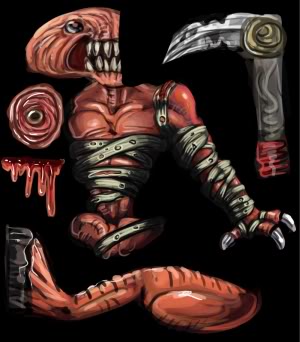
Okay, let's start with an example base. Yours may be all drawn like mine, yours may be the base of blizzards or such. In this case, I whipped up a quick demon creature that has the usual unwrap layout Blizzard makes. Its quick obvious the base here is an example, I do hope you use something more refined, this is also blown up and thus will look better shrunk or on a model.
Understanding the most common light source
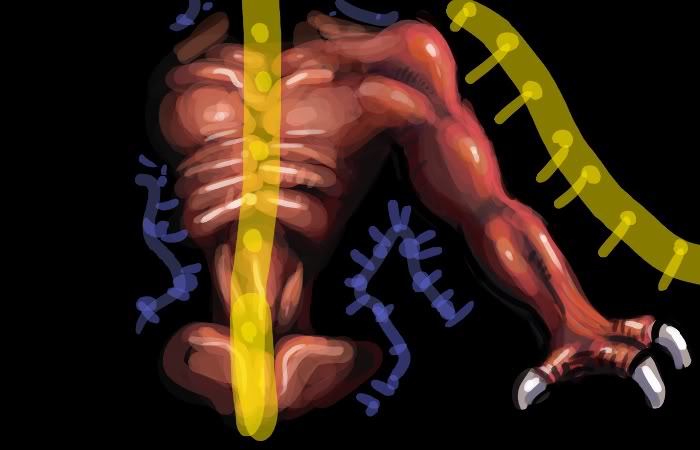
Now, a key thing BEFORE you go as mad as a hatter, is to PLAN and KNOW your light sources. In most wc3 unwraps/textures, the light sources are much like this (if its this unwrap layout). Alot of people forget that textures are NOT directly at front or they just have it all over the place. You have to take into consideration of the models default form WITH its texture ingame and see where the light source should be and where shadows should be placed.
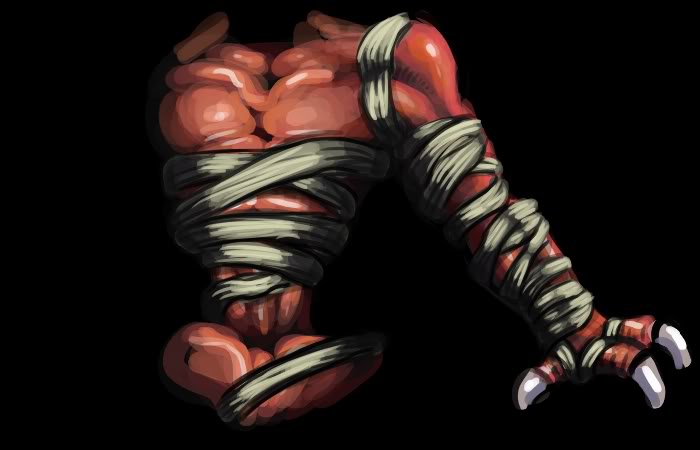
1)Start off with drawing the solid colour for your bandages, could be any colour, just make sure its abit darkened and grayed out. No one wants rave bandages unless ...you want that :/...

2)Now. Go under the layer of the badges with a low opacity shadow. Dont go overboard, be abit subtle, it just makes it seem abit more connected with the creature/unit/person being bandaged.

3) Now that's done, grab a shadow colour, remember, don't make it too different from the thing you are texturing, use a similar shadow value/tone/colour so it blends into together and doesn't pop out.

4)Now just quickly draw over some lineart for the bandages, doesn't have to be perfect, this is just to give you an idea of where you are going.

5)Grab a lighter colour than the base of the bandages, not too bright/light remember. Go over the central parts of the bandages or parts that stick out due to the light. Remember to keep in mind the muscles and form of the thing you are adding bandages too. The key here is to remember that the bandages are NOT floating foriegn objects, but something that is suppose to be within, around, over and not simply "floating above aimlessly".

6) Lets start that again, but this time with a lighter colour, but keep the application far more less in terms of radius compared to the step above so it gives the illusion of a shade gradient to compliment form and light.

7) Grab a dark colour, not TOTALLY BLACK or TOO THICK, try to use something abit soft and with abit of colour that relates to the bandages or the thing you are bandaging. Now go over the bandages like you did with the first lineart, but this time be more focused and detailed, add abit of crinkles on the parts that seem to be in more of the shadow, don't go overboard.

8) Use a lighter brush to compliment the highlights of the bandages crinkles, try to make some of the highlights lean over the shadows, but be subtle. Use a lot of it where light seems to be formed or is strongest.

9) Have a look..does it look a bit dull/blurry and such? Then go over some areas with a dark lineart brush that seem to be weak or need distinction.

Finished! Or..is it?
Here is what you should have ....If you want clean bandages that's fine, if you want to know to make holes and wounds then look below.
1)Draw the lineart of the holes, yet again, not too thick or dark.

2) Once that is done, grab a light brush and go "around" the holes, but not completely, still keep in mind of the form+shadows+tone.

3) Compliment what is in the holes by leaving bare bandage (simply leave it, its already toned) OR draw in some exposed flesh or what is beneath. Keep in mind, you have to be consistent, one bandage strap just by itself wont have a magically appearing bandage seen through the hole. If its obvious there are bandages overlapped, then make it apparent when using the holes.

1) Want blood? Then draw a dark red fill in the bandages hole or tear.

2) Now draw a shadow around the flesh/wound. This is because light will be in the middle as its a hole and thus the middle should be the brightest part.

3) Simply get a solid SMALL brush and draw subtle lines or dots to mimic highlights as flesh when fresh is shiny and moist.

4) For a finishing touch, use a medium opacity brush with dark red and draw around the wound on the bandages. Remember, when blood or liquid soaks into material like bandages (that isn't very white), they will have a darker addition to the red. Use the multiply layer to bring this out a bit.

Done? Its up to you ...This is a quick and cartoony method, experiment and take time to make it more realistic or to your feel.
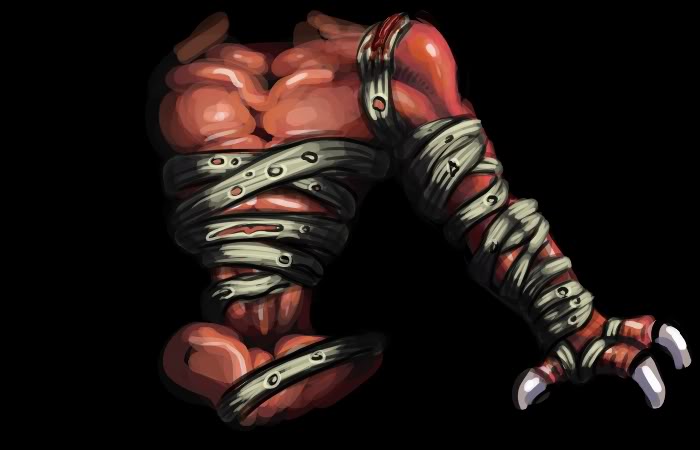
Here is an example of what it will look like on a more finished unwrap (fake unwrap made, no model)
- Understand form, figure and anatomy
- Understand light sources and tonal values
- Understand the overlapping of objects.
The Base texture/form. The thing you want to bandage.
Okay, let's start with an example base. Yours may be all drawn like mine, yours may be the base of blizzards or such. In this case, I whipped up a quick demon creature that has the usual unwrap layout Blizzard makes. Its quick obvious the base here is an example, I do hope you use something more refined, this is also blown up and thus will look better shrunk or on a model.
Understanding the most common light source
Now, a key thing BEFORE you go as mad as a hatter, is to PLAN and KNOW your light sources. In most wc3 unwraps/textures, the light sources are much like this (if its this unwrap layout). Alot of people forget that textures are NOT directly at front or they just have it all over the place. You have to take into consideration of the models default form WITH its texture ingame and see where the light source should be and where shadows should be placed.
1)Start off with drawing the solid colour for your bandages, could be any colour, just make sure its abit darkened and grayed out. No one wants rave bandages unless ...you want that :/...

2)Now. Go under the layer of the badges with a low opacity shadow. Dont go overboard, be abit subtle, it just makes it seem abit more connected with the creature/unit/person being bandaged.

3) Now that's done, grab a shadow colour, remember, don't make it too different from the thing you are texturing, use a similar shadow value/tone/colour so it blends into together and doesn't pop out.

4)Now just quickly draw over some lineart for the bandages, doesn't have to be perfect, this is just to give you an idea of where you are going.

5)Grab a lighter colour than the base of the bandages, not too bright/light remember. Go over the central parts of the bandages or parts that stick out due to the light. Remember to keep in mind the muscles and form of the thing you are adding bandages too. The key here is to remember that the bandages are NOT floating foriegn objects, but something that is suppose to be within, around, over and not simply "floating above aimlessly".

6) Lets start that again, but this time with a lighter colour, but keep the application far more less in terms of radius compared to the step above so it gives the illusion of a shade gradient to compliment form and light.

7) Grab a dark colour, not TOTALLY BLACK or TOO THICK, try to use something abit soft and with abit of colour that relates to the bandages or the thing you are bandaging. Now go over the bandages like you did with the first lineart, but this time be more focused and detailed, add abit of crinkles on the parts that seem to be in more of the shadow, don't go overboard.

8) Use a lighter brush to compliment the highlights of the bandages crinkles, try to make some of the highlights lean over the shadows, but be subtle. Use a lot of it where light seems to be formed or is strongest.

9) Have a look..does it look a bit dull/blurry and such? Then go over some areas with a dark lineart brush that seem to be weak or need distinction.

Finished! Or..is it?
Here is what you should have
1)Draw the lineart of the holes, yet again, not too thick or dark.

2) Once that is done, grab a light brush and go "around" the holes, but not completely, still keep in mind of the form+shadows+tone.

3) Compliment what is in the holes by leaving bare bandage (simply leave it, its already toned) OR draw in some exposed flesh or what is beneath. Keep in mind, you have to be consistent, one bandage strap just by itself wont have a magically appearing bandage seen through the hole. If its obvious there are bandages overlapped, then make it apparent when using the holes.

1) Want blood? Then draw a dark red fill in the bandages hole or tear.

2) Now draw a shadow around the flesh/wound. This is because light will be in the middle as its a hole and thus the middle should be the brightest part.

3) Simply get a solid SMALL brush and draw subtle lines or dots to mimic highlights as flesh when fresh is shiny and moist.

4) For a finishing touch, use a medium opacity brush with dark red and draw around the wound on the bandages. Remember, when blood or liquid soaks into material like bandages (that isn't very white), they will have a darker addition to the red. Use the multiply layer to bring this out a bit.

Done? Its up to you
Here is an example of what it will look like on a more finished unwrap
Attachments
Last edited by a moderator:


