- Joined
- Dec 30, 2007
- Messages
- 1,556


Utilizing 3D Coat for Warcraft 3 Retextures: A Grand Declaration of War against Traditionalist and Archaic Procedure or How to Philosophize with the 3D Coat
• Required Software
• Exporting the Mesh Form the WC3 MPQ
• Converting the Mesh to a Readable Format
• Cleaning the Mesh
• Importing the Mesh Correctly
• Exporting Colour Layers
• Saving and Converting the Texture Correctly
Roughly eight years ago a somewhat new way of handpainting textures became quite prevalent; the idea of per pixel painting and microvertex painting. A way to paint directly on your mesh instead of the old trial and error way of painting on a 2D UV map. Since then, we’ve seen a lot of development moving towards the near-automatization of texturing with software such as Substance Designer and Quixel Suite.
But this tutorial will focus on the almost decade old approach to texturing, because I have not seen too many people embrace it and I honestly think it is time to change that. We will accomplish this by learning how to utilize 3D Coat in a Warcraft 3 environment.
However, this is not an in-depth tutorial on how to work with 3D Coat or 3D software in general. I can only claim that it is an attempt to give you a quick guide on how to actually utilize this software without using – or limited use thereof - archaic software that personally drives me insane. Thus, I will assume that you have some knowledge of both 3D Coat and modern 3D software, such as Autodesk Maya or at least that you have some interest in learning them by yourself.
In the end, you should be able to do this on any Warcraft 3 model:
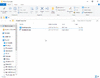
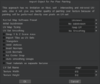
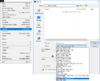
Click “Search in MPQ” > Write “DEMONESS” -> Double click on the correct .mdx file > Right-click on “Demoness.mdx” in the treeview> Click “Extract MDX” > Save the file

If your model does not show up in the search field, it might be due to the fact that some assets does not share in-game names with asset names. For example, the Succubus is simply called Demoness in the MPQ. If this is the case, use the treeview to locate you model manually.
Another reason might be due to the fact that you are browsing the wrong MPQ. There are two MPQs, one called “war3.mpq” and another called “war3x.mpq”. The former contains the vanilla models and the latter contains expansion pack models.

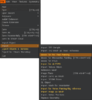
Write "Demoness.mdx" -> write "Demoness.obj" -> Done, check if the conversion was complete

The modelconv.exe is case sensitive, so you have to write the exact name of the file with correct capitalization and file format.

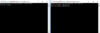
Before clean up:

After clean up:

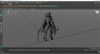
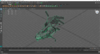
Once you have cleaned up the model, I would strongly suggest that you shatter your model into parts and rotate weapons and similar stuff into angles that will make it easier to paint on and most importantly, rotate around in 3D Coat.

As long as you do not actually edit anything on the model, i.e. the position of verts or drag around trises or polys, you can set it up however you want. Once finished with your composition, export the selected mesh as a .FBX or .OBJ and remember to save the Maya scene as well. We don't need the scene for anything specific, but it's good to have if we have to edit the model later on.
Footnote
You can do all these things in 3D Coat as well, but I don't like subsurface editing in 3D Coat so I will not be covering this here.
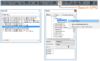
File -> Import -> Model for Per Pixel Painting -> Locate the model and open it

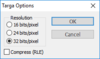
A black box will appear. If you've worked with 3D Coat before, go for the settings you prefer. If you haven't I would suggest the following settings.

Why 512x512? Because you will have a better representation of what the texture actually will look like in-game. 1024x1024 feels better and 2048x2048 feels even better, but you will also lose a massive amount of detail when you reduce the size to 512 and even more when you convert the .TGA to a .BLP. You are free to do whatever you want, but I wouldn't go over 1024.
If you are retexturing a model with an excellent UV map, you can go for a higher resolution without too many worries. But Blizzards models generally feature horrible unwarps that doesn't utilize the UV space at all. This de facto translate to the horrible fact that a 512x512 is more like a 256x256 due to how horribly bad the UV map is utilized.
Once you are done with your product, you have to export all your color layers and currently, you are only able to export this file as an .PSD.
Layers -> Export -> All Color Layers -> Save file

Table of Contents
• Author's Notes• Required Software
• Exporting the Mesh Form the WC3 MPQ
• Converting the Mesh to a Readable Format
• Cleaning the Mesh
• Importing the Mesh Correctly
• Exporting Colour Layers
• Saving and Converting the Texture Correctly
Author's Notes
Let’s face it, the traditional way of approaching texturing for Warcraft 3 is old and in many ways archaic. During the last ten years or so we have seen massive leaps in how artists approach the “art of texturing 3D meshes”.Roughly eight years ago a somewhat new way of handpainting textures became quite prevalent; the idea of per pixel painting and microvertex painting. A way to paint directly on your mesh instead of the old trial and error way of painting on a 2D UV map. Since then, we’ve seen a lot of development moving towards the near-automatization of texturing with software such as Substance Designer and Quixel Suite.
But this tutorial will focus on the almost decade old approach to texturing, because I have not seen too many people embrace it and I honestly think it is time to change that. We will accomplish this by learning how to utilize 3D Coat in a Warcraft 3 environment.
However, this is not an in-depth tutorial on how to work with 3D Coat or 3D software in general. I can only claim that it is an attempt to give you a quick guide on how to actually utilize this software without using – or limited use thereof - archaic software that personally drives me insane. Thus, I will assume that you have some knowledge of both 3D Coat and modern 3D software, such as Autodesk Maya or at least that you have some interest in learning them by yourself.
In the end, you should be able to do this on any Warcraft 3 model:
Required Software
|
| 3D Coat This is multi-purpose tool, perdominantly used for retopology, per pixel painting and to some degree, sculpting. As the software of this topic, this software is strictly required and I do not know of any alternatives. As of this writing, there is a Amateur version of the software, a cheaper but more restrictive version of the software. |
| Autodesk Maya This will be our main 3D editing software. As mentioned, this tutorial will not cover anything on how to actually use a 3D software, but we will need it for a few procedures. Free alternative: Blender | |
| Photoshop This will be our main 2D editing software. This tutorial will not cover anything on how to actually use the software and I will assume that you know how to handle this software or similar software. Free alternative: GIMP | |
| Warcraft 3 Viewer We will use this tool to access the Warcraft 3 MPQs and thus, Warcraft 3 models. We will also use it as a converter. If you prefer other programs, go ahead and use them instead. Download | |
| modelconv.exe This simple program will convert *.MDX files to *.OBJ files. This is key if we do not want to use old and archaic software. Download |
Exporting the Mesh Form the WC3 MPQ
The first thing we need to establish is what model we want to retexture and for the purposes of this tutorial we are going to retexture the Demoness.mdx. With that in mind, we can open up the Warcraft 3 Viewer and get our model.Click “Search in MPQ” > Write “DEMONESS” -> Double click on the correct .mdx file > Right-click on “Demoness.mdx” in the treeview> Click “Extract MDX” > Save the file
If your model does not show up in the search field, it might be due to the fact that some assets does not share in-game names with asset names. For example, the Succubus is simply called Demoness in the MPQ. If this is the case, use the treeview to locate you model manually.
Another reason might be due to the fact that you are browsing the wrong MPQ. There are two MPQs, one called “war3.mpq” and another called “war3x.mpq”. The former contains the vanilla models and the latter contains expansion pack models.
Converting the Mesh to a Readable Format
Now that we have our model we need to convert it to format that more modern software can read. For this we will need to open the modelconv.exe. There are two quirks to this converter; everything has to be located in the same folder, the .MDX and the modelconv.exe. Secondly, it is case sensitive, so you have to write the exact name for it to work.Write "Demoness.mdx" -> write "Demoness.obj" -> Done, check if the conversion was complete
The modelconv.exe is case sensitive, so you have to write the exact name of the file with correct capitalization and file format.
Cleaning the Mesh
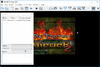
Now, because we have refrained from using archaic software, we have to clean our model from various kinks created by the converter. In general, we will have to remove the skeleton mesh for the death animation, merge vertices, flip the model to fit the X, Y and Z axis correctly and maybe flip some normals.Before clean up:
After clean up:
Once you have cleaned up the model, I would strongly suggest that you shatter your model into parts and rotate weapons and similar stuff into angles that will make it easier to paint on and most importantly, rotate around in 3D Coat.
As long as you do not actually edit anything on the model, i.e. the position of verts or drag around trises or polys, you can set it up however you want. Once finished with your composition, export the selected mesh as a .FBX or .OBJ and remember to save the Maya scene as well. We don't need the scene for anything specific, but it's good to have if we have to edit the model later on.
Footnote
You can do all these things in 3D Coat as well, but I don't like subsurface editing in 3D Coat so I will not be covering this here.
Importing the Mesh Correctly
Our model should now be ready to be splashed with paint, so open up 3D Coat and before you do anything, make sure that you load the model correctly.File -> Import -> Model for Per Pixel Painting -> Locate the model and open it
A black box will appear. If you've worked with 3D Coat before, go for the settings you prefer. If you haven't I would suggest the following settings.
Why 512x512? Because you will have a better representation of what the texture actually will look like in-game. 1024x1024 feels better and 2048x2048 feels even better, but you will also lose a massive amount of detail when you reduce the size to 512 and even more when you convert the .TGA to a .BLP. You are free to do whatever you want, but I wouldn't go over 1024.
If you are retexturing a model with an excellent UV map, you can go for a higher resolution without too many worries. But Blizzards models generally feature horrible unwarps that doesn't utilize the UV space at all. This de facto translate to the horrible fact that a 512x512 is more like a 256x256 due to how horribly bad the UV map is utilized.
Exporting Colour Layers
As mentioned earlier, this is not a tutorial on how to actually use 3D Coat. There are tons of resources out there today and if you have painted with Photoshop or similar software before, it should not take too much time to learn how 3D Coat works.Once you are done with your product, you have to export all your color layers and currently, you are only able to export this file as an .PSD.
Layers -> Export -> All Color Layers -> Save file
Saving and Converting the Texture Correctly
This should be a no brainer if you have worked with Warcraft 3 textures before, but here we go. Open your PSD file, click Save As and choose .TGA. If you are using the Alpha layer, pick 32 bits/pixel and press ok. Open Warcraft 3 Viewer and convert the .TGA to a .BLPAttachments
-
 3DCoat.png5.6 KB · Views: 359
 -
 MayaLogo.png6.5 KB · Views: 341
 -
 WC3V.png6.3 KB · Views: 363
 -
 Modelconv.png3.2 KB · Views: 331
 -
 Logo_Photoshop.png5.9 KB · Views: 422
 -
 ModelConvertion.gif428.5 KB · Views: 383
 -
 HowTo_ModelConv.png11.5 KB · Views: 580
 -
 Example_AfterCleanUp.png555.2 KB · Views: 321
 -
 Example_AfterConv.png517.6 KB · Views: 357
 -
 Example_Shattered.png552.8 KB · Views: 317
 -
 HowTo_WC3V.gif1.9 MB · Views: 409
 -
 HowTo_ImportSettings.png36.4 KB · Views: 406
 -
 HowTo_ImportPerPixel.png66.5 KB · Views: 391
 -
 PSSaveTGA3.png7.7 KB · Views: 311
 -
 PSSaveTGA1-2.png71.7 KB · Views: 91
 -
 HowTo_WC3V.png57.1 KB · Views: 396
Last edited: