- Joined
- Jun 2, 2008
- Messages
- 541
Smoothing linear animations in Mdlvis
In this tutorial I will explain this little trick I do to make animations a bit smoother. I'm gonna assume that the reader have at least some familiarity with Mdlvis. I myself don't fully understand everything, anyone more knowledgeable is welcome to correct me, especially if i'm making grave mistakes. Also, this tutorial is not about teaching you how to animate, so don't expect that.
Basics:
-First thing you need to understand about your model is that it is essentially a lot of text strings. Each instance of translation/rotation/scaling happening is a text string. You can see this clearly if you convert model to .mdl and open it in notepad, or in War3ModelEditor by using Edit Node. This will be important later.
-Camera. Zoom in/out with mouse wheel, hold right mouse to move camera. Hold Alt+Left Mouse to rotate the camera, or press the Perspective button in the top left corner. Some of the Perspective button angles (left for example) will have messed up shading (darker than usual). Oh yeah, you only have one shot at resizing the Mdlvis window without messing up the shading completely for this instance of the program. That one shot is right after you opened it.
-At the bottom of sequence editor is an animation reel. There is a quick way of getting around it. Position the cursor where the digits are down there and start clicking. You will see that red bar snaps from one keyframe to another depending on where your cursor is. This eliminates a lot of tedious manual selecting/inputting the frame.
-Make backups often. Mdlvis is very janky. Sometimes you get error messages that will simply create a .dmp file and you're fine. Other times you can destroy your model beyond any hope of repair. It is also possible to get the sneakiest errors, ones that happen after you pressed Ctrl+S. In that case only backups will save you. I personally make a backup every time I start a new animation. You will always get an error if you try creating a new animation after having edited something in the Movement tab.
And don't ignore backups if you're only editing the mesh either.
-Learn the hotkeys. Mdlvis has plenty of them (but not enough, looking at you "Invert Normals"). You will save yourself a lot of time by clicking the buttons on your keyboard rather than doing everything with the mouse.
-Highlight KF. In the movement tab of sequence editor there is a "Highlight KF" checkmark. It should always be checked. Always. The only time it's not on is when you didn't click on it yet. What it does is shows if there exist any keyframes for the selected transformation (translation/rotation/scaling) of the selected bone (or helper, particle emitter etc) within the selected sequence. And most importantly, it affects the copy, delete and the rest of keyframe manipulation. It is incredibly important and animating without it is shooting yourself in the dick.
Safety? Always off. Highlight KF? Always on.
-Difference between "Copy" and "Copy frame". "Copy" (Ctrl+C) should be used to copy frames in the "Anims" tab of sequence editor. You can select whole animation by clicking on the first/last frame of the animation reel at the bottom and then shift+left click dragging the red bar to the opposite end. Or you can, for example, copy only the first frame (or any other frame/blue bar) of your "Stand Ready" for your newly created "Attack". "Copy" will copy everything that is defined (written down as a string in mdl) at that particular frame of animation. Most of the time hotkey "Ctrl+C" in Sequence editor simply won't work, so click it with the mouse in the "Frames" tab at the top.
Now "Copy frame" (C) should only be used in the "Movement" tab and only with a bone selected and "Highlight KF" checked on. Don't do it otherwise. That's the short of it. If you want the long explanation that dips in War3ModelEditor and .mdl text file, welcome to the spoiler.
Stuff in a model can be either static or animated. Static is one single value and animated is when it changes with time. Here are some examples from War3ModelEditor.
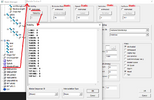
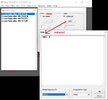
"tillinghast, you silly bitch," - BBC mandarins are bleating again. "This is self-explanatory," - Bear with me.
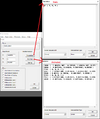
Want to know what happens if you simply press OK without even editing anything in that Translation dialog? Convert to .mdl to find out.
Before and after:

Your translation for bone_chest is now animated, bucko. This will happen with any such dialog in War3ModelEditor. But what does it have to do with "Copy frame" in Mdlvis?
Unless "Highlight KF" is selected, "Copy frame" copies everything that is not static. It makes a complete "snapshot" of the frame, even the stuff that is not defined gets copied. All the animated visibility, animated colors, animated emission rates, animated material alphas - everything. As you can see actually pasting what you copied this way is, to put it mildly, not recommended, because you will have to do a lot of cleanup.
You might think "So what if visibility is 1 several times in one animation". You're right. But it goes back to the first point. A model is a bunch of text strings and each string adds a few bytes of size to the file. It doesn't matter that much on newer patches of the game with expanded limits, but it is important on older ones. And if you want to post your model to Hive's database, you will be required to optimize it.


"tillinghast, you silly bitch," - BBC mandarins are bleating again. "This is self-explanatory," - Bear with me.

Want to know what happens if you simply press OK without even editing anything in that Translation dialog? Convert to .mdl to find out.
Before and after:

Your translation for bone_chest is now animated, bucko. This will happen with any such dialog in War3ModelEditor. But what does it have to do with "Copy frame" in Mdlvis?
Unless "Highlight KF" is selected, "Copy frame" copies everything that is not static. It makes a complete "snapshot" of the frame, even the stuff that is not defined gets copied. All the animated visibility, animated colors, animated emission rates, animated material alphas - everything. As you can see actually pasting what you copied this way is, to put it mildly, not recommended, because you will have to do a lot of cleanup.
You might think "So what if visibility is 1 several times in one animation". You're right. But it goes back to the first point. A model is a bunch of text strings and each string adds a few bytes of size to the file. It doesn't matter that much on newer patches of the game with expanded limits, but it is important on older ones. And if you want to post your model to Hive's database, you will be required to optimize it.
Understanding and visualizing:
Interpolation is the way transformation happens from one keyframe to the next. There are four interpolation types in Warcraft III models (Mdlvis calls them controller types). This tutorial only deals with linear type.
What is the shortest way between point A and point B? A straight line. That's what linear interpolation basically is.
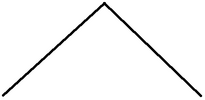
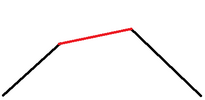
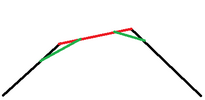
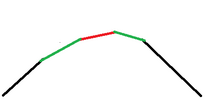
Here's a way to visualize this smoothing trick.
Finally getting to smoothing:
Let's say you have a basic "looking around" animation that you want to make a bit smoother.
Open Mdlvis, go to sequence editor (F3), select your animation (Stand), go to Movement tab, select your bone_chest, select Rotation (R), check Highlight KF, press "Play sequence" in bottom left corner. Doesn't look like much.
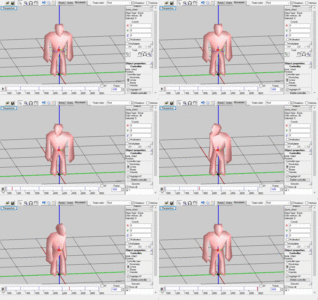
body1before.mdx
Stop the sequence, select frame 1200 (where there is no keyframe), press C and immediately, on the same frame, press Ctrl+V. There is now a keyframe on 1200, it's blue. The almighty "Copy frame" captured the rotation of bone_chest. Do the same thing on frame 1400, select, C & Ctrl+V. Finally select frame 1300 and delete it. Play sequence. That part looks a bit smoother now. Repeat the same thing for frames 1700, 2200 and 2700.
(Another thing, always make sure to stop the sequence before you leave the sequence editor. Otherwise the button will get locked at stop and you will have to close Mdlvis and open it again to play your sequences.)
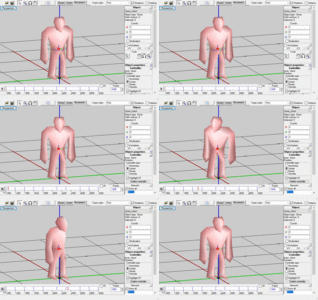
body1after.mdx
As you can see the bone_chest rotation is now a bit smoother at the cost of having more keyframes/bytes in size, and not reaching the same angle that original keyframes had. Still looks like crap doesn't it? Yeah. That's because at the moment it's only one bone rotating by one axis. The more bones you animate the livelier your model will look, obviously. This trick works for Translation and Scaling too. Use common sense when to utilize this and when to leave your animations as is.
Attachments
Last edited:

