• 🏆 Texturing Contest #33 is OPEN! Contestants must re-texture a SD unit model found in-game (Warcraft 3 Classic), recreating the unit into a peaceful NPC version. 🔗Click here to enter!
  • It's time for the first HD Modeling Contest of 2024. Join the theme discussion for Hive's HD Modeling Contest #6! Click here to post your idea!

Skinning and Wrapping tutorial

Status
Not open for further replies.
Level 16
Joined
Aug 20, 2009
Messages
1,552
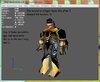
I haven't found a decent tutorial that explains thoroughly on how to wrap a skin on a model.

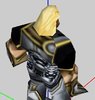
There should be a tutorial like "Skinning to wrapping from Scratch" Tutorial on hive, explaining a freshly made skinless model, which are skinned and wrapped mesh by mesh.

I believe that this is extremely important, and should be done for the sake of the world, it depends on it. wc3 is srz business.

Tools used and link should be explained,
Alternative routes should be explained, like if you are modeling with milkshape, do this, or if you model with 3ds max, do this. etc.

I have tried asking many modelers, and most of them didn't bother to explain at all.

Therefore, this is a very important contribution if you manage to do it.

It is fine if its simple, but please explains what to do on complex mesh, not just simple shapes like box or spheres, shapes and other troubles that might be faced by modelers.

How to reuse in-game wc3 skin, and how to wrap using multiple skins, etc.
 
Level 10
Joined
Dec 15, 2012
Messages
650
I will try my best to explain to you, buddy :3 Althrough I'm a noob modeler :p

A war3 model is made up by the geoset(s).A geoset is made up by the polygons.
And then polygons are made up by the verticles.
Tool such as Mdlvis can links up 3 verticles(verticles must be in a same geoset) into a polygon. :fp: When a polygon was made, a face of the model made.

Geoset contains the polygons so if you want to change the texture on the surface, you need to change the texture in the material used by the geoset.

Reminder : A geoset can only use a material.

For the re-wrap tutorial, I think someone is making it so just wait for it :>
 
Level 16
Joined
Aug 20, 2009
Messages
1,552
I will try my best to explain to you, buddy :3 Althrough I'm a noob modeler :p

A war3 model is made up by the geoset(s).A geoset is made up by the polygons.
And then polygons are made up by the verticles.
Tool such as Mdlvis can links up 3 verticles(verticles must be in a same geoset) into a polygon. :fp: When a polygon was made, a face of the model made.

Geoset contains the polygons so if you want to change the texture on the surface, you need to change the texture in the material used by the geoset.

Reminder : A geoset can only use a material.

For the re-wrap tutorial, I think someone is making it so just wait for it :>

I know that much.. but how do you wrap your texture to your polygons??

until now, no tutorial explaining that. how do you apply texture and wrap textures on it, how do you use in-game texture? how do you use custom texture? what are the specification to be used as texture? file type? resolution? etc.

There need to be someone to make these tuts
 
Level 16
Joined
Aug 20, 2009
Messages
1,552
Kiss..!?!?! o.o

178651-albums4680-picture69935.jpg
 
Level 10
Joined
Dec 15, 2012
Messages
650
I haven't post it yet.. =.=
I will show you the noob tut now :D (I have stored it)

EDIT : Noob tutorial
IMAGE : (name of the image)

Nothing

Tutorial

See page 2, the noob re-wrap tutorial

Be sure you won't laugh at the end part -.-"
Re-wrap Texture
Tools needed for this tutorial
Magos's War3 Model Editor
Mdlvis
You can re-wrap a model easier after you watched this tutorial. In this tutorial, I will re-wrap VillageMale.mdx from the villager texture to Arthas texture (wow, this man is awesome ! <-.<- you were fooled by the tut editor). Before get into the topic, you need a little knowlegdges about material. It's needed for the people that new to War3 Model Editor.
=>IMAGE : Knowledge --- Material

Preparation
Prepare textures that gonna to be used in your model. It doesn't counts as a step in this tutorial.
If you don't want to use the war3 original texture(s) but custom texture(s) then skip to Prepare B

Prepare A :
1. Open War3 Model Editor and open your model.
2. Click Windows then select MPQ browser.
3. Open any mpq that contains the war3 original textures and then browse for your texture :D
4. After you found your desired texture then right-click on it and select Use as Texture.
5. Click Windows and select Material Manager.
6. Holding Ctrl key and then Right-click the part that you want to make a change of your model (skip this if you want to change everything on your model)
7. Now back to Material Manager, you will see that you have already selected a material.
8. Double-click the Material #### and then double-click Material Layer ####. Now change the texture in Texture ID

=>IMAGE : Change Texture

Prepare B :
(skip this preparation if you don't want to use a custom texture)
1. Click Windows then select Texture Manager.
2. Right-click on the blank place and then select Import.
3. A window will pops up, now select your texture.

Prepare C :
1. Save your model now. (We call it NewVillager in this tutorial right now)
2. Open the original model(from MPQ) that you have modified just now and then export the model. (We call it OldVillager in this tutorial start from now)

Step 1 (only 1 step...in this tutorial) : Compare both "before texture" and "after texture"
note
before texture ---> Old texture used by the model
after texture ---> New texture for the model
This comparison let you know which part of the texture is used for which part of the model. Don't be confused, it's easy only :)
1. Open Mdlvis and then open Mdlvis again because we're going to make a comparison :> (in short : open Mdlvis twice)
----note : first Mdlvis you have opened has been called as Mdlvis1 and second Mdlvis you have opened has been called as Mdlvis2
2. Go to the Mdlvis-1 and open NewVillager
3. Select the whole model.
=> IMAGE : Step 1 Mdlvis1
4. Go to Mdlvis-2 and open OldVillager.
5. Select the whole model.
6. Click Modules and select UV map editor (do this for both Mdlvis-1 and Mdlvis-2)
7. Go to Mdlvis-2 and Mdlvis-1 then start to compare each other. . .
=> IMAGE : Step 1 Comparison-1
=> IMAGE : Step 1 Comparison-2
~ Tutorial End ~
This is what I have done :
=> IMAGE : done
Don't laugh at him cuz I used 3 hours 5 minutes to create this tutorial.
hahahahahahahahahahahahahahahaha

I think I have made wrong choice --- Use Arthas texture for Villager

Everything's done, hope you learn something fomr this tutorial, if you say "I didn't learn anything then I will kill myself like this :
xp -> xo -> xO -> xD -> XD (Laugh until die. . .)
 

Attachments

  • Change Texture.JPG
    Change Texture.JPG
    77.9 KB · Views: 216
  • done.JPG
    done.JPG
    20.9 KB · Views: 226
  • Knowledge --- Material.JPG
    Knowledge --- Material.JPG
    149.7 KB · Views: 204
  • Step 1 Comparison-1.JPG
    Step 1 Comparison-1.JPG
    219.1 KB · Views: 226
  • Step 1 Comparison-2.JPG
    Step 1 Comparison-2.JPG
    214.6 KB · Views: 234
  • Step 1 Mdlvis1.JPG
    Step 1 Mdlvis1.JPG
    113 KB · Views: 215
Last edited:
Level 16
Joined
Sep 19, 2011
Messages
829
Status
Not open for further replies.
Top