- Joined
- Apr 19, 2008
- Messages
- 2,188


How to Transfer Reforged Weapons
Problem Statement
In this tutorial, I will cover how to transfer Reforged weapons between different 3D model files. In particular, this task has been more challenging than it should have been for years, because many of the Reforged models encode their weapon animations as free-floating world space coordinates, which means that if we transfer the weapon to a character with a smaller frame -- but try to retain the weapon's animation data -- the weapon ends up floating away from the character in an awkward fashion.
Then, if users attempt to fix the problem, they are faced with the bizarre use of keyframes in Reforged for frames that are not "key" to the model at all -- because these assets were made in a hurry and use fixed-rate frame exports from some other system (i.e. the original LemonSky artwork) rather than true keyframes, for whatever reason.
It can be tempting for the user to want to click each frame of the Reforged model, and try to manually move the weapon of the character back to the hand in each frame, but this can take a very long time and often the end result appears to "vibrate" to due small, human inconsistencies.
In fact, it is much better to automate the task of solving this problem with a computer that does not introduce human error!
So, for this tutorial, suppose that we copy the Weapons (and their animation) from the Human Footman to the Human Sorceress!
Requirements[/SIZE]
Step 1: Open the Model Files
I will assume you have your Retera Model Studio setup completed from a previous tutorial.
Personally I like to disable the "Quick Browse" setting in the options menu. You can access the preferences by going to "Edit > Preferences".

Once the Quick Browse is disabled, any time that you open a model the model will remain open and continue to consume memory and resources on your PC until you close the Retera Model Studio. This is not desirable if you are going to do a lot of model browsing without editing anything. But if you are a user who already is familiar with the model database, and you want to use this program for editing files, I find it more convenient if any model file that I open remains open.
Congratulations! Now you have a Reforged model with the weapon from a different model, including its animations, and the new data is stored in world coordinates that match the new model. At no point did we have to do frame-by-frame edits to correct the physical offset of the weapon!
Extra credit:
If you follow this tutorial exactly, the result should end up looking like the model linked here, except for a few key differences. Can you spot the differences? What tool would you use to upgrade the result of this tutorial to become the model that I created an uploaded, and in what way?
Problem Statement
In this tutorial, I will cover how to transfer Reforged weapons between different 3D model files. In particular, this task has been more challenging than it should have been for years, because many of the Reforged models encode their weapon animations as free-floating world space coordinates, which means that if we transfer the weapon to a character with a smaller frame -- but try to retain the weapon's animation data -- the weapon ends up floating away from the character in an awkward fashion.
Then, if users attempt to fix the problem, they are faced with the bizarre use of keyframes in Reforged for frames that are not "key" to the model at all -- because these assets were made in a hurry and use fixed-rate frame exports from some other system (i.e. the original LemonSky artwork) rather than true keyframes, for whatever reason.
It can be tempting for the user to want to click each frame of the Reforged model, and try to manually move the weapon of the character back to the hand in each frame, but this can take a very long time and often the end result appears to "vibrate" to due small, human inconsistencies.
In fact, it is much better to automate the task of solving this problem with a computer that does not introduce human error!
So, for this tutorial, suppose that we copy the Weapons (and their animation) from the Human Footman to the Human Sorceress!
Requirements[/SIZE]
Step 1: Open the Model Files
I will assume you have your Retera Model Studio setup completed from a previous tutorial.
Personally I like to disable the "Quick Browse" setting in the options menu. You can access the preferences by going to "Edit > Preferences".
Once the Quick Browse is disabled, any time that you open a model the model will remain open and continue to consume memory and resources on your PC until you close the Retera Model Studio. This is not desirable if you are going to do a lot of model browsing without editing anything. But if you are a user who already is familiar with the model database, and you want to use this program for editing files, I find it more convenient if any model file that I open remains open.
- Enter Reforged models mode if you have not already. If your program did not automatically setup to use this mode, you should be able to go into "Preferences > Warcraft Data" and then find the UI option for "Reforged Graphics Mode". Simply click this button, then press OK on the Preferences window.
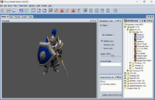
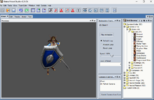
- Open Sorceress by navigating the Unit Browser on the right-hand side to find "Standard Units / Human / Melee / Units / Sorceress". Double click on the Sorceress icon and you should see the Sorceress appear in the 3D preview in front of you. Because we disabled Quick Browse, this has created an editor context to modify the Sorceress that will remain open even if we browse to a different model file.
- Now navigate to "Standard Units / Human / Melee / Units / Footman". Double click on the Footman icon and you should see the Footman appear in the 3D preview in front of you. Because we disabled Quick Browse, again this has created a second editor context to modify the Footman. We will use this to delete everything besides her legs. Then when we have a "legs model" like this, we will be able to put it onto the Sorceress.
- Let us begin with the Sorceress. To do this, assuming your 3D previewer still is showing a Footman, click on "Window > Sorceress" in the menu bar across the top of the program.
- (Similar to how the Warcraft III World Editor can have multiple maps open at a time, the Retera Model Studio can have multiple models open at a time. You will probably notice on the dropdown that four models have been opened: Sorceress, Sorceress_Portrait, Footman, and Footman_Portrait. For now we can ignore the portrait model files because they are outside the scope of this tutorial.)
- (Similar to how the Warcraft III World Editor can have multiple maps open at a time, the Retera Model Studio can have multiple models open at a time. You will probably notice on the dropdown that four models have been opened: Sorceress, Sorceress_Portrait, Footman, and Footman_Portrait. For now we can ignore the portrait model files because they are outside the scope of this tutorial.)
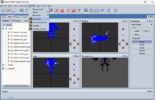
- Now that Sorceress is the active context for editing, click on the Edit tab to begin customizing the model file. In this view, you will see the model in several 2d editor views as well as a 3d editor preview.
- I usually begin this kind of model edit by expanding out the Mesh section on the Outliner that we see to our left. In particular, in this tutorial we are not interested in modifying the animation data of the Sorceress so we will not touch the Nodes box.
- Under the Mesh section, we can see a list of the Sorceress's 3d components. If you hover the mouse over the name of a component, that component will highlight in green and yellow in the four views. This can help to get a better sense of how the different 3d components are divided.
- Also notice how some of the geometry of Jaina is hidden by default. The program hides the geometry that is named "_LOD1" or "_LOD2" or "_LOD3" because these are lower Levels of Detail of the Sorceress geometry. According to a former Blizzard Employee Reforged producer, and long-time member of the Hive Workshop, these Level of Detail geometries inside of the Reforged model are completely unused. Because of this, it is safe to ignore them completely, or even delete them if you would like. For the purposes of this tutorial I want to delete them to make a simpler workspace.
- To delete the unused Level of Detail geometry, use the dropdown option "Scripts > Delete LODs".
- Now that we have created a cleaner version of the Sorceress, we want to do the same with the Footman. First, click on "Window > Footman" in the top menu. Because the Retera Model Studio supports having multiple editor contexts open at a time, our modified Sorceress model will remain open and waiting for us when we get back.
- Return again to the Edit tab and expand the Mesh section like we did on the Sorceress model. Repeat the process of deleting the LODs for this model. You will know if you succeeded because the list of Mesh will become much shorter.
- Now we have a clean Footman and clean Sorceress model to work with! Congratulations. The next steps will be easier.
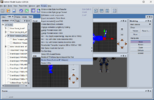
- First, we want to prepare the Footman animation data so that we can transfer this information to the Sorceress more easily. Collapse the Mesh section in the Outliner, and instead expand the Nodes section. The, expand weapon_bind_jnt and click on it to enable editing the weapon_bind_jnt. However, this will automatically enable editing nodes beneath weapon_bind_jnt as well and we do not want this. So, click twice more to un-check the boxes for each node beneath weapon_bind_jnt in the tree.
- When you are done manipulating the boxes, there should be only one pink square in the 2D edit views. Click on this one pink square to select it.
- Now that this node is selected, we want to rewrite its animation information to be relative to to the left hand of the Footman, instead of relative to world coordinates. This sounds complicated, but the necessary code is compacted into a single button. For this, we will use the menu option "Scripts > Re-link Bone (Such as RF Weapon)". Click on this menu option now! It will apply to the node we selected in the 2D views.
-
468681[/ATTACH]]
- Now we are presented with a list of other nodes inside the model file. We must choose with node will be the new parent of our animation data. So, in this case, we want to scroll until we select bone_hand_left, and then push OK.
- There may be some processing time while the Retera Model Studio hangs, because it is rewriting animation data for the weapon in all animations.
- At this point, we want to repeat the same process for the shield of the Footman, by changing its animation data to be relative to the right handinstead of the world coordinates.
- Click out in the empty space to automatically deselect the sword
- Expand the shield_bind_jnt item in the Outliner, activate it, and then deactivate the nodes beneath it in the tree.
- Uncheck the box for the weapon if it is still showing as checked
- Click on the pink square in the 2D edit view. It may be necessary to scroll inwards to better see the pink square. (See attached GIF)
-
- Click on "Scripts > Re-link Bone (Such as RF Weapon)" to rewrite the shield animation data to be relative to the right hand. This time, choose bone_hand_right in the popup box.
-
- Again, there may be some processing time while the animation data is rewritten. This is normal.
- Now that both models are prepared for transfer, navigate back to the Sorceress using "Window > Sorceress" in the menus.
- At this point, we want to import the cleaned up sword and shield from the Footman into the Sorceress, along with animations. So, with the Sorceress showing, click on "File > Import > From Workspace" and choose "Footman" in the popup window.
-
- After a short loading time, you should see a new window titled Importing Footman into Sorceress with a series of options for performing a model data transfer.
- This Import menu is a one-stop shop for transferring anything you want between two model files.
- You can use it to "skin splice" the footman Mesh in from the Footman model into the Sorceress model
[*]Although it is outside the scope of this tutorial, you could create the above by using "Leave all" in the Animation tab to exclude the Footman motion sequences from import, "Leave all" in the Bones tab to exclude the Footman animation nodes from import, "Apply Smart Mapping" in the Skin ("Matrices") tab to do a skin splice, and "Leave all" in the Objects tab to skip footman death sounds and such which will not have their corresponding animations loaded, then pressing "Finish" on the import. - You can use it to transfer Footman animations to the Sorceress
[*]Although it is outside the scope of this tutorial, you could create the above by clicking "Leave all" in the Geosets tab, checking the "Clear pre-existing animations" box in the "Animations" tab (and "Import all" to load all Footman animations), "Motion from all" in the Bones tab so that we write over Sorceress data with the motion from all Footman bones, leaving Skin ("Matrices") tab the default to retain Sorceress rig, leaving Objects tab the default to load all Footman animation sounds and events, and then linking Sorceress layers to Footman layers in the "Visibility" tab so that Sorceress fades during Footman death animation, instead of at a seemingly random glitch time using the numerical timeline values from the Sorceress. Note that this is more powerful than the actual "Skin Splice" menu option, which does not touch Visibility data and often creates models with seemingly random disappearing events in the wrong places, because it uses the Sorceress timeline on the Footman animations, or vice versa. - You can use it to transfer the entire Footman onto the Sorceress, such as for creating mounted units who retain the animations of their source models
-
[*]Although it is outside the scope of this tutorial, you could create this model by pushing "Time-scale all" in the Animations tab and then pressing Finish.
- You can use it to "skin splice" the footman Mesh in from the Footman model into the Sorceress model
- Because of the many possibilities of the Import menu, it is important for us to only click in the correct places. Below is a walkthrough of what we want to do in each menu.
- First, I usually maximize the Window to full screen by double clicking the Title Bar, so that I have full access to any and all information.
- Geosets Tab
- For this import, we want the Sword and Shield of the footman, but nothing else. I am imagining placing them into the Sorceress's hands.
- When we click a Geoset in the Geosets Tab, we see a control for what Material/textures this Geoset will use. This doubles as an easy way for us to determine which Geoset is the Sword, and which Geoset is the Shield.
- Animation Tab
- In this menu, on a high level we want to put the Footman animation sequences into our current Sorceress file, and eliminate the existing Sorceress animations. The default behavior is to import everything, so we need only to click on Clear pre-existing animations to activate it.
-
- Bones Tab
- Conceptually, we want to perform two operations simultaneously:
- We want to make the Sorceress walk and fight like a footman
- We want the Sword and Shield to load as independent geometry with their independent animations that don't fit the pre-existing Sorceress model.
- In order to achieve both of our two goals at the same time, we need to "get our hands dirty" in the more complex buttons. In this case, we want to use the base "Import" operation for sword and shield animation bones, but the "Motion to pre-existing" operation for all the many Footman body parts.
- To do this, first select all animation bones in the left-hand list except for shield_bind_jnt, weapon_bind_jnt, and their children nodes. Because they are at the end of the list, we can easily hold the SHIFT key, click the top of the list, scroll the to bottom while still holding SHIFT, and then click once above the shield and weapon items. This changes our center view for what we are currently modifying, and enters multi-select mode which allows us to modify all of these items simultaneously with one click.
- Now, with all these Bones selected, click on the dropdown that says Import this bone and change it to Import motion to pre-existing: instead.
-
- If we were changing a single bone at a time in this way, we would be presented with a list of options for which Sorceress bones we wanted to overwrite during the transfer. However, we are changing multiple bones at one time, so the Sorceress list that shows in the center of the screen will be disabled. This is fine. By default, a generic name-driven animation transfer selector is used, unless we click on individual bones to manipulate where their motion data will be copied into. This generic name-driven animation transfer will be good enough for our case.
- For the remaining 5 bones that we did not select, you may click them to check on their status but they should already default to Import this bone status, which is the one that we want. HOWEVER: We want these bones that were previously part of the Footman rig skeleton to seamlessly link into the Sorceress rig instead.
- To link these bones into the Sorceress rig, click on the root of each sub-tree and then change the Parent setting to the corresponding Sorceress bone.
- There are two "roots" to change: weapon_bind_jnt and shield_bind_jnt. Each one needs to link to the corresponding Sorceress bone -- and the Sorceress bone names in this case match the ones from Footman that we linked to earlier (So that this process would be seamless and incorporate relative, not absolute, motion.)
- Conceptually, we want to perform two operations simultaneously:
- Skin ("Matrices") Tab
- In this tab, the skinning of the Sorceress remains attached to Sorceress rig, and the skinning of Footman (sword & shield) remain attached to the Footman rig parts that we're bringing over. Lucky us! So we can entirely skip this tab and leave the defaults.
- Objects Tab
- In the Objects tab, we can fine-tune which events from the Footman animations are transferred over, such as the Footman death sound, footprints, or attachment points. We want to keep the original Sorceress attachment points and their locations, other than maybe the Weapon attachment point which we can bring over with the sword from the Footman. This will technically create a duplicate, because there is not a menu option to nuke/remove the Sorceress Weapon attachment when we bring in a new one, but it is fairly trivial to delete the original Sorceress weapon attachment when we are done.
- So, as a general rule of thumb with importing for our transfer, I would suggest:
- Attachments from Footman: no
- EventObjects from Footman(footprints, death sound): yes
- CollisionShapes from Footman(despite the name their only function is click-hitbox): no
- Camera from Footman(default to load if Portrait file is missing): no
- If you have in mind all of the above choices, we can use CTRL and SHIFT to do a multi-select, then turn off the import of all the stuff we don't want in a single click.
- Visibility Tab
- This tab allows us to carry over the Footman data to hide and show his corpse -- in a way that is integrated with the rest of the transfer we are performing. In this way, we won't have glitches where the Sorceress randomly flickers or disappears in the model, and instead she will fade away in time with the Footman animations if we make our choices correctly.
- To that end, to try to auto-carry as much as possible, click on "Select Similar Options" as a baseline to try to match the models. Unfortunately, it is an old SD matching algorithm that is not very exact, and in particular matches Geosets based on numerical index instead of any concept of what they are, so at the moment we may wish to tweak settings.
- Key things to tweak:
- Set the Sorceress "Human_Female_Corpse_Diffuse" layer to use the hiding/showing animations from Footman by changing their "Imported animation visibility from:" setting to
- Set the rest of the Sorceress texture layers to use the hiding/showing animations from Footman's Main texture layer.
- Change the Geoset settings so that:
- Sorceress Geoset 7 inherits from Footman Geoset 8 (corpse stuff)
- Sorceress Geoset 8 inherits from Footman Geoset 9 (corpse stuff)
- See the GIF of me performing these tweaks if any part of this sounds confusing. The goal is for Sorceress components to hide and show in time with Footman animations, to make the model look as correct/polished as possible.
-
- Finish!
- When you are done, click "Finish" on the Import window!
- This Import menu is a one-stop shop for transferring anything you want between two model files.
- When the import completes, you should see a Sorceress with a Footman sword and shield in the Edit window. However, the base ("T-pose") position of the sword and shield do not match the Sorceress's hands by default. Activate the Select and T-Posemode to correct this.
- In the Select and T-Pose mode, grab the root of the Sword and drag it until it fits roughly into the Sorceress hand.
- This process is a little bit manual, but should hopefully go fairly smoothly. The Sword geometry will move along with the root of its animation tree, and the newly completed Import operation will automatically show the Sword and Shield sub-trees for editing by default.
-
- At this point, if you go to the View tab, and preview some animation sequences for fun, you may begin to see that the transfer has completed. If the sword is not quite in her hand, it should be offset by the same amount in every animation due to the relative nature of the transfer, so you can flip between the View and Edit tabs and continue to use the T-pose tool until you position the sword fully in her hand. Doing it in any animation will, effectively, do it for all animations.
- At this point, you probably have a usable model, but you might find that some animation sequences such as Death -- where the Sword and Shield were meant to animate in world coordinates free of the hand -- might look visually awkward.
- In particular, between the 30-fps-fixed-export keyframes, the shield will try to float up from its fallen location on the ground and incorrectly track the motion of the Sorceress's hand.
- It turns out, this incorrect tracking of the hand motion is due to our "relative instead of world space" animation data created at the start of this tutorial.
- So, let's perform the same process in reverse! By selecting the weapon_bind_jnt and then shield_bind_jnt and rewriting their animations to be in world space again -- by setting their parent to "(No parent)" -- we can achieve this finishing touch of putting the model back in the formatting style that it started from, but with new world space animation coordinates that match the hand of the Sorceress, achieving a mathematical result that is in some ways quite fancy.
- To do this, use the Outliner to expand out until we see weapon_bind_jnt and shield_bind_jnt again. Then, uncheck the boxes for the nodes beneath them in the tree, until only these two nodes can be selected/modified.
- Select both pink squares -- it is OK to do them at the same time -- and then use the "Scripts > Re-link Bone (Such as RF Weapon)" and choose "(No parent)" and press "OK." However, make sure you de-activate Select and TPose mode before using the scripts menu for this, otherwise due to a bug the relinking operation might do nothing instead of doing the re-link process.
-
Congratulations! Now you have a Reforged model with the weapon from a different model, including its animations, and the new data is stored in world coordinates that match the new model. At no point did we have to do frame-by-frame edits to correct the physical offset of the weapon!
Extra credit:
If you follow this tutorial exactly, the result should end up looking like the model linked here, except for a few key differences. Can you spot the differences? What tool would you use to upgrade the result of this tutorial to become the model that I created an uploaded, and in what way?