• 🏆 Texturing Contest #33 is OPEN! Contestants must re-texture a SD unit model found in-game (Warcraft 3 Classic), recreating the unit into a peaceful NPC version. 🔗Click here to enter!
  • It's time for the first HD Modeling Contest of 2024. Join the theme discussion for Hive's HD Modeling Contest #6! Click here to post your idea!

How did they do it?

Level 5
Joined
Aug 9, 2019
Messages
54
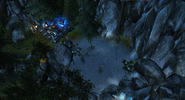
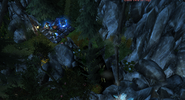
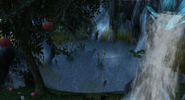
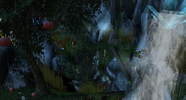
I am trying to figure out how they put doodads so it gives 3d look. I know about alpha tileset, but I haven't figured out how they did this. I posted pictures below of what I mean. See how some doodads below others or some are above.
1683634381305.png
1683634816250.png
1683635089097.png
1683641055936.png


Also, in case someone can help me, I created alpha tileset according to the tutorial, but it's black every time I do it. What if I want it to be something else? Like I am trying to create arena in the sky like in picture #3. Do I create alpha tileset and then just put something on top of it to cover the blackness? Any help would be greatly appreciated.
 
Level 5
Joined
Aug 9, 2019
Messages
54
Scale and proportion.

Once you get the alpha tiles to work, you basically just create a bunch of doodads, scale 'em up, and sink them way below the terrain.

Images 2-4 look like they're built using walkable doodads as terrain. That can be glitchy, but it seems to work. I'd advocate for the former approach.
Ah, I see. So if I want an object to appear to be below the terrain/alpha tileset, I need to make them smaller? And the ones above to be bigger, right? Thank you! For image 4, I really like how they did it, so I will research more about walkable doodads.
 
Level 36
Joined
Jul 1, 2007
Messages
6,677
I think the XYZ grid and one-point perspective camera inherent to the game engine should solve that for you.

Exaggerating scale is risky business. Not to say it can't be a great approach - it probably just takes a lot more work than simply lowering an object down really far. But I'd try it and see what works best for you.
 
Level 8
Joined
Oct 25, 2018
Messages
68
Alpha tile is as easy as painting a portion of the map you want to have "depth".
Then it's only a matter of placing doodads in such a way that it gives the illusion of depth.

It's much easier to explain in an example, so here's how I used the almighty Alpha tile to give the illusion of water reflection on a lake in my project.

Scenery.pngNoWaterPlane.png

The lake has doodads "reflecting" on it, the trees, cattails and the mountain. However, that's all a lie. Because once we remove the water plane from the picture, you can see that I have another set of doodads rotated around, and what I did was "sink" them into ground. You can change the vertical position of doodads by hitting CTRL + Page Up/Page Down on your keyboard. To rotate doodads around, find the Art - Maximum Pitch Angle (degrees) and change the value. Here I used -90 (hold shift when clicking on the field to allow you to go negative values).

And that's it! Here's a non-overview angle of this, with and without water, but more zoomed in.

AngledLookScenery.pngAngledLook.png

The thing about Alpha tile is that you HAVE to make walkable terrain first, and then paint it, or you can literally lose your mind trying to fix it up. Which means, if you want to make a bridge over a very deep mountain gorge, you would terrain it first by making areas you want walkable, and then lower the surrounding terrain down as much as you'd like. THEN apply the alpha tile to "erase" terrain, and place bridge doodad(s) on top of it. Now you have a bridge suspended in air. Now it's just a matter of placing doodads, and using the above mentioned shift + page down to "sink" them into ground, to give the illusion of depth of field, such as water flowing bellow the bridge, small trees (use common sense, things look smaller the further away), rocks, etc.

Hope this helps man, happy terraining!
 
Top