- Joined
- Jan 4, 2010
- Messages
- 19
My original planet view tutorial pretty much sucked. I'm going to recreate it.
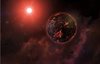
i will have a piece of finished work at the bottom of this thread...
Before you ask i will be adding Tutorial pictures soon enough it will take me time.
:edit: sorry peeps but i will not be uploading any tutorial pictures a friend of mine put a bunch of coats over my computer and it overheated it melting some if the parts when i was gone at the store..therefore i am using my fathers computer for now. don't ask why he did it because i have no idea.
step 1: go to File -> new map it doesn't really matter what terrain you'll pick because you'll be turning off the terrain.
step 2: you'll see a button beneath where you pick the width of the map called "Use Terrain" check it off.
step 3: go to the dependencies tab and enable the campaign dependency
step 4: make the map as big as possible recommended would be 256 x 256
step 5: go to file -> dependencies Click Add standard and then add Liberty Story (Campaign) to your list of Dependencies
step 6: you'll pretty much have a map with no terrain it will be pitch black lest turn it into something spectacular. in the units section on the panel below the file edit view ETC the units button will look like a Zergling. search for SS_BackgroundSpaceTerranLarge i recommend using the search text box above the list of units.
step 7: hold down ctrl and scroll out with your mouse wheel as far as you can and you'll see a space background if you have a mouse with one of those balls and no mouse wheel...sorry i don't know how to use those therefore i don't know how to scroll out with them.
step 8: Now to find the Models of the planets in the Data Editor. go to the Models tab and look for Neutral Protoss Terran Zerg area open one of the folders and then find Building open that folder and change the model by doing this: to the right you'll see all the things you can change scroll down and look for Model and click the Browse... Button you'll see an Archive Browser Show up Look for UI double click it then loom for Starmap Double click it then go to Planet views and open it you'll see this list of planet views.
PlanetViewAgria
PlanetViewAiur
PlanetViewAlbion
PlanetViewAvernus
PlanetViewBelShir
Dido
pick the one you want and open the folder and double click the .m3 file
step 9: sizing the planet is an important part, back in the Data editor after setting your model scroll down and find Scale Minimum and scale maximum beneath scale minimum recommended setting would be 100.0 in the x y and z areas
step 10: when your done scaling your planet go to the units area in the editor and then search for the building you edited in the search text field and place it anywhere on the map preferably in the middle of the map.
step 11: now you must angle the camera in a spot that looks perfect. hold down Ctrl and zoom out with your middle mouse Button as far as you can for everything to show up on the map. now hold down Ctrl and your right mouse button and move your mouse around and find the right angle you want your camera at and then hit the Print Screen key on your keyboard at the far top right of your keyboard.
step 1: open up gimp and hold down Ctrl and then press V you'll see your picture on the screen now we need to crop it to get rid of the rest of the junk on the screen like the panels and stuff the crop tool looks like a grey and white knife click it.
step 2: make a box around the area where there are no tabs and panels you just want the planet and the scenery around it, then press enter. now you have a picture of a planet and the wonderful scenery around it
step 4: now to add the sun effect i will post pictures of the settings i use with the filter i will be using to make the sun. go to Filters -> Light and Shadow -> Gradient Flare
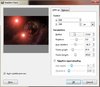
step 5: pick Distant_sun you will see a settings tab click it and you'll see a whole crap load of settings i will show you the settings i used for my volcanic planet sun in a picture at the bottom of this thread.
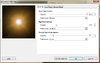
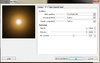
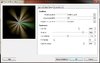
step 6: go back to the selector tab and then at the bottom click edit you must still have distant_sun selected. i will show you the settings i used for my sun in the 4 different tabs in pictures that can be viewed at the bottom of this thread.
step 7: now you must place this sun anywhere on the picture at your will. in the selector tab on your left you'll see your picture and a big plus as your cursor click anywhere and it will set your sun at the point.
step 8: now saving your image, first off go to file -> save as and type what you want your file to be and add a .jpg at the end click save and set the quality to 100.
your done!
-Busted_stuff89
i will have a piece of finished work at the bottom of this thread...
Before you ask i will be adding Tutorial pictures soon enough it will take me time.
:edit: sorry peeps but i will not be uploading any tutorial pictures a friend of mine put a bunch of coats over my computer and it overheated it melting some if the parts when i was gone at the store..therefore i am using my fathers computer for now. don't ask why he did it because i have no idea.
Starcraft 2 Editor Part 1 of the Tutorial
First off, lets start a mapstep 1: go to File -> new map it doesn't really matter what terrain you'll pick because you'll be turning off the terrain.
step 2: you'll see a button beneath where you pick the width of the map called "Use Terrain" check it off.
step 3: go to the dependencies tab and enable the campaign dependency
step 4: make the map as big as possible recommended would be 256 x 256
step 5: go to file -> dependencies Click Add standard and then add Liberty Story (Campaign) to your list of Dependencies
step 6: you'll pretty much have a map with no terrain it will be pitch black lest turn it into something spectacular. in the units section on the panel below the file edit view ETC the units button will look like a Zergling. search for SS_BackgroundSpaceTerranLarge i recommend using the search text box above the list of units.
step 7: hold down ctrl and scroll out with your mouse wheel as far as you can and you'll see a space background if you have a mouse with one of those balls and no mouse wheel...sorry i don't know how to use those therefore i don't know how to scroll out with them.
step 8: Now to find the Models of the planets in the Data Editor. go to the Models tab and look for Neutral Protoss Terran Zerg area open one of the folders and then find Building open that folder and change the model by doing this: to the right you'll see all the things you can change scroll down and look for Model and click the Browse... Button you'll see an Archive Browser Show up Look for UI double click it then loom for Starmap Double click it then go to Planet views and open it you'll see this list of planet views.
PlanetViewAgria
PlanetViewAiur
PlanetViewAlbion
PlanetViewAvernus
PlanetViewBelShir
Dido
pick the one you want and open the folder and double click the .m3 file
step 9: sizing the planet is an important part, back in the Data editor after setting your model scroll down and find Scale Minimum and scale maximum beneath scale minimum recommended setting would be 100.0 in the x y and z areas
step 10: when your done scaling your planet go to the units area in the editor and then search for the building you edited in the search text field and place it anywhere on the map preferably in the middle of the map.
step 11: now you must angle the camera in a spot that looks perfect. hold down Ctrl and zoom out with your middle mouse Button as far as you can for everything to show up on the map. now hold down Ctrl and your right mouse button and move your mouse around and find the right angle you want your camera at and then hit the Print Screen key on your keyboard at the far top right of your keyboard.
Adding a Sun Effect in GIMP
GIMP is completely Free just Google it its almost like Photoshop i like it better than Photoshop that's why i use it.step 1: open up gimp and hold down Ctrl and then press V you'll see your picture on the screen now we need to crop it to get rid of the rest of the junk on the screen like the panels and stuff the crop tool looks like a grey and white knife click it.
step 2: make a box around the area where there are no tabs and panels you just want the planet and the scenery around it, then press enter. now you have a picture of a planet and the wonderful scenery around it
step 4: now to add the sun effect i will post pictures of the settings i use with the filter i will be using to make the sun. go to Filters -> Light and Shadow -> Gradient Flare
step 5: pick Distant_sun you will see a settings tab click it and you'll see a whole crap load of settings i will show you the settings i used for my volcanic planet sun in a picture at the bottom of this thread.
step 6: go back to the selector tab and then at the bottom click edit you must still have distant_sun selected. i will show you the settings i used for my sun in the 4 different tabs in pictures that can be viewed at the bottom of this thread.
step 7: now you must place this sun anywhere on the picture at your will. in the selector tab on your left you'll see your picture and a big plus as your cursor click anywhere and it will set your sun at the point.
step 8: now saving your image, first off go to file -> save as and type what you want your file to be and add a .jpg at the end click save and set the quality to 100.
your done!
-Busted_stuff89
Attachments
Last edited:


