- Joined
- May 3, 2008
- Messages
- 229
[WIP] General WE tut for Begginers.
General WE tut for Beginners...
INTRO:
Well, you probably know what the warcraft world editor is by now so I don't have to explain much more about its location.
But if not... Read!
If you seriously had no idea how to open it I suggest you read thoroughly.
--------------------
This guide to general WE editing might help you in some way so may attention.
Segments are shown by large red text such as the INTRO: up there.
The following is for beginners take note of this.
Basic locations and such:
Ok you should have the editor open now. I am using the very original editor for simple show (Besides this is general)
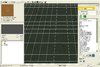
Now if you haven't found preferences yet your editor should look something like this:
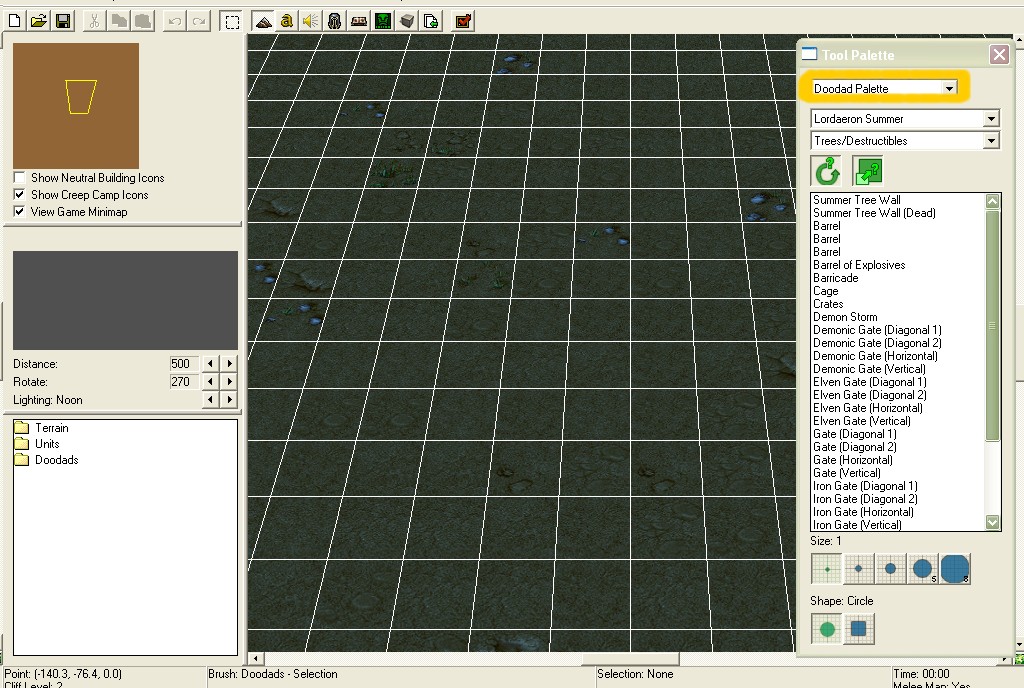
you see the orange circle on the box? Well that is the palette switcher. It is quite useful. It allow you to switch palettes from units, doodads, terrain, cameras and regions. We will be explaining the UNIT palette next so if you are seeing this or something like it set it to units.
The Unit Palette:
Well as you have now set the palette to units we can get started...
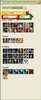
See those pictures there? Well those are the units for the unit palette.
Tool palette \/
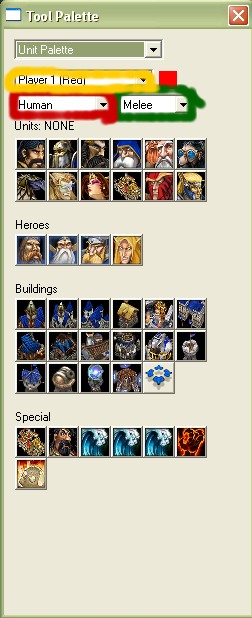 This is what the unit palette looks like. It is pretty simple in fact just 2 clicks will place a unit.
Inside the red circle is the Race this splits up the units into races: Human, Undead, Orc and nightelve. To place a unit select a button now select your actual map area in the editor and click again.
CONGRATS you just placed a unit...
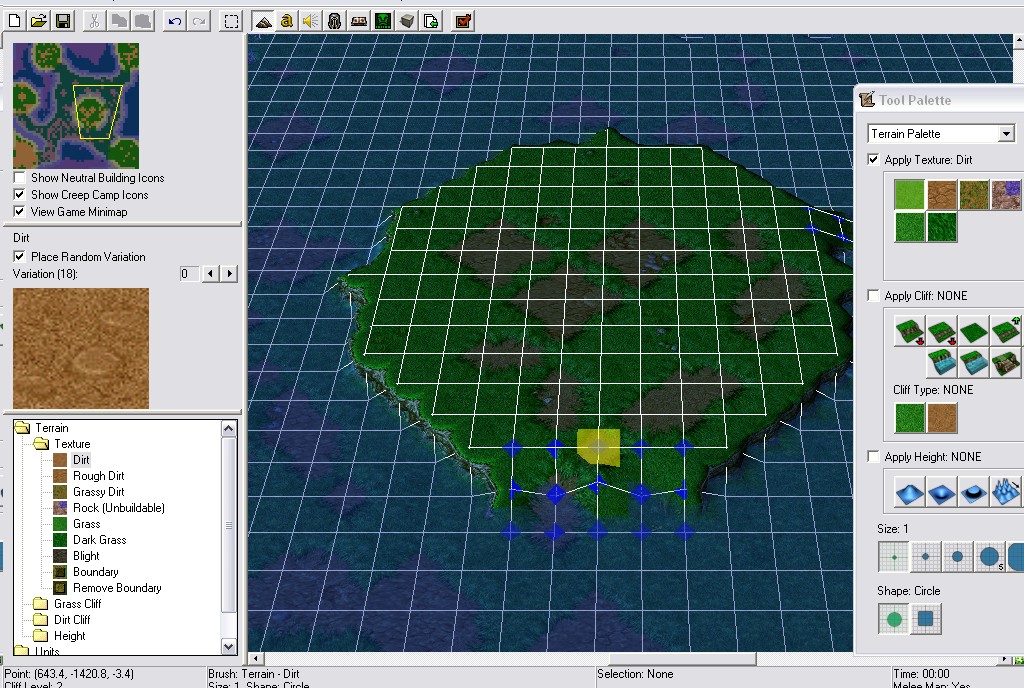
The Terrain Palette:
Ok this will be a simple demonstration. Advanced terraining is found in tutorials somewhere...
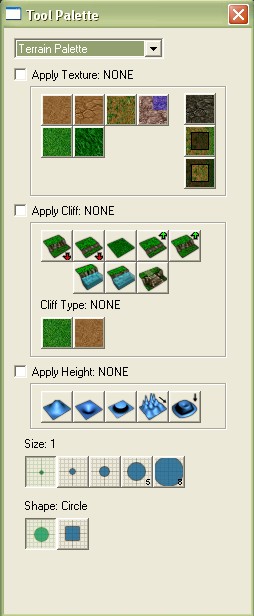
Ok well this is the terrain palette. As I said I won't take you through an advanced course because there are other tutorials for it.
Ok lets work down from this.
Very top: Palette selector thing, Ignore this for terrain.
Apply texture: Does exactly what the name suggests. Depending what tileset your working with this will be different.
Apply Cliff: Applies cliffs. This is to make cliffs... Duh. Mess around with the buttons a little bit before moving on.
Apply height: This applies hight just like the others it does as it name suggests. Mess around with it a bit before moving on...
The Doodad Palette:
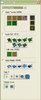
Okay now we are getting somewhere to pretty up that map of yours. The Doodad palette is very useful for any map.
Lets work from the top down again.
The selector thing: Again nothing to do with anything for this palette.
The box saying "Ashenvale": There are different doodads for different terrains. So if you were using the barrens terrain, the doodads that would look less out of place would be the "Barrens" and not "Ashenvale"
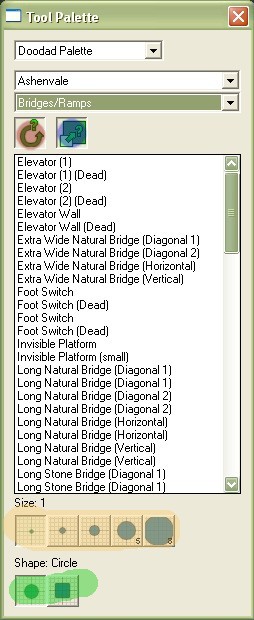
The box saying "Bridges/Ramps": This changes the type of doodad you are looking at. "Environment" has small pieces to set up your environment.
Red highlighted button: Random rotation. This randomly rotates doodads, this is good when placing something that looks good in clumps, it makes them look less specifically placed.
Blue highlighted button: Randomly scaled. Not highly recommended (Well I usually have it turned off) but can be used in the same way as random rotation.
Large white box with names of doodads in it: The mighty doodad selector where you can select your current selection of doodads
(This changes with the First and Second box will change what is seen here)
The Region Palette:
Welcome to the mighty Region Palette where battles are fought over nothing with no men or weapons...
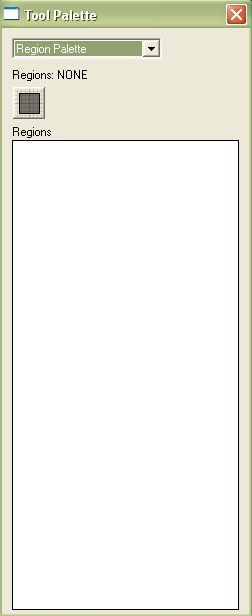
EGADS ITS BROKEN!!! IT HAS NOTHING IN THE BIG WHITE BOX!!! Stay calm civilian we will solve this.
Ok as a beginning mapper I will go over the most simple uses of this handy palette for you.
Lemme explain how to make a region first so you can try this yourself
See that only button there? Well click it and try clicking around on the main editor screen.
Basicly this has 2 uses. The first being how you can lay down regions for a town or something:
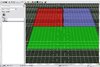
For this I will demonstrate with a picture:
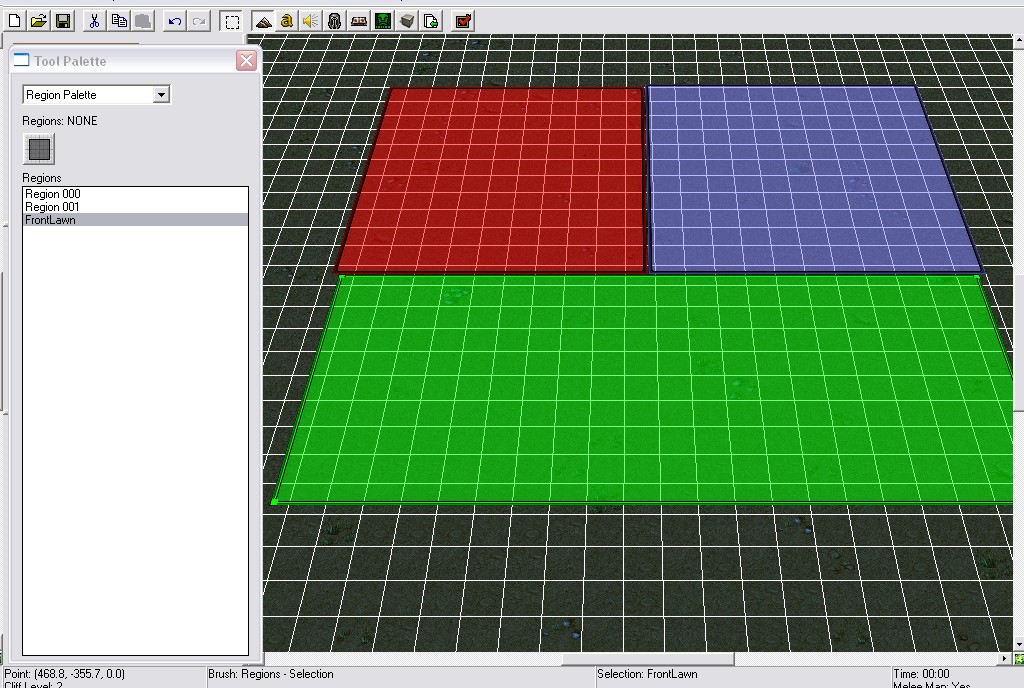
Look at the colors of the regions. They are blue green and red. You may be saying "Hey I only made blue regions and they were Region1 Region2 ect." Well you can edit this in the region properties.
Right click on a region (In the palette) then Edit Region Properties. Play around with it untill you get the desired region look. (Then delete them)
The Camera Palette:
Well this is the camera palette...
Ok camera palette. Not too complicated just click a few buttons to see what they do, right click for properties where you can edit values for the camera:
Target X moves the currently selected camera Left and Right.
Target Y moves the currently selected camera forwards and Backwards.
Target Z moves the currently selected camera Up and Down.
Rotation: Rotates...
Angle of attack: This rotates either up or down on a "String" that is connected to the target location.
Distance: Moves camera further or closer to target point.
Roll: This Flips the camera (/_\|/_\)
Field Of view: Zoom + or -
These are used for specific locations of witch you may never use or use a lot.
now enjoy your camera.
Cameras are used in triggering and terraining (Set view) otherwise not used in the map making process.
Making a simple melee map:
Well now that we have the basics down lets actually make something with it.
I'll go through the movements and when you should think about stuff.
Ok I assume you have a blank map in front of you. DEFAULTS should be on the map and nothing else.
Before we do anything else we have to think of what this map will be. It's a melee map. THINKING DONE wow your breezing through this. What will it be called? I was thinking "Isles of Deception" but you can come up with something yourself. Next thing to do is think of what we want it to look like. Well islands of course. so we must do preperations before we start. Okay. Lower all of the land to shallow water. This will be with the terrain editor's "Shallow Water" button.
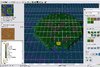
Okay so now we have a whole place of just shallow water and dirt. TIME FOR ISLANDS! So now you select the increase ground level 1 button. Be sure it's 1. Now make a few circles in the water. Spread them out nicely so they are not touching or in archer range. Now look at your work to confirm this and notice how there is no way to get from island to island. Now for the mighty ramp button. Click it. Now click the edges of your islands until you have a decent ramp on each one.


Now things are still boring. Bear with. As we all know: melee maps have cool scenery. We are going to do a trick used for swamps and stuff.

Well look at that. it's looking better.
(I did this by making imaginary paths that all ended up at at the ramps to the islands. Then I made Deep Water in the non-path and non-island areas. This makes the path smaller and can create effect in scenarios.)
Well now we need some players. Player slots actually. This is more complicated and not outlined in the basics. But its simple anyway.
Top bar: Scenario: Player Properties:
Set Controller to User on player 2 (Blue) and thats it! (More simple than you thought but so far it's just been pushing buttons.) now exit that and we can move on to placing some terrain to make it look nice. We will do some doodads after the terrain.
Let's make this dirt into something better. (Islands with water usually have some grass or something in it.) Start with covering the whole damn thing with grass. Uncheck the apply cliff button and you won't stuff up your work. Now randomly click with the Dirt button engaged (Cliff button unchecked still) or do it carefully. I like randomness so I have a madness method. Now it should look something like this:
Okay, Thats all there is to map making. Just kidding. But we are damn close.
Now for the doodads. What ya wanna do is get your doodad palette. Set it to water type doodads. Grab some seaweed and place it over the place. Also put some fish in the water.
(Remember earlier how I mentioned the Random Size/Rotation? Well have them both enabled for this.)
AWESOME WORK! WE ARE 3 QUARTERS THERE ALREADY!
Now lets think. What do melee maps have as a basic necessity for the player? Yes that's right. We need gold and lumber.
--------------------------------------------
Well now you have a basic idea of how to make a map. Some simple tips.
Enjoy map making and +rep me if this helped you.
Beta.
General WE tut for Beginners...
INTRO:
Well, you probably know what the warcraft world editor is by now so I don't have to explain much more about its location.
But if not... Read!
If you seriously had no idea how to open it I suggest you read thoroughly.
--------------------
This guide to general WE editing might help you in some way so may attention.
Segments are shown by large red text such as the INTRO: up there.
The following is for beginners take note of this.
Basic locations and such:
Ok you should have the editor open now. I am using the very original editor for simple show (Besides this is general)
Now if you haven't found preferences yet your editor should look something like this:
you see the orange circle on the box? Well that is the palette switcher. It is quite useful. It allow you to switch palettes from units, doodads, terrain, cameras and regions. We will be explaining the UNIT palette next so if you are seeing this or something like it set it to units.
The Unit Palette:
Well as you have now set the palette to units we can get started...
See those pictures there? Well those are the units for the unit palette.
Tool palette \/
Inside the red circle is the Race this splits up the units into races: Human, Undead, Orc and nightelve. To place a unit select a button now select your actual map area in the editor and click again.
CONGRATS you just placed a unit...
The Terrain Palette:
Ok this will be a simple demonstration. Advanced terraining is found in tutorials somewhere...
Ok well this is the terrain palette. As I said I won't take you through an advanced course because there are other tutorials for it.
Ok lets work down from this.
Very top: Palette selector thing, Ignore this for terrain.
Apply texture: Does exactly what the name suggests. Depending what tileset your working with this will be different.
Apply Cliff: Applies cliffs. This is to make cliffs... Duh. Mess around with the buttons a little bit before moving on.
Apply height: This applies hight just like the others it does as it name suggests. Mess around with it a bit before moving on...
The Doodad Palette:
Okay now we are getting somewhere to pretty up that map of yours. The Doodad palette is very useful for any map.
Lets work from the top down again.
The selector thing: Again nothing to do with anything for this palette.
The box saying "Ashenvale": There are different doodads for different terrains. So if you were using the barrens terrain, the doodads that would look less out of place would be the "Barrens" and not "Ashenvale"
The box saying "Bridges/Ramps": This changes the type of doodad you are looking at. "Environment" has small pieces to set up your environment.
Red highlighted button: Random rotation. This randomly rotates doodads, this is good when placing something that looks good in clumps, it makes them look less specifically placed.
Blue highlighted button: Randomly scaled. Not highly recommended (Well I usually have it turned off) but can be used in the same way as random rotation.
Large white box with names of doodads in it: The mighty doodad selector where you can select your current selection of doodads
(This changes with the First and Second box will change what is seen here)
The Region Palette:
Welcome to the mighty Region Palette where battles are fought over nothing with no men or weapons...
EGADS ITS BROKEN!!! IT HAS NOTHING IN THE BIG WHITE BOX!!! Stay calm civilian we will solve this.
Ok as a beginning mapper I will go over the most simple uses of this handy palette for you.
Lemme explain how to make a region first so you can try this yourself
See that only button there? Well click it and try clicking around on the main editor screen.
Basicly this has 2 uses. The first being how you can lay down regions for a town or something:
For this I will demonstrate with a picture:
Look at the colors of the regions. They are blue green and red. You may be saying "Hey I only made blue regions and they were Region1 Region2 ect." Well you can edit this in the region properties.
Right click on a region (In the palette) then Edit Region Properties. Play around with it untill you get the desired region look. (Then delete them)
The Camera Palette:
Well this is the camera palette...
Ok camera palette. Not too complicated just click a few buttons to see what they do, right click for properties where you can edit values for the camera:
Target X moves the currently selected camera Left and Right.
Target Y moves the currently selected camera forwards and Backwards.
Target Z moves the currently selected camera Up and Down.
Rotation: Rotates...
Angle of attack: This rotates either up or down on a "String" that is connected to the target location.
Distance: Moves camera further or closer to target point.
Roll: This Flips the camera (/_\|/_\)
Field Of view: Zoom + or -
These are used for specific locations of witch you may never use or use a lot.
now enjoy your camera.
Cameras are used in triggering and terraining (Set view) otherwise not used in the map making process.
Making a simple melee map:
Well now that we have the basics down lets actually make something with it.
I'll go through the movements and when you should think about stuff.
Ok I assume you have a blank map in front of you. DEFAULTS should be on the map and nothing else.
Before we do anything else we have to think of what this map will be. It's a melee map. THINKING DONE wow your breezing through this. What will it be called? I was thinking "Isles of Deception" but you can come up with something yourself. Next thing to do is think of what we want it to look like. Well islands of course. so we must do preperations before we start. Okay. Lower all of the land to shallow water. This will be with the terrain editor's "Shallow Water" button.
Okay so now we have a whole place of just shallow water and dirt. TIME FOR ISLANDS! So now you select the increase ground level 1 button. Be sure it's 1. Now make a few circles in the water. Spread them out nicely so they are not touching or in archer range. Now look at your work to confirm this and notice how there is no way to get from island to island. Now for the mighty ramp button. Click it. Now click the edges of your islands until you have a decent ramp on each one.
Now things are still boring. Bear with. As we all know: melee maps have cool scenery. We are going to do a trick used for swamps and stuff.
Well look at that. it's looking better.
(I did this by making imaginary paths that all ended up at at the ramps to the islands. Then I made Deep Water in the non-path and non-island areas. This makes the path smaller and can create effect in scenarios.)
Well now we need some players. Player slots actually. This is more complicated and not outlined in the basics. But its simple anyway.
Top bar: Scenario: Player Properties:
Set Controller to User on player 2 (Blue) and thats it! (More simple than you thought but so far it's just been pushing buttons.) now exit that and we can move on to placing some terrain to make it look nice. We will do some doodads after the terrain.
Let's make this dirt into something better. (Islands with water usually have some grass or something in it.) Start with covering the whole damn thing with grass. Uncheck the apply cliff button and you won't stuff up your work. Now randomly click with the Dirt button engaged (Cliff button unchecked still) or do it carefully. I like randomness so I have a madness method. Now it should look something like this:
Okay, Thats all there is to map making. Just kidding. But we are damn close.
Now for the doodads. What ya wanna do is get your doodad palette. Set it to water type doodads. Grab some seaweed and place it over the place. Also put some fish in the water.
(Remember earlier how I mentioned the Random Size/Rotation? Well have them both enabled for this.)
AWESOME WORK! WE ARE 3 QUARTERS THERE ALREADY!
Now lets think. What do melee maps have as a basic necessity for the player? Yes that's right. We need gold and lumber.
--------------------------------------------
Well now you have a basic idea of how to make a map. Some simple tips.
Enjoy map making and +rep me if this helped you.
Beta.
Attachments
-
 Toutorial Pic 1.JPG217 KB · Views: 263
 -
 Toutorial Pic 2.JPG50.4 KB · Views: 243
 -
 Toutorial pic 3.JPG39.5 KB · Views: 303
 -
 Toutorial pic 4.JPG60.1 KB · Views: 245
 -
 Toutorial Pic 5.JPG15.4 KB · Views: 145
 -
 Reg. Example..JPG220.4 KB · Views: 165
 -
 Toutorial Pic 6.JPG17.8 KB · Views: 139
 -
 Example Island os Deception 3.JPG257.8 KB · Views: 134
Last edited:

