
- Joined
- Aug 1, 2010
- Messages
- 1,741


And for better results and more freedom, use the JassNewGen World Editor.
If you don't know the basics of the World Editor, you should read This Tutorial.

A.Custom Cliffs.
I will recommend you that you never use the blizzard cliffs. They look ugly and bad. Now I will create a custom cliff, using the raise/lower tool and some tilesets. Dont forget about the pathing!
Note: you must have a file named MiscData in folder named UI in your WC3 folder. If you dont have UI folder, simply create it and download the MiscData file attached at the bottom of this tutorial. This will allow you to create infinite steep cliffs.
Note: If you already have the MiscData.txt in the "UI" folder, but it still doesn't allow you to make steep cliffs, open the MiscData.txt in Notepad or Wordpad, scroll down to the place where it says [Terrain]. below should be "Maximum slope in degrees". Below should be some number. Make it more than 86 and save it.

Step1: Use the raise/lower tool to raise the region in which you need the cliff.
Step2: Use some rocky tilesets on the cliff, so it looks more realistic.
Step3: You may use some doodads to enchant your cliff. Id recommend you to use rocks, shrubs and few trees if there is place. Dont forget to remove the pathing from the OE.
Step4: (optional) use the smooth tool to smoothen the terrain where you want it to be walkable.
Note: In some cases the Blizzard Clifs may look actually better, like when you're making cityscape terrain and such. However, they look too empty without doodads, dont forget about them
")
Note: The Blizz and the custom cliffs have a diffirent view range for the ground units. This can be a problem...

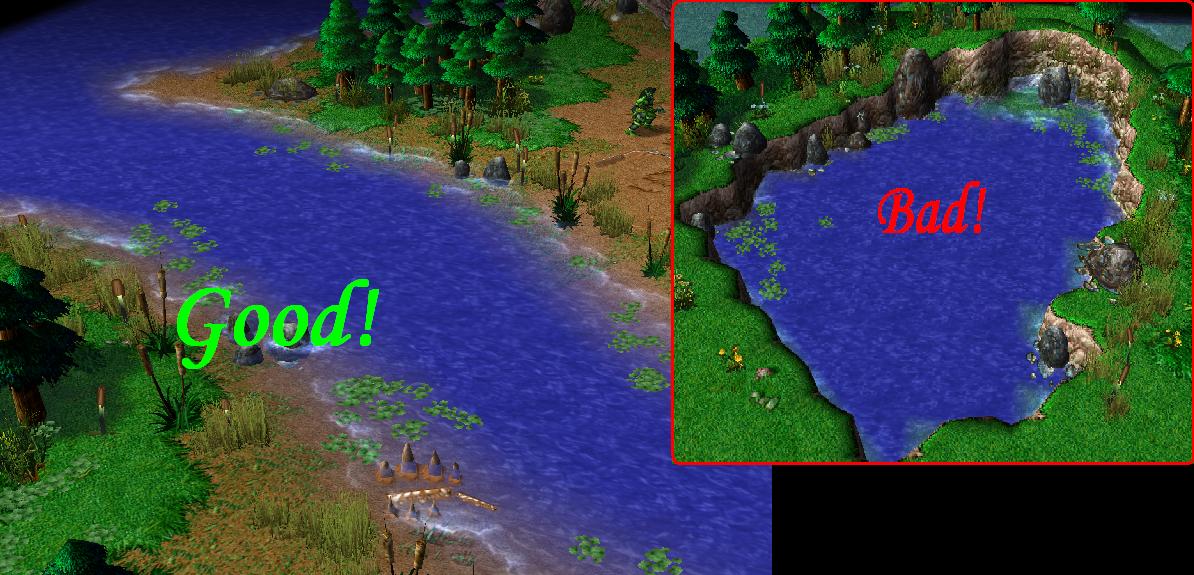
B. Rolling Shores
Placing water with blizzard cliffs looks ugly (as I said in A.) I will recommend you to place water, using the raise/lower tool. This is called rolling shores.
Note: You must have started the map with Water and used the Raise tool to make it land. If you havent used this method, it is hard to use rolling shores (you can also use doodad water, which can be found in the UTM).
Note: You can find more about the Rolling Shores Here.
Step1: Use the raise/lower tool to lower the terrain until you reach the water.
Step2: Use the Smoothen tool to make the shores smooth.
Step3: Change the tileset. Dirt and grassy dirt near the water, grass and think grass everywhere else (and rocks if there are custom cliffs)
Step4: Put some doodads like River rushes, some rocks, shrubs, lily pads, etc.
C. Smooth Terrain Tiles
Smooth terrain tiles are very important when doing natural terrain. It is looking bad if you put thick grass and next to it dirt. This is called sharp terrain and I dislike it. To do a smooth terrain, you will need to use the tiles in order. Something like:
Cracked Dirt -> Dirt -> Grassy Dirt -> Grass -> Thick Grass
Note: the grassy dirt need to go over the grass and the thick grass (not the reverse), so it dont looks sharp. To do this go to Advanced > Modify Tileset. Then check the box Use custom Tileset and then move the grassy dirt right of the grass and thick grass.
Note: Don't use this method if you're making non-natural terrain, it may not look right.


D. Doodad Manipulating
Doodads can be manipulated by 4 different ways: Raise/lower, Rotate, Size and Recolor.
a. Raise/lower
Raising/lowering the doodads is achieved very easily: just by pressing Ctrl+PageUp or Ctrl+PageDown. This will help you setting the doodads as you wish them, fitting the theme, hiding part of them under the ground or making them flying or put them on another doodad.
b. Rotate
Rotating a doodad is not that easy. It can be achieved only with the OE (Object Editor) by two ways: depending on the terrain and free rotate. Depending on the terrain is rotating that will follow the terrain lines. Increasing the Maximum Pitch Angle (degrees) and "Max Roll Angle (degrees)" allows the doodads to follow the terrain lines. It will look like that:

The Free rotate is harder. First of all go to File>Preferences and check the box saying: Allow negative real values in Object Editor. Then go to the OE and Shift-Click Max Roll Angle (degrees) to rotate the doodad you wish to. Do the same with the "Max Roll Angle (degrees), if you wish to.
-3.14 rotates the doodad by 180 degrees. By the way, -1.57 rotates it by 90 degrees and -0.79 rotates it by 45 degrees.
Note: After rotating the doodads, they will be buried in the ground. Simply raise them to see their full form. Also, the rotate depending on terrain will take effect too.

Note: You can find more about Doodad Rotating Here.
c. Size
Sizing a doodad is easy. Almost all blizzard doodads have a minimum size of 0.80 and maximum of 1.20. By changing these numbers on a placed doodad you can deform it. Like setting X and Y to 0.80 (0.8 x the normal size) and setting the Z (height) to 1.20, like that the doodad will look thinner and higher than normal. Also, you can change the normal size of the doodad with the OE by changing the Art- default Scale. The Default is 1.00, but you can make it larger or smaller. You can also change the limits of deforming a doodad (0.80 and 1.20) by changing the Editor Maximum scale and Editor Minimum scale. This will allow you to deform the doodad by your needs. You can also use the "Page Up" and "Page Down" keys to change the height and the "Home" and "End" for the X and Y.
Note: The X and Y (2Ds) depend on the rotation of the doodad, while the Z (height 3D) does NOT depend on anything.

d. Recolor (Tint)
Recoloring doodads (Also called Tinting doodads) is also simple. You just need to change the Art- tinting color. If the doodad have much variations you can recolor them different. Like Variation 1 Red, Variation 2- Blue, etc.
To recolor a doodad, you need to change the color variables (the Max is 255). For Example, if you leave Red to 255, and set the others to 0, the doodad will look all red. The following picture will show you the basic tint colors:

E: Creating Indoors
Creating Indoors isnt that easy. Indoor is inside a building, which can be castle, tower, orc fortress, cave or even a poor house. Most of the people make the building with Blizzard cliffs, which is more easier, however I dislike and I dont think a high quality terrain would have such indoor. The harder way to create an indoor is with doodads. The UTM (Ultimate Terraining Map) offers many types of walls (with windows, doors, columns) which can be used to create an indoor. Also, indoors need another tile. I would prefer using a doodad as tile too, but you must be very accurate to connect the tiles, as well as the walls. Every wall must be connected with a column, so the walls wont have cut edges, but make sure the column and the wall fit perfectly. Also the walls must NOT be too high, so they wont stay in the way of the camera. The following images will show you how to do nice indoor. The UTM contains all needed doodads.

F. Pathing ground
Pathing ground is the most important thing for the playable terrain. Pathing is there, where the Units can walk/fly/build and where they can't. There are more types pathing: Fly, Boundnary, ground, unbuildable. When you click P in the editor, it shows you the pathing in different colors.

The pathing can be achieved by three ways: Doodad pathing, Cliff Pathing and Pathing Blockers. The doodad pathing is when you place a doodad, you will see purple or blue pathing under it. You can always change that pathing from the OE. I would prefer to turn it off and do the pathing myself with blockers. In the UTM, the pathing of all doodads is off. The Cliff pathing is when you place blizzard cliffs. The Blizzard cliffs have their own pathing, but since I am using custom cliffs, I am doing it with pathing blockers. The pathing blockers are small doodads with click helper that dont allow the units to pass trough. There are different types of blockers: ground, fly, both, etc. They block different units from passing. There is a unique type blocker The line of sight blocker. The line of sight blocker blocks ground units too, but it dont allow units to see trough it. It is placed mainly on cliffs and indoor walls.
Note: You must put the blockers INSIDE the doodads/terrain you want to be unwalkable, not outside it, the image shows the diffirence:

G. To the Infinite and beyond
The JassNewGen World Editor offers more ways to edit maps and gives more freedom to your possibilities.
a. No limits
One of the priorities of the JNG WE is that it gives the possibility to put more than the limits for doodads, units, builings and so on (for example the limit of doodads is around 8500, of neutral buildings around 30 etc.) If you use the normal WE, if you put more than the limit, you can't save the map unitil you fix this. With the JNG WE you can actually. You just need to go to Grimoire>Enable no limits. You can find other useful things there as well. The only bad thing about the JNG WE is that you can't test the map from the "Test map" button, because the JNG Warcraft don't works.
b. Up to 16 Tilesets
Another Priority of the JassNewGen WE is, that you can use up to 16 Tilesets in one Map., while the normal WE allows you only up to 13 Tileset Spaces (not tilesets). You can use up to 16, no matter if the Tileset uses 1 or 2 spaces. Just go to Extensions>Edit Tileset. There you'l find a wide menu. Choose what you need by clicking on the tilesets you need and remove by clicking the selected ones.

Note: Be careful though. You can add Cliff Tiles, but you CANNOT remove them. If you need cliff tiles, go to Advanced>Modify Tileset and after all Tilesets there are "Cliff Base Tiles" - add them from there.
After you've finished with your choices, click "Ok". DO NOT save after that, it will save for you automatically. Then don't do anything and rerun the JassNewGen WE. And so here you have up to 16 Tilesets. You can arrange them way you want from Advanced>Modify Tileset with "Turn Left" and "Turn Right". You can also find more useful priorities in the Extensions Menu, such as change the tileset pathing and other.
Also, you can download the JassNewGen WorldEditor here.

A. Fog
The Fog is unique thing that allows you to cover the more distant areas in color. The Fog can be generated by Scenario>Map Options>Use Terrain Fog
After checking the box Use Terrain Fog some options will appear:
Start and End Distance: The start distance is on what distance of the screen the fog will start being more dense until it reaches the End distance, where it will be pure color (except the sky). I will recommend that you set the start distance to 0, so it wont be sharp. Density: leave it as it is, I dont see any diffirence. Color: the color of the fog. The colors are like tinting doodads. Example:

Note: The Fog can also be used in playable terrains!
Note: You can find more about the fog Here.
B. Sky
The sky is a picture that is put on the background in the palce of the black abyss when you click V or Ingame. There are much skies which can be found in Scenario>Map Preferences>Sky Display. You may also put custom sky by importing it. The sky is visible in the upper Picture.
Note: The Sky does NOT gets affected by the fog, if you havent put Fogged sky
Note: You can find out how to create custom skies Here.
C. Effects
The Effects a Unique Objects like Glows, Light Rays, Shadow Affecters, Stars, fires and others. They are often kept in the Cinematic selection is the doodad palette (as in the UTM). They can enchant your terrain greatly, but most of them cant be used in the playable terrain. The bad thing is that they cannot be tinted or just the most of them cannot. It isnt so easy to use effects because the most of them (except the fires) must be rotated, raised/lowered and so on. Here is example of Sun, made with effects:

I also used sky and fog to achieve this.
Note: The effects dont gets affected by the Fog.
D. The Mighty Alpha Tile"
The Mighty Alpha Tile" is a simple invisible tile. It is transparent and shows the sky under it and can be used for few things: Flying Castles and buildings or Water Reflection. It can also be used in Playable terrains, but its more often used in Templates. Creating flying objects in the sky is simple. Just paint everything in the MAT (Mighty Alpha Tile") and place some wall doodads and such things. Here is a example of it:

Note: You must put something under the castle, so it wont look flat. Here I put some rocks, rotated upside-down (look at rotating, Doodad Manipulating, b2)
The MAT" can also be used to achieve river reflection. You just need to put it in shore water with Rolling Shores (1B) and copy and paste the doodads, upside-down. Also, the use of sky here is very important, so it will look like reflection, not black hole in the water. Example:
Note: The Rotating upside-down can be done by the following way:
1. Make custom doodads in the Object Editor with the same models as the ones you wish to reflect.
2. Remove thier pathing if there is any and rotate them by 180 Degrees (look at Doodad Manipulating, b2). (Note: you must do them with the same doodad what it is made from)
3. Select all doodads you want to reflect and Copy them (Ctrl+C)
4. Go to Advanced>Replace Doodads and replace every doodad type with it's reflected version.
5. Paste the doodads on thier old places (Ctrl+V) (You must be accurate.)

Note: You can find more about Reflections Here.
Here you can find more tutorials for how to make other specific locations:
Thanks for Reading! Hope you learned something. If I missed anything, feel free to tell me and I will add it. Happy terraining!

Attachments
Last edited:

")


 - Second Place")


 - Winner")


