- Joined
- Dec 3, 2008
- Messages
- 189
Hello and welcome to my Map-Preview tutorial. In this tutorial you will learn how to make a custom Map-Preview picture for your maps...
Content:
1. What's the Map-Preview?
2. How to create it.
3. How to use it.
Difficulty: 2/10
1. What's the Map-Preview?
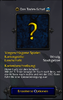
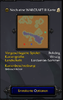
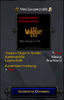
The Map-Preview is a picture you can see when you join a game (on Battle.Net) or when you play a normal game (on Singleplayer). There you can see how many people are playing and there races.
On the top-right of the screen, you see a picture. Sometimes it shows the landscape of the map (if no special picture is used), sometimes it shows a big yellow question mark (if you haven't downloaded the map, for example) or it shows a custom square-sized image.
In this tutorial I will show you, how to make the image as a Map-Preview.
In the end you can see three Preview-attachements for each group...
2. How to make it
To create a custom Map-Preview picture, you must have an image-editing program. Of course, there are a lot of these programs out there, but for people who want a freeware-program, I would suggest IrfanView, because its fast and does a good job")
At first we have to open (or create) a picture. If you want to use a picture that already exists on your computer, click the "Open"-button in your program. If you want to create a completely new picture, click the "New"-button.
Now the real work can begin:
At first you have to make sure, that your image is square-sized (I would suggest 128x128 pixel). If the picture hasn't already got this size, resize it (with IrfanView just click on "Picture" and then on "Resize". Normally your program will resize it proportional (that means, when your image was a square before with let's say 64x64 pixel, you can't resize it to a 123x102 pixeled picture).
To avoid that "auto-resizing", just uncheck the "Proportional"-box (when you use IrfanView). Now you can resize a picture to what size you want.
When your (square-sized) picture is ready, save it as a .tga (Targa), and not as a usual .jpg or .bmp or something like this. Now you're ready with this part, let's have a look at the last one
3. How to use it
This is the last and maybe easiest part of the tutorial. When you opened your World-Editor (remember: it has to be the TFT-Editor) you have to open the "Import-Editor" (F12). Now you click on "Import File" and select your image, which you have made. Then select it and rename the path to:
war3mapPreview.tga instead of war3mapImported...
When you save your map now and test it, there will appear a custom Map-Preview picture and you're done. Good job and thanks to read this tutorial
DarkLordX
Content:
1. What's the Map-Preview?
2. How to create it.
3. How to use it.
Difficulty: 2/10
1. What's the Map-Preview?
The Map-Preview is a picture you can see when you join a game (on Battle.Net) or when you play a normal game (on Singleplayer). There you can see how many people are playing and there races.
On the top-right of the screen, you see a picture. Sometimes it shows the landscape of the map (if no special picture is used), sometimes it shows a big yellow question mark (if you haven't downloaded the map, for example) or it shows a custom square-sized image.
In this tutorial I will show you, how to make the image as a Map-Preview.
In the end you can see three Preview-attachements for each group...
2. How to make it
To create a custom Map-Preview picture, you must have an image-editing program. Of course, there are a lot of these programs out there, but for people who want a freeware-program, I would suggest IrfanView, because its fast and does a good job
At first we have to open (or create) a picture. If you want to use a picture that already exists on your computer, click the "Open"-button in your program. If you want to create a completely new picture, click the "New"-button.
Now the real work can begin:
At first you have to make sure, that your image is square-sized (I would suggest 128x128 pixel). If the picture hasn't already got this size, resize it (with IrfanView just click on "Picture" and then on "Resize". Normally your program will resize it proportional (that means, when your image was a square before with let's say 64x64 pixel, you can't resize it to a 123x102 pixeled picture).
To avoid that "auto-resizing", just uncheck the "Proportional"-box (when you use IrfanView). Now you can resize a picture to what size you want.
When your (square-sized) picture is ready, save it as a .tga (Targa), and not as a usual .jpg or .bmp or something like this. Now you're ready with this part, let's have a look at the last one
3. How to use it
This is the last and maybe easiest part of the tutorial. When you opened your World-Editor (remember: it has to be the TFT-Editor) you have to open the "Import-Editor" (F12). Now you click on "Import File" and select your image, which you have made. Then select it and rename the path to:
war3mapPreview.tga instead of war3mapImported...
When you save your map now and test it, there will appear a custom Map-Preview picture and you're done. Good job and thanks to read this tutorial
DarkLordX
Attachments
Last edited:


