- Joined
- Aug 11, 2009
- Messages
- 163
Playable Forests and Villages
This tutorial is about how to make forests and villages that are playable.
- The Configuration -
If you want to make a really beautiful and professionally looking forest with a lot of details and more tilesets, then you should first get JassNewGenPack from this page and set it right. (It has a No Limit option and you can use up to 16 tiles in one map. Okay, now when you've set up JNGP, I will show you how to make a little village in a forest.
- The Tileset -
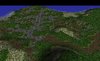
(First, before you start the tileset, make the whole map in deep water, go to File --> New Map, and under the text Initial Water Level click on Deep Water
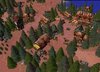
For the tileset I suggest a mix of Village (summer) and Ashenvale or custom textures. In the picture I am using a combination of Village, Ashenvale and custom textures and the village is near a lake. The stone paths will be inside the village and the cobbles will be outside it.
Try to make the tiles randomly placed, not too much at one place, make some areas more rocky. After you've finished, try to imagine how would you put a village in this place... This rocky areas will be the hills...
- The Raise/Lower tool -
Next is the Raise and Lower tool. By the way, don't use the blizzard cliffs, they are ugly and are rarely used. Now grab the Raise tool and try to raise the rocky ares a little bit, not too much! It's a hill, not a mountain. Also use the Lower tool to make the lake.
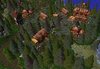
- The Doodads -
This part is my favorite part and I make it even more beautiful. Now you can use import like trees and buildings.Note: Use more variations of trees or make them different like I do by only using the Object Editor.
On this picture i am "planting" trees with the same model, just different color and size. Also I have some imported House models and Animated Shrubs.
I use models with no pathing, so you can walk through them, and they are only for the environment.
Q: How do you make 'em?
A: First I import them and copy/paste the Mushroom doodad, then change him model and Scale - Min = 1 - Max = 3
Q: What about the colored trees?
A: I copy/paste the doodad I've just created and change his RGB (red green blue) colors, you should practices a bit with the colors. min-0 max 255 ... if you set all colors to 255 the model will be normal, if all 0 the model will be all black, and there are a lot of combinations like R 100 G 255 B 100 = more green color...
- The Pathing Blockers -
Now that you've made you terrain and environment, you now have to make it playable. To do this you will have to use Pathing Blockers which are located in the Doodads tab (hotkey D). If you are using JNGP enable the No Limit option in the Grimoire tab. There are 4 Types of Pathing Blockers
-------------------------
Air - Air units can't pass
Ground - Ground units can't pass
Both - Neither Air nor Ground units can pass
Line of Sight - Limits the LoS, you can't see through it
Also, every pathing blocker is available as a small or big one.
Please note that there are and Dead ones, which are there but don't do anythings, they are used in triggered actions, to revive them and block you path back or something like that.
-------------------------
Press P to see the pathing of the map. If Game View Settings (hotkey V) are enabled, then disable them to see the pathing. Any areas that are Pink are not pathable, as in, units can not go in those regions. Anything shown in Gray is a boundary, which also means that units can not go in those areas.
You can also press N to see the naval pathing of the map. Anything that travels in the water, such as a boat, will not be able to pass in the pink areas.
For example:
Now that you've put pathing blockers we are almost done.
Note - Take extreme care, don't make a hole somewhere where it shouldn't be, units will run through it.
Also put pathing blockers near the water, otherwise they will walk underwater!
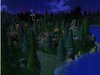
- Fine Tuning -
Now only whats left are Laterns (lightning), Fog and Weather EffectsAdd them and try to experiment with them for the best result.
Tip:
Add shrubs, stumps, houses, rocks, plants, birds...etc
... And this ends my tutorial, I think it helped you guys!
Attachments

Last edited by a moderator:

 - Second Place")


")