- Joined
- Nov 11, 2006
- Messages
- 7,518


Importing Custom Models:
Many people still wonder how to import models into their map, so this is the tutorial for that.
Note: This tutorial is designed for the Frozen Throne version of the Warcraft III World Editor, not Reign of Chaos which requires SLK editing. For importing models into Reign of Chaos maps, refer to this tutorial:
Using TFT Features in the RoC Editor
Difficulty Level:
DifficultyEasy
- 3/10
- Warcraft III World Editor of The Frozen Throne expansion
- The model file in .mdx format (and its corresponding skin in .blp format if it has one)
The model used for this tutorial is the Dwarven Mountaineer model by Norinrad that can be downloaded here.
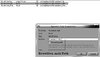
1. In the World Editor, open the Import Manager. You can open this in one of three different ways: click the icon is on the toolbar of the main (terrain) editor (two papers with a green arrow), use the hotkey (F12), or select it from the module menu.
==--Example Picture:--==

2. Right-click anywhere on the empty white space and select Import File. You can also get this option from the File menu of the Import Manager. If you want to import multiple files at once, select Import Files. When you choose one of the choices, the Editor will open a window to allow you to browse to your file(s).
==--Example Picture:--==

3. Browse to your file and select it. If you chose to import multiple files, you only need to browse to the directory level. Press the button that reads *Ok* or double click the file.
==--Example Picture:--==

Setting up the Imported Model, Skins, and Portraits:==--Example Picture:--==
2. Right-click anywhere on the empty white space and select Import File. You can also get this option from the File menu of the Import Manager. If you want to import multiple files at once, select Import Files. When you choose one of the choices, the Editor will open a window to allow you to browse to your file(s).
==--Example Picture:--==
3. Browse to your file and select it. If you chose to import multiple files, you only need to browse to the directory level. Press the button that reads *Ok* or double click the file.
==--Example Picture:--==
Your file(s) should now appear in the Import Manager window list along with the details of its file type, size, and location. This means that the files have been imported, but you are not yet finished, because you need to set the files up correctly before you can use them.
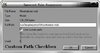
1. To the right of the area where it says "File Name", there should be something that says "Full Path". Beneath it your file should say "war3mapImported\Mountaineer.mdx". This is the default address that models are imported into, and you can usually just leave it as it is. The item of concern (in terms of changing the path) is the texture file. Those will have specific paths that you need to set. If the model does not have any textures with it, then it is most likely using in-game textures, so you do not have to worry about it.
==--Example Pictures:--==

2. If you want your model to replace a model that already exists in the game, you need to make sure that your model has the same custom path as the model it is replacing.
3. Most models will require that you also import the skin that goes with the model. You can import the skin in the same fashion as you did for the model above. However, as said before, you must change the path of it. The proper custom path for a model's skin is embedded in the model itself. If you don't know this path (most people post the skin's path with the model when they upload it to sites), you will need to find out what it is before proceeding.
==--Example Picture:--==

4. Models without skins usually will not appear in the editor or the game or may cause the editor to crash. If you can't find the path for the skin, common locations are either no directory which, for our model's skin would read Mountaineer.blp or sometimes they are placed into the Textures directory, which would read Textures\Mountaineer.blp, but since this path has no directory, it will stay at Mountaineer.blp. Keep in mind that some models require multiple skins with different custom paths. This information is part of the model and cannot be changed without editing the model.
==--Example Pictures:--==


5. If you cannot find the correct path, seek help from a modeler - any person with even a beginner-level understanding of MDL editing could tell you the correct paths by opening the model in some third-party tools that they should have. Otherwise, you may simply use this program to easily detect the path. Another easy way to detect the path file is getting Warcraft III Viewer, and viewing the textures used by going to Current File | Show Used Texture Names (CTRL + I). To get Warcraft III Viewer, click here...
==--Example Pictures:--==


6. Many models also have separate portrait model files that accompany them. These files must always be placed in the same directory as the model that they accompany and the name should have the same name as the model it goes with, but the tag "_Portrait" included before the file type. Import it just as you did for the base model. Changing the path is not necessary, it can remain as war3mapImported\name.mdx.
==--Example Picture:--==

Finishing Up the Import Process:==--Example Pictures:--==
2. If you want your model to replace a model that already exists in the game, you need to make sure that your model has the same custom path as the model it is replacing.
3. Most models will require that you also import the skin that goes with the model. You can import the skin in the same fashion as you did for the model above. However, as said before, you must change the path of it. The proper custom path for a model's skin is embedded in the model itself. If you don't know this path (most people post the skin's path with the model when they upload it to sites), you will need to find out what it is before proceeding.
==--Example Picture:--==
4. Models without skins usually will not appear in the editor or the game or may cause the editor to crash. If you can't find the path for the skin, common locations are either no directory which, for our model's skin would read Mountaineer.blp or sometimes they are placed into the Textures directory, which would read Textures\Mountaineer.blp, but since this path has no directory, it will stay at Mountaineer.blp. Keep in mind that some models require multiple skins with different custom paths. This information is part of the model and cannot be changed without editing the model.
==--Example Pictures:--==
5. If you cannot find the correct path, seek help from a modeler - any person with even a beginner-level understanding of MDL editing could tell you the correct paths by opening the model in some third-party tools that they should have. Otherwise, you may simply use this program to easily detect the path. Another easy way to detect the path file is getting Warcraft III Viewer, and viewing the textures used by going to Current File | Show Used Texture Names (CTRL + I). To get Warcraft III Viewer, click here...
==--Example Pictures:--==
6. Many models also have separate portrait model files that accompany them. These files must always be placed in the same directory as the model that they accompany and the name should have the same name as the model it goes with, but the tag "_Portrait" included before the file type. Import it just as you did for the base model. Changing the path is not necessary, it can remain as war3mapImported\name.mdx.
==--Example Picture:--==
- Okay, once you have the models imported into the editor with the skins and (possibly the portrait), and the custom paths are set, you might think you are finished. However, not yet. This part is very important: the world editor hasn't recognized the imported models yet. To fix this, you must save the map. If the model still does not show up, save and then exit the editor, and reopen it.
- Re-open your map and assign your model to your unit. You can do this by opening the object editor, clicking the "units" tab, choosing or creating a new unit, and then going down to their model file. Select that part and scroll down to the Imported section to change your model.
Have fun importing your models!
Common Issues and Questions with Importing Models:
Useful Tip: Always try reimporting the model and its corresponding files before anything else. Sometimes the editor just won't recognize it. To reimport, you should clear it from all objects that are assigned to it (set them to some other model), delete the files, save the map, and then reimport and set the paths. Save again and see if it works now.
- My model appears as a big green checkered cube and the world editor says it can't open the file when the map loads. Please Help!
Make sure you assigned the object to the correct model path.
- My model still appears as a checkered cube, even though I have the right path.
Sometimes there is a common issue where you set a unit's model to the imported model before you have saved or exited the editor. Even if you save afterward, it will still show up as a green cube. To fix this, reset the "model" field in the object editor of the unit, delete the imported model from your import manager, save the map, reimport it, change the paths accordingly, save, and then close WE and open it again. Then you can set the unit's model and hopefully it will work.
- I did everything correctly, but my model is invisible in the game!
This usually means your skin(s) for the model is not found. Make sure you import all of the model files, although the icon and some other stuff like a readme don't need to be imported.
- My model appears in War3ModelEditor but not in game.
This may happen quite often with models imported from other games, like WoW. Open up the model in Magos' War3ModelEditor, go to Windows -> Texture Manager. Try to see if there are any textures that are listed that you don't have. If you don't have it, then try removing it by right clicking the name and selecting "Remove". Then go to "File -> Save As" and save it (include the extension .mdx when you are saving it!). Import it and see if it works.
Otherwise, again it is likely a texture issue. Try reconverting the skin to BLP and make sure the alpha channels are working correctly.
- The model has no color and no skin.
This means the skin was changed, edited, or improperly created. You may edit the skin, but you may find that it isn't worth the trouble, and just look for a new model.
- I don't know the custom paths for my model and skins.
Model downloading sites should display the paths for both the model and the skin . The model might be made using in-game textures (see above) so it may not require one. If the model didn't come with the path, you can usually just set it up as we did above without a directory, but you will still need to find the path for the skin for the model to work correctly. See help from a modeler.
- Special effects work on regular models, but not my custom one.
Some custom models don't have attachment points or they may not be labeled the say way that Warcraft models are labeled. The only way to fix this problem is to seek help from a modeler or someone who knows model editing well enough to add attachment points.
- My model doesn't do anything at all!
This means your model has no animations. Animations allow the unit to do certain stuff such as stand, walk, attack, etc. Once again, a model that should have animations but doesn't, you will need to seek help from a modeler or find another model.
- My model won't play a death animation when it dies! It just stands there.
This means your model was created without a death animation, so that means the unit will just revert to the stand animation until the unit is removed (or the decay time runs out). This model can only be fixed by a modeler.
- My model has no Hero Glow.
Obviously, that means your model was created without a hero glow. You can add hero glows as a separate model and attach it to the unit if you require one or seek help from a modeler.
- Certain parts of the model display correctly, but others won't.
This is usually a problem with the skin being used. If you have used an imported skin, make sure that you have included all of the necessary .blp files and that they have the correct custom path.
- Some parts of the model have color, but others don't!
This usually means that alpha layer on the skin is set up incorrectly or model has the texture set up improperly. It may be possible to edit the skin to resolve the issue or you may need to seek help from a modeler to fix the texture material settings.
-- Credits --
- CHUNK for proofreading and editing my tutorial.
- Norinrad for his great model
Attachments
Last edited: