- Joined
- May 27, 2007
- Messages
- 1,689


Alright, I have noticed that lately there are people having trouble with some basic (in my eyes) terraining knowledge/skills. But it has nothing to do with their terrains, but how they accomplish it. Also, in the sticky section there is basically Misc Data twice. Because it is in the For those beggining to terrain along with a seperate sticky. Anyhow... I am not at home right now so I cannot give perfect descriptions of these thing without a WE. Also if anyone has any other tips/tricks please post them and I will edit them in.
-Doodads resetting height after moving them?
-Can't change anything in your terrain because you added fog?
~Void~
-Doodads resetting height after moving them?
- You can change a setting in the WE called 'Reset doodad height'.
-Can't change anything in your terrain because you added fog?
- Just go into the object editor and go to your fog doodads, or for that matter any doodad you do not want selectable while terraining, and there is a 'Ignore Model Clicks' boolean statement. Set it to true, and the WE will ignore any clicks on that model. BUT if you do a select of multiple doodads, the ignored model click doodads will also be selected
- Just raise your terrain ground up around the height you want, and make sure you have changed the doodad height reset, hit CTRL+ PG UP or CTRL + PG DOWN, and then relower your ground so it is where you want it, and you will have saved time rather than raising it from the ground..
~Void~
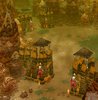
- Use boulders! The bigger, more solid and thick rocks are by far better than the thin pointy ones, they can be manipulated however you want them to be. Burying your rocks 1/3 of the way into the ground is also a good idea, it makes them look like they have been there for a while, which they probably have.
- Place your trees naturally, and everything you make. Looking at pictures of nature (ESPECIALLY in the setting you are working in) is a really good thing to do. I do it myself for almost everything I make (it's also really good for making excuses for small blips that people uncover after you post it!). Trees don't grow evenly spaced one by one, they tend to grow in formations and clumps, but kinda loose clumps. Remember that in nature, nothing is really uniform.
- Don't stop until you get exactly what you want! When you make something, be it terrain or anything really, look back at it and ask yourself "is this the kind of thing I want to make, and can I improve it in any way?". If you don't ask yourself these kinds of questions, you miss small flaws and awkwardness in your terrain. Think of it like proof-reading a paper, except not as lame and boring and totally more important.
- Although something COULD happen in real life, that doesn't mean it's appealing. I find myself fucking this up a lot, and I also find other people (everyone?) fucking this up too. Sure, you can get a bunch of pointy rocks on a hillside surrounded by clumps of evenly-spaced trees, but it doesn't look good at all. Sure, there are plenty of empty hillsides with no fog whatsoever, but that doesn't mean we want to see you make them.
Last edited: