- Joined
- Jul 20, 2005
- Messages
- 414
@Admin or Moderator reading this: Thank you for the time you're spending reading my submission. I'm not extremely certain about the rules for tutorial submissions because this is my first one, so if I have any changes that need to be made, please notify me so I can do so and possibly get this approved. Thanks very much.
Also, this tutorial was from a thread where a member needed help, so most is copy/pasted from that thread (which is where my images are attached).
Once again thanks for your time")
This tutorial is for using only one skin, so if necessary, you can PM me for information on multiple skins.
Now the easiest way to start this is to create a texture for you to UVMap to.
What I would do is imagine how you want your pad laid out
Do you want to have detail on a majority of the front/back side, or the top of it?
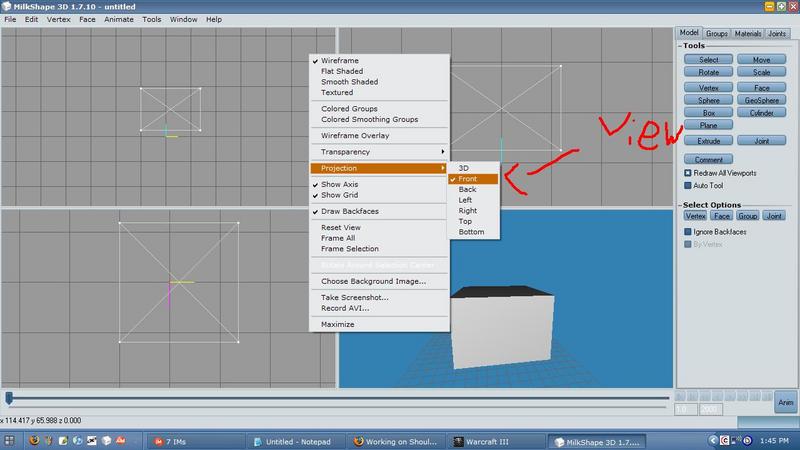
1. If front/back, change the perspective of the view in Milkshape to front, make sure it's on Wireframe, and then take a screenshot (PRT SCRN).
2. Paste that view into paint or photoshop, on a document that's size is 128x128 or 256x256. I would probably choose 128 unless you want lots of details for just the shoulder pads, or if you have plenty of space.
The view should look something like this:
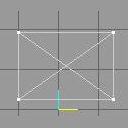
And your new texture like this:
BTW: Now if you wanted to do it from the Top, do the same process as 1. but instead take the screenshot from the top view.
Moving on, now that you have your base UVMap, save it (I would avoid saving it as a jpeg, as it will lose quality).
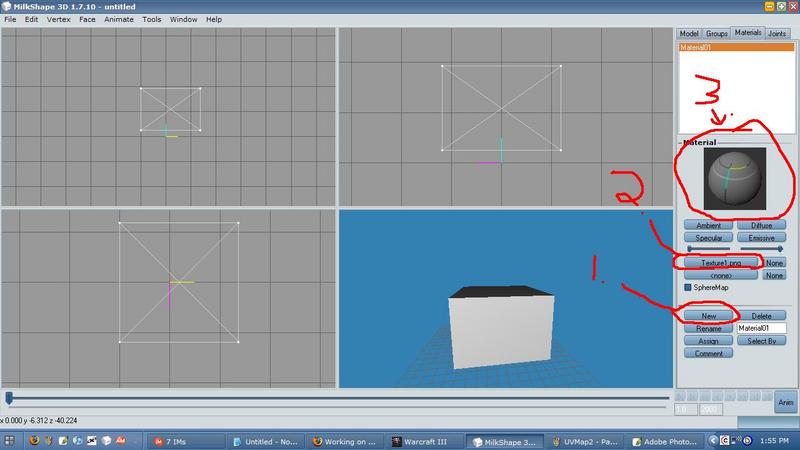
Now move into Milkshape once again. Go to the Materials tab and create a new material by selecting the button the says New at the bottom (1). Now that your new material has been created, you need to assign your texture that you just created to it. Do this by selecting None in the middle of the Materials tab panel. There are two, one on the bottom, one on the top. Just select the top one for the sake of not messing something up . If you're lost, look at 2 on the image at the bottom of this paragraph. Now that the window has opened after pressing None, select your new texture, which is your uvmap...map!
You can see your texture on the sphere that is shown in the panel (3).
Now we need to assign your mesh to that material. You do this by going to the groups tab, and selecting all the groups that contain your model. Select it by clicking on the Group Name at the top, and then hitting the Select button right below it.
Now if you have all the groups you want to be assigned to the texture, go back to the materials tab and click Assign. Assign is 2 buttons below the New button, so I'm hoping you won't need another screenshot (trying to save some space here)
Now your texture has been assigned to the model! whoop whoop!
You are now ready to begin uvmapping the model! IMPORTANT: SELECT THE FACES OF YOUR MODEL BEFORE YOU BEGIN THIS STEP! IT WILL CAUSE YOU LESS CONFUSION THAN NECESSARY! Go to Window > Texture Coordinator (Ctrl + T). A spiffy window will pop up. The view will be a bit weird, so it helps to zoom in (Scale tool AT THE BOTTOM) as well as to move the camera around (hold ctrl and left click and drag to move it).
If you wanted to map the top view, then during this next step, use top instead of front.
Now you'll see two drop down bars, and a button below it.
The top one represents the geoset selected, and the second one represents which view you want to remap to, hence the remap button.
We want to remap to the Front view, so select front, and then press remap.
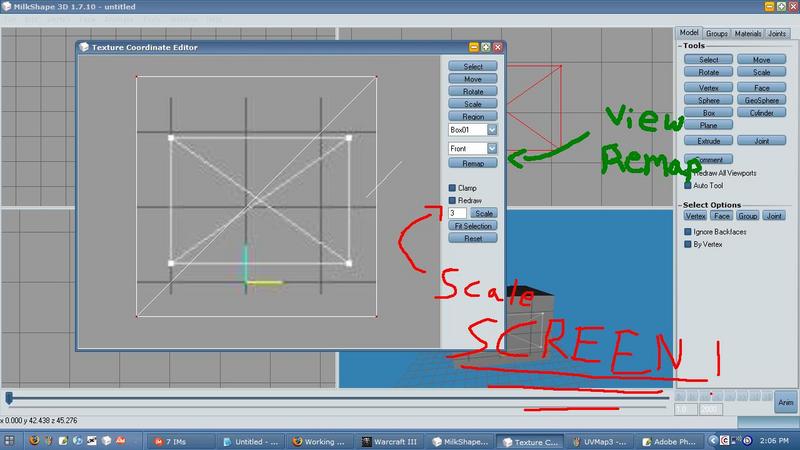
Now you can simply resize your selection and move it in place over the Uvmap/texture's white lines and match them up, and then you're done!
It should look like this:
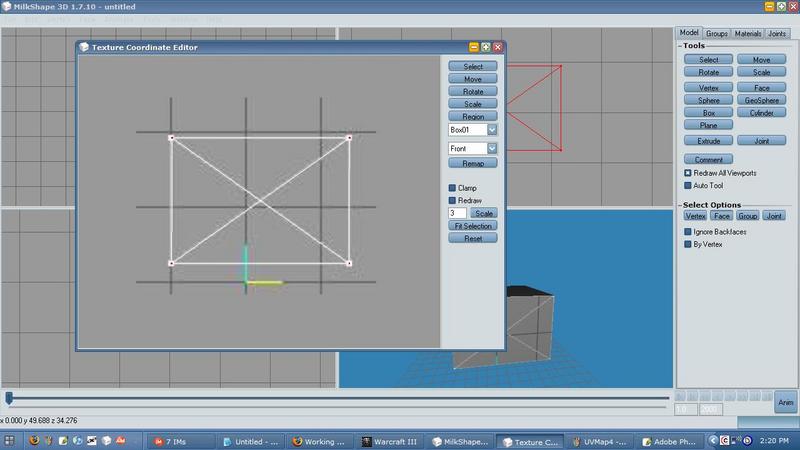
(those should be red dots, the jpg lost quality).
Now that that's done, your model is uvmapped and ready to be textured.
Save your progress so far.
To add your real texture, in paint or Photoshop just create your texture over your uvmap lines.
Whatever you color is what it will show up like exactly on the front and back sides of your model.
When you've finished texturing your skin, save it and then convert it to a .BLP using either Warcraft 3 Viewer or (from what i've heard, I don't actually use this though) MDLX Converter (?).
For exporting the Milkshape model, I would use Guesst's MDL/MDX Exporter.
In your exported MDL, after you add in your sequences and all that other jazz, use
as your textures area. You can change "Texture.blp" to "whateveryouwant.blp"....meaning you can change it to whatever you feel like and that will be your path.
If you have any questions, feel free to PM me.
Good luck!
Also, this tutorial was from a thread where a member needed help, so most is copy/pasted from that thread (which is where my images are attached).
Once again thanks for your time
This tutorial is for using only one skin, so if necessary, you can PM me for information on multiple skins.
Now the easiest way to start this is to create a texture for you to UVMap to.
What I would do is imagine how you want your pad laid out
Do you want to have detail on a majority of the front/back side, or the top of it?
1. If front/back, change the perspective of the view in Milkshape to front, make sure it's on Wireframe, and then take a screenshot (PRT SCRN).
2. Paste that view into paint or photoshop, on a document that's size is 128x128 or 256x256. I would probably choose 128 unless you want lots of details for just the shoulder pads, or if you have plenty of space.
The view should look something like this:
And your new texture like this:
BTW: Now if you wanted to do it from the Top, do the same process as 1. but instead take the screenshot from the top view.
Moving on, now that you have your base UVMap, save it (I would avoid saving it as a jpeg, as it will lose quality).
Now move into Milkshape once again. Go to the Materials tab and create a new material by selecting the button the says New at the bottom (1). Now that your new material has been created, you need to assign your texture that you just created to it. Do this by selecting None in the middle of the Materials tab panel. There are two, one on the bottom, one on the top. Just select the top one for the sake of not messing something up
. If you're lost, look at 2 on the image at the bottom of this paragraph. Now that the window has opened after pressing None, select your new texture, which is your uvmap...map! You can see your texture on the sphere that is shown in the panel (3).
Now we need to assign your mesh to that material. You do this by going to the groups tab, and selecting all the groups that contain your model. Select it by clicking on the Group Name at the top, and then hitting the Select button right below it.
Now if you have all the groups you want to be assigned to the texture, go back to the materials tab and click Assign. Assign is 2 buttons below the New button, so I'm hoping you won't need another screenshot (trying to save some space here
)Now your texture has been assigned to the model! whoop whoop!
You are now ready to begin uvmapping the model! IMPORTANT: SELECT THE FACES OF YOUR MODEL BEFORE YOU BEGIN THIS STEP! IT WILL CAUSE YOU LESS CONFUSION THAN NECESSARY! Go to Window > Texture Coordinator (Ctrl + T). A spiffy window will pop up. The view will be a bit weird, so it helps to zoom in (Scale tool AT THE BOTTOM) as well as to move the camera around (hold ctrl and left click and drag to move it).
If you wanted to map the top view, then during this next step, use top instead of front.
Now you'll see two drop down bars, and a button below it.
The top one represents the geoset selected, and the second one represents which view you want to remap to, hence the remap button.
We want to remap to the Front view, so select front, and then press remap.
Now you can simply resize your selection and move it in place over the Uvmap/texture's white lines and match them up, and then you're done!
It should look like this:
(those should be red dots, the jpg lost quality).
Now that that's done, your model is uvmapped and ready to be textured.
Save your progress so far.
To add your real texture, in paint or Photoshop just create your texture over your uvmap lines.
Whatever you color is what it will show up like exactly on the front and back sides of your model.
When you've finished texturing your skin, save it and then convert it to a .BLP using either Warcraft 3 Viewer or (from what i've heard, I don't actually use this though) MDLX Converter (?).
For exporting the Milkshape model, I would use Guesst's MDL/MDX Exporter.
In your exported MDL, after you add in your sequences and all that other jazz, use
Code:
Textures 1 {
	Bitmap {
		Image "Texture.blp",
	}
}If you have any questions, feel free to PM me.
Good luck!


