- Joined
- Nov 11, 2004
- Messages
- 1,985


Happy Animating with IK
By BlinkBoyOverview
Difficulty
- 3/10 Easy difficulty
Tools Required
Knowledge Requirements
- Basic knowledge on rigging bones in 3dsmax/gmax.
- Basic knowledge on animation with 3dsmax/gmax.
This tutorial will teach you to:
- Create simple Ik riggs.
- Organize your scene for easy animating.
- Improve your overall knowledge of game character animation.
Content
- Section 1: Introduction
- Section 2: Setting up the Scene
- Section 3: Rigging a Basic Ik system
- Section 4: Animating
- Section 5: NeoDex and IK Systems
Author's Note
- Whenever you get stuck, don't hesitate to post. I'll be looking into the tutorial constantly.
- This tutorial is a follow up to my Basic Animation Tutorial It's designed for advanced animators.
Section 1: Introduction:
Welcome to the wonderful world of Inverse Kinematics Animations. In this tutorial we will learn the basics of setting up an IK rig to animate like the badass boys actually do.
Before getting started let´s have a discussion.
First, what’s IK? What is it used for?
Normally we have two ways to represent motion in skeletical animations. The first is FK, which I already taught you in the Basic Animation Tutorial. However, there´s also another method which is called IK!
FK stands for Forward Kinematics. It means that you animate from the highest parent to the children. In IK, it’s the other way around. We animate the children and they affect the parents. That’s why IK stands for Inverse Kinematics.
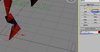
Let me show you an example. Let´s say we have a leg and we want to flex it.
In FK we would do this:
A lot of steps and it´s not even perfect!
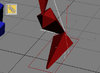
However, in IK this is all we have to do:
Yep that simple.
So why did we learn FK before IK? It's quite simple. It's like learning to understand poems without knowing how to read. Learning FK is the very basics while IK is a complex system built over FK. If we understand FK we understand IK afterwards.
Also not always IK systems are the solution. Sometimes we may do things in a FK manner because it's easier to animate that way. IK is just an abstraction.
So, how do we do this?
The basics are the same. What this tutorial will differ from the other is the way rigging is done. This tutorial will just extend the basic animation tutorial and add the way IK rigging is done.
Section 2: Setting up the Scene:
We will start from the end of section 2 of my Basic Animation Tutorial. Link
The idea is to make an IK rig instead of a simple FK rig.
You can get the start file here:Start.max
GMAX Users Start File: GMAX Scenes
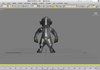
Okey first things first. Open the file, or in case it's not compatible with your 3ds max version, follow the Basic Animation Tutorial until you finish section 2.
Note for GMAX:
GMAX does not have a layer manager so skip anything refering to it. It's not needed but it helps organize the scene.
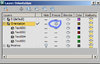
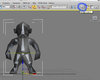
Now select the mesh and go to the layer manager.

Hit create a new layer and call it Meshes

Now just hide the layer:
Perfect! Now we can work on the bones.
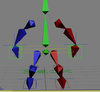
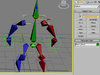
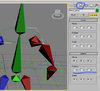
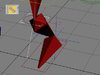
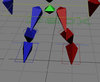
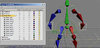
Select the bones on the left and change their color to red so we know they are the left bones.
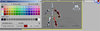
Do the same for the right bones but with blue and make the rest of the bones green.
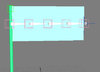
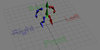
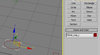
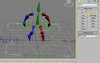
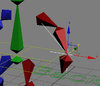
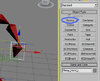
We are now going to setup the scene's orientation so we always know where's Front, Back, Left and Right. (this is perfect for animating in one viewport)
Go to Create Panel -> Shapes -> Text
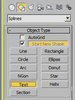
Create 4 Texts in the Viewport with the names Front, Back, Left and Right and place them where they should go.
Now select the 4 texts and left click -> Object Properties. Turn of "Show Frozen in Gray"

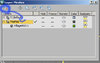
Go to the layer manager and create a Layer for the 4 Texts called "Orientation". Afterwards Freeze the layer.
Important! If you look into the layer manager there's a parameter with a check. The layer that has a check is active layer. Any objects you create will go to that layer. Make sure to check the 0 (default) layer always. To avoid autohiding or autofreezing of anything you create.
With this we have set up our scene. Now that we have organized ourselves, we can start making the IK
Section 3: Rigging the IK System:
Before we start rigging be aware that if something is done badly. You can ruin your scene. So ALWAYS keep a backup. There are some rules for IK rigging:
- Never rigg an skeleton which has been already skinned.
- Carefull with undos. Undos and IK tend to bug. It's better to delete the mess rather than run to the magic panic button called "Ctrl + Z"
- Save every set of time and always start a new scene when you start your IK Rigg.
- It is important to change animation controllers by hand, don't use tools or anything to help you out on that.
- In the case of NeoDex you cannot add IK animations to imported models unless you remove their animations and remove the skin modifier.
Section 3.1: Introduction to IK Systems and Constraints:
The IK Solvers:

IK Solvers define different IK behaviors to bone chains.
There are 4 types of IK Solvers:
- HI Solver: This is the Ik solver used for bone chains of 4 or more bones. It has a goal and fixes bones according to the distance between the goal and the parent bone. It's mainly used for limbs.
- HD Solver: This is an old legacy solver used for robotic hands and machinery. It's sparingly used now-a-days.
- IK Limb: This is the Ik solver used for bone chains of 3 bones. It has a goal and fixes bones according to the distance between the goal and the parent bone. It's mainly used for limbs. It's a simplified version of HI Solver. we'll use it in the tutorial.
- SplineIK Solver: This is an Ik solver which adapts a bone chain according to an spline. It's main purpose is for tails, capes, hooks, chains, etc. We will not use it in this tutorial.
The Constraints:

Constraints can limit an object's transformations to follow an specific behavior. They are quite useful for animating.
There are 7 types of Constraints:
- Attachment Constraint: Forces an object to stay on the position and orientation of one of other objects's faces.
- Surface Constraint: Allows an object to sit on a parametric surface.
- Path Constraint: This constraint forces an object to stay in within the range of a selected spline.
- Position Constraint: This constraint forces an object to stay within the position of one or more objects. It's perfect if you want the object to stay always at center of many moving objects.
- Link Constraint: This constraint forces an object to link/parent another object temporaly. It's quite usefull for weapons that go from one hand to another or objects that your model picks and then let's off.
- Orientation Constraint: This constraint forces an object to stay on the same orientation/rotation as another object.
- Look-At Constraint: This constraint forces an object to always orient itself facing another object. It's useful for eyes and heads in portraits.
Section 3.2: Rigging the Legs:
Okey so let's get started:
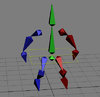
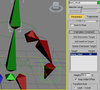
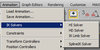
The first thing we should do is select the top bone of the legs. Now go to Animation -> Ik Solvers -> IK Limb Solver and select the bottom bone.
This sets up an Ik system for that bone chain.
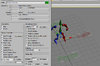
Test it up! move the solver around and see how it goes!

Remember to undo the actions as you test.
With this we have set up an Ik solver to our left leg. Now we need to make our manipulators which we will use to animate and control the Ik system.
Go to Creation Panel -> Shapes -> Rectangle and create a rectangle for the foot. Call it "Manip_Foot_L" and color it red. Yes RED, I love red xD. Just kidding.
Now link the solver to the manipulator.
Now we will create a manipulator for the leg which will control the knee's orientation.
Go to Creation Panel -> Shapes -> Circle and create a circle. Call it "Manip_Leg_L" and color it red.
The next step is important
Align the leg manipulator to the second leg bone. make sure you are aligning it to the pivot point. In order to align an object do: select the object click Tools-> Align, Pick the middle bone and set the X,,Y,Z position on and match pivot point with pivot point.

Link the Leg manipulator to the foot Manipulator:

Now let's make our leg manipulator work.
Save here just in case something goes wrong.
Select the IK Solver, go to Controller Panel and roll down until you find The Ik Solver Target option. Pick the Leg_L manipulator.
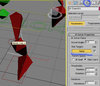
Ok now the last thing left is making sure our Foot bone always faces the same direction as our Foot manipulator. For that, we will use Orientation Constraints
Select the Foot bone and go to. Animation -> Constraints -> Orientation Constraint then pick the Foot Manipulator.
Oh shit, it moved! No worrries, the bone is just facing the exact orfientation of the manipulator but we want to keep the bone on it's original orientation. To fix that, it's simple.
Select the Foot Bone and go to motion panel, roll down until you find the orientation constraint section. Turn on Keep Initial Offset

Now let's test the rig!

Looks nice, isn't it? easy to work now with legs.
Now repeat the same process we went through for the left leg on the right leg.

Section 3.3: Rigging the Arms:
Rigging the arms is just like rigging the legs. They are both limbs, so it's quite the same process:

The difference here is that instead of using a rectangle for the hands' manipulator, I used a dummy(found on Creation Panel -> Helpers). You can use anything you want. Just use a shape you feel comfortable with:

Now do the full process for both arms:
Section 3.4: Rigging the Head:
The head is a bit tricky. We want the head to follow the chest but at the same time we want the head not to be reoriented. In order to achieve this we need to create a manipulator for the head.
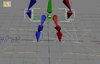
Start by creating a circle and align it to the head bone. Call it "Manip_Head" and color it green.
Now link the Head manipulator to the chest bone:

Now apply an Orientation Constraint from the head bone to the head manipulator. Rember to turn on the option Keep Initial Offset
The last step is important. We don't want to manipulator to inherit the rotation from the chest. So select the head manipulator and go to Hierarchy Panel -> Inherit. Turn of all of the rotation inheritance.
we are done with the head now.
Section 3.5: Finishing up:
Now let's finish the rig.
All that's left is creating the body manipulator which will control all the rig.
Start by creating a star shape at the center. (Create Panel -> Shapes -> Star). make sure it's position is [0,0,0]
Now select all the manipulators(excep Manip_Head) and Bone_root. Link them to the Body_Manipulator.
There we go. Congrats, we finished the rig!
Now we need to organize our scene.
Select all the solvers and create a layer for them.

Select all the manipulators and create a layer for them.

Select all the bones which are affected by IK Solvers or Constraints and make a layer for them.
Select all the bones which are NOT affected by IK Solvers or Constraints and make a layer for them.

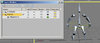
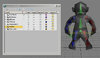
Now you can skin the mesh! For that refer to:
Basic Animation Tutorial: Skinning
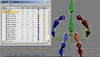
Here's the setting for skinning up the mesh. In this setting, you'll be able to select the mesh and the bones and, at the same time, ignore the solvers and manipulators:

You can also test the rig if you want.
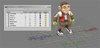
Section 4: Animating:
Animation using this rig is just as usual. Just that this time we won't animate the Ik affected bones directly but instead we will animate the manipulators.
Set up your scene this way to animate like a happy kid:
Now you can animate normally. If you read through my animation tutorial, the rest should be easy.
Here's an example done in less than 5 minutes:
As you can see adding flow and character to the animation is a lot easier. Not only that but things stay where you want, no need to fit legs arms correctly anymore. Animation is a lot easier now.
Here's the GMAX sample. Also made quite fast:
Section 5: NeoDex and Exporting IK Systems
NeoDex since version 2.3 can export IK systems naturally. It does not, however, support all the constraints and Ik Solvers.
NeoDex Supports:
- IK Solvers:
- HI Solver.
- Limb IK Solver.
- SplineIK Solver.
- Constraints:
- Orientation Constraint.
- Look-at Constraint.
For exporting, you don't need to worry much. NeoDex will automatically convert the IK System into an FK system on export. It will do it with the most accuracy possible and producing fewer keys than other exporters.
The End.
Attachments
-
 Intro02.gif72 KB · Views: 2,114
 -
 IK01.jpg127.2 KB · Views: 2,329
 -
 IK02.jpg123.5 KB · Views: 2,058
 -
 IK03.jpg63.2 KB · Views: 2,022
 -
 Intro01.gif389.3 KB · Views: 2,126
 -
 IK04.jpg88.2 KB · Views: 2,035
 -
 IK05.jpg99.7 KB · Views: 2,028
 -
 IK06.jpg67.7 KB · Views: 2,246
 -
 IK07.jpg57 KB · Views: 1,997
 -
 IK08.jpg117.8 KB · Views: 2,221
 -
 IK13.gif263.6 KB · Views: 2,308
 -
 IK12.jpg71.9 KB · Views: 2,113
 -
 IK11.jpg60.5 KB · Views: 2,159
 -
 IK10.jpg76.7 KB · Views: 2,216
 -
 IK09.jpg223.6 KB · Views: 2,185
 -
 IK14.gif384.8 KB · Views: 2,212
 -
 IK15.jpg134.8 KB · Views: 2,142
 -
 IK16.jpg56.6 KB · Views: 2,164
 -
 IK17.jpg67.7 KB · Views: 2,131
 -
 IK18.gif266.6 KB · Views: 2,261
 -
 IK19.jpg67.3 KB · Views: 2,127
 -
 IK20.jpg143.9 KB · Views: 2,190
 -
 IK21.gif255.8 KB · Views: 2,218
 -
 IK22.jpg161.7 KB · Views: 2,309
 -
 IK23.gif355.9 KB · Views: 2,162
 -
 IK25.jpg72.7 KB · Views: 2,106
 -
 IK28.jpg155 KB · Views: 2,102
 -
 IK27.jpg92.4 KB · Views: 2,109
 -
 IK24.jpg98.8 KB · Views: 2,148
 -
 IK26.jpg101 KB · Views: 2,099
 -
 IK29.jpg86 KB · Views: 2,108
 -
 IK30.jpg142.9 KB · Views: 2,361
 -
 IK31.jpg148.4 KB · Views: 2,138
 -
 IK32.jpg159 KB · Views: 2,128
 -
 IK33.jpg143.1 KB · Views: 2,096
 -
 IK34.jpg86.4 KB · Views: 2,143
 -
 IK35.jpg155.6 KB · Views: 2,096
 -
 IK36.jpg183.2 KB · Views: 2,079
 -
 IK37.jpg146.5 KB · Views: 2,069
 -
 IK38.jpg122.7 KB · Views: 2,081
 -
 IK39.gif712.3 KB · Views: 2,191
 -
 IKPreview.gif334.9 KB · Views: 2,152
 -
Setup.max252 KB · Views: 331
-
IKRigged.max308 KB · Views: 349
-
IKSkinned.max332 KB · Views: 341
-
IKAnimating.max360 KB · Views: 337
-
Tutorial.mdx10.2 KB · Views: 341
-
 IK40.jpg125.7 KB · Views: 2,173
 -
GMAX_Scenes.rar154.2 KB · Views: 326
-
 IKPreview2.gif338.9 KB · Views: 2,247
 -
Tutorial_GMAX.mdx10.7 KB · Views: 315
Last edited: